mirror VOLVO S60 CROSS COUNTRY 2016 Owner´s Manual
[x] Cancel search | Manufacturer: VOLVO, Model Year: 2016, Model line: S60 CROSS COUNTRY, Model: VOLVO S60 CROSS COUNTRY 2016Pages: 392, PDF Size: 10.06 MB
Page 79 of 392
03 Instruments and controls
03
}}
* Option/accessory, for more information, see Introduction.77
Key memory – power driver's seat* and door mirrors
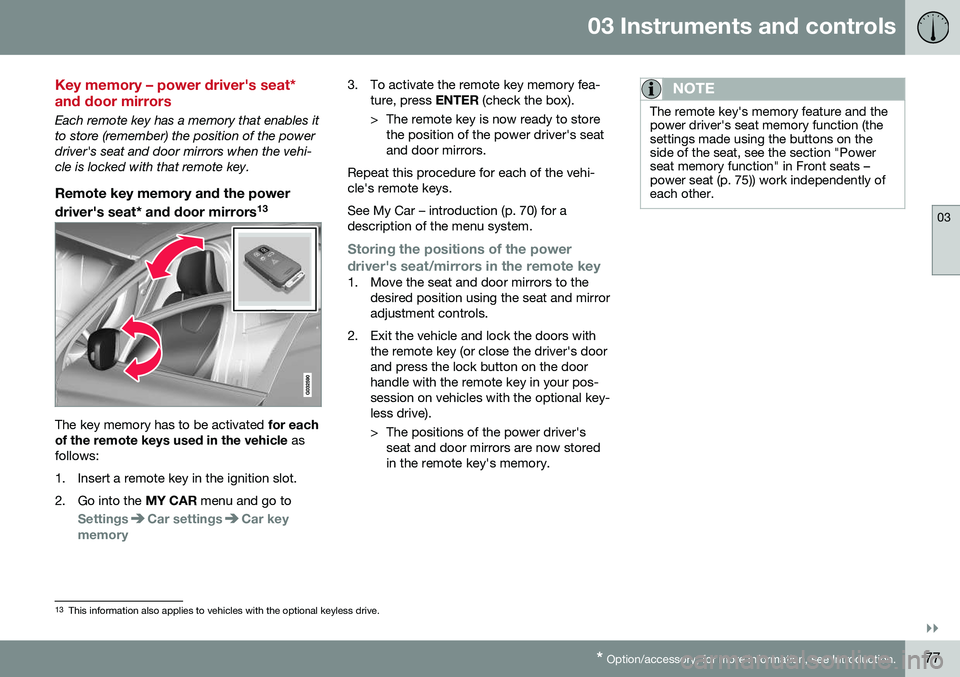
Each remote key has a memory that enables it to store (remember) the position of the powerdriver's seat and door mirrors when the vehi-cle is locked with that remote key.
Remote key memory and the power
driver's seat* and door mirrors 13
The key memory has to be activated
for each
of the remote keys used in the vehicle as
follows:
1. Insert a remote key in the ignition slot.
2. Go into the MY CAR menu and go to
SettingsCar settingsCar key
memory
3. To activate the remote key memory fea- ture, press ENTER (check the box).
> The remote key is now ready to store the position of the power driver's seat and door mirrors.
Repeat this procedure for each of the vehi-cle's remote keys. See My Car – introduction (p. 70) for a description of the menu system.
Storing the positions of the power
driver's seat/mirrors in the remote key
1. Move the seat and door mirrors to the desired position using the seat and mirror adjustment controls.
2. Exit the vehicle and lock the doors with the remote key (or close the driver's doorand press the lock button on the doorhandle with the remote key in your pos-session on vehicles with the optional key-less drive).
> The positions of the power driver'sseat and door mirrors are now stored in the remote key's memory.
NOTE
The remote key's memory feature and the power driver's seat memory function (thesettings made using the buttons on theside of the seat, see the section "Powerseat memory function" in Front seats –power seat (p. 75)) work independently ofeach other.
13This information also applies to vehicles with the optional keyless drive.
Page 80 of 392
||
03 Instruments and controls
03
78
Returning the seat/mirrors to the storedpositions
To move the seat and door mirrors to the position stored in the remote key:
1. Unlock the driver's door with the same
remote key (the one used to lock the doors). For models equipped with theoptional keyless drive, you must have thesame remote key in your possession.
2. Open the driver's door within 2 minutes. The driver's seat and door mirrors will auto- matically move to the position in which youleft them (if the vehicle has been unlockedwith one of the other keys and new seat/mirror adjustments have been made).
NOTE
• The seat will move to this position even if someone else has moved it to adifferent position and locked the vehi-cle with a
different remote key.
• This feature will work in the same waywith all of the remote keys that youuse with your vehicle.
Emergency stop
WARNING
•
Because the driver's seat can be adjusted with the ignition off, childrenshould never be left unattended in thevehicle.
• Movement of the seat can be STOP-PED at any time by pressing any but-ton on the power seat control panel.
• Do not adjust the seat while driving.The seat should be adjusted so thatthe brake pedal can be depressedfully. In addition, position the seat asfar rearward as comfort and controlallow.
• The seat rails on the floor must not beobstructed in any way when the seat isin motion.
Related information
•
Remote key – functions (p. 142)
Rear seats – head restraints
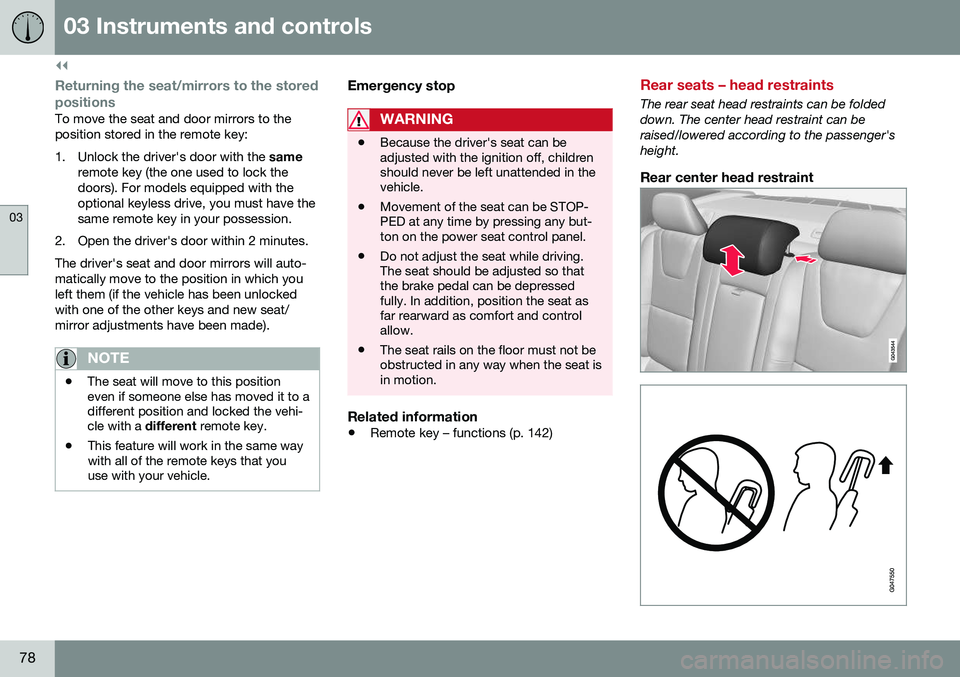
The rear seat head restraints can be folded down. The center head restraint can beraised/lowered according to the passenger'sheight.
Rear center head restraint
Page 93 of 392
03 Instruments and controls
03
}}
* Option/accessory, for more information, see Introduction.91
Home safe lighting
When you leave your vehicle at night, you can make use of the home safe lighting functionto illuminate the area in front of the vehicle. This function illuminates the headlights, park- ing lights, lights in the door mirrors, licenseplate lights, front ceiling lighting and footwell lighting. These lights will remain on for 30 19
,
60 or 90 seconds. The time interval can be set in MY CAR under
SettingsCar
settings
Light settingsHome safe
light duration. See My Car – introduction
(p. 70) for a description of the menu system.
1. Remove the key from the ignition slot to put the ignition in mode 0 (see Ignition
modes (p. 73) for information about the ignition modes).
2. Pull the turn signal lever as far as possible towards the steering wheel and release it.
3. Exit the vehicle and lock the doors.
Related information
• Approach lighting (p. 91)
Approach lighting
Approach lighting activates the parking lights, door mirror lights, license plate lighting, domelighting and door step lighting when youapproach the vehicle. This function is activated by pressing the approach light button on the remote key (see
the illustration in Remote key – functions(p. 142)). The time interval for this lighting can be set by pressing
MY CAR and going to
Car
settings
Light settingsApproach light
duration. See My Car – introduction (p. 70)
for a description of the menu system.
Related information
• Home safe lighting (p. 91)
Windshield wipers
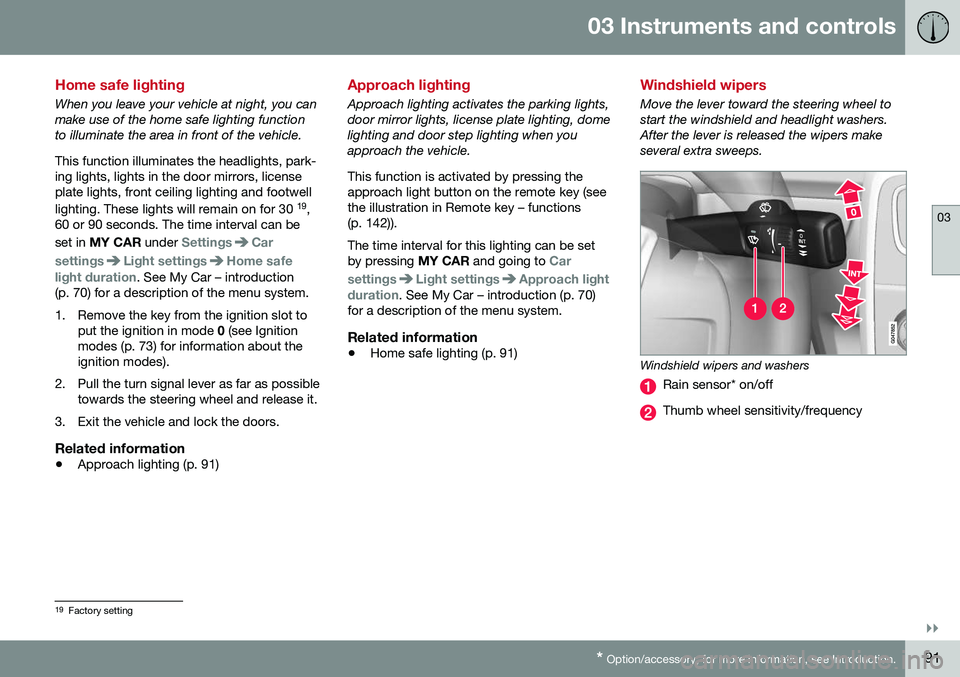
Move the lever toward the steering wheel to start the windshield and headlight washers.After the lever is released the wipers makeseveral extra sweeps.
Windshield wipers and washers
Rain sensor* on/off
Thumb wheel sensitivity/frequency
19
Factory setting
Page 98 of 392
03 Instruments and controls
03
96* Option/accessory, for more information, see Introduction.
Sun shades*
A sun shades can be integrated into the rear parcel shelf.
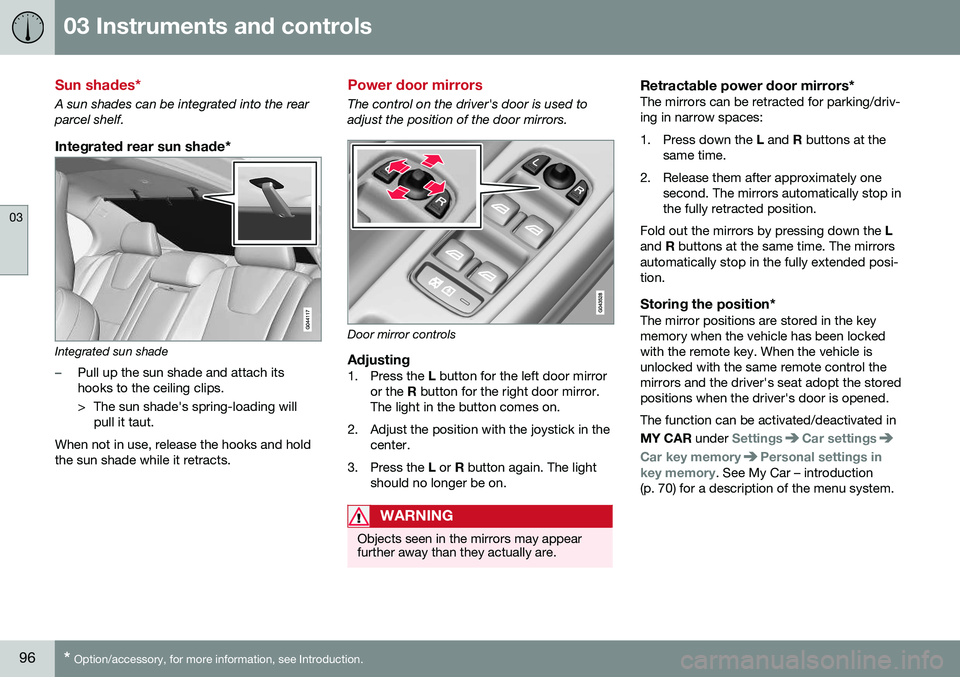
Integrated rear sun shade*
Integrated sun shade
–Pull up the sun shade and attach its hooks to the ceiling clips.
> The sun shade's spring-loading will
pull it taut.
When not in use, release the hooks and hold the sun shade while it retracts.
Power door mirrors
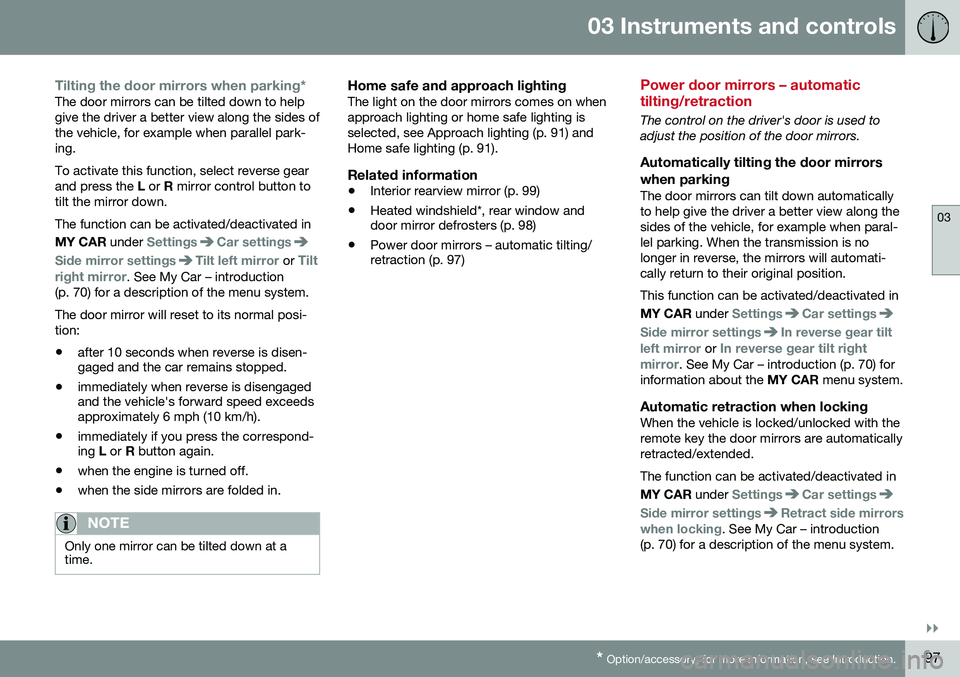
The control on the driver's door is used to adjust the position of the door mirrors.
Door mirror controls
Adjusting1. Press the L button for the left door mirror
or the R button for the right door mirror.
The light in the button comes on.
2. Adjust the position with the joystick in the center.
3. Press the L or R button again. The light
should no longer be on.
WARNING
Objects seen in the mirrors may appear further away than they actually are.
Retractable power door mirrors*The mirrors can be retracted for parking/driv- ing in narrow spaces:
1. Press down the L and R buttons at the
same time.
2. Release them after approximately one second. The mirrors automatically stop in the fully retracted position.
Fold out the mirrors by pressing down the L
and R buttons at the same time. The mirrors
automatically stop in the fully extended posi-tion.
Storing the position*The mirror positions are stored in the keymemory when the vehicle has been lockedwith the remote key. When the vehicle isunlocked with the same remote control themirrors and the driver's seat adopt the storedpositions when the driver's door is opened. The function can be activated/deactivated in MY CAR under
SettingsCar settings
Car key memoryPersonal settings in
key memory. See My Car – introduction
(p. 70) for a description of the menu system.
Page 99 of 392
03 Instruments and controls
03
}}
* Option/accessory, for more information, see Introduction.97
Tilting the door mirrors when parking*The door mirrors can be tilted down to help give the driver a better view along the sides ofthe vehicle, for example when parallel park-ing. To activate this function, select reverse gear and press the L or R mirror control button to
tilt the mirror down. The function can be activated/deactivated in MY CAR under
SettingsCar settings
Side mirror settingsTilt left mirror or Tilt
right mirror
. See My Car – introduction
(p. 70) for a description of the menu system. The door mirror will reset to its normal posi- tion: • after 10 seconds when reverse is disen- gaged and the car remains stopped.
• immediately when reverse is disengagedand the vehicle's forward speed exceedsapproximately 6 mph (10 km/h).
• immediately if you press the correspond-ing
L or R button again.
• when the engine is turned off.
• when the side mirrors are folded in.
NOTE
Only one mirror can be tilted down at a time.
Home safe and approach lightingThe light on the door mirrors comes on when approach lighting or home safe lighting isselected, see Approach lighting (p. 91) andHome safe lighting (p. 91).
Related information
• Interior rearview mirror (p. 99)
• Heated windshield*, rear window and door mirror defrosters (p. 98)
• Power door mirrors – automatic tilting/retraction (p. 97)
Power door mirrors – automatic tilting/retraction
The control on the driver's door is used to adjust the position of the door mirrors.
Automatically tilting the door mirrors
when parking
The door mirrors can tilt down automaticallyto help give the driver a better view along thesides of the vehicle, for example when paral-lel parking. When the transmission is nolonger in reverse, the mirrors will automati-cally return to their original position. This function can be activated/deactivated in MY CAR under
SettingsCar settings
Side mirror settingsIn reverse gear tilt
left mirror
or In reverse gear tilt right
mirror. See My Car – introduction (p. 70) for
information about the MY CAR menu system.
Automatic retraction when lockingWhen the vehicle is locked/unlocked with the remote key the door mirrors are automaticallyretracted/extended. The function can be activated/deactivated in MY CAR under
SettingsCar settings
Side mirror settingsRetract side mirrors
when locking. See My Car – introduction
(p. 70) for a description of the menu system.
Page 100 of 392
||
03 Instruments and controls
03
98* Option/accessory, for more information, see Introduction.
Resetting to neutralMirrors that have been moved out of position by an external force must be electrically resetto the neutral position for electric retracting/extending to work. • Retract the mirrors with the
L and R but-
tons.
• Fold them out again with the
L and R but-
tons.
The mirrors are now reset in neutral position.
Related information
• Interior rearview mirror (p. 99)
• Heated windshield*, rear window and door mirror defrosters (p. 98)
Heated windshield*, rear window and door mirror defrosters
The heating function is used to defrost/de-ice the windshield and/or the rear window anddoor mirrors.
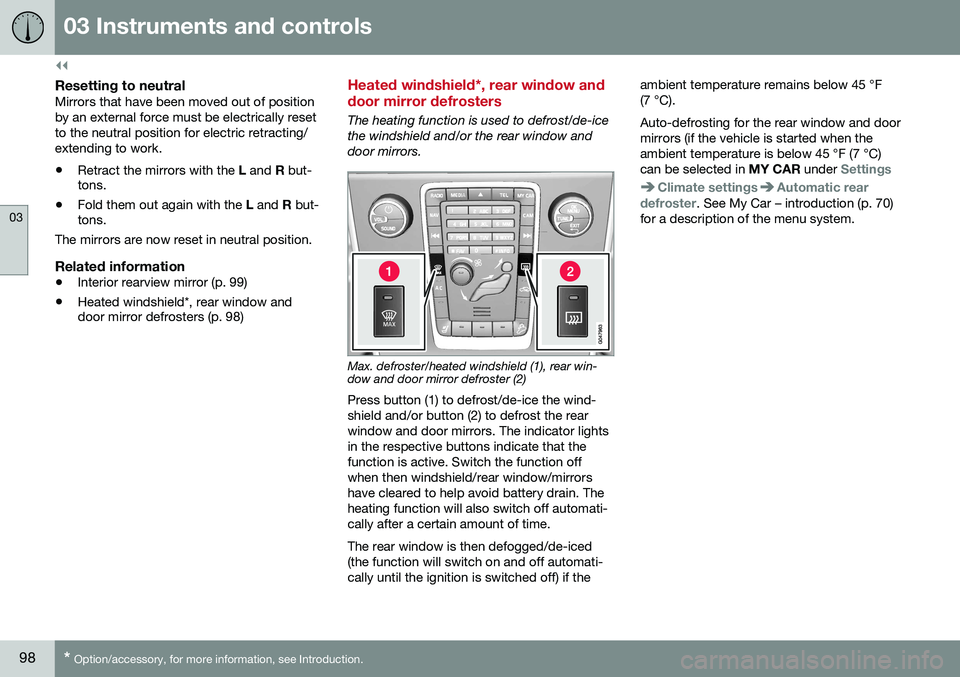
Max. defroster/heated windshield (1), rear win- dow and door mirror defroster (2)
Press button (1) to defrost/de-ice the wind- shield and/or button (2) to defrost the rearwindow and door mirrors. The indicator lightsin the respective buttons indicate that thefunction is active. Switch the function offwhen then windshield/rear window/mirrorshave cleared to help avoid battery drain. Theheating function will also switch off automati-cally after a certain amount of time. The rear window is then defogged/de-iced (the function will switch on and off automati-cally until the ignition is switched off) if the ambient temperature remains below 45 °F(7 °C). Auto-defrosting for the rear window and door mirrors (if the vehicle is started when theambient temperature is below 45 °F (7 °C)can be selected in
MY CAR under
Settings
Climate settingsAutomatic rear
defroster. See My Car – introduction (p. 70)
for a description of the menu system.
Page 101 of 392

03 Instruments and controls
03
}}
* Option/accessory, for more information, see Introduction.99
Interior rearview mirror
The interior rearview mirror has an auto-dim function that helps reduce glare from follow-ing vehicle's headlights.
Auto-dim functionThe interior rearview mirror’s auto-dim func-tion is controlled by two sensors: one point-ing forward (located on the forward-facingside of the mirror, which monitors the amountof ambient light) and one pointing rearward(located on the side of the mirror facing thedriver at the upper edge, which senses thestrength of following vehicles' headlights), and work together to help eliminate glare. 21
NOTE
Obstructing the forward sensor with e.g., parking stickers, transponders, etc., or therear sensor by placing objects on the par-cel shelf or the rear seat in such a way thatlight is prevented from reaching the sensorwill reduce the auto-dim function in theinterior rearview mirror and optional auto-dim function in the door mirrors.
Related information
•
Power door mirrors (p. 96)
Digital compass*
The rear-view mirror has an integrated display that shows the compass direction in whichthe vehicle is traveling.
Operation
Rearview mirror with compass.
Eight different directions are shown with the abbreviations:
N (north), NE (north east), E(east), SE (southeast), S (south), SW (south-
west), W (west) and NW (northwest).
The compass is displayed automatically when the vehicle is started or in ignition mode II. To
switch the compass on/off use a pen, paper-clip or similar object and press in the buttonon the underside of the mirror.
CalibrationNorth America is divided into 15 magneticzones and the compass will need to be cali-brated if the vehicle is driven into a new one(see the magnetic zones on the map in thefollowing section "Selecting a magneticzone"). To do so:
1. Stop the vehicle in a large open area, safely out of traffic and away from steel structures and high-tension electricalwires.
2. Start the vehicle.
NOTE
• For best calibration results, switch off all electrical equipment in the vehicle(climate system, windshield wipers,audio system, etc.) and make sure thatall doors are closed.
• Calibration may not succeed or beincorrect if the vehicle's electricalequipment is not switched off.
3. Using a pen, paperclip or similar object,
press and hold the button on the under- side of mirror for approx. 6 seconds until
C is displayed in the mirror.
21The auto-dim function is also available as an option on the door mirrors.
Page 102 of 392
||
03 Instruments and controls
03
100* Option/accessory, for more information, see Introduction.
4. Press and hold the button for 3 seconds
until the number of the current magnetic zone is displayed.
5. Press the button repeatedly until the number of the desired magnetic zone (
1-15) is displayed. See the magnetic
zones on the map in the following section "Selecting a magnetic zone").
6. Wait until
C is again displayed in the mir-
ror.
7. Drive slowly in a circle at a speed of no more than 6 mph (10 km/h) until a direc- tion is displayed. This indicates that cali-bration is complete.
8. Drive around in a circle an additional two times to fine-tune the calibration.
9. Vehicles with an electrically heated windshield:
* if
C is displayed when the
heating function is activated, perform step 7 with the heating function on. Seealso Max. defroster and electricallyheated windshield* (p. 125) for additionalinformation about the heated windshield.
Repeat the calibration procedure if neces-sary.
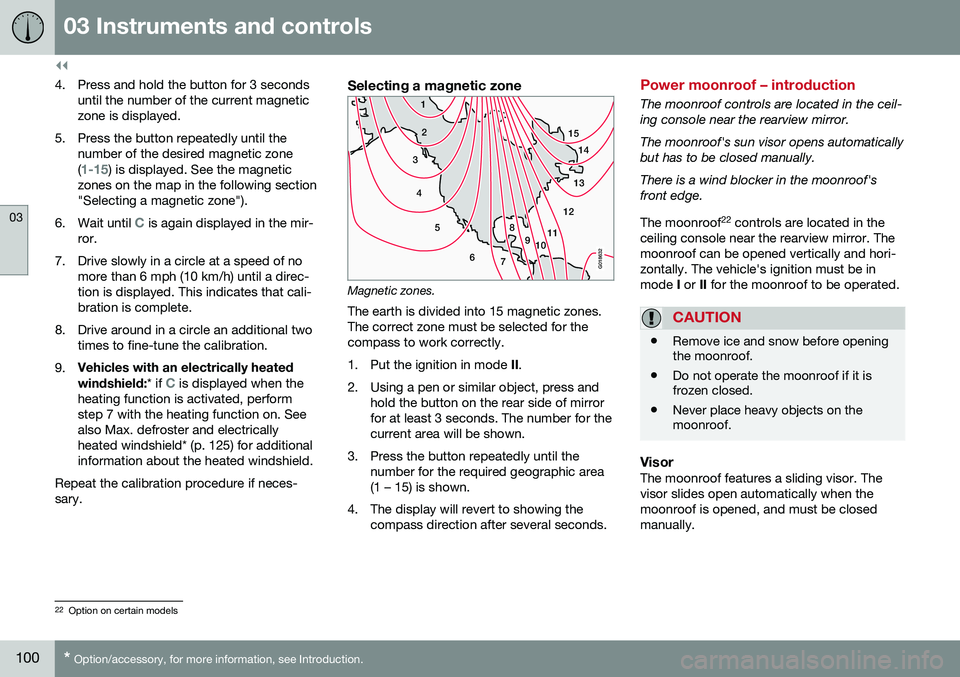
Selecting a magnetic zone
15 14
13
12
11
9
8
7
6
5
4
3
2
1
10
G018632
Magnetic zones.The earth is divided into 15 magnetic zones. The correct zone must be selected for thecompass to work correctly.
1. Put the ignition in mode II.
2. Using a pen or similar object, press and hold the button on the rear side of mirror for at least 3 seconds. The number for thecurrent area will be shown.
3. Press the button repeatedly until the number for the required geographic area(1 – 15) is shown.
4. The display will revert to showing the compass direction after several seconds.
Power moonroof – introduction
The moonroof controls are located in the ceil- ing console near the rearview mirror. The moonroof's sun visor opens automatically but has to be closed manually. There is a wind blocker in the moonroof's front edge. The moonroof 22
controls are located in the
ceiling console near the rearview mirror. The moonroof can be opened vertically and hori-zontally. The vehicle's ignition must be inmode I or II for the moonroof to be operated.
CAUTION
• Remove ice and snow before opening the moonroof.
• Do not operate the moonroof if it isfrozen closed.
• Never place heavy objects on themoonroof.
VisorThe moonroof features a sliding visor. The visor slides open automatically when themoonroof is opened, and must be closedmanually.
22
Option on certain models
Page 103 of 392
03 Instruments and controls
03
}}
101
Wind blocker
The moonroof is equipped with a wind blocker that folds up when the moonroof isopen.
Power moonroof – operation
The moonroof controls are located in the ceil- ing console near the rearview mirror. The moonroof's sun visor opens automatically but has to be closed manually. There is a wind blocker in the moonroof's front edge.
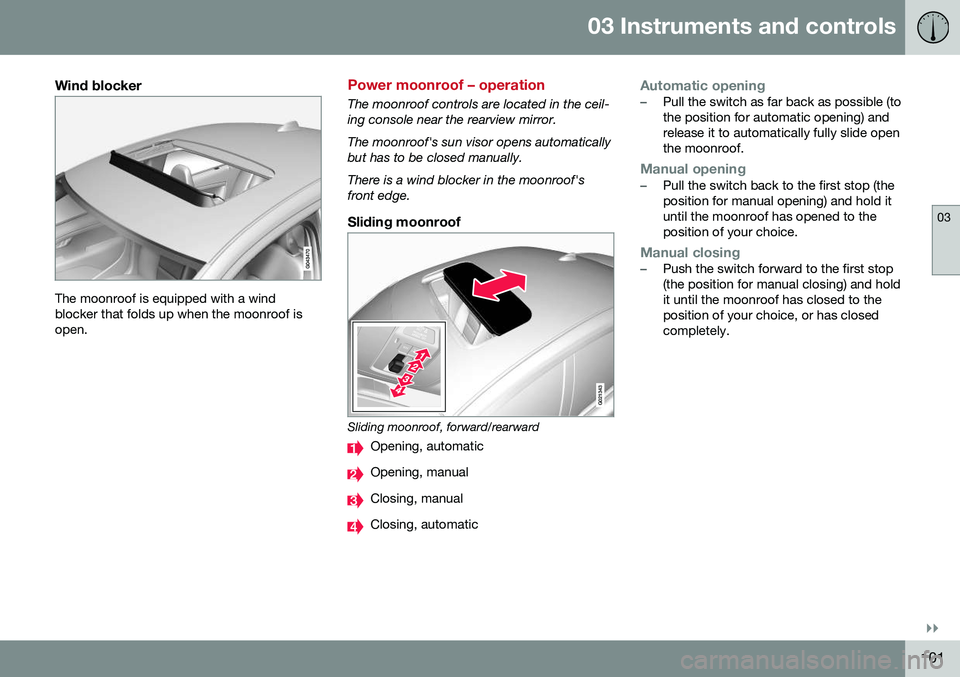
Sliding moonroof
G021343
Sliding moonroof, forward/rearward
Opening, automatic
Opening, manual
Closing, manual
Closing, automatic
Automatic opening–Pull the switch as far back as possible (to the position for automatic opening) andrelease it to automatically fully slide openthe moonroof.
Manual opening–Pull the switch back to the first stop (the position for manual opening) and hold ituntil the moonroof has opened to theposition of your choice.
Manual closing–Push the switch forward to the first stop (the position for manual closing) and holdit until the moonroof has closed to theposition of your choice, or has closedcompletely.
Page 121 of 392
04 Climate
04
* Option/accessory, for more information, see Introduction.119
Climate – sensors
The climate system utilizes a number of sen- sors to help regulate the temperature andhumidity level in the passenger compartment.
Sensor location
• The sunlight sensor is located on the top side of the dashboard.
NOTE
The sunlight sensor monitors which side of the car that is most exposed to sunlight.This can mean that the temperature maydiffer between the right and left-side airvents, even if the temperatures set for bothsides of the passenger compartment arethe same.
•The temperature sensor for the passen- ger compartment is located below the cli-mate control panel.
• The outside (ambient) temperature sensoris located on the door mirror.
• The humidity sensor* is located in theinterior rearview mirror.
NOTE
Do not cover or block the sensors with clothing or other objects.
Related information
•
Climate – general information (p. 118)
Air quality
The passenger compartment has been designed to be pleasant and comfortable,even for people with asthma and contactallergies.
Passenger compartment filterReplace the cabin air filter with a new one atthe recommended intervals. Please refer toyour Warranty and Service Records Informa-tion booklet, or consult a trained and qualifiedVolvo service technician for these intervals.The filter should be replaced more often whendriving under dirty and dusty conditions. Thefilter cannot be cleaned and therefore shouldalways be replaced with a new one.
NOTE
There are different types of cabin air filters. Ensure that the correct type is installed.
Interior Air Quality System (IAQS)A multifilter helps reduce gases and particles in the incoming air, thereby reducing the lev-els of odors and contaminants entering thevehicle. The air quality sensor detectsincreased levels of contaminants in the out-side air. When the air quality sensor detectscontaminated outside air, the air intake closesand the air inside the passenger compart-ment is recirculated, i.e., no outside air entersthe vehicle. The filter also cleans recirculatedpassenger compartment air.
NOTE
Contact your Volvo retailer for IAQS air fil- ter replacement intervals.
Materials used in the cabinThe materials used in the cabin have been developed to help minimize the amount ofdust and make the cabin easier to keepclean. All floor mats can be easily removedfor cleaning. Use car cleaning products rec-ommended by Volvo. See also the informa-tion in Cleaning the interior (p. 359).
Related information
•Climate – general information (p. 118)
• Interior Air Quality System (IAQS)* (p. 120)
• Climate – menu settings (p. 120)