mirror VOLVO S60 CROSS COUNTRY 2016 Owner´s Manual
[x] Cancel search | Manufacturer: VOLVO, Model Year: 2016, Model line: S60 CROSS COUNTRY, Model: VOLVO S60 CROSS COUNTRY 2016Pages: 392, PDF Size: 10.06 MB
Page 127 of 392
04 Climate
04
}}
* Option/accessory, for more information, see Introduction.125
Air conditioning
The air conditioning function cools and dehu- midifies the air in the passenger compart-ment.
When the indicator light inthe button is on, the air con-ditioning is controlled auto-matically. This cools/heatsand dehumidifies the incom-ing air. When the indicatorlight in the button is off, the
air conditioning is disengaged. Other func-tions are still controlled automatically. Whenmaximum defroster (p. 125) is selected, theair conditioning system is set for maximumblower speed and dehumidifies the cabin asquickly as possible.
Related information
• Climate – general information (p. 118)
• Automatic climate control (p. 124)
Max. defroster and electrically heated windshield*
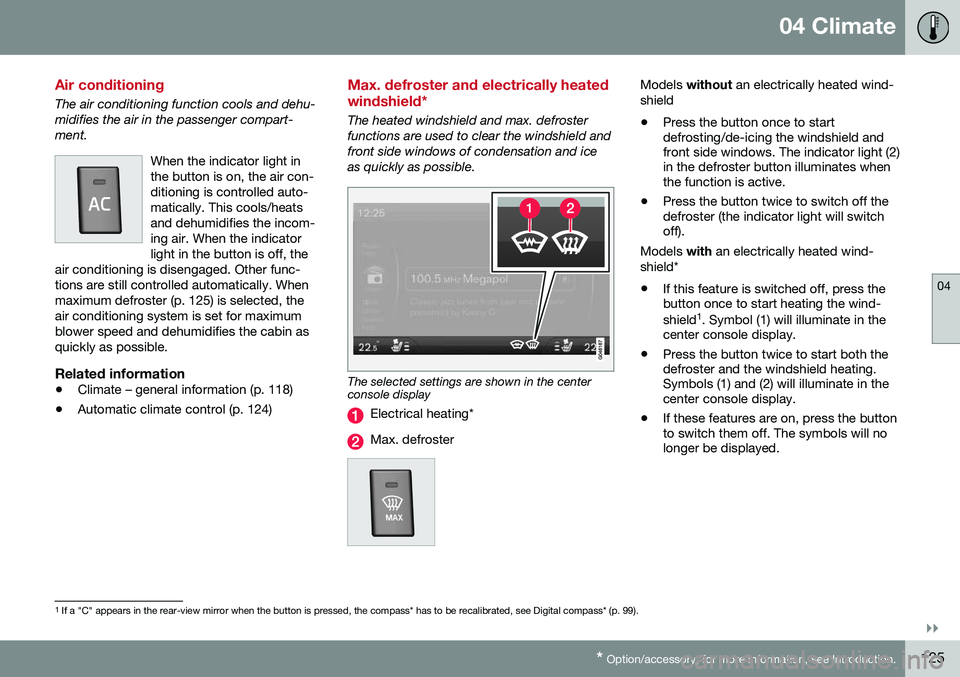
The heated windshield and max. defroster functions are used to clear the windshield andfront side windows of condensation and iceas quickly as possible.
The selected settings are shown in the center console display
Electrical heating*
Max. defroster
Models
without an electrically heated wind-
shield • Press the button once to start defrosting/de-icing the windshield andfront side windows. The indicator light (2)in the defroster button illuminates whenthe function is active.
• Press the button twice to switch off thedefroster (the indicator light will switchoff).
Models with an electrically heated wind-
shield*
• If this feature is switched off, press thebutton once to start heating the wind- shield 1
. Symbol (1) will illuminate in the
center console display.
• Press the button twice to start both the defroster and the windshield heating.Symbols (1) and (2) will illuminate in thecenter console display.
• If these features are on, press the buttonto switch them off. The symbols will nolonger be displayed.
1
If a "C" appears in the rear-view mirror when the button is pressed, the compass* has to be recalibrated, see Digital compass* (p. 99).
Page 128 of 392
||
04 Climate
04
126* Option/accessory, for more information, see Introduction.
NOTE
• Triangular areas at the far sides of the windshield are not heated electricallyand will take slightly longer todefrost/de-ice.
• The heated windshield may affect theperformance/range of e.g., transpond-ers used to automatically pay highwaytolls or other communication equip-ment.
The following occurs when the defroster/ windshield heating functions have been acti-vated: •
Blower speed increases automatically and the air conditioning (p. 125) willswitch on (if not already on and if the pas-senger compartment blower is not turnedoff) to dehumidify the air in the passengercompartment. Air conditioning can beswitched off by pressing the
AC button.
• Recirculation (p. 127) will not functionwhile defrost is engaged.
The climate system will return to its previous
settings when the defroster/windshield heat- ing function is switched off. See also Heated windshield*, rear window and door mirror defrosters (p. 98) for addi-tional information.
Related information
• Climate – general information (p. 118)
• Automatic climate control (p. 124)
Air distribution – function
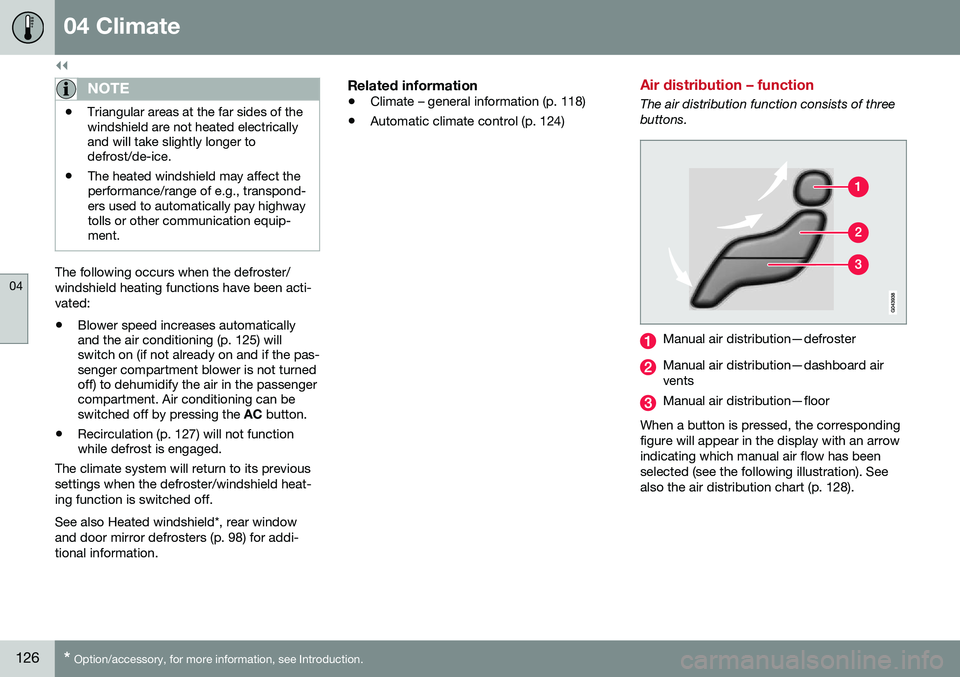
The air distribution function consists of three buttons.
Manual air distribution—defroster
Manual air distribution—dashboard air vents
Manual air distribution—floor
When a button is pressed, the corresponding figure will appear in the display with an arrowindicating which manual air flow has beenselected (see the following illustration). Seealso the air distribution chart (p. 128).
Page 134 of 392
||
05 Loading and storage
05
132* Option/accessory, for more information, see Introduction.
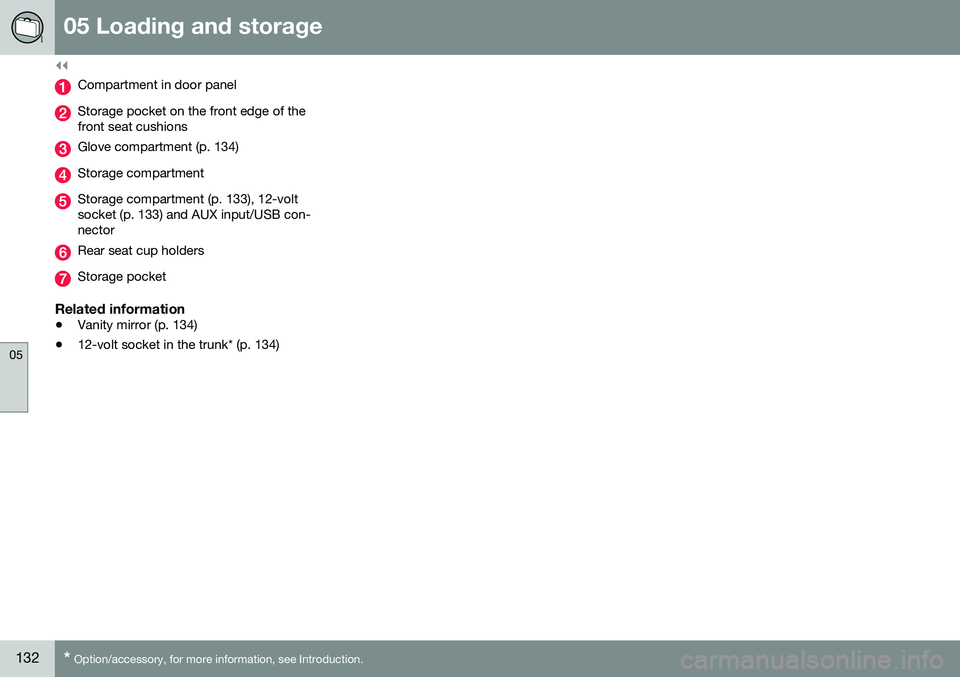
Compartment in door panel
Storage pocket on the front edge of the front seat cushions
Glove compartment (p. 134)
Storage compartment
Storage compartment (p. 133), 12-volt socket (p. 133) and AUX input/USB con-nector
Rear seat cup holders
Storage pocket
Related information
• Vanity mirror (p. 134)
• 12-volt socket in the trunk* (p. 134)
Page 136 of 392
05 Loading and storage
05
134* Option/accessory, for more information, see Introduction.
Glove compartment
The glove compartment provides a lockable storage compartment for small items.
The owner's manual and maps can be kept here. There are also holders for pens and fuelcards. The glove compartment can be lockedmanually with the key blade, see Locking/unlocking – glove compartment (p. 155).
Related information
• Storage spaces (p. 131)
Vanity mirror
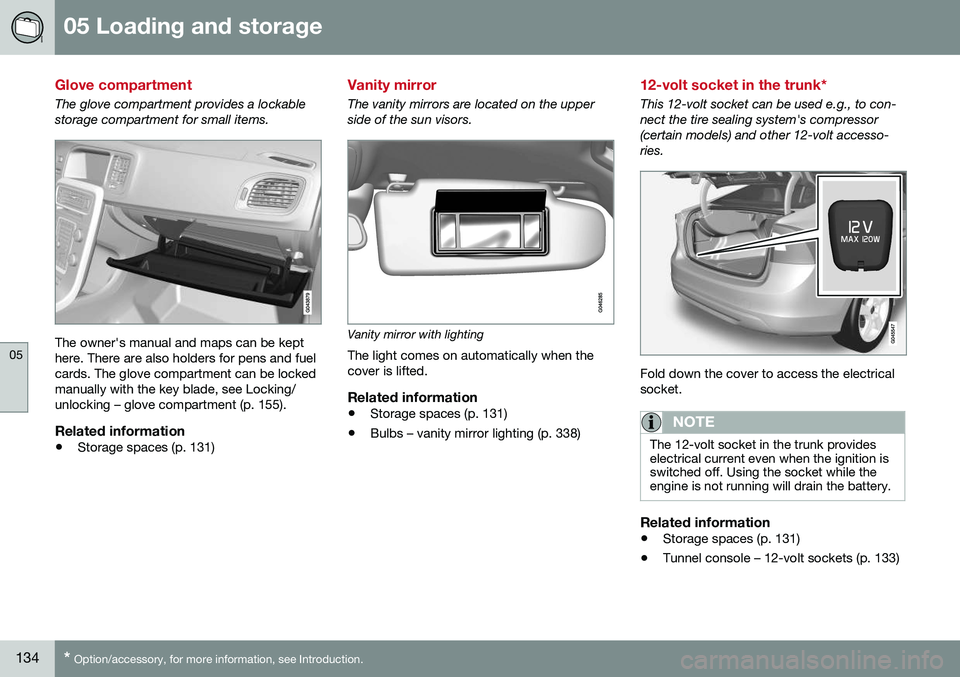
The vanity mirrors are located on the upper side of the sun visors.
Vanity mirror with lighting
The light comes on automatically when the cover is lifted.
Related information
• Storage spaces (p. 131)
• Bulbs – vanity mirror lighting (p. 338)
12-volt socket in the trunk*
This 12-volt socket can be used e.g., to con- nect the tire sealing system's compressor(certain models) and other 12-volt accesso-ries.
Fold down the cover to access the electrical socket.
NOTE
The 12-volt socket in the trunk provides electrical current even when the ignition isswitched off. Using the socket while theengine is not running will drain the battery.
Related information
• Storage spaces (p. 131)
• Tunnel console – 12-volt sockets (p. 133)
Page 142 of 392
06 Locks and alarm
06
140* Option/accessory, for more information, see Introduction.
Key memory
The memory in the remote key makes it possi- ble to store certain personal settings. The position of the side door mirrors, power driver's seat* and the selected instrument panel theme 1
are stored in the remote keys
when the vehicle is locked. The next time the
driver's door is unlocked with the same
remote key and the door is opened within 2 minutes , the power driver's seat and side
door mirrors will automatically move to theposition that they were in when the doorswere most recently locked with the sameremote key. If the seat/mirrors have not beenreadjusted since the vehicle was locked, theywill already be in the position stored in thatparticular remote key and will not move. Formore information on this feature, see Frontseats – power seat (p. 75). This feature can be activated or deactivated in the vehicle's menu by pressing MY CAR
and going into
SettingsCar settingsCar key memory. For a description of the
menu system, see My Car – introduction (p. 70).
NOTE
If the vehicle is locked with the remote key or is left unlocked for more than 30minutes, the key memory function will bedeactivated. To reactivate the key's memory: • Press the unlock button on the remote key.
For information regarding vehicles with the optional keyless drive, see Keyless drive*–locking/unlocking (p. 148).
Related information
•
Locking/unlocking confirmation (p. 140)
Locking/unlocking confirmation
Settings can be made in the menu system for audible and visual confirmation when thevehicle has been locked or unlocked. Withthese functions activated, the following willoccur when the vehicle is locked/unlocked:
Locking confirmation
•
The turn signals flash once, an audible signal sounds and the door mirrors willfold* in.
Confirmation will only be given when all doors and the trunk are properly closed and locked.
NOTE
If you do not receive confirmation when locking the vehicle, check whether a dooror the trunk is ajar, or if this feature hasbeen turned off in the menu.
Unlocking confirmation
• The turn signals will flash twice and the door mirrors will fold* out.
1
Optional digital instrument panel only
Page 145 of 392
06 Locks and alarm
06
* Option/accessory, for more information, see Introduction.143
After a short pause, press the Unlock button a second time within 10 seconds to unlockthe other doors and the trunk. This function can be changed so that all doors unlock at the same time by pressing My Car
and going to
SettingsCar
settings
Lock settingsChange doors
unlock setting. For a description of the menu
system, see My Car – introduction (p. 70).
Approach lighting – As you approach
the vehicle, press the button on the remote key to light the interior lighting, parking lights,license plate lighting and the lights in the doormirrors*. These lights will switch off automatically after 30, 60 or 90 seconds. For a description of themenu system, see My Car – introduction(p. 70).
Unlock/open trunk
Press once: This unlocks the trunk (but does
not open it) and disarms the alarm (the alarm indicator light on the dashboard will go out). Ifthe trunk is not opened within two minutes itwill automatically relock and the alarm will berearmed. Press twice: This both unlocks the trunk and
pops it open slightly.
NOTE
Any excess weight (snow, etc.) on the trunk lid may prevent it from opening.
For information on opening the trunk from the passenger compartment, see Locking/unlocking – trunk (p. 155). After closing, the trunk will not automatically relock. Press Lock to relock it and rearm thealarm.
Panic alarm – This button can be used
to attract attention during emergency situa- tions. To activate the panic alarm, press and hold this button for at least 3 seconds or press ittwice within 3 seconds. The turn signals andhorn will be activated. The panic alarm willstop automatically after 2 minutes and45 seconds. To deactivate, wait approximately 5 seconds and press the button again. The Panic alarm button will not unlock the vehicle.
Related information
• Locking/unlocking – from inside (p. 153)
• Locking/unlocking – from the outside (p. 152)
• Locking/unlocking confirmation (p. 140)
Remote key – range
The remote key has a range of approximately 60 ft. (20 m) from the vehicle.
NOTE
Buildings or other obstacles may interfere with the function of the remote key. Thevehicle can also be locked or unlockedwith the key blade, see Alarm-related func-tions (p. 160).
If the remote key is removed from the vehicle while the engine is running or if the ignition isin mode
I or II and all of the doors are closed,
a message will appear in the instrument paneldisplay and there will be an audible signal. When the remote key is returned to the vehi- cle, the message will be erased and the audi-ble signal will stop after one of the followinghas been done: • The remote key is inserted in the ignition slot
• The vehicle's speed exceeds 20 mph(30 km/h)
• The
OK button on the left steering wheel
lever is pressed
Related information
• Remote key – functions (p. 142)
Page 152 of 392
||
06 Locks and alarm
06
150* Option/accessory, for more information, see Introduction.
position of the driver's seat 2
and door mirrors
will be stored in the remote key's memory. The next time a door is opened by a person with the same remote key in his/her posses-
sion, the driver's seat and door mirrors willautomatically move to the position that theywere in when the door was most recentlylocked.
NOTE
If several people carrying remote keys approach the vehicle at the same time, thedriver's seat and door mirrors will assumethe positions they were in for the personwho opens the driver's door.
See also power seats (p. 75) for information on adjusting and storing the seat's position inthe seat memory.
NOTE
If the vehicle is locked by pressing the but- ton on one of the door handles or bypressing the lock button on the remotekey, or if it is left unlocked for more than30 minutes, the key memory function willbe deactivated. To reactivate the key's memory: • Unlock the vehicle by pulling a door handle with the remote key in yourpossession or by pressing the unlockbutton on the remote key.
Related information
•
Keyless drive*– locking/unlocking (p. 148)
• Remote key – functions (p. 142)
Keyless drive* – messages
If all of the remote keys are removed from the vehicle while the engine is running or if theignition modes (p. 73) is in mode
II and all of
the doors are closed, a message will appearin the instrument panel display and an audiblesignal will sound. When at least one remote key has been returned to the car, the message will beerased in the display and the audible signalwill stop when:
• A door has been opened and closed
• The remote key has been inserted in the ignition slot
• The
OK button has been pressed. For the
location of this button, see Informationdisplay – menu controls (p. 107)
2 Power seats only
Page 239 of 392
07 Driver support
07
237
WARNING
Keep in mind that the image on the screen only shows the area behind the vehicle.The driver must always watch for people,animals, other vehicles, etc., near the sidesof the vehicle when turning while backingup.
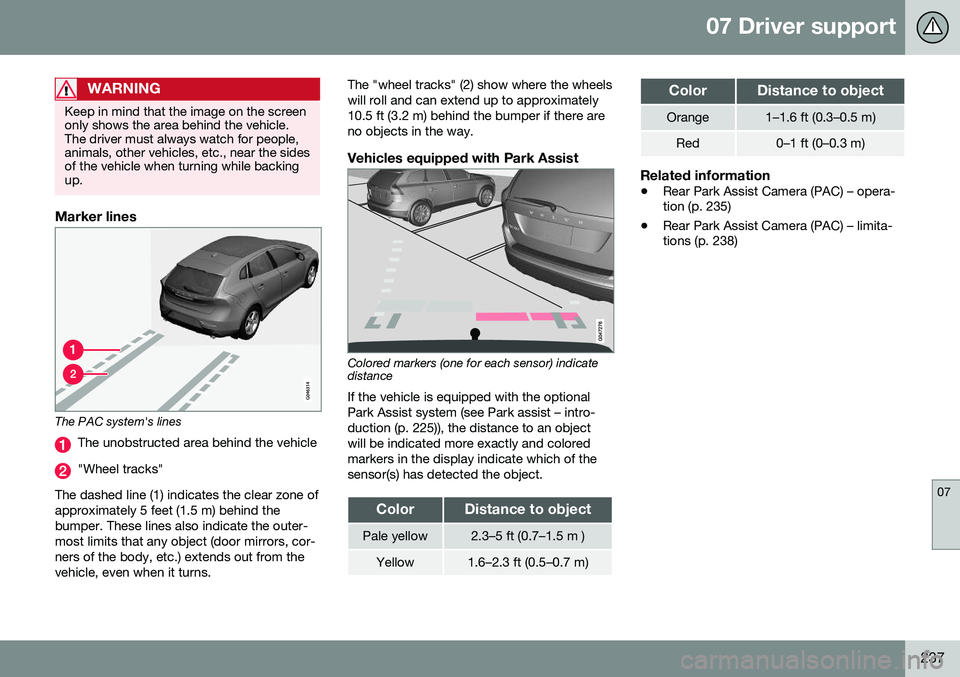
Marker lines
The PAC system's lines
The unobstructed area behind the vehicle
"Wheel tracks"
The dashed line (1) indicates the clear zone of approximately 5 feet (1.5 m) behind thebumper. These lines also indicate the outer-most limits that any object (door mirrors, cor-ners of the body, etc.) extends out from thevehicle, even when it turns. The "wheel tracks" (2) show where the wheelswill roll and can extend up to approximately10.5 ft (3.2 m) behind the bumper if there areno objects in the way.
Vehicles equipped with Park Assist
Colored markers (one for each sensor) indicate distance If the vehicle is equipped with the optional Park Assist system (see Park assist – intro-duction (p. 225)), the distance to an objectwill be indicated more exactly and coloredmarkers in the display indicate which of thesensor(s) has detected the object.
ColorDistance to object
Pale yellow2.3–5 ft (0.7–1.5 m )
Yellow1.6–2.3 ft (0.5–0.7 m)
ColorDistance to object
Orange1–1.6 ft (0.3–0.5 m)
Red0–1 ft (0–0.3 m)
Related information
•
Rear Park Assist Camera (PAC) – opera- tion (p. 235)
• Rear Park Assist Camera (PAC) – limita-tions (p. 238)
Page 240 of 392
07 Driver support
07
238* Option/accessory, for more information, see Introduction.
Rear Park Assist Camera (PAC) – limitations
LimitationsEven if a fairly small section of the screen image appears to be obstructed, this maymean that a relatively large area behind thevehicle is hidden and objects there may notbe detected until they are very near the vehi-cle.
NOTE
Bicycle carriers or other accessories mounted on the trunk may obstruct thecamera's field of view.
Keep in mind
• Keep the camera's lens free of dirt, ice and snow. Remove ice and snow care-fully to avoid scratching the lens.
• Clean the lens regularly with warm waterand a suitable car washing detergent.
Related information
•Rear Park Assist Camera (PAC) – intro-duction (p. 234)
• Rear Park Assist Camera (PAC) – opera-tion (p. 235)
• Park assist – introduction (p. 225)
BLIS* – introduction
The Blind Spot Information System (BLIS) is an information system that indicates the pres-ence of another vehicle moving in the samedirection as your vehicle on roads with severallanes.
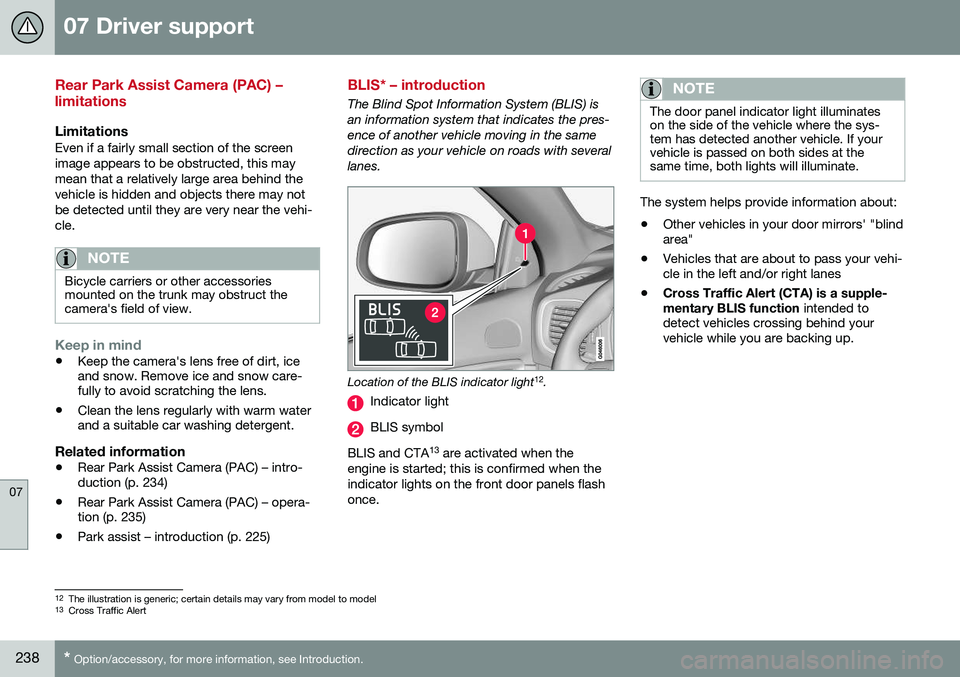
Location of the BLIS indicator light 12
.
Indicator light
BLIS symbol
BLIS and CTA 13
are activated when the
engine is started; this is confirmed when the indicator lights on the front door panels flashonce.
NOTE
The door panel indicator light illuminates on the side of the vehicle where the sys-tem has detected another vehicle. If yourvehicle is passed on both sides at thesame time, both lights will illuminate.
The system helps provide information about:
• Other vehicles in your door mirrors' "blind area"
• Vehicles that are about to pass your vehi-cle in the left and/or right lanes
• Cross Traffic Alert (CTA) is a supple- mentary BLIS function
intended to
detect vehicles crossing behind your vehicle while you are backing up.
12 The illustration is generic; certain details may vary from model to model
13 Cross Traffic Alert
Page 241 of 392
07 Driver support
07
* Option/accessory, for more information, see Introduction.239
WARNING
• BLIS and CTA are information sys- tems, NOT warning or safety systemsand do not function in all situations.
• BLIS and CTA do not eliminate theneed for you to visually confirm theconditions around you, and the needfor you to turn your head and should-ers to make sure that you can safelychange lanes or back up.
• As the driver, you have full responsibil-ity for changing lanes/backing up in asafe manner.
Related information
•
BLIS* – function (p. 239)
• BLIS* – operation (p. 240)
• BLIS* – Cross Traffic Alert (CTA) (p. 240)
• BLIS* – limitations (p. 242)
• BLIS* – messages (p. 243)
BLIS* – function
When does BLIS functionThe system functions when your vehicle is moving at speeds above 6 mph (10 km/h).
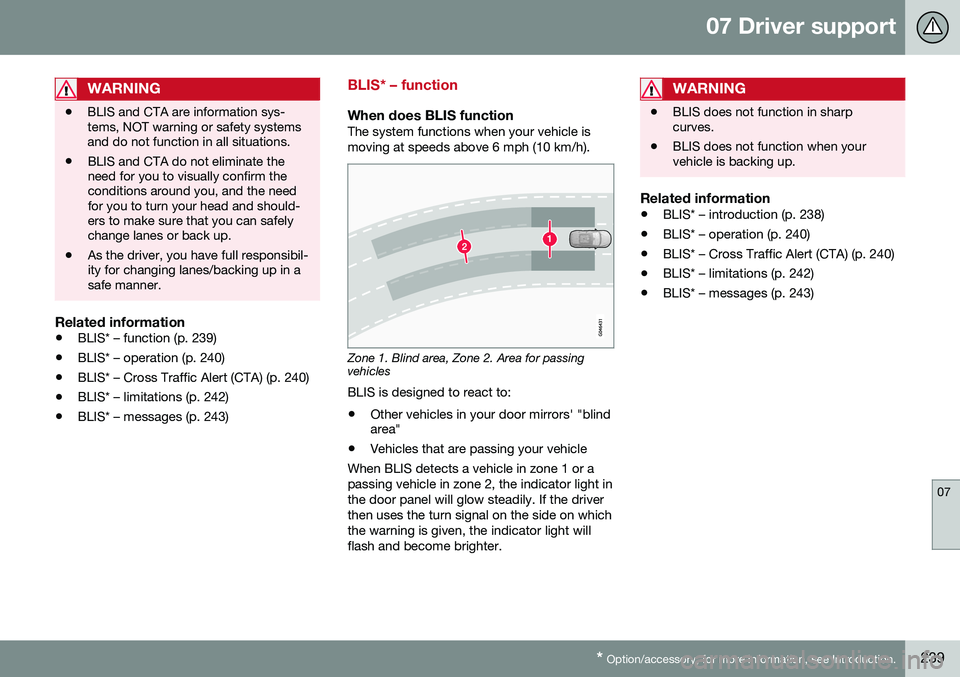
Zone 1. Blind area, Zone 2. Area for passing vehicles
BLIS is designed to react to:
• Other vehicles in your door mirrors' "blind area"
• Vehicles that are passing your vehicle
When BLIS detects a vehicle in zone 1 or a passing vehicle in zone 2, the indicator light inthe door panel will glow steadily. If the driverthen uses the turn signal on the side on whichthe warning is given, the indicator light willflash and become brighter.
WARNING
• BLIS does not function in sharp curves.
• BLIS does not function when yourvehicle is backing up.
Related information
•
BLIS* – introduction (p. 238)
• BLIS* – operation (p. 240)
• BLIS* – Cross Traffic Alert (CTA) (p. 240)
• BLIS* – limitations (p. 242)
• BLIS* – messages (p. 243)