warning lights VOLVO S60 TWIN ENGINE 2019 Owners Manual
[x] Cancel search | Manufacturer: VOLVO, Model Year: 2019, Model line: S60 TWIN ENGINE, Model: VOLVO S60 TWIN ENGINE 2019Pages: 645, PDF Size: 13.96 MB
Page 6 of 645
4
Resetting user data when the vehiclechanges owners132
Resetting center display settings132
Table of settings in the center display133
Driver profiles134
Selecting a driver profile135
Changing a driver profile's name135
Protecting a driver profile136
Linking a remote key to a driver profile136
Resetting driver profile settings137
Messages in the center display138
Handling messages in the center display138
Handling messages saved from thecenter display139
Head-up display*140
Activating and deactivating the head-up display*141
Head-up display settings*142
Voice control143
Using voice commands144
Voice control for cellular phones145
Voice control for radio and media146
Voice control settings147
LIGHTING
Lighting control and panel150
Adjusting light functions via the cen-ter display151
Adjusting the headlight pattern152
Parking lights152
Daytime running lights153
Low beams154
Using high beam154
Active high beam155
Using turn signals156
Active Bending Lights*157
Front fog lights/cornering illumination*157
Rear fog light158
Brake lights159
Emergency brake lights159
Hazard warning flashers159
Using home safe lighting160
Welcome Light160
Interior Lighting160
Adjusting interior lighting162
WINDOWS, GLASS AND MIRRORS
Windows, glass and mirrors164
Pinch protection for windows andsun curtains164
Reset procedure for pinch protection165
Power windows165
Operating the power windows166
Using sun curtains*167
Rearview/door mirrors168
Adjusting the rearview mirror dim-ming function168
Adjusting the door mirrors169
Panoramic roof*170
Operating the panoramic roof*171
Auto closing the panoramic roof* suncurtain174
Wiper blades and washer fluid174
Using the windshield wipers175
Using the rain sensor175
Using the rain sensor's memory function176
Using the windshield and headlightwashers177
Page 82 of 645
DISPLAYS AND VOICE CONTROL
* Option/accessory.80
Instruments and controls in left-hand drive vehicles
The overviews show the location of the vehicle'sdisplays and controls.
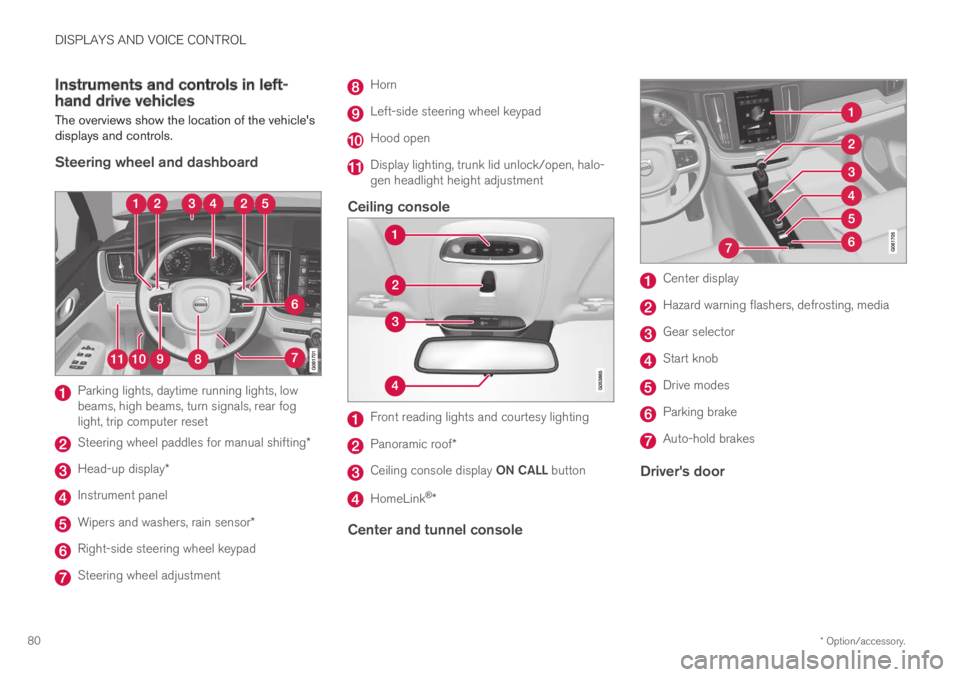
Steering wheel and dashboard
Parking lights, daytime running lights, lowbeams, high beams, turn signals, rear foglight, trip computer reset
Steering wheel paddles for manual shifting*
Head-up display*
Instrument panel
Wipers and washers, rain sensor*
Right-side steering wheel keypad
Steering wheel adjustment
Horn
Left-side steering wheel keypad
Hood open
Display lighting, trunk lid unlock/open, halo-gen headlight height adjustment
Ceiling console
Front reading lights and courtesy lighting
Panoramic roof*
Ceiling console display ON CALL button
HomeLink®*
Center and tunnel console
Center display
Hazard warning flashers, defrosting, media
Gear selector
Start knob
Drive modes
Parking brake
Auto-hold brakes
Driver's door
Page 96 of 645

||
DISPLAYS AND VOICE CONTROL
94
SymbolMeaning
Active high beams off
This symbol lights up in white whenthe active high beams are off.Parking lights are on.
High beams on
This symbol illuminates when thehigh beams and parking lights areon.
Rear fog light on
This symbol illuminates when therear fog light is on.
Rain sensor on
This symbol illuminates when therain sensor is on.
Preconditioning on
This symbol illuminates when theengine block/passenger compart-ment heater or air conditioning arepreconditioning the vehicle.
Stability system
This symbol flashes when the sta-bility system is actively working tostabilize the vehicle. If the symbolglows steadily, there is a fault inthe system.
SymbolMeaning
Stability system, Sport mode
This symbol illuminates when Sportmode is activated. Sport modeoffers a more active driving experi-ence.
Lane Keeping Aid
White symbol: Lane Keeping Aid ison and lane marker lines aredetected.
Gray symbol: Lane Keeping Aid ison but no lane marker lines aredetected.
Amber-colored symbol: Lane Keep-ing Aid is alerting/intervening.
Lane Keeping Aid and rain sen-sor
White symbol: Lane Keeping Aid ison and lane marker lines aredetected. The rain sensor is on.
Gray symbol: Lane Keeping Aid ison but no lane marker lines aredetected. The rain sensor is on.
ACanadian models.BUS models.
Related information
Instrument panel (p. 82)
Warning symbols in the instrument panel(p. 95)
Page 153 of 645
LIGHTING
* Option/accessory.151
WARNING
The vehicle lighting system cannot in all situa-tions determine when the daylight is too weakor not strong enough, e.g. when there is fogor rain.
The driver is always responsible for driving thevehicle with lighting that is safe for the trafficconditions and as specified by applicable traf-fic regulations.
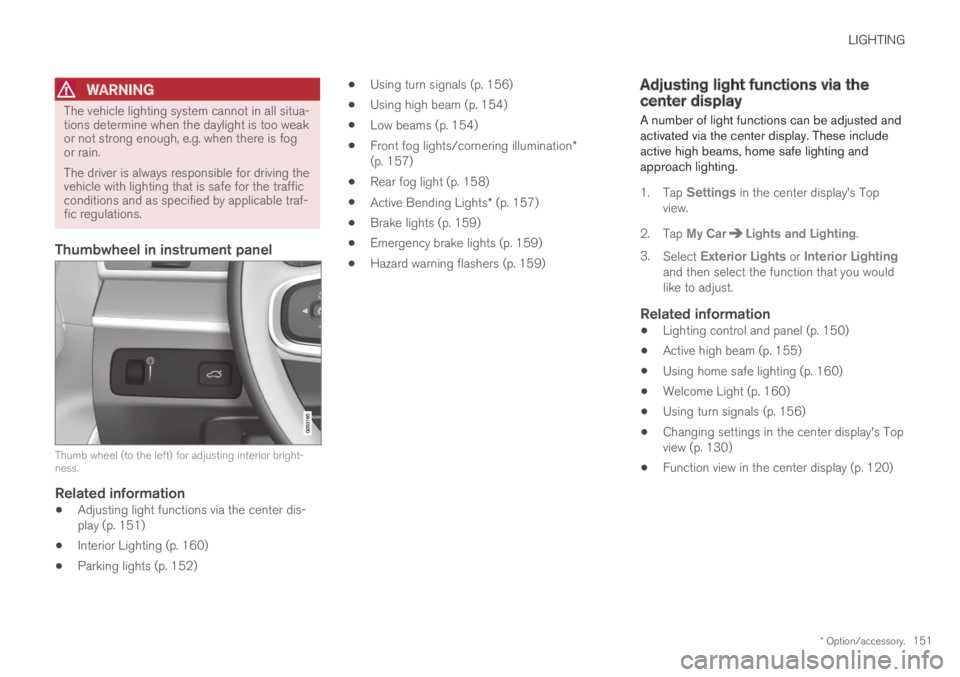
Thumbwheel in instrument panel
Thumb wheel (to the left) for adjusting interior bright-ness.
Related information
Adjusting light functions via the center dis-play (p. 151)
Interior Lighting (p. 160)
Parking lights (p. 152)
Using turn signals (p. 156)
Using high beam (p. 154)
Low beams (p. 154)
Front fog lights/cornering illumination*(p. 157)
Rear fog light (p. 158)
Active Bending Lights* (p. 157)
Brake lights (p. 159)
Emergency brake lights (p. 159)
Hazard warning flashers (p. 159)
Adjusting light functions via thecenter display
A number of light functions can be adjusted andactivated via the center display. These includeactive high beams, home safe lighting andapproach lighting.
1.Tap Settings in the center display's Topview.
2.Tap My CarLights and Lighting.
3.Select Exterior Lights or Interior Lightingand then select the function that you wouldlike to adjust.
Related information
Lighting control and panel (p. 150)
Active high beam (p. 155)
Using home safe lighting (p. 160)
Welcome Light (p. 160)
Using turn signals (p. 156)
Changing settings in the center display's Topview (p. 130)
Function view in the center display (p. 120)
Page 155 of 645
LIGHTING
* Option/accessory.153
Daytime running lights
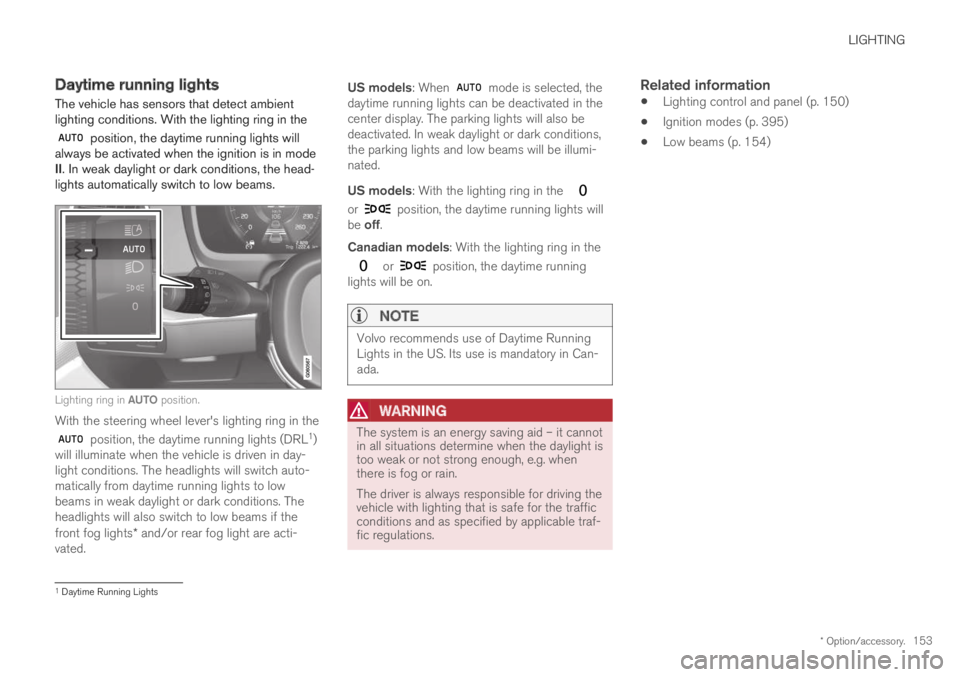
The vehicle has sensors that detect ambientlighting conditions. With the lighting ring in the
position, the daytime running lights willalways be activated when the ignition is in modeII. In weak daylight or dark conditions, the head-lights automatically switch to low beams.
Lighting ring in AUTO position.
With the steering wheel lever's lighting ring in the
position, the daytime running lights (DRL1)will illuminate when the vehicle is driven in day-light conditions. The headlights will switch auto-matically from daytime running lights to lowbeams in weak daylight or dark conditions. Theheadlights will also switch to low beams if thefront fog lights* and/or rear fog light are acti-vated.
US models: When mode is selected, thedaytime running lights can be deactivated in thecenter display. The parking lights will also bedeactivated. In weak daylight or dark conditions,the parking lights and low beams will be illumi-nated.
US models: With the lighting ring in the
or position, the daytime running lights willbe off.
Canadian models: With the lighting ring in the
or position, the daytime runninglights will be on.
NOTE
Volvo recommends use of Daytime RunningLights in the US. Its use is mandatory in Can-ada.
WARNING
The system is an energy saving aid – it cannotin all situations determine when the daylight istoo weak or not strong enough, e.g. whenthere is fog or rain.
The driver is always responsible for driving thevehicle with lighting that is safe for the trafficconditions and as specified by applicable traf-fic regulations.
Related information
Lighting control and panel (p. 150)
Ignition modes (p. 395)
Low beams (p. 154)
1Daytime Running Lights
Page 161 of 645
LIGHTING
159
Brake lights
The brake lights are automatically illuminatedwhen braking.
The brake lights are illuminated when the brakepedal is depressed and when the brakes areautomatically applied by a driver support system.
Related information
Emergency brake lights (p. 159)
Brake functions (p. 396)
Driver support systems (p. 260)
Emergency brake lights
The emergency brake lights are activated towarn following vehicles of hard braking.
This function causes an additional taillight oneach side of the vehicle to illuminate.
The emergency brake lights are activated in theevent of hard braking or if the ABS system isactivated and the vehicle is traveling at a highspeed.
After the driver decelerates to a low speed andthen releases the brake, the brake lights resumetheir normal brightness.
Related information
Brake lights (p. 159)
Brakes (p. 397)
Hazard warning flashers (p. 159)
Hazard warning flashers
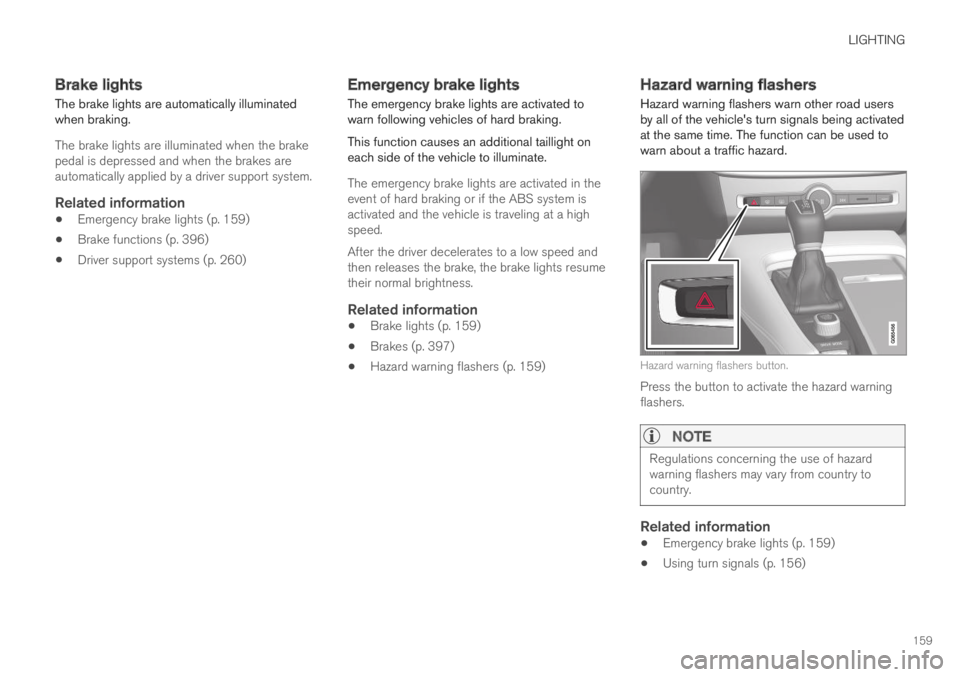
Hazard warning flashers warn other road usersby all of the vehicle's turn signals being activatedat the same time. The function can be used towarn about a traffic hazard.
Hazard warning flashers button.
Press the button to activate the hazard warningflashers.
NOTE
Regulations concerning the use of hazardwarning flashers may vary from country tocountry.
Related information
Emergency brake lights (p. 159)
Using turn signals (p. 156)
Page 170 of 645
WINDOWS, GLASS AND MIRRORS
* Option/accessory.168
Rearview/door mirrors
The rearview mirror and door mirrors can beused to improve the driver's visibility behind thevehicle.
Rearview mirror
The rearview mirror can be adjusted manually.The rearview mirror can be equipped with Home-Link*, auto-dim* and compass*.
Door mirrors
WARNING
The door mirror on the passenger side iscurved to improve visibility. Objects in the mir-ror may appear farther away than they actuallyare.
The joystick in the drivers' door control panel isused to adjust the position of the door mirrors.There are also several automatic settings thatcan also be connected to the memory functionbuttons for the power seat*.
Related information
HomeLink®* (p. 440)
Compass* (p. 443)
Adjusting the rearview mirror dimming func-tion (p. 168)
Adjusting the door mirrors (p. 169)
Storing positions for seats, mirrors and head-up display* (p. 182)
Activating and deactivating the heated rearwindow and door mirrors (p. 213)
Adjusting the rearview mirrordimming function
Bright light entering the vehicle from behind, e.g.from the headlights of following vehicles, couldreflect in the rearview mirror and door mirrorsand cause a glare. Use the dimming functionwhen light from behind is distracting.
Auto-dim
If bright light enters the vehicle from behind, thedoor mirrors will automatically dim. Auto-dim isalways active when the engine is running, exceptwhen reverse gear is engaged.
NOTE
Adjustments to the sensitivity level will not benoticeable immediately but will instead takeeffect after a short period of time.
The sensitivity level for dimming will affect boththe rearview mirror and door mirrors.
To change the dimming sensitivity level:
1.Tap Settings in the Top view in the centerdisplay.
2.Tap My CarMirrors and Convenience.
3.Under Rearview Mirror Auto Dimming,select Normal, Dark or Light.
The rearview mirror instead has two sensors -one pointing forward and one pointing rearward -
Page 284 of 645

||
DRIVER SUPPORT
282
WARNING
The function is supplementary driver sup-port intended to facilitate driving and helpmake it safer – it cannot handle all situa-tions in all traffic, weather and road condi-tions.
The driver is advised to read all sectionsin the Owner's Manual about this functionto learn of its limitations, which the drivermust be aware of before using the func-tion.
Driver support functions are not a substi-tute for the driver's attention and judg-ment. The driver is always responsible forensuring the vehicle is driven in a safemanner, at the appropriate speed, with anappropriate distance to other vehicles,and in accordance with current trafficrules and regulations.
Pilot Assist regulates speed by accelerating andbraking. It is normal for the brakes to emit a slightsound when they are being used to adjust speed.
Pilot Assist attempts to smoothly regulate speed.The driver must apply the brakes in situationsrequiring immediate braking. For example, whenthere are great differences in speed betweenvehicles or if the vehicle ahead brakes suddenly.
Due to limitations in the camera and radar sen-sor, braking may occur unexpectedly or not at all.
Pilot Assist is designed to follow a vehicle aheadin the same lane and maintain a time interval tothat vehicle set by the driver. If the radar sensordoes not detect a vehicle ahead, it will insteadmaintain the speed set by the driver. This will alsohappen if the speed of the vehicle aheadexceeds the set speed for your vehicle.
WARNING
This is not a collision avoidance system.The driver is always responsible and mustintervene if the system fails to detect avehicle ahead.
The function does not brake for people oranimals and does not brake for smallvehicles, such as bikes and motorcycles.Similarly, it does not brake for low trailers,oncoming, slow-moving or stationary vehi-cles and objects.
Do not use the function in demanding sit-uations, such as in city traffic, at intersec-tions, on slippery surfaces, with a lot ofwater or slush on the road, in heavy rain/snow, in poor visibility, on winding roads,or on on/off ramps.
CAUTION
Maintenance of driver support components
may only performed by a workshop31.
In curves and forks in the road
Pilot Assist is designed to interact with the driver.The driver should never wait for steering assis-tance from Pilot Assist, but instead should alwaysbe ready to increase his or her own steeringefforts, particularly in curves.
When the vehicle is approaching an off-rampor a fork in the road, the driver should steertoward the desired lane to indicate to PilotAssist the desired direction of travel.
Pilot Assist strives to keep the vehicle
in the center of the lane
When Pilot Assist provides steering assistance, itstrives to position the vehicle in the center of thelane between the lane markings. For the smooth-est driving experience possible, the driver shouldpermit the vehicle to find the optimal positioning.The driver should check that the vehicle is posi-tioned safely in the lane and can always adjustthe vehicle's position by applying more force tothe steering wheel.
If Pilot Assist does not position the vehicleappropriately in the lane, the driver should
31An authorized Volvo workshop is recommended.
Page 310 of 645

||
DRIVER SUPPORT
* Option/accessory.308
3 - Auto-brake
The automatic braking function is activated at thelast moment.
If the driver has not taken evasive action by thisstage and a collision is imminent, the automaticbraking function will be triggered. This occurswhether or not the driver is pressing the brakepedal. Full braking force will be applied to reducethe speed at impact or reduced braking effect willbe applied if this is sufficient to avoid the colli-sion.
The seat belt tensioner may be activated whenthe automatic braking function is triggered.
In certain situations, auto-braking may begin witha limited braking force before applying full brak-ing force.
If City Safety has prevented a collision, the vehi-cle will be kept at a standstill until the drivertakes action. If the vehicle has slowed to avoidcolliding with a slower-moving vehicle ahead, yourspeed will be reduced to that vehicle's speed.
Auto-braking can always be cancelled if thedriver presses hard on the accelerator pedal.
NOTE
When City Safety activates the brakes, thebrake lights come on.
When City Safety applies the brakes, a text mes-sage will appear in the instrument panel to notifythe driver that the function is/was activated.
WARNING
City Safety may not be used to change howthe driver operates the vehicle. The drivermust not only rely on City Safety to brake thevehicle.
Related information
City Safety™ (p. 305)
Head-up display* (p. 140)
Seat belt tensioners (p. 50)
Setting a warning distance for CitySafety
City Safety is always active, but the function'swarning distance can be adjusted.
NOTE
The City Safety function cannot be deacti-vated. It is activated automatically each timethe engine/electric motor is started.
The alert distance determines the sensitivity ofthe system and regulates the distance at whichthe light, sound and brake pulsations will be acti-vated.
To select warning distance:
1.Select SettingsMy CarIntelliSafe inthe center display's Top view.
2.Under City Safety Warning, tap Late,Normal or Early to set the desired warningdistance.
If the driver feels that the Early setting is givingtoo many warnings or finds them irritating, theNormal or Late warning distance settings canbe selected instead.
If the driver feels that the warnings are too fre-quent and distracting, the warning distance canbe reduced. This will reduce the total number ofwarnings, but it will also result in City Safety pro-viding warnings at a later stage.
Page 311 of 645

DRIVER SUPPORT
}}
309
The Late warning distance setting should there-fore only be used in exceptional cases, such aswhen a more dynamic driving style is preferred.
WARNING
No automatic system can guarantee100% correct function in all situations.You should therefore never test use ofCity Safety in the direction of people, ani-mals or vehicles – this could lead tosevere damage, serious personal injury oreven death.
City Safety warns the driver if there is arisk of collision, but the function cannotreduce the driver's reaction time.
Even if the warning distance has been setto Early, warnings may be perceived aslate in certain situations – e.g. when thereare large speed differences or if the vehi-cle ahead suddenly brakes heavily.
With the warning distance set to Early,warnings come further in advance. Thismay cause the warnings to come morefrequently than with warning distanceNormal, but is recommended since it canmake City Safety more effective.
NOTE
The warning with direction indicators for RearCollision Warning is deactivated if the colli-sion warning distance in the City Safety func-tion is set to the lowest level "Late".
The seat belt tensioning and braking func-tions remain active.
Related information
City Safety™ (p. 305)
Rear Collision Warning (p. 320)
Detecting obstacles with City Safety
City Safety can help the driver detect other vehi-cles, cyclists, large animals and pedestrians.
Vehicles
City Safety can detect most vehicles that are sta-tionary or are moving in the same direction asyour vehicle. In some cases, it can also detectoncoming vehicles and crossing traffic.
For City Safety to be able to detect a vehicle inthe dark, its headlights and taillights must be onand clearly visible.
Cyclists
Optimal examples of what City Safety would interpret tobe a cyclist: clear body and bicycle shapes.
For optimal performance, the system's functionfor cyclist detection needs the clearest possibleinformation about the contours of the bicycle andof the cyclist's head, arm, shoulders, legs, torso