VOLVO S80 2008 Owners Manual
Manufacturer: VOLVO, Model Year: 2008, Model line: S80, Model: VOLVO S80 2008Pages: 275, PDF Size: 7.17 MB
Page 191 of 275
To increase loading space, the rear seat backrests can be folded down, see page 85.
The trunk lid can be unlocked via the button located on the lighting panel, see page 64.
Load the cargo in the trunk against the backrest.
Load wide cargo in the trunk on both sides of the rear seat split.
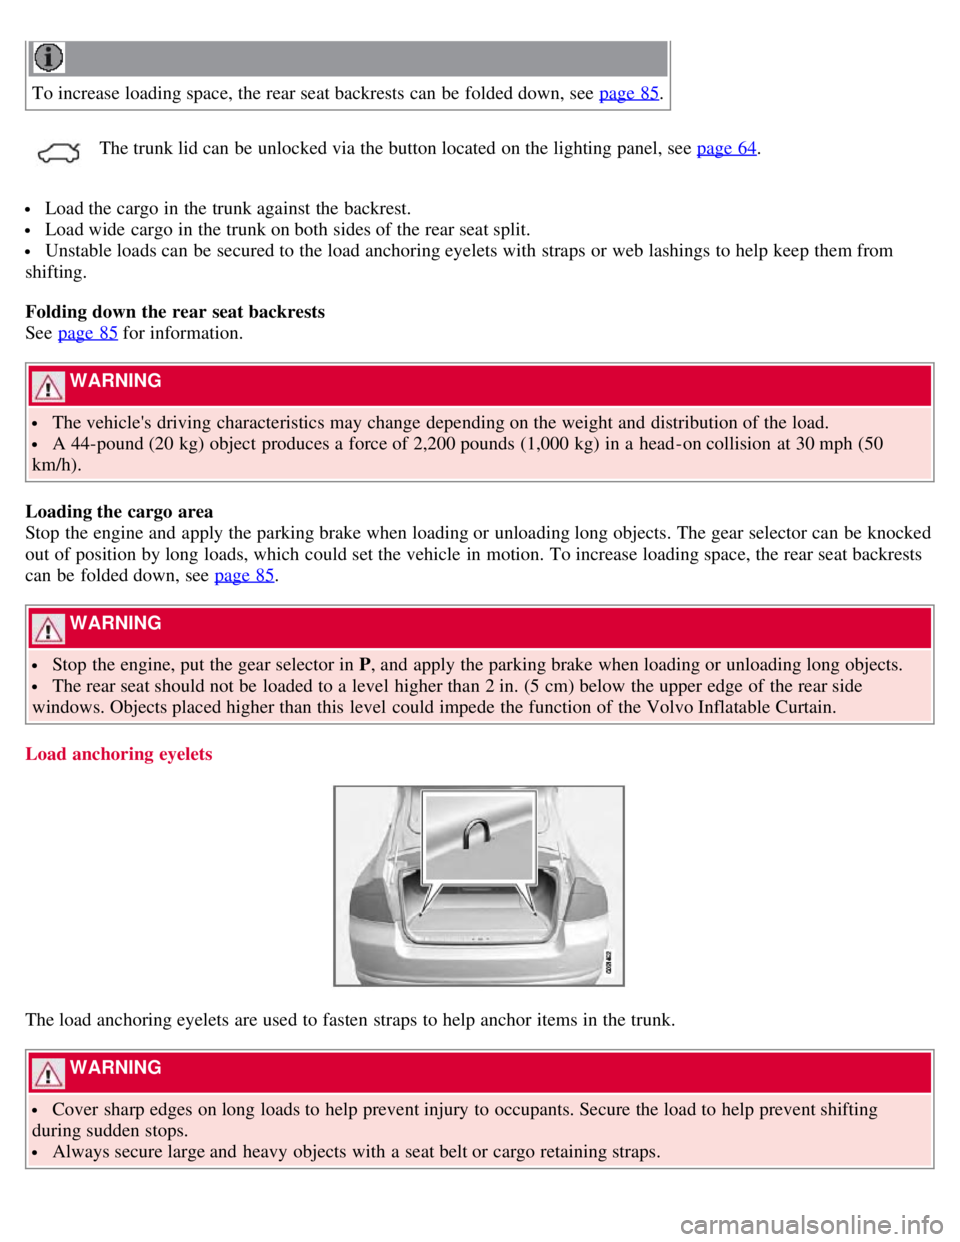
Unstable loads can be secured to the load anchoring eyelets with straps or web lashings to help keep them from
shifting.
Folding down the rear seat backrests
See page 85
for information.
WARNING
The vehicle's driving characteristics may change depending on the weight and distribution of the load.
A 44-pound (20 kg) object produces a force of 2,200 pounds (1,000 kg) in a head-on collision at 30 mph (50
km/h).
Loading the cargo area
Stop the engine and apply the parking brake when loading or unloading long objects. The gear selector can be knocked
out of position by long loads, which could set the vehicle in motion. To increase loading space, the rear seat backrests
can be folded down, see page 85
.
WARNING
Stop the engine, put the gear selector in P , and apply the parking brake when loading or unloading long objects.
The rear seat should not be loaded to a level higher than 2 in. (5 cm) below the upper edge of the rear side
windows. Objects placed higher than this level could impede the function of the Volvo Inflatable Curtain.
Load anchoring eyelets
The load anchoring eyelets are used to fasten straps to help anchor items in the trunk.
WARNING
Cover sharp edges on long loads to help prevent injury to occupants. Secure the load to help prevent shifting
during sudden stops.
Always secure large and heavy objects with a seat belt or cargo retaining straps.
Page 192 of 275
199 05 During your trip
Loading
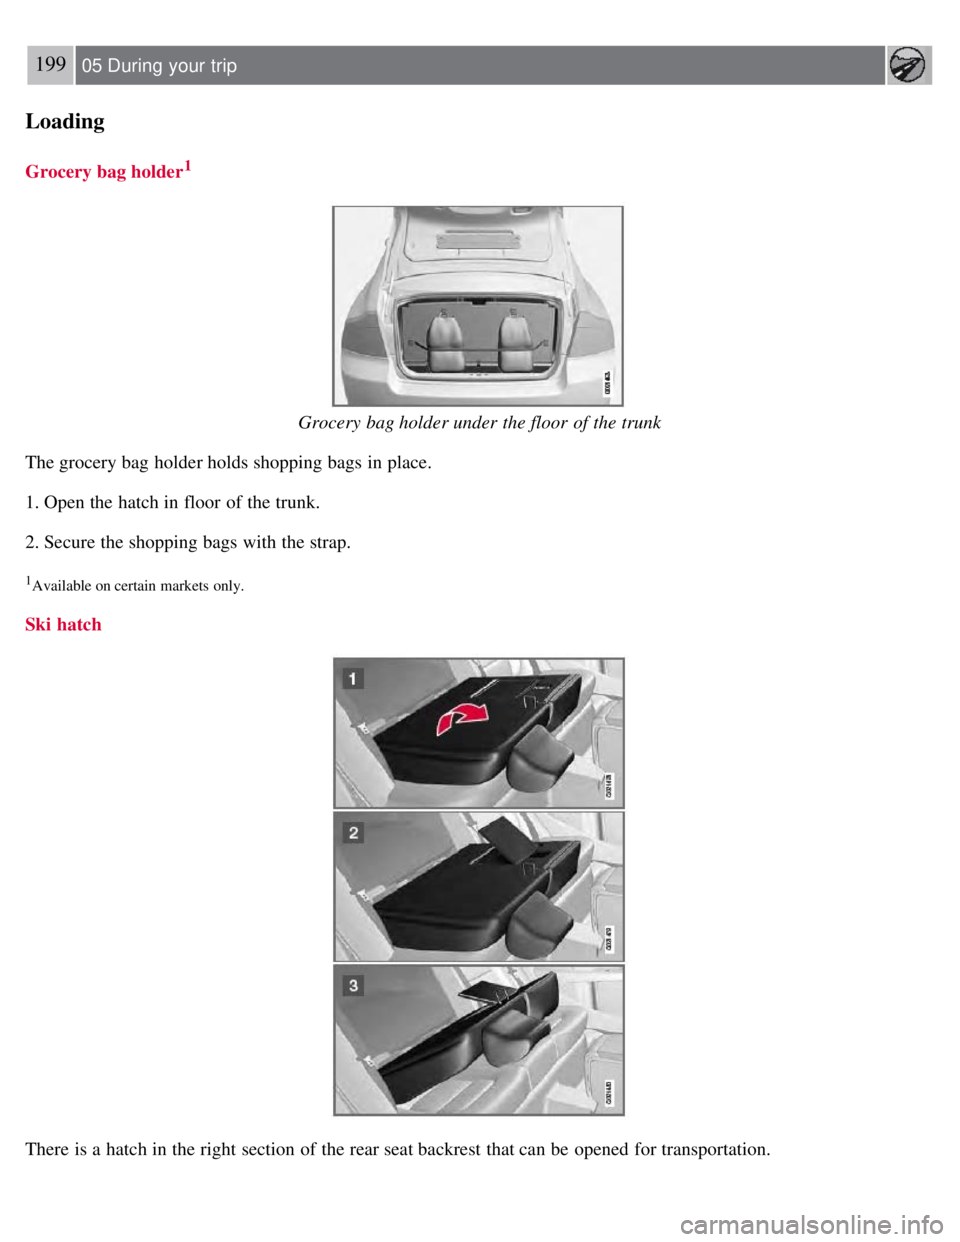
Grocery bag holder1
Grocery bag holder under the floor of the trunk
The grocery bag holder holds shopping bags in place.
1. Open the hatch in floor of the trunk.
2. Secure the shopping bags with the strap.
1Available on certain markets only.
Ski hatch
There is a hatch in the right section of the rear seat backrest that can be opened for transportation.
Page 193 of 275
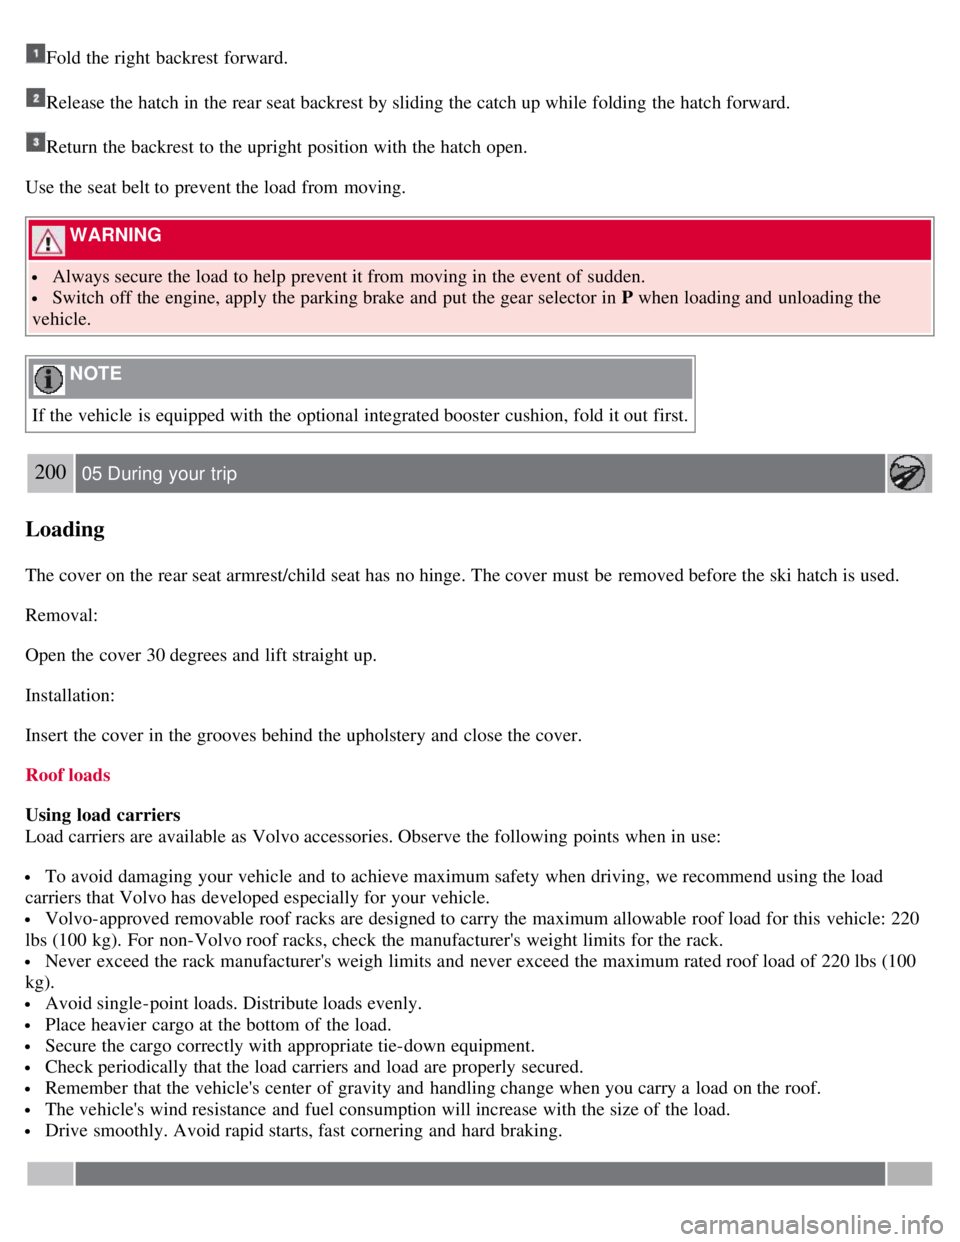
Fold the right backrest forward.
Release the hatch in the rear seat backrest by sliding the catch up while folding the hatch forward.
Return the backrest to the upright position with the hatch open.
Use the seat belt to prevent the load from moving.
WARNING
Always secure the load to help prevent it from moving in the event of sudden.
Switch off the engine, apply the parking brake and put the gear selector in P when loading and unloading the
vehicle.
NOTE
If the vehicle is equipped with the optional integrated booster cushion, fold it out first.
200 05 During your trip
Loading
The cover on the rear seat armrest/child seat has no hinge. The cover must be removed before the ski hatch is used.
Removal:
Open the cover 30 degrees and lift straight up.
Installation:
Insert the cover in the grooves behind the upholstery and close the cover.
Roof loads
Using load carriers
Load carriers are available as Volvo accessories. Observe the following points when in use:
To avoid damaging your vehicle and to achieve maximum safety when driving, we recommend using the load
carriers that Volvo has developed especially for your vehicle.
Volvo-approved removable roof racks are designed to carry the maximum allowable roof load for this vehicle: 220
lbs (100 kg). For non-Volvo roof racks, check the manufacturer's weight limits for the rack.
Never exceed the rack manufacturer's weigh limits and never exceed the maximum rated roof load of 220 lbs (100
kg).
Avoid single-point loads. Distribute loads evenly.
Place heavier cargo at the bottom of the load.
Secure the cargo correctly with appropriate tie-down equipment.
Check periodically that the load carriers and load are properly secured.
Remember that the vehicle's center of gravity and handling change when you carry a load on the roof.
The vehicle's wind resistance and fuel consumption will increase with the size of the load.
Drive smoothly. Avoid rapid starts, fast cornering and hard braking.
Page 194 of 275
201 05 During your trip
Towing a trailer
Introduction
Volvo recommends the use of Volvo trailer hitches that are specially designed for the vehicle.
NOTE
See page 270
for the maximum trailer and tongue weights recommended by Volvo.
Observe the legal requirements of the state/province in which the vehicles are
All Volvo models are equipped with energy- absorbing shock-mounted bumpers. Trailer hitch installation should
not interfere with the proper operation of this bumper system.
Trailer towing does not normally present any particular problems, but take into consideration:
Increase tire pressure to recommended full. See the tire inflation tables on pages 240 and 241.
When your vehicle is new, avoid towing heavy trailers during the first 620 miles (1,000 km).
Maximum speed when towing a trailer: 50 mph (80 km/h).
Engine and transmission are subject to increased loads. Therefore, engine coolant temperature should be closely
watched when driving in hot climates or hilly terrain. Use a lower gear and turn off the air conditioner if the
temperature gauge needle enters the red range.
If the automatic transmission begins to overheat, a message will be displayed in the text window.
Avoid overload and other abusive operation.
Hauling a trailer affects handling, durability, and economy.
It is necessary to balance trailer brakes with the towing vehicle brakes to provide a safe stop (check and observe
state/local regulations).
Do not connect the trailer's brake system directly to the vehicle's brake system.
More frequent vehicle maintenance is required.
Remove the ball and drawbar assembly when the hitch is not being used.
Volvo recommends the use of synthetic engine oil when towing a trailer over long distances or in mountainous
areas.
WARNING
Bumper-attached trailer hitches must not be used on Volvos, nor should safety chains be attached to the bumper.
Trailer hitches attaching to the vehicle rear axle must not be used.
Never connect a trailer's hydraulic brake system directly to the vehicle brake system, nor a trailer's lighting system
directly to the vehicle lighting system. Consult your nearest authorized Volvo retailer for correct installation.
When towing a trailer, the trailer's safety wire must be correctly fastened to the hole or hook provided in the
trailer hitch on the vehicle. The safety wire should never be fastened to or wound around the drawbar ball.
202 05 During your trip
Towing a trailer
NOTE
Page 195 of 275
When parking the vehicle with a trailer on a hill, apply the parking brake before putting the gear selector in P.
Always follow the trailer manufacturer's recommendations for wheel chocking.
When starting on a hill, put the gear selector in D before releasing the parking brake. See also page 117 for more
detailed information about starting off on a hill while towing a trailer.
If you use the manual (Geartronic) shift positions while towing a trailer, make sure the gear you select does not
put too much strain on the engine (using too high a gear).
The drawbar assembly/trailer hitch may be rated for trailers heavier than the vehicle is designed to tow. Please
adhere to Volvo's recommended trailer weights.
Avoid driving with a trailer on inclines of more than 15 %.
Trailer cable
An adapter is required if the vehicle's trailer hitch has a 13-pin connector and the trailer has 7 pins. Use an adapter
cable approved by Volvo. Make sure the cable does not drag on the ground.
203 05 During your trip
Towing a trailer
Detachable trailer hitch (accessory)
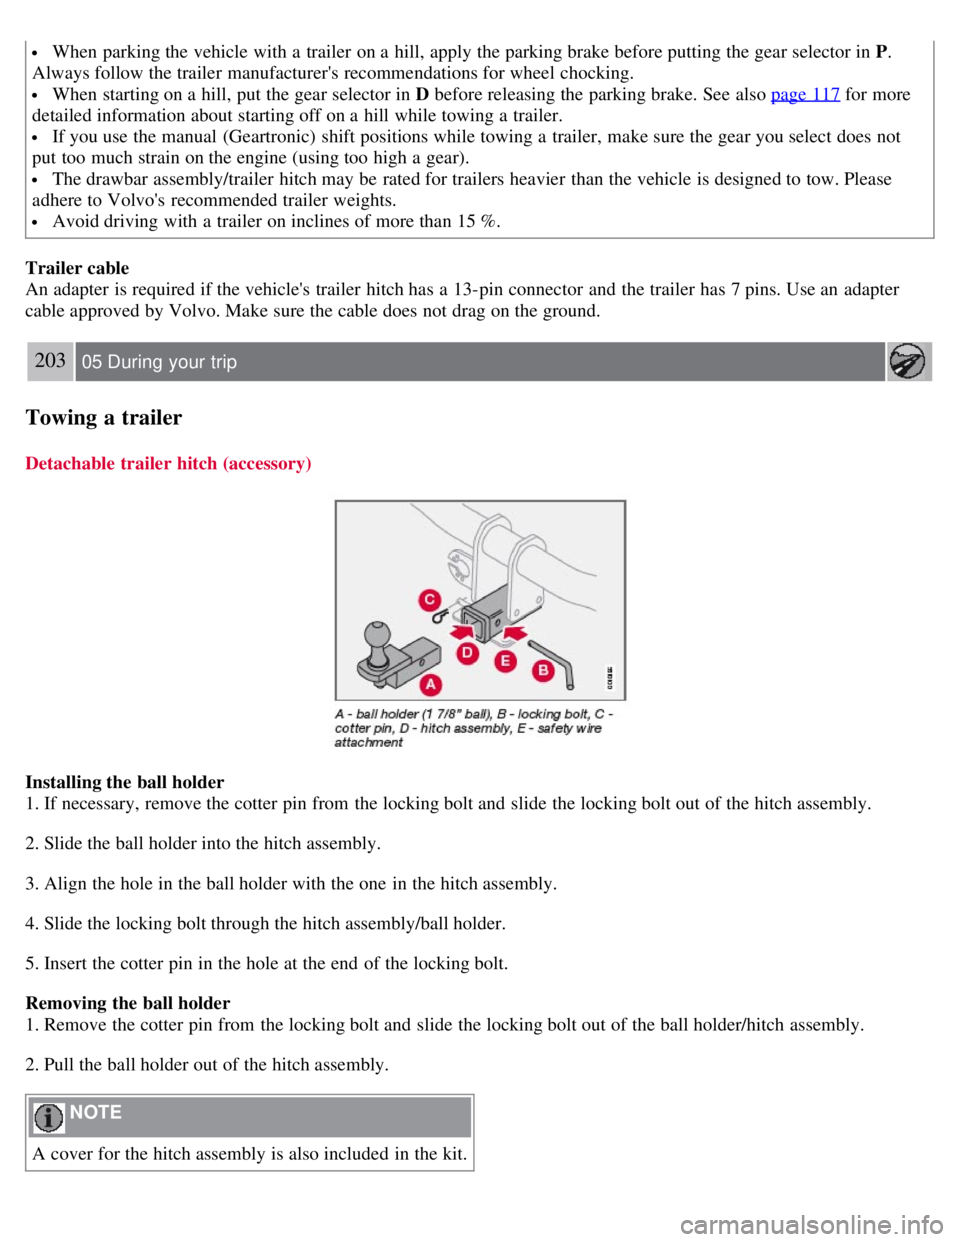
Installing the ball holder
1. If necessary, remove the cotter pin from the locking bolt and slide the locking bolt out of the hitch assembly.
2. Slide the ball holder into the hitch assembly.
3. Align the hole in the ball holder with the one in the hitch assembly.
4. Slide the locking bolt through the hitch assembly/ball holder.
5. Insert the cotter pin in the hole at the end of the locking bolt.
Removing the ball holder
1. Remove the cotter pin from the locking bolt and slide the locking bolt out of the ball holder/hitch assembly.
2. Pull the ball holder out of the hitch assembly.
NOTE
A cover for the hitch assembly is also included in the kit.
Page 196 of 275
204 05 During your trip
Emergency towing
Towing eyelet
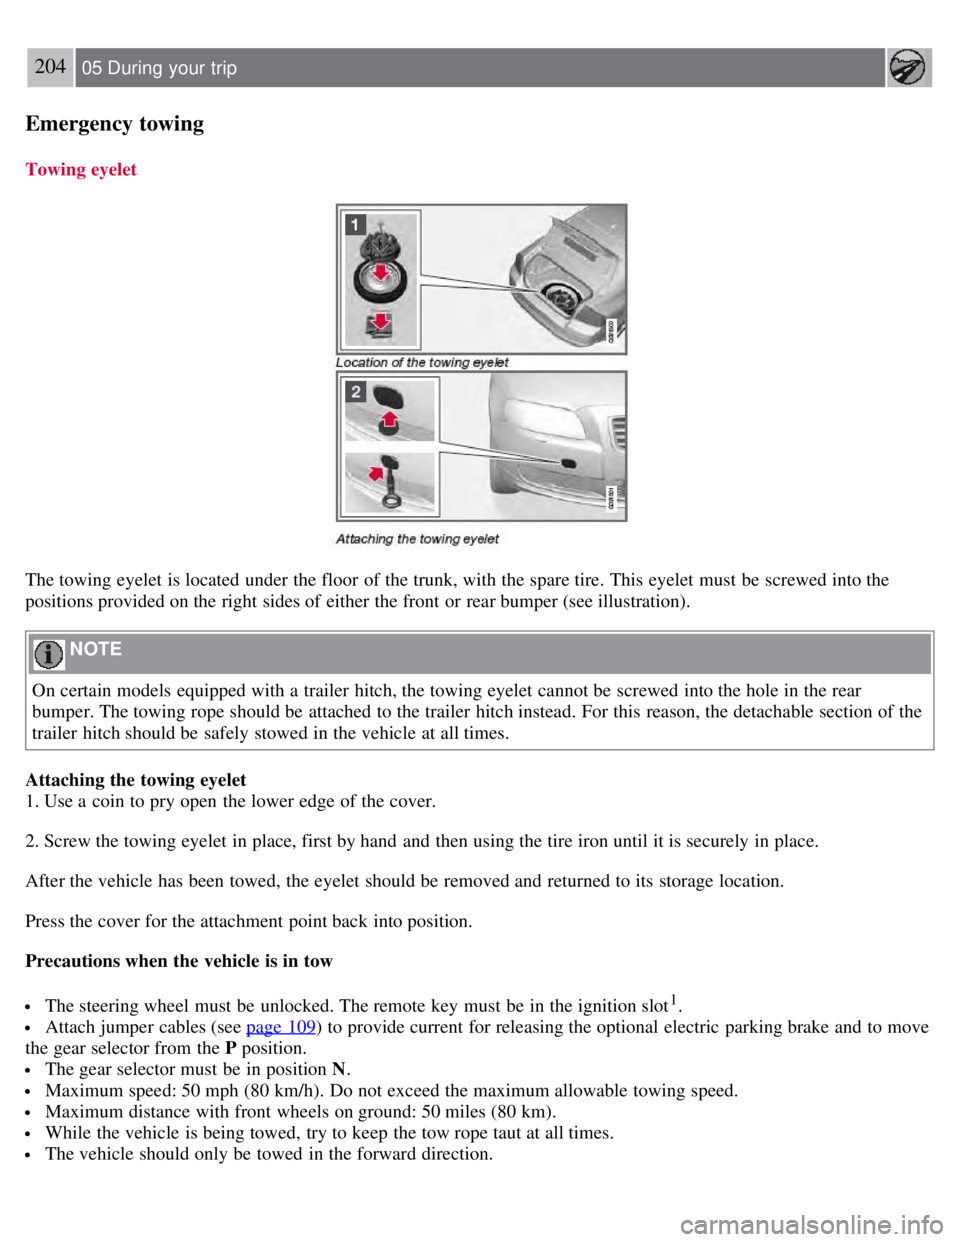
The towing eyelet is located under the floor of the trunk, with the spare tire. This eyelet must be screwed into the
positions provided on the right sides of either the front or rear bumper (see illustration).
NOTE
On certain models equipped with a trailer hitch, the towing eyelet cannot be screwed into the hole in the rear
bumper. The towing rope should be attached to the trailer hitch instead. For this reason, the detachable section of the
trailer hitch should be safely stowed in the vehicle at all times.
Attaching the towing eyelet
1. Use a coin to pry open the lower edge of the cover.
2. Screw the towing eyelet in place, first by hand and then using the tire iron until it is securely in place.
After the vehicle has been towed, the eyelet should be removed and returned to its storage location.
Press the cover for the attachment point back into position.
Precautions when the vehicle is in tow
The steering wheel must be unlocked. The remote key must be in the ignition slot1.
Attach jumper cables (see page 109) to provide current for releasing the optional electric parking brake and to move
the gear selector from the P position.
The gear selector must be in position N .
Maximum speed: 50 mph (80 km/h). Do not exceed the maximum allowable towing speed.
Maximum distance with front wheels on ground: 50 miles (80 km).
While the vehicle is being towed, try to keep the tow rope taut at all times.
The vehicle should only be towed in the forward direction.
Page 197 of 275
1On vehicles with the optional keyless drive, the remote key must be in the passenger compartment.
CAUTION
Please check with state and local authorities before attempting this type of towing, as vehicles being towed are
subject to regulations regarding maximum towing speed, length and type of towing device, lighting, etc.
If the vehicle's battery is dead, do not attempt to start the vehicle by pushing or pulling it as this will damage the
three-way catalytic converter(s). The engine must be jump started using an auxiliary battery (see page 109
).
If the vehicle is being towed on a flat bed truck, the towing eyelets must not be used to secure the vehicle on the
flat bed. Consult the tow truck operator.
205 05 During your trip
Emergency towing
Towing vehicles with front wheel drive/All Wheel Drive
Volvo recommends the use of flat bed equipment.
If wheel lift equipment must be used, please use extreme caution to help avoid damage to the vehicle. In this case,
the vehicle should be towed with the rear wheels on the ground if at all possible .
If it is absolutely necessary to tow the vehicle with the front wheels on the ground, please refer to the towing
information on the page 204
.
CAUTION
Sling-type equipment applied at the front will damage radiator and air conditioning lines.
It is equally important not to use sling -type equipment at the rear or apply lifting equipment inside the rear
wheels; serious damage to the rear axle may result.
If the vehicle is being towed on a flat bed truck, the towing eyelets must not be used to secure the vehicle on the
flat bed. Consult the tow truck operator.
Contents | Top of Page
Page 198 of 275
2 0 0 8
VOLVO S80
206 06 Maintenance and specifications
Volvo maintenance 208
Maintaining your car209
Hood and engine compartment211
Engine oil212
Fluids214
Replacing bulbs216
Wiper blades and washer fluid224
Battery226
Fuses230
Wheels and tires235
Vehicle care262
Label information267
Specifications269
Volvo programs277
207 06 Maintenance and specifications
208 06 Maintenance and specifications
Volvo maintenance
Introduction
Volvo advises you to follow the maintenance program outlined in the Warranty and Service Records Information
booklet. This maintenance program contains inspections and services necessary for the proper function of your vehicle.
The maintenance services contain several checks that require special tools and training, and therefore must be
performed by a qualified technician. To keep your Volvo in top condition, specify time-tested and proven Genuine
Volvo Parts and Accessories.
Page 199 of 275

The Federal Clean Air Act - U.S.
The Federal Clean Air Act requires vehicle manufacturers to furnish written instructions to the ultimate purchaser to
assure the proper servicing and function of the components that control emissions. These services, which are listed in
the "Warranty and Service Records Information" booklet, are not covered by the warranty. You will be required to pay
for labor and material used.
Maintenance
Your Volvo passed several major inspections before it was delivered to you, in accordance with Volvo specifications.
The maintenance procedures outlined in the Warranty and Service Records Information booklet, many of which will
positively affect your vehicle's emissions, should be performed as indicated. It is recommended that receipts for
vehicle emission maintenance be retained in case questions arise concerning maintenance. Inspection and maintenance
should also be performed anytime a malfunction is observed or suspected.
Applicable warranties - U.S./Canada
In accordance with applicable U.S. and Canadian regulations, the following list of warranties is provided.
New Vehicle Limited Warranty
Parts and Accessories Limited Warranty
Corrosion Protection Limited Warranty
Seat Belt and Supplemental Restraint Systems Limited Warranty
Emission Design and Defect Warranty
Emission Performance Warranty
These are the federal warranties; other warranties are provided as required by state/provincial law. Refer to your
separate Warranty and Service Records Information booklet for detailed information concerning each of the warranties.
Periodic maintenance helps minimize emissions
Periodic maintenance will help keep your vehicle running well. Your Warranty and Service Records Information
booklet provides a comprehensive periodic maintenance schedule up to 150,000 miles (240,000 km) of vehicle
maintenance. The schedule includes components that affect vehicle emissions. This page describes some of the
emission-related components.
Vehicle Event Data (Black Box)
Your vehicle's driving and safety systems employ computers that monitor, and share with each other, information
about your vehicle's operation. One or more of these computers may store what they monitor, either during normal
vehicle operation or in a crash or near-crash event. Stored information may be read and used by:
Volvo Car Corporation
service and repair facilities
law enforcement or government agencies
others who may assert a legal right to know, or who obtain your consent to know such information.
209 06 Maintenance and specifications
Maintaining your car
Owner maintenance
Periodic maintenance requirements and intervals are described in your vehicle's Warranty and Service Records
Information booklet.
The following points can be carried out between the normally scheduled maintenance services.
Page 200 of 275
Each time the car is refueled:
Check the engine oil level.
Clean the windshield, windshield wipers, headlights, and tail lights.
Monthly:
Check cold tire pressure in all tires. Inspect the tires for wear.
Check that engine coolant and other fluid levels are between the indicated "min" and "max" markings.
Clean interior glass surfaces with a glass cleaner and soft paper towels.
Wipe driver information displays with a soft cloth.
Visually inspect battery terminals for corrosion. Corrosion may indicate a loose terminal connector, or a battery near
the end of its useful service life. Consult your Volvo retailer for additional information.
As needed:
Wash the car, including the undercarriage, to reduce wear that can be caused by a buildup of dirt, and corrosion that
can be caused by salt residues.
Clean leaves and twigs from air intake vents at the base of the windshield, and from other places where they may
collect.
NOTE
Complete service information for qualified technicians is available online for purchase or subscription at
www.volvotechinfo.com
.
210 06 Maintenance and specifications
Maintaining your car
Emission inspection readiness
What is an Onboard Diagnostic System (OBD II)?
OBD II is part of your vehicle's computerized engine management system. It stores diagnostic information about your
vehicle's emission controls. It can light the Check Engine light (MIL) if it detects an emission control "fault." A "fault"
is a component or system that is not performing within an expected range. A fault may be permanent or temporary.
OBD II will store a message about any fault.
How do states use OBD II for emission inspections?
Many states connect a computer directly to a vehicle's OBD II system. The inspector can then read "faults." In some
states, this type of inspection has replaced the tailpipe emission test.
How can my vehicle fail OBD II emission inspection?
Your vehicle can fail OBD II emission inspection for any of the following reasons.
If your Check Engine (MIL) light is lit, your vehicle may fail inspection.
If your vehicle's Check Engine light was lit, but went out without any action on your part, OBD II will still have a
recorded fault. Your vehicle may pass or fail, depending on the inspection practices in your area.
If you had recent service that required disconnecting the battery, OBD II diagnostic information may be incomplete
and "not ready" for inspection. A vehicle that is not ready may fail inspection.
How can I prepare for my next OBD II emission inspection?