VOLVO S80 2008 Owners Manual
Manufacturer: VOLVO, Model Year: 2008, Model line: S80, Model: VOLVO S80 2008Pages: 275, PDF Size: 7.17 MB
Page 221 of 275
Detach the black negative cable
Detach the black negative cable
Detach the red positive cable
Detach the ventilation hose
Loosen the screw holding the battery clamp.
Move the battery to the side and lift it up.
WARNING
PROPOSITION 65 WARNING!
Battery posts, terminals, and related accessories contain lead and lead compounds, chemicals known to the state of
California to cause cancer and reproductive harm. Wash hands after handling.
229 06 Maintenance and specifications
Battery
Installation
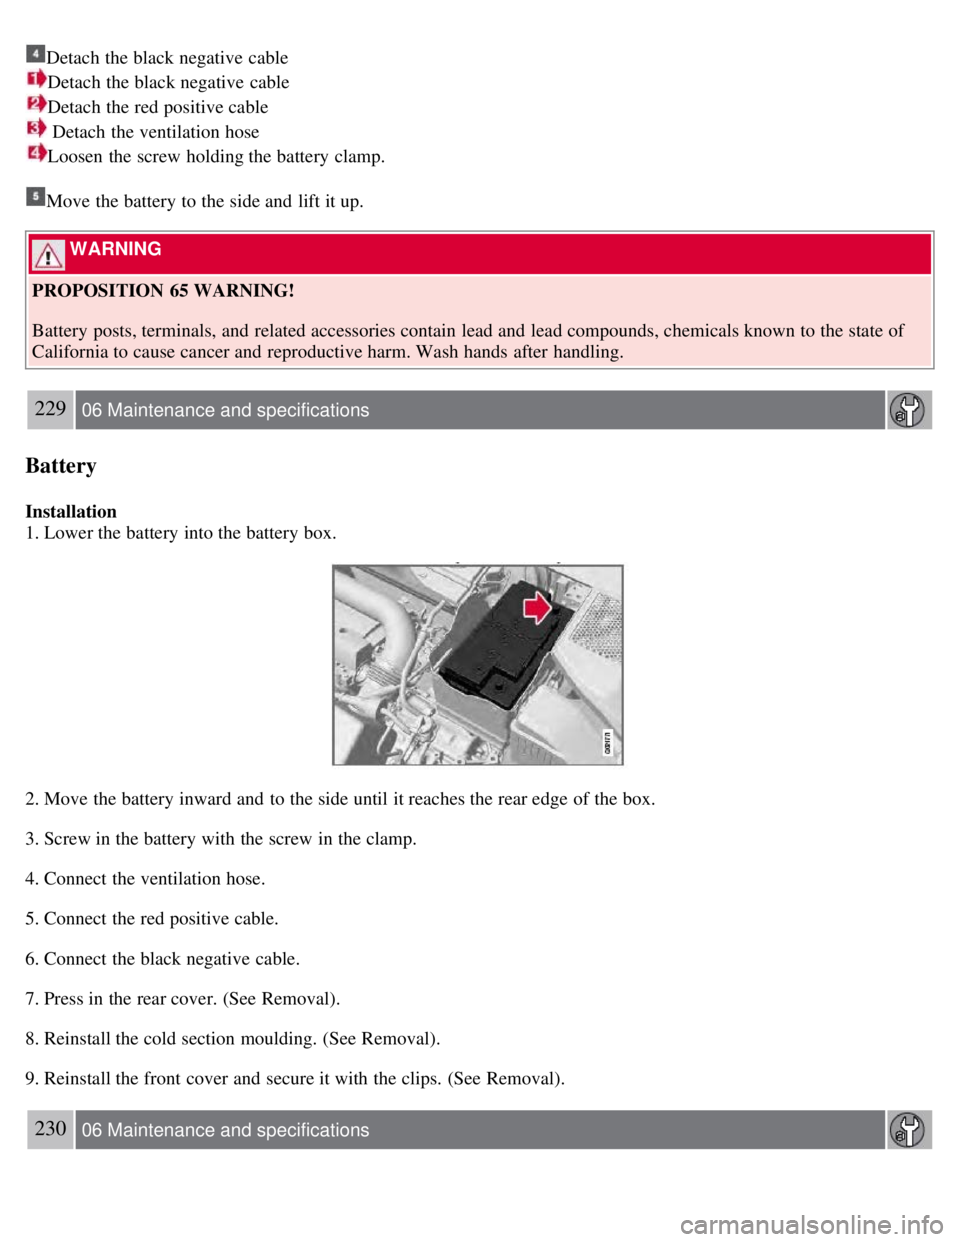
1. Lower the battery into the battery box.
2. Move the battery inward and to the side until it reaches the rear edge of the box.
3. Screw in the battery with the screw in the clamp.
4. Connect the ventilation hose.
5. Connect the red positive cable.
6. Connect the black negative cable.
7. Press in the rear cover. (See Removal).
8. Reinstall the cold section moulding. (See Removal).
9. Reinstall the front cover and secure it with the clips. (See Removal).
230 06 Maintenance and specifications
Page 222 of 275
Fuses
Replacing fuses
There are relay/fuse boxes located in the engine compartment, the passenger compartment, and the trunk.
If an electrical component fails to function, this may be due to a blown fuse. The easiest way to see if a fuse is blown
is to remove it.
To do so:
1. Pull the fuse straight out. If a fuse is difficult to remove, special fuse removal tools are located on the inside of the
fuse box covers.
2. From the side, examine the curved metal wire in the fuse to see if it is intact.
If the wire is broken, insert a new fuse of the same color and amperage (written on the fuse).
If fuses burn out repeatedly, have the electrical system inspected by a trained and qualified Volvo service technician.
WARNING
Never use metal objects or fuses with higher amperage than those stated on the following pages. Doing so could
seriously damage or overload the vehicle's electrical system.
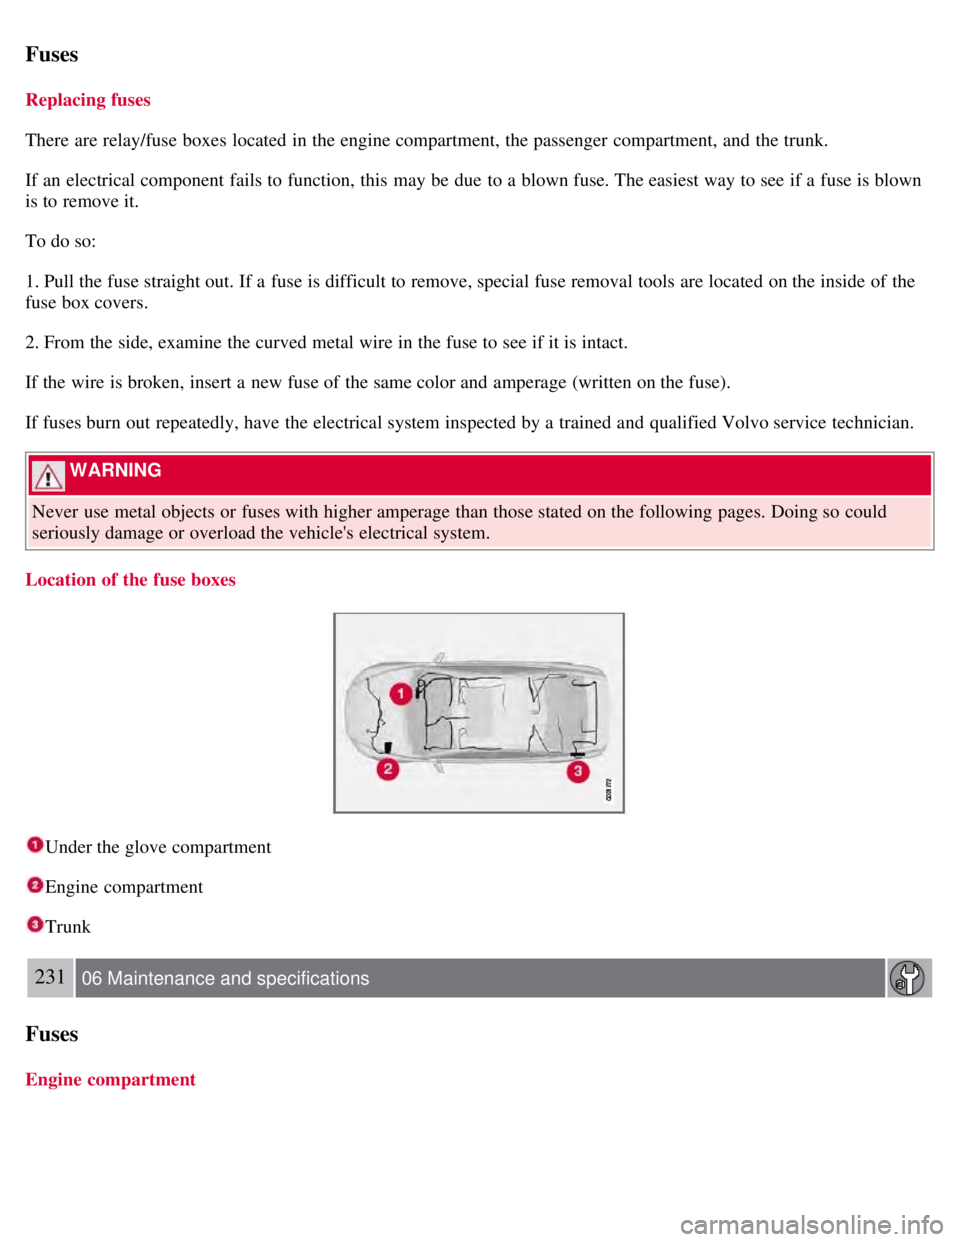
Location of the fuse boxes
Under the glove compartment
Engine compartment
Trunk
231 06 Maintenance and specifications
Fuses
Engine compartment
Page 223 of 275
232 06 Maintenance and specifications
Fuses
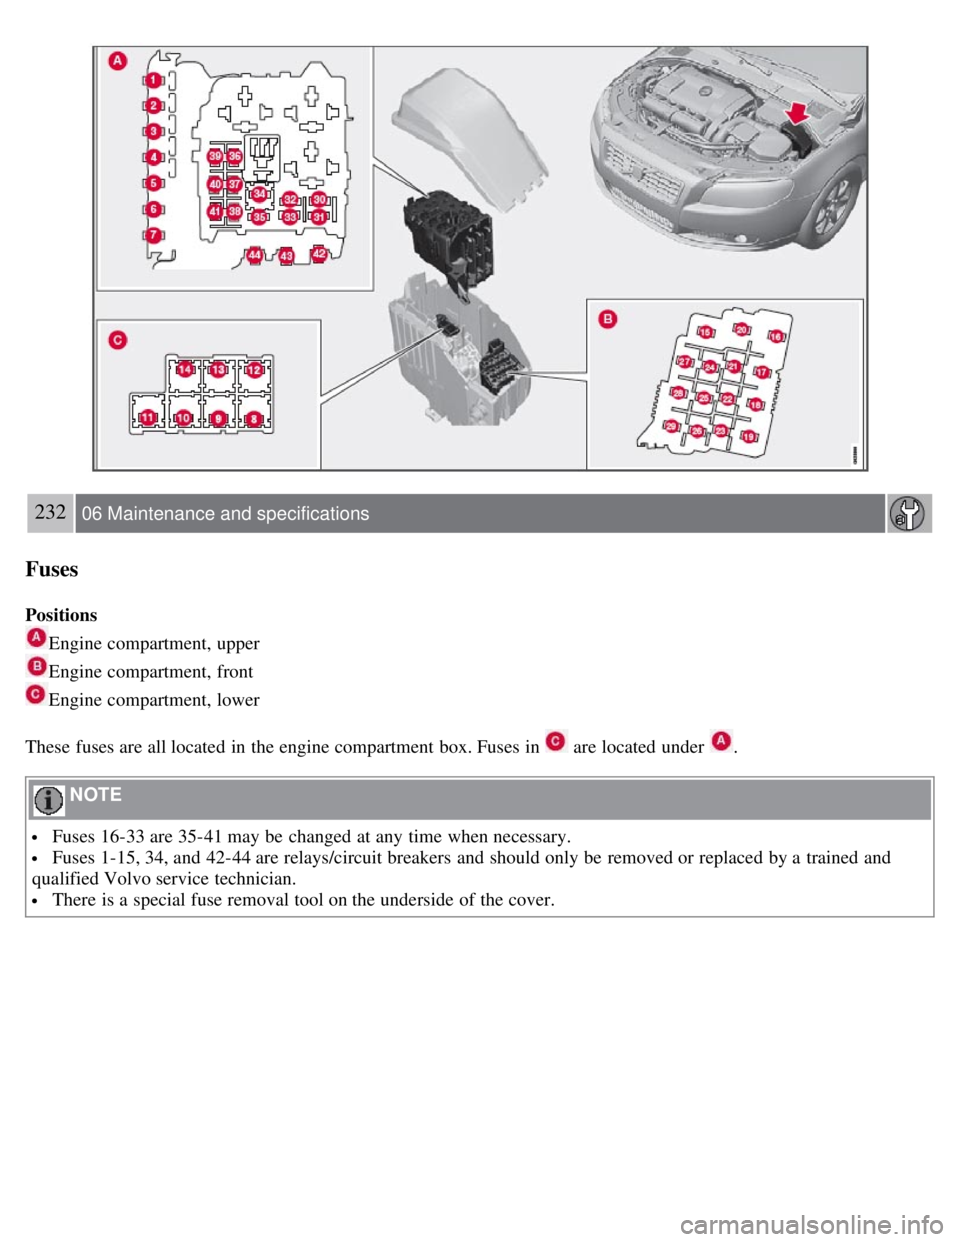
Positions
Engine compartment, upper
Engine compartment, front
Engine compartment, lower
These fuses are all located in the engine compartment box. Fuses in
are located under .
NOTE
Fuses 16-33 are 35-41 may be changed at any time when necessary.
Fuses 1-15, 34, and 42-44 are relays/circuit breakers and should only be removed or replaced by a trained and
qualified Volvo service technician.
There is a special fuse removal tool on the underside of the cover.
Page 224 of 275
233 06 Maintenance and specifications
Fuses
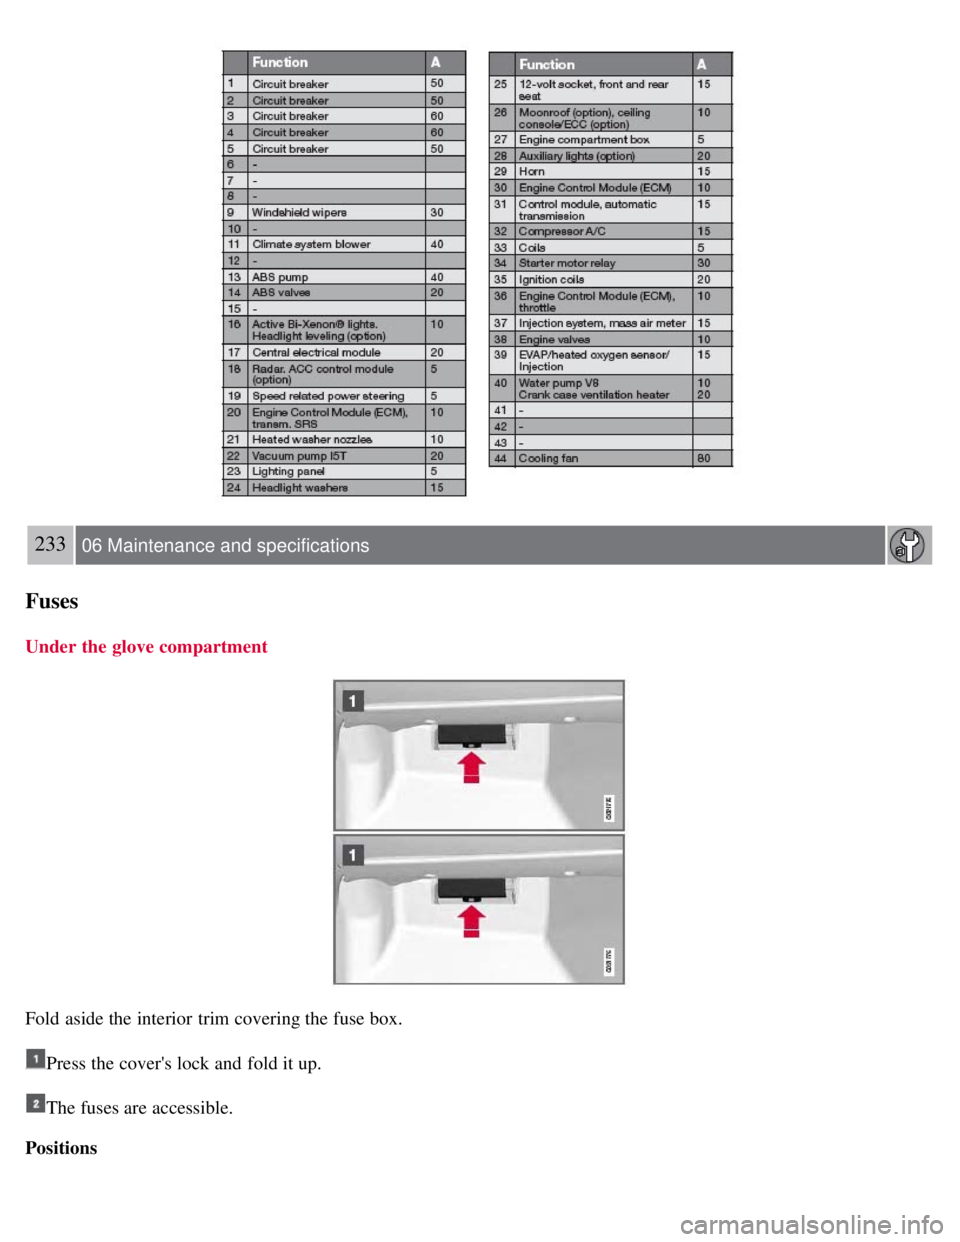
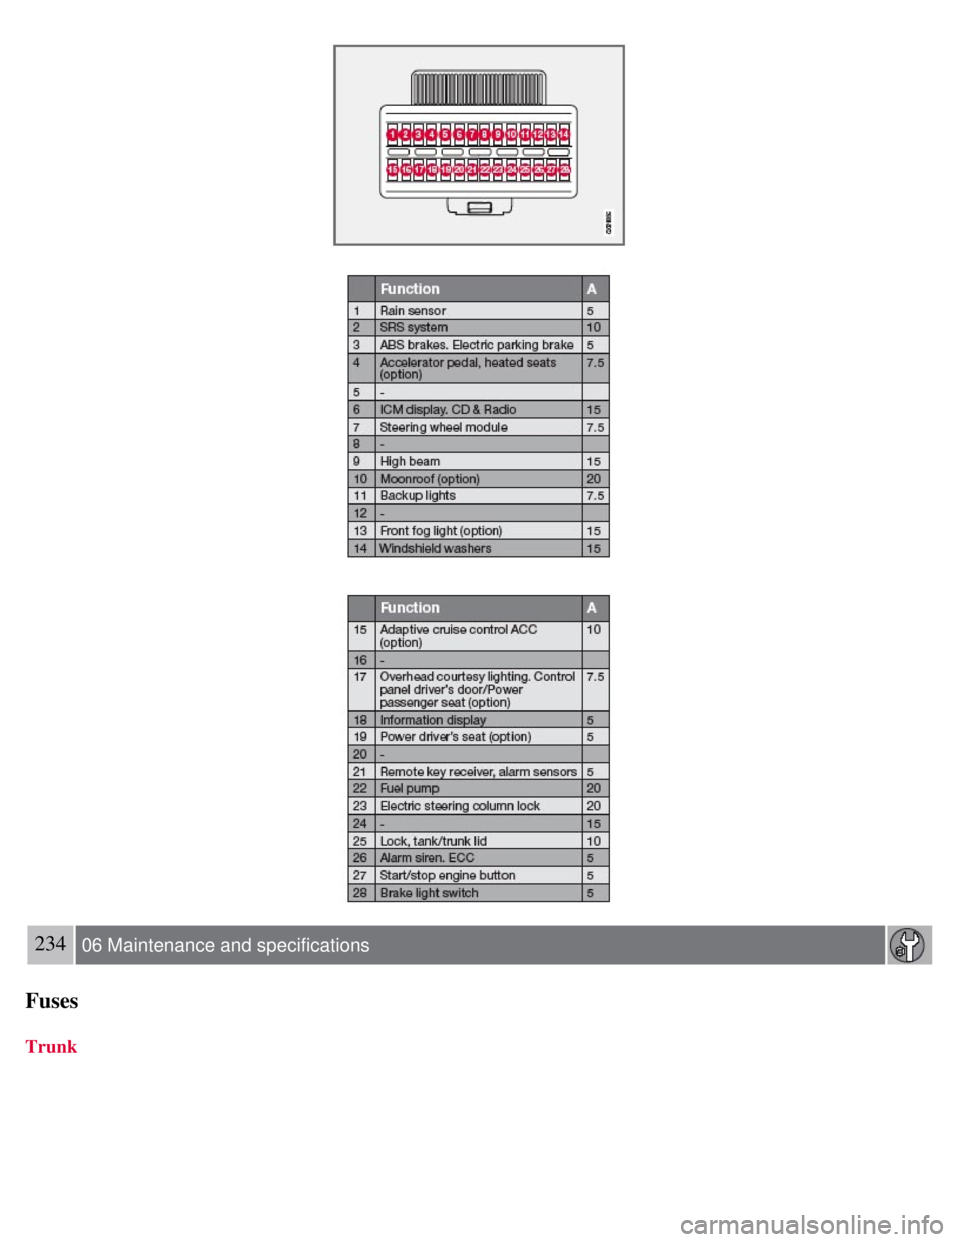
Under the glove compartment
Fold aside the interior trim covering the fuse box.
Press the cover's lock and fold it up.
The fuses are accessible.
Positions
Page 225 of 275
234 06 Maintenance and specifications
Fuses
Trunk
Page 226 of 275
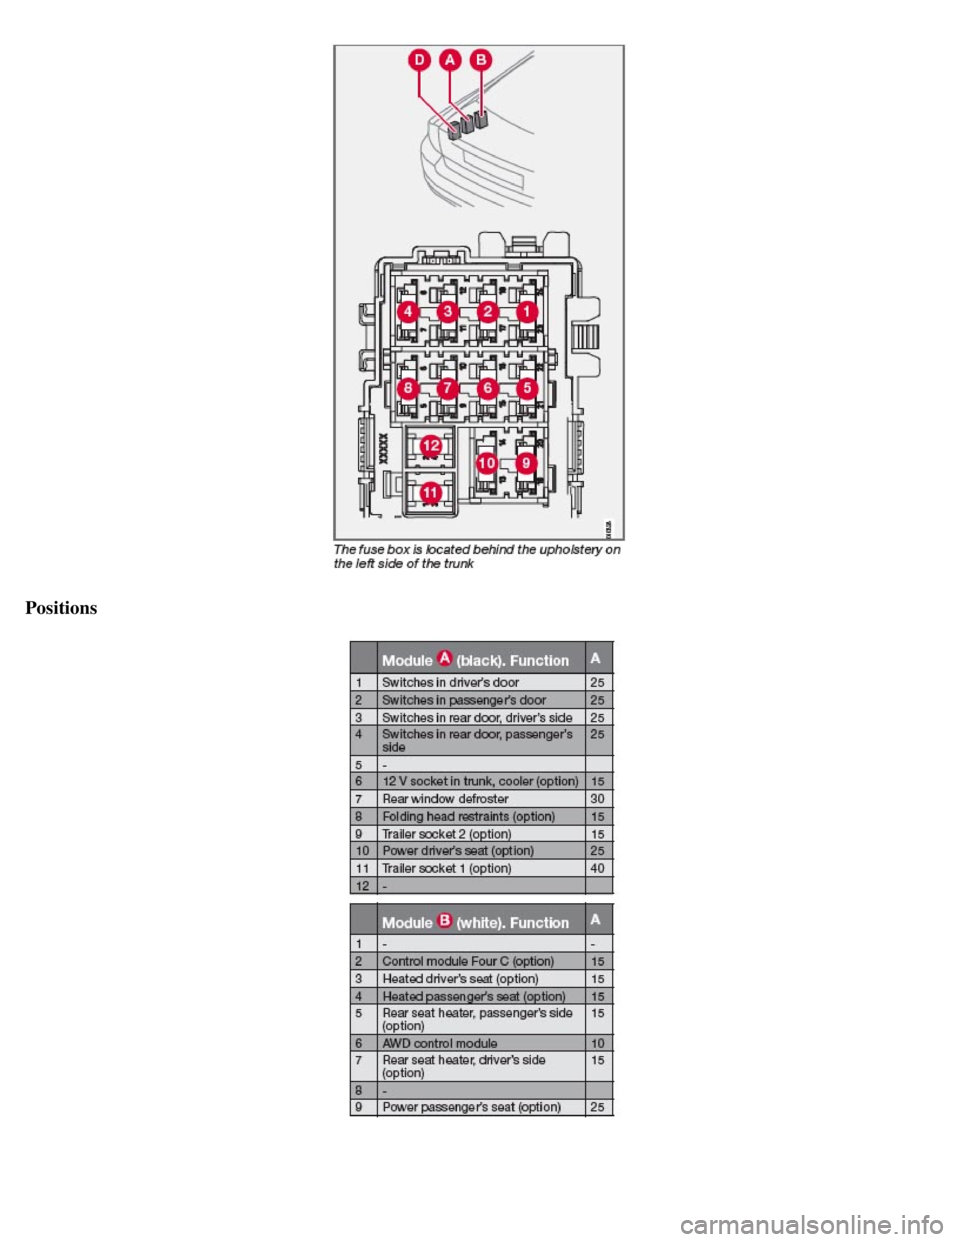
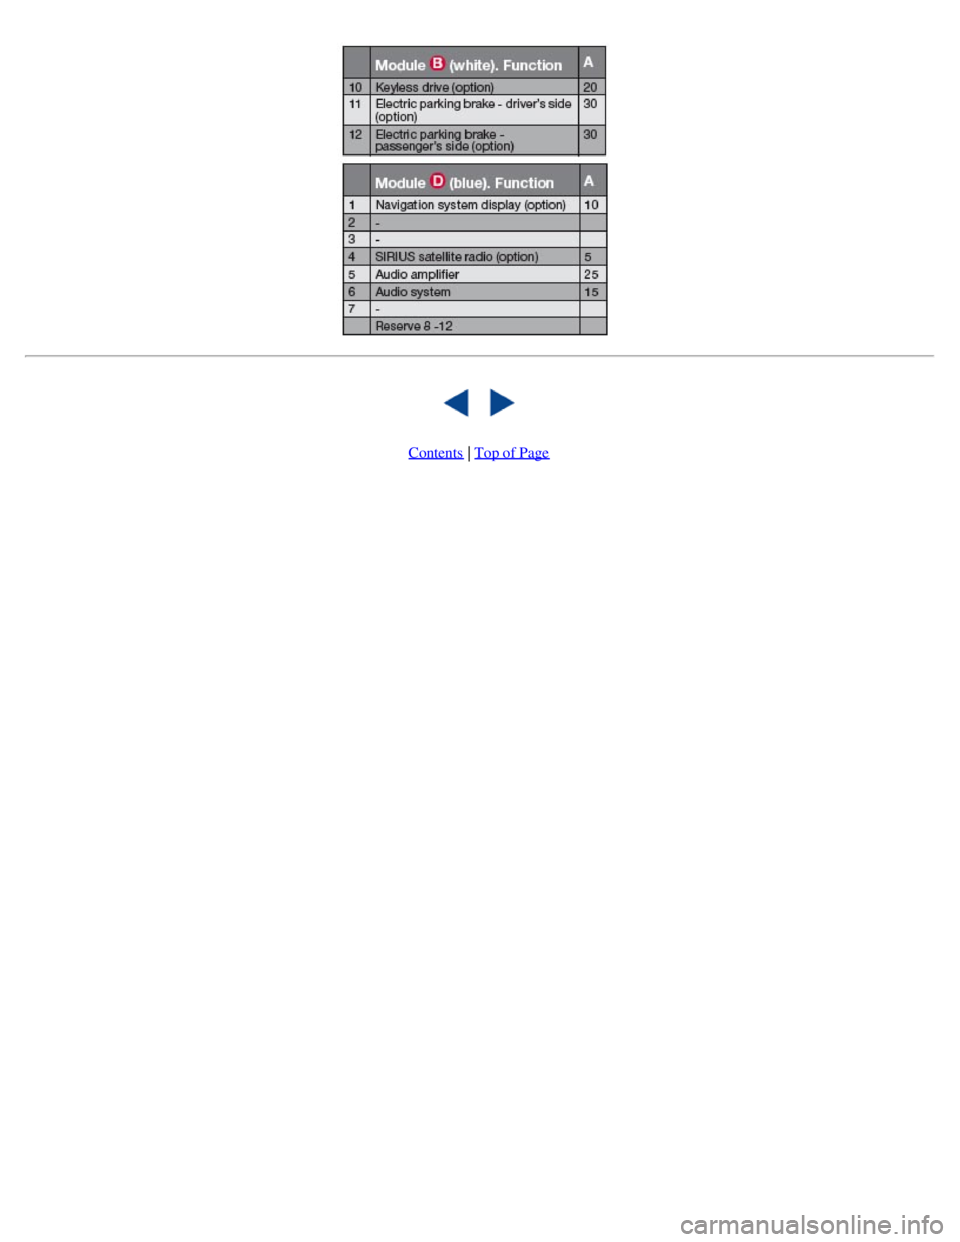
Positions
Page 227 of 275
Contents | Top of Page
Page 228 of 275
2 0 0 8
VOLVO S80
235 06 Maintenance and specifications
Wheels and tires
Introduction
Your vehicle is equipped with tires according to the vehicle's tire information placard on the B-pillar (the structural
member at the side of the vehicle, at the rear of the driver's door opening).
The tires have good road holding characteristics and offer good handling on dry and wet surfaces. It should be noted
however that the tires have been developed to give these features on snow/ice-free surfaces.
Certain models are equipped with "all-season" tires, which provide a somewhat higher degree of road holding on
slippery surfaces than tires without the "all-season" rating. However, for optimum road holding on icy or snow-
covered roads, we recommend suitable winter tires on all four wheels.
When replacing tires, be sure that the new tires are the same size designation, type (radial) and preferably from the
same manufacturer, on all four wheels. Otherwise there is a risk of altering the car's roadholding and handling
characteristics.
Storing wheels and tires
When storing complete wheels (tires mounted on rims), they should be suspended off the floor or placed on their sides
on the floor.
Tires not mounted on rims should be stored on their sides or standing upright, but should not be suspended.
CAUTION
Tires should preferably be stored in a cool, dry, dark place, and should never be stored in close proximity to
solvents, gasoline, oils, etc.
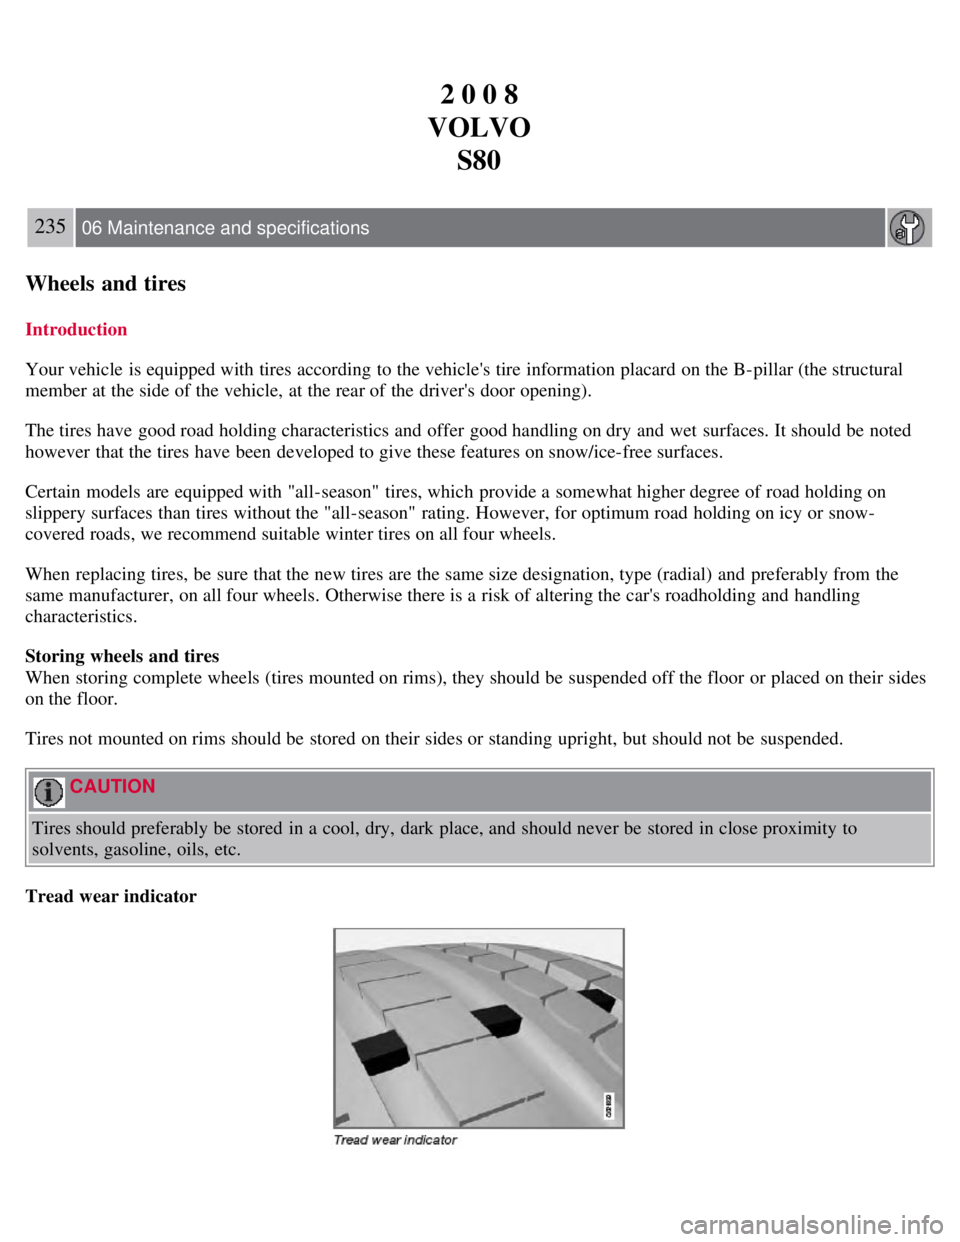
Tread wear indicator
Page 229 of 275
The tires have wear indicator strips running across or parallel to the tread. The letters TWI are printed on the side of
the tire. When approximately 1/16" (1.6 mm) is left on the tread, these strips become visible and indicate that the tire
should be replaced. Tires with less than 1/16" (1.6 mm) tread offer very poor traction.
When replacing worn tires, it is recommended that the tire be identical in type (radial) and size as the one being
replaced. Using a tire of the same make (manufacturer) will prevent alteration of the driving characteristics of the
vehicle.
WARNING
The wheel and tire sizes for your Volvo are specified to meet stringent stability and handling requirements.
Unapproved wheel/tire size combinations can negatively affect your vehicle's stability and handling. Approved tire
sizes are shown in the Tire inflation pressure tables beginning on page 240
.
Any damage caused by installation of unapproved wheel/tire size combinations will not be covered by your new
vehicle warranty. Volvo assumes no responsibility for death, injury, or expenses that may result from such
installations.
236 06 Maintenance and specifications
Wheels and tires
New tires
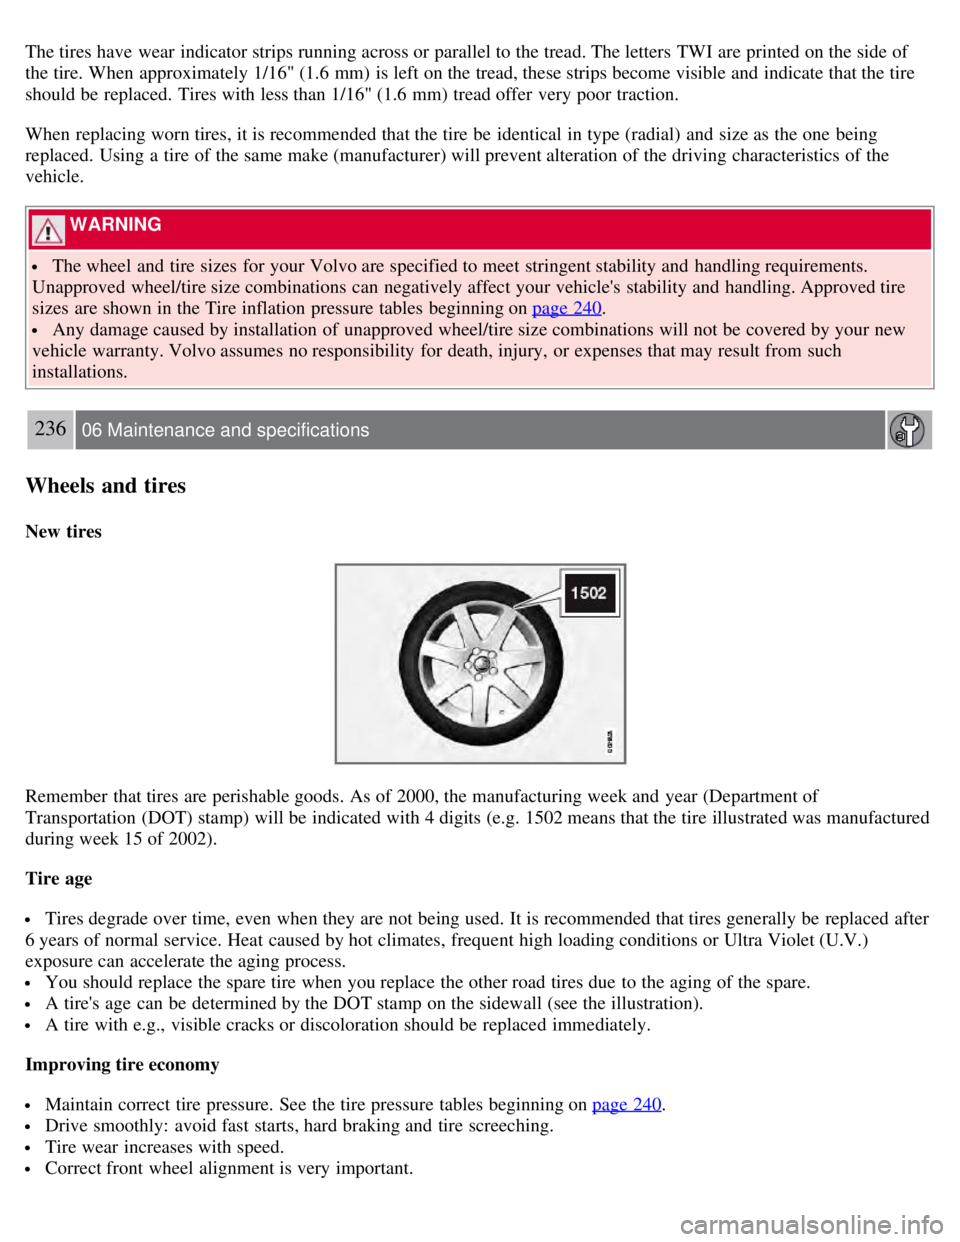
Remember that tires are perishable goods. As of 2000, the manufacturing week and year (Department of
Transportation (DOT) stamp) will be indicated with 4 digits (e.g. 1502 means that the tire illustrated was manufactured
during week 15 of 2002).
Tire age
Tires degrade over time, even when they are not being used. It is recommended that tires generally be replaced after
6 years of normal service. Heat caused by hot climates, frequent high loading conditions or Ultra Violet (U.V.)
exposure can accelerate the aging process.
You should replace the spare tire when you replace the other road tires due to the aging of the spare.
A tire's age can be determined by the DOT stamp on the sidewall (see the illustration).
A tire with e.g., visible cracks or discoloration should be replaced immediately.
Improving tire economy
Maintain correct tire pressure. See the tire pressure tables beginning on page 240.
Drive smoothly: avoid fast starts, hard braking and tire screeching.
Tire wear increases with speed.
Correct front wheel alignment is very important.
Page 230 of 275
Unbalanced wheels impair tire economy and driving comfort.
Tires must maintain the same direction of rotation throughout their lifetime.
When replacing tires, the tires with the most tread should be mounted on the rear wheels to reduce the chance of
oversteer during hard braking.
Hitting curbs or potholes can damage the tires and/or wheels permanently.
237 06 Maintenance and specifications
Wheels and tires
Tire inflation
Tire inflation
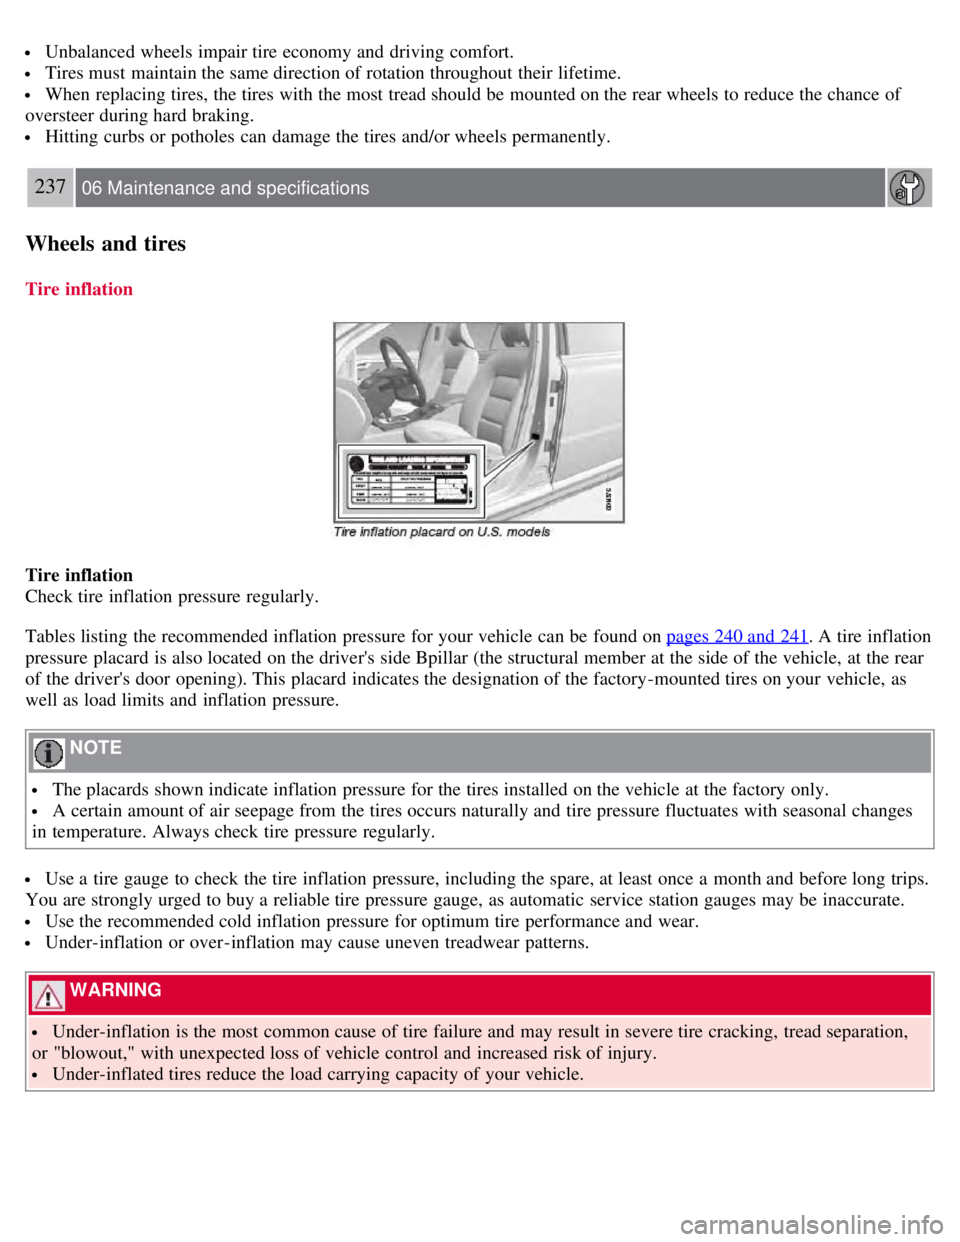
Check tire inflation pressure regularly.
Tables listing the recommended inflation pressure for your vehicle can be found on pages 240 and 241
. A tire inflation
pressure placard is also located on the driver's side Bpillar (the structural member at the side of the vehicle, at the rear
of the driver's door opening). This placard indicates the designation of the factory-mounted tires on your vehicle, as
well as load limits and inflation pressure.
NOTE
The placards shown indicate inflation pressure for the tires installed on the vehicle at the factory only.
A certain amount of air seepage from the tires occurs naturally and tire pressure fluctuates with seasonal changes
in temperature. Always check tire pressure regularly.
Use a tire gauge to check the tire inflation pressure, including the spare, at least once a month and before long trips.
You are strongly urged to buy a reliable tire pressure gauge, as automatic service station gauges may be inaccurate.
Use the recommended cold inflation pressure for optimum tire performance and wear.
Under-inflation or over-inflation may cause uneven treadwear patterns.
WARNING
Under-inflation is the most common cause of tire failure and may result in severe tire cracking, tread separation,
or "blowout," with unexpected loss of vehicle control and increased risk of injury.
Under-inflated tires reduce the load carrying capacity of your vehicle.