USB VOLVO S90 2020 Quick Guide
[x] Cancel search | Manufacturer: VOLVO, Model Year: 2020, Model line: S90, Model: VOLVO S90 2020Pages: 643, PDF Size: 13.68 MB
Page 464 of 643
AUDIO, MEDIA AND INTERNET
* Option/accessory.
462
Connecting a device via Bluetooth ®
Connect a Bluetooth ®
device to the vehicle to
wirelessly play media and give the vehicle an Internet connection if it is available.
Many cellular phones on the market currently offer wireless Bluetooth ®
technology, but not
all phones are fully compatible with the vehi- cle. The procedure for connecting a media device is the same as for connecting a cellular phone to the vehicle via Bluetooth ®
.
Related information
Streaming media via Bluetooth ®
(p. 461)
Connecting a phone to the car via Blue- tooth for the first time (p. 472)
Playing media (p. 456)
Playing media via the USB port
External audio sources, such as an iPod ® or
MP3 player, can be connected to the audio system via the vehicle's USB port.
Devices with rechargeable batteries can be charged when they are connected via the USBport and the ignition is in mode I, II or the
engine is running. The content on the external source can be read faster if it only contains data of a compat-ible format. Video files can also be played viathe USB port. Some MP3 players have their own file system that the vehicle has support for.
Related information
Connecting a device via the USB port(p. 462)
Playing media (p. 456)
Video (p. 460)
Ignition modes (p. 381)
Technical specifications for USB devices(p. 463)
Apple ®
CarPlay ®
* (p. 464)
Android Auto
* (p. 468)
Connecting a device via the USB port
External audio sources, such as an iPod ®
or
MP3 player, can be connected to the audio system via any of the vehicle's USB ports.
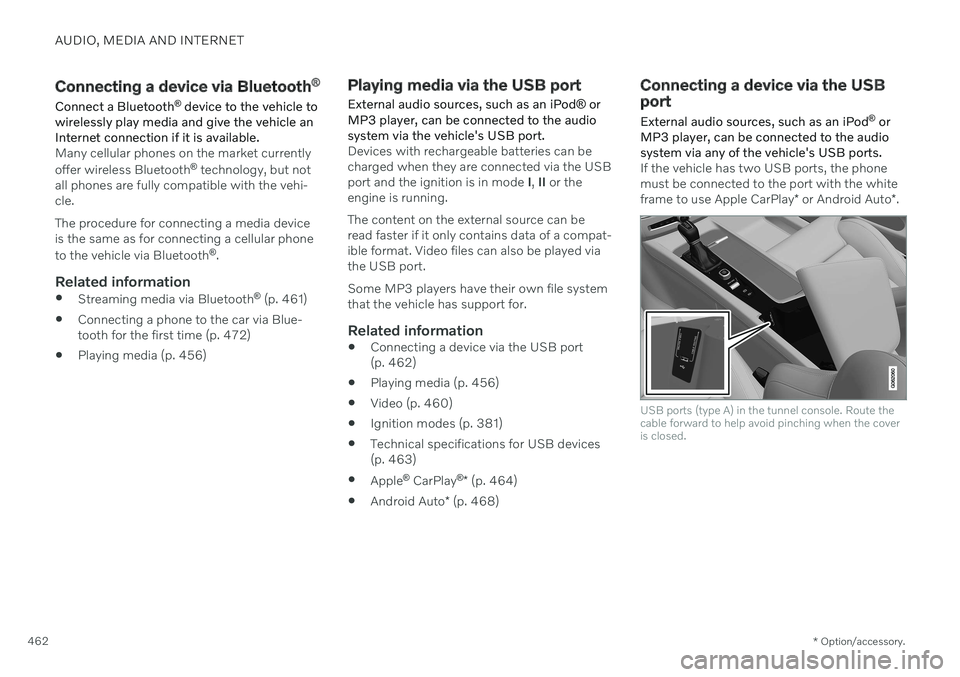
If the vehicle has two USB ports, the phone must be connected to the port with the white frame to use Apple CarPlay * or Android Auto *.
USB ports (type A) in the tunnel console. Route the cable forward to help avoid pinching when the coveris closed.
Page 465 of 643
AUDIO, MEDIA AND INTERNET
}}
* Option/accessory.463
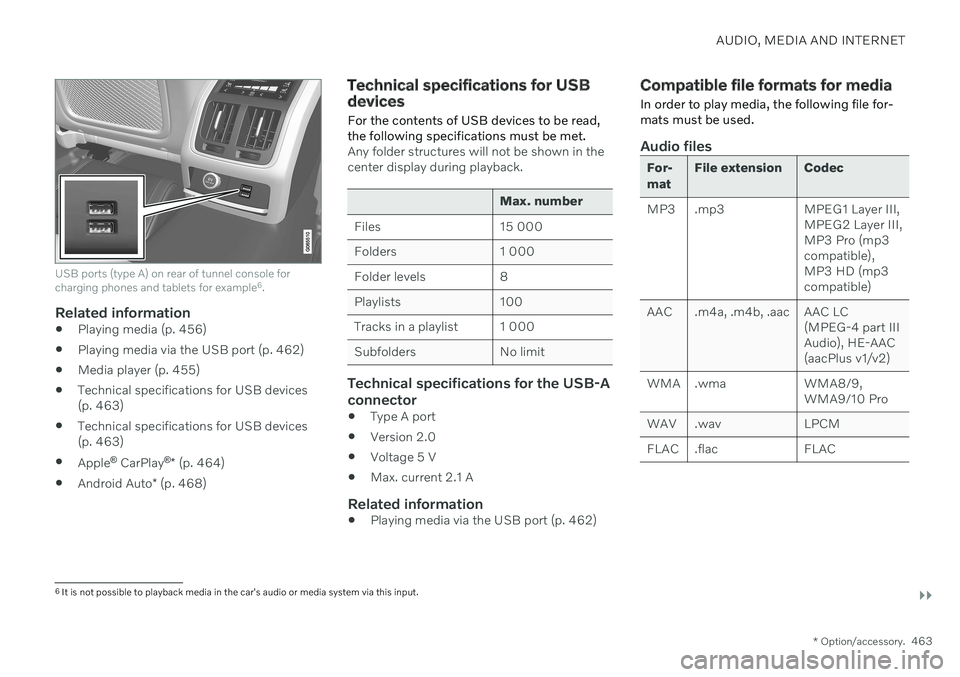
USB ports (type A) on rear of tunnel console for charging phones and tablets for example 6
.
Related information
Playing media (p. 456)
Playing media via the USB port (p. 462)
Media player (p. 455)
Technical specifications for USB devices (p. 463)
Technical specifications for USB devices(p. 463)
Apple ®
CarPlay ®
* (p. 464)
Android Auto
* (p. 468)
Technical specifications for USB devices
For the contents of USB devices to be read, the following specifications must be met.
Any folder structures will not be shown in the center display during playback.
Max. number
Files 15 000
Folders 1 000
Folder levels 8
Playlists 100
Tracks in a playlist 1 000
Subfolders No limit
Technical specifications for the USB-A connector
Type A port
Version 2.0
Voltage 5 V
Max. current 2.1 A
Related information
Playing media via the USB port (p. 462)
Compatible file formats for media
In order to play media, the following file for- mats must be used.
Audio files
For- mat File extension Codec
MP3 .mp3 MPEG1 Layer III, MPEG2 Layer III, MP3 Pro (mp3compatible),MP3 HD (mp3compatible)
AAC .m4a, .m4b, .aac AAC LC (MPEG-4 part IIIAudio), HE-AAC(aacPlus v1/v2)
WMA .wma WMA8/9, WMA9/10 Pro
WAV .wav LPCM
FLAC .flac FLAC
6 It is not possible to playback media in the car's audio or media system via this input.
Page 468 of 643
||
AUDIO, MEDIA AND INTERNET
* Option/accessory.
466
Starting CarPlay
To start CarPlay from an iOS device that has previously been connected:
1. Connect an iOS device to the USB port. If
there are two USB ports, use the one with the white frame. >If the auto start setting is selected –
the name of the device will be dis- played. The CarPlay tile will open auto-matically when Home view is displayedwhen the iOS device is connected.
2. If the CarPlay tile does not open automati- cally, tap the name of the device. TheCarPlay tile will open and compatible appswill be displayed.
3. If any other app is active in the same tile, tap
Apple CarPlay in App view.
> The CarPlay tile will open and compati- ble apps will be displayed.
4. Tap the desired app. > The app will start up.
CarPlay will run in the background if another app is started, or is already active when thedevice is connected, in the same view. To dis-play CarPlay in the tile, tap the CarPlay icon inApp view.
Switching connection between CarPlay and iPod
CarPlay to iPod
1.
Tap Settings in the Top view.
2. Proceed to
CommunicationApple
CarPlay.
3. Uncheck the box for the iOS device that should no longer start CarPlay automati- cally when the USB cable is connected.
4. Remove and then reinsert the iOS device into the USB port.
5. Open the
iPod app from App view.
iPod to CarPlay
1.
Tap Apple CarPlay in App view.
2. Read the information in the pop-up win- dow and then tap
OK.
3. Remove and then reinsert the iOS device into the USB port.
> The Apple CarPlay tile will open and
compatible apps will be displayed 8
.
Related information
Connecting a device via the USB port (p. 462)
Apple ®
CarPlay ®
* (p. 464)
Settings for Apple ®
CarPlay ®
* (p. 467)
Connecting the vehicle to the Internet viaa phone (Wi-Fi) (p. 481)
Connecting the vehicle to the Internet viavehicle modem (SIM card) (p. 482)
Voice Control (p. 142)
8
Apple, CarPlay, iPhone and iPod are registered trademarks of Apple Inc.
Page 469 of 643
AUDIO, MEDIA AND INTERNET
}}
* Option/accessory.467
Settings for Apple ®
CarPlay ®
*
Settings for an iOS device connected through CarPlay 9
.
Automatic start1. Tap Settings in the Top view.
2. Tap
CommunicationApple CarPlayand select the desired setting: Check the box - CarPlay will start auto- matically when the USB cable is con-nected.
Uncheck the box - CarPlay will not startautomatically when the USB cable isconnected.
A maximum of 20 iOS devices can be storedin the list, which may be worth noting if manypeople share the vehicle, e.g. in a car pool.When the list is full and a new device is con-nected, the oldest one will be deleted. To delete the list, the settings must be rest in the center display (factory reset).
System Volumes1. Tap Settings in the Top view. 2. Tap
SoundSystem Volumes to
change the settings for the following:
Voice Control
Navi Voice Guidance
Phone Ringtone
Related information
Apple ®
CarPlay ®
* (p. 464)
Using Apple ®
CarPlay ®
* (p. 465)
Resetting center display settings (p. 131)
Tips for using Apple ®
CarPlay ®
*
Here are some useful tips for when you use CarPlay ®
.
Update your iOS device with the latest version of the iOS operating system andensure that the apps have been updated.
In the event of a problem with CarPlay,unplug the iOS device from the USB portand then plug it in again. Otherwise, try toclose the app on the device that is not working and then restart the app, or try closing all apps and restart your device.
If the apps do not appear when CarPlaystarts (black screen), try minimizing andexpanding the tile for CarPlay.
Using apps that are not compatible withCarPlay may sometimes cause the con-nection between the iOS device and thevehicle to be broken. Information aboutsupported apps and compatible devicescan be found on Apple's website. You canalso search for CarPlay in the App Store tofind information about apps that are com-patible with CarPlay in your market.
You can use Siri to write or dictate mes-sages or have them read aloud. Messagesare read aloud and dictated in the lan-guage selected in the Siri settings. Whenyou write/dictate messages, no text willbe shown in the vehicle's center display,
9
Apple and CarPlay are registered trademarks of Apple Inc.
Page 471 of 643
AUDIO, MEDIA AND INTERNET
* Option/accessory.469
Related information
Using Android Auto
* (p. 469)
Settings for Android Auto
* (p. 470)
Using Android Auto *
To use the
Android Auto app, the app must
be installed on the Android device and the device must be connected to the vehicle'sUSB port.
NOTE
For installation of Android Auto to be pos- sible, the vehicle must be equipped with two USB ports (USB hub) *. If the car only
has one USB port then it is not possible to use Android Auto.
Connecting an Android device for the first
time
1. Connect the Android device to the USB port with the white frame.
2. Read the information in the pop-up win- dow and then tap
OK.
3. Tap
Android Auto in App view.
4. Read the terms and conditions and then tap
Accept to connect.
> The Android Auto tile will open and compatible apps will be displayed.
5. Tap the desired app. > The app will start up.
From a previously connected Android
device
1. Connect the device to the USB port with the white frame. >If the auto start setting is selected -
the name of the device will be dis- played.
2. Tap the name of the device – the Android Auto tile will open and compatibleapps will be displayed.
3. If the automatic start setting is not acti- vated - open the
Android Auto app from
App view.
> The Android Auto tile will open and compatible apps will be displayed.
4. Tap the desired app. > The app will start up.
Android Auto will run in the background if another app is started in the same tile. To dis-play Android Auto in the tile, tap theAndroid Auto icon in App view.
Related information
Android Auto
* (p. 468)
Settings for Android Auto
* (p. 470)
Connecting a device via the USB port(p. 462)
Voice Control (p. 142)
Page 472 of 643
AUDIO, MEDIA AND INTERNET
* Option/accessory.
470
Settings for Android Auto *
Settings for Android devices initially con- nected with Android Auto.
Automatic start1. Tap Settings in the Top view.
2. Tap
CommunicationAndroid Autoand select setting: Check the box - Android Auto will start automatically when the USB cable isconnected.
Uncheck the box - Android Auto will notstart automatically when the USB cableis connected.
A maximum of 20 Android devices can bestored in the list. When the list is full and anew device is connected, the oldest one willbe deleted. A factory reset must be performed to delete the list.
System Volumes1. Tap Settings in the Top view.
2. Tap
SoundSystem Volumes to
change the settings for the following:
Voice Control
Navi Voice Guidance
Phone Ringtone
Related information
Android Auto
* (p. 468)
Using Android Auto
* (p. 469)
Resetting center display settings (p. 131)
Tips for using Android Auto
*
Here are some useful tips for when you use Android Auto.
Ensure that your apps are updated.
When starting the vehicle, wait until the center display has started, connect thedevice and then open Android Auto fromthe app view.
In the event of problems with AndroidAuto, unplug your Android device from theUSB port and then plug it in again. Other-wise, try closing the app on the device andthen restarting the app.
When a device is connected to AndroidAuto it is still possible to play media viaBluetooth to another media player. TheBluetooth function is on when AndroidAuto is used.
If the Android Auto icon is grayed out, itmeans that a device is no longer con-nected. When you connect your device,the icon will light up. If there is no icon atall, the vehicle does not support connect-ing a device for this purpose.
If the device is connected to the vehiclethrough Bluetooth, the connection will bebroken when Android Auto is used.Resume Internet connection in the vehicle
Page 534 of 643
LOADING, STORAGE AND PASSENGER COMPARTMENT
* Option/accessory.
532
Passenger compartment interior
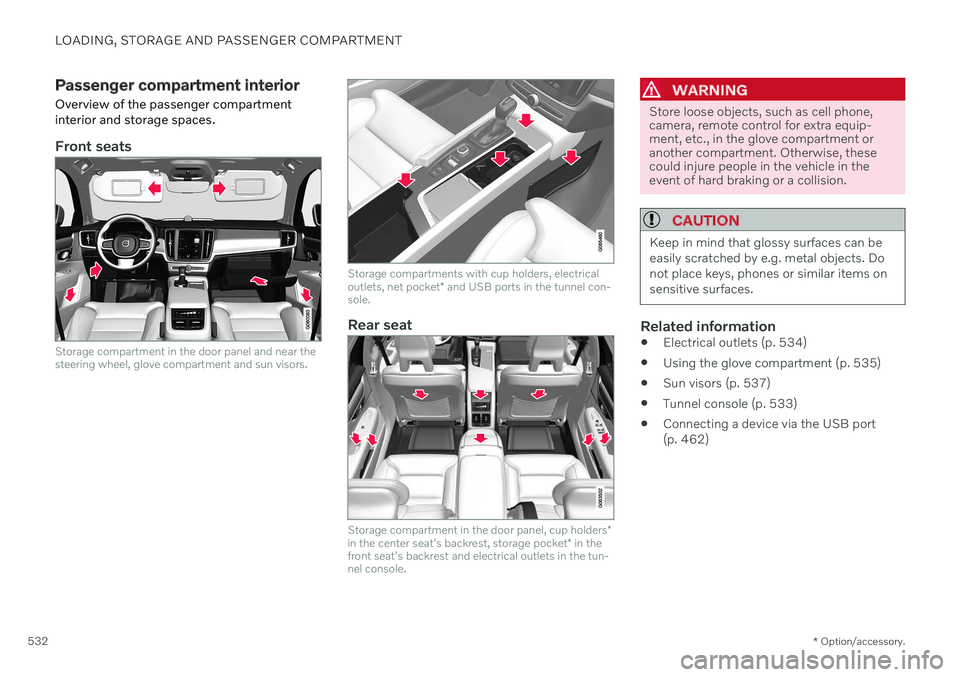
Overview of the passenger compartment interior and storage spaces.
Front seats
Storage compartment in the door panel and near the steering wheel, glove compartment and sun visors.
Storage compartments with cup holders, electrical outlets, net pocket * and USB ports in the tunnel con-
sole.
Rear seat
Storage compartment in the door panel, cup holders *
in the center seat's backrest, storage pocket * in the
front seat's backrest and electrical outlets in the tun- nel console.
WARNING
Store loose objects, such as cell phone, camera, remote control for extra equip-ment, etc., in the glove compartment oranother compartment. Otherwise, thesecould injure people in the vehicle in theevent of hard braking or a collision.
CAUTION
Keep in mind that glossy surfaces can be easily scratched by e.g. metal objects. Donot place keys, phones or similar items onsensitive surfaces.
Related information
Electrical outlets (p. 534)
Using the glove compartment (p. 535)
Sun visors (p. 537)
Tunnel console (p. 533)
Connecting a device via the USB port (p. 462)
Page 535 of 643
LOADING, STORAGE AND PASSENGER COMPARTMENT
* Option/accessory.533
Tunnel console
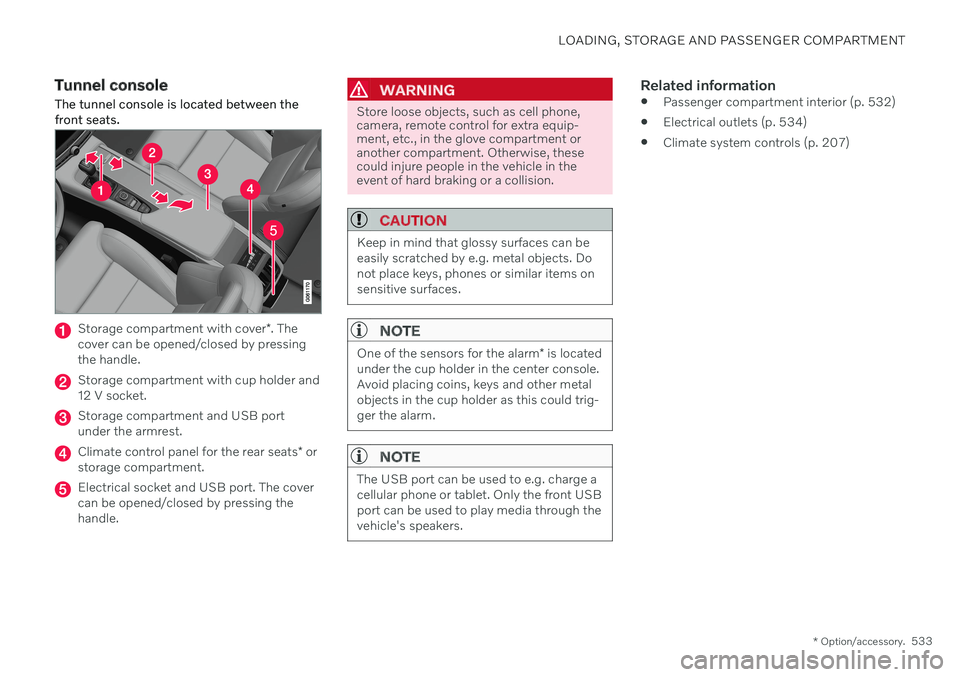
The tunnel console is located between the front seats.
Storage compartment with cover *. The
cover can be opened/closed by pressing the handle.
Storage compartment with cup holder and 12 V socket.
Storage compartment and USB port under the armrest.
Climate control panel for the rear seats * or
storage compartment.
Electrical socket and USB port. The cover can be opened/closed by pressing thehandle.
WARNING
Store loose objects, such as cell phone, camera, remote control for extra equip-ment, etc., in the glove compartment oranother compartment. Otherwise, thesecould injure people in the vehicle in theevent of hard braking or a collision.
CAUTION
Keep in mind that glossy surfaces can be easily scratched by e.g. metal objects. Donot place keys, phones or similar items onsensitive surfaces.
NOTE
One of the sensors for the alarm * is located
under the cup holder in the center console. Avoid placing coins, keys and other metalobjects in the cup holder as this could trig-ger the alarm.
NOTE
The USB port can be used to e.g. charge a cellular phone or tablet. Only the front USBport can be used to play media through thevehicle's speakers.
Related information
Passenger compartment interior (p. 532)
Electrical outlets (p. 534)
Climate system controls (p. 207)
Page 579 of 643
MAINTENANCE AND SERVICE
}}
* Option/accessory.577
Function Ampere Type
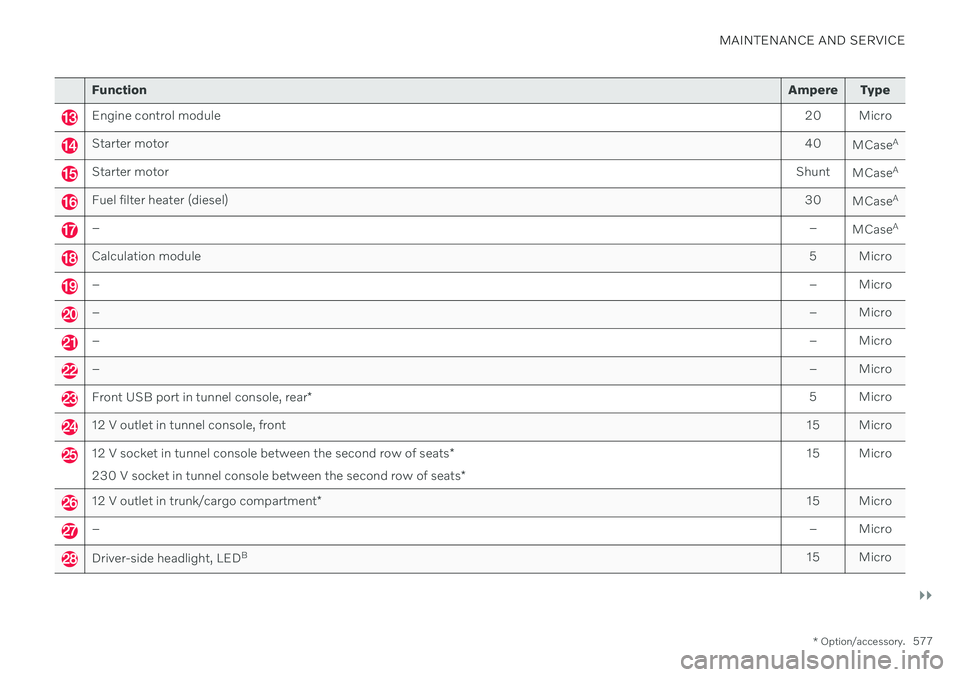
Engine control module 20 Micro
Starter motor40
MCaseA
Starter motor
Shunt
MCaseA
Fuel filter heater (diesel)
30
MCaseA
–
–
MCaseA
Calculation module
5 Micro
–– Micro
–– Micro
–– Micro
–– Micro
Front USB port in tunnel console, rear* 5 Micro
12 V outlet in tunnel console, front
15 Micro
12 V socket in tunnel console between the second row of seats*
230 V socket in tunnel console between the second row of seats *15 Micro
12 V outlet in trunk/cargo compartment
* 15 Micro
–
– Micro
Driver-side headlight, LEDB
15 Micro
Page 585 of 643
MAINTENANCE AND SERVICE
}}
* Option/accessory.583
Function Ampere Type
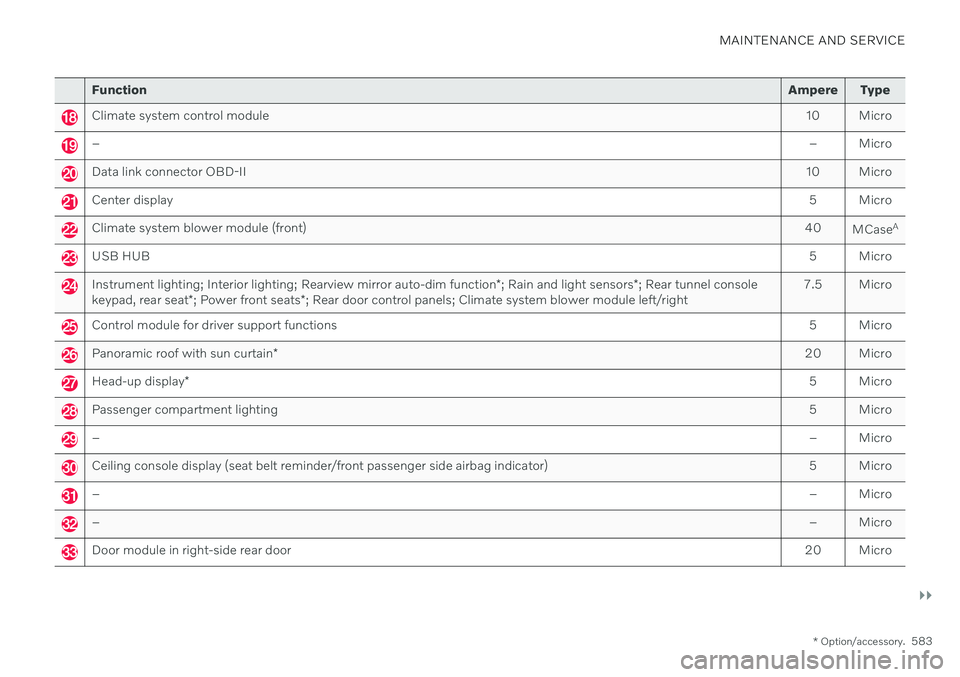
Climate system control module 10 Micro
– – Micro
Data link connector OBD-II10 Micro
Center display 5 Micro
Climate system blower module (front)40
MCaseA
USB HUB
5 Micro
Instrument lighting; Interior lighting; Rearview mirror auto-dim function*; Rain and light sensors *; Rear tunnel console
keypad, rear seat *; Power front seats *; Rear door control panels; Climate system blower module left/right 7.5 Micro
Control module for driver support functions
5 Micro
Panoramic roof with sun curtain* 20 Micro
Head-up display
* 5 Micro
Passenger compartment lighting
5 Micro
–– Micro
Ceiling console display (seat belt reminder/front passenger side airbag indicator) 5 Micro
–– Micro
–– Micro
Door module in right-side rear door20 Micro