center console VOLVO S90 2020 Quick Guide
[x] Cancel search | Manufacturer: VOLVO, Model Year: 2020, Model line: S90, Model: VOLVO S90 2020Pages: 643, PDF Size: 13.68 MB
Page 403 of 643
STARTING AND DRIVING
}}
* Option/accessory.401
Changing drive mode *
Select the drive mode that is adapted to the current driving conditions. The drive mode is changed using the control in the tunnel console.
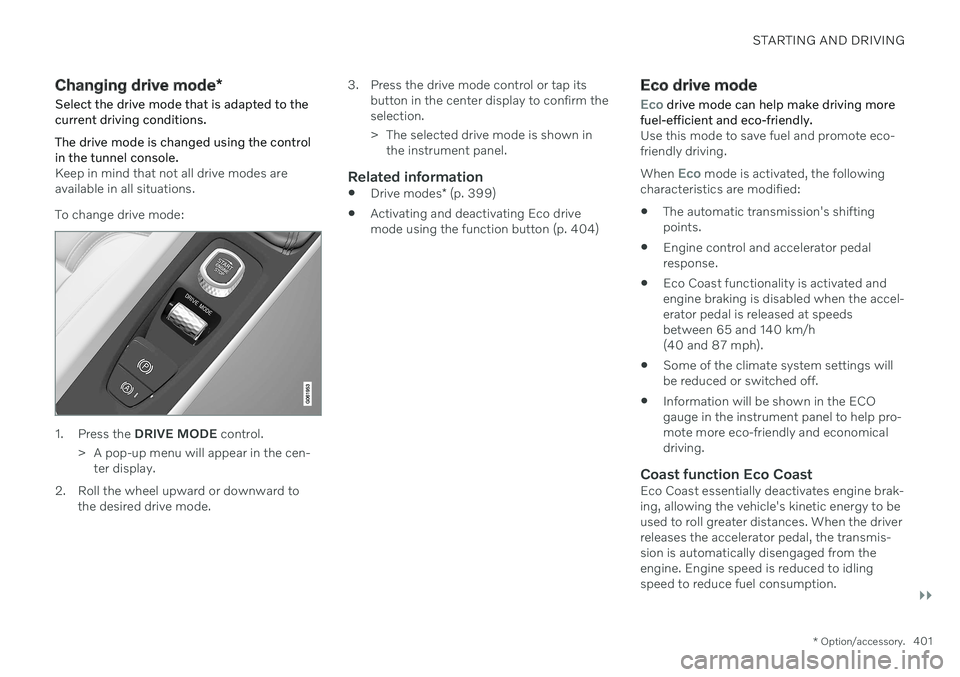
Keep in mind that not all drive modes are available in all situations. To change drive mode:
1. Press the DRIVE MODE control.
> A pop-up menu will appear in the cen- ter display.
2. Roll the wheel upward or downward to the desired drive mode. 3. Press the drive mode control or tap its
button in the center display to confirm the selection.
> The selected drive mode is shown inthe instrument panel.
Related information
Drive modes
* (p. 399)
Activating and deactivating Eco drive mode using the function button (p. 404)
Eco drive mode
Eco drive mode can help make driving more
fuel-efficient and eco-friendly.
Use this mode to save fuel and promote eco- friendly driving. When
Eco mode is activated, the following
characteristics are modified:
The automatic transmission's shifting points.
Engine control and accelerator pedalresponse.
Eco Coast functionality is activated andengine braking is disabled when the accel-erator pedal is released at speedsbetween 65 and 140 km/h(40 and 87 mph).
Some of the climate system settings willbe reduced or switched off.
Information will be shown in the ECOgauge in the instrument panel to help pro-mote more eco-friendly and economicaldriving.
Coast function Eco CoastEco Coast essentially deactivates engine brak-ing, allowing the vehicle's kinetic energy to beused to roll greater distances. When the driverreleases the accelerator pedal, the transmis-sion is automatically disengaged from theengine. Engine speed is reduced to idlingspeed to reduce fuel consumption.
Page 406 of 643
STARTING AND DRIVING
* Option/accessory.
404
Activating and deactivating Eco drive mode using the functionbutton There is a function button for
Eco drive mode
in the center display's Function view if the vehicle is not equipped with a drive modecontrol in the tunnel console.
When the engine is switched off, Eco mode is
deactivated and must therefore be reactivated each time the engine is started. ECO will be
displayed in the instrument panel when thefunction is activated.
Selecting Eco drive mode in the center
display's Function view
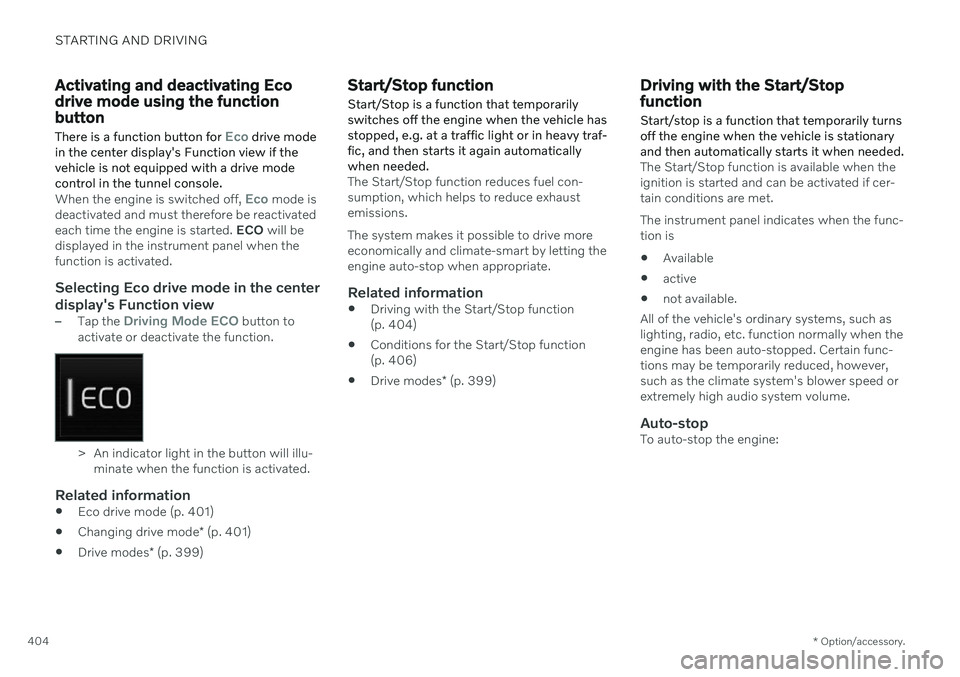
–Tap the Driving Mode ECO button to
activate or deactivate the function.
> An indicator light in the button will illu- minate when the function is activated.
Related information
Eco drive mode (p. 401)
Changing drive mode
* (p. 401)
Drive modes
* (p. 399)
Start/Stop function Start/Stop is a function that temporarily switches off the engine when the vehicle hasstopped, e.g. at a traffic light or in heavy traf-fic, and then starts it again automaticallywhen needed.
The Start/Stop function reduces fuel con- sumption, which helps to reduce exhaustemissions. The system makes it possible to drive more economically and climate-smart by letting theengine auto-stop when appropriate.
Related information
Driving with the Start/Stop function(p. 404)
Conditions for the Start/Stop function(p. 406)
Drive modes
* (p. 399)
Driving with the Start/Stop function
Start/stop is a function that temporarily turns off the engine when the vehicle is stationaryand then automatically starts it when needed.
The Start/Stop function is available when the ignition is started and can be activated if cer-tain conditions are met. The instrument panel indicates when the func- tion is
Available
active
not available.
All of the vehicle's ordinary systems, such aslighting, radio, etc. function normally when theengine has been auto-stopped. Certain func-tions may be temporarily reduced, however,such as the climate system's blower speed orextremely high audio system volume.
Auto-stopTo auto-stop the engine:
Page 450 of 643
||
AUDIO, MEDIA AND INTERNET
* Option/accessory.
448
Categories/Genres
Tap to display the categories available. Tap a category or genre name to display the chan-nels that it contains and then tap a channel tolisten. If you have activated alerts (see the “Alerts” section below) and an alert is activated for anartist, song or team, temporary virtual catego-ries will also be created and displayed. Thechannels currently broadcasting the song,artist or broadcasting a program with theselected team will be listed in a virtual cate-gory.
EPG (Electronic Program Guide)On the center display's Home view, tap EPGfor information about e.g., when a program is being broadcast and its name, description,artist, etc. If no information is currently availa- ble,
No information will be displayed.
AlertsIf this feature has been selected underSiriusXM Settings, the Alerts button will be
displayed on the Home view. To add e.g. an artist's name, song title or a sports team to the list of alerts:
1. Tune to a channel that is broadcasting a song, game, etc., of your choice.
2. Tap the
Alerts button. 3. A pop-up window will be displayed show-
ing a list of alerts (nothing will be dis- played if the selected channel does notsupport the alert function).
4. Select one of the alternatives in list (only one can be selected at a time).
5. The song/artist/team will now be added to the list of alerts. Favorite sports teams canalso be added to the list using “GameAlert” in the SiriusXM satellite radio set-tings.
> When your choice is being broadcaston a channel, you will be informed by a pop-up.
iTunes taggingFrom the center display's Top view, tapSiriusXM Settings. Tap the iTunes Taggingmenu. Tap the iTunes Tagging box to acti-
vate/deactivate this function and tap Close to
return to Home view. Tap Tags List to display
a list of all tagged songs. If the function is activated, the
iTunes tagbutton will be displayed in Home view. If a song is played that you would like to buy inthe iTunes store, tap this button while the song is playing to tag it. If a song with
iTunes
Tagging information is available, the button
will be selectable. Tap the button to tag the song. If you would like to buy a tagged song via iTunes, Tap the iTunes tag button. To buy a song in iTunes, begin by connecting an iPhone/iPod/iPad to the USB port in thetunnel console. The iTunes tagging list willautomatically be transferred to the device andremoved from the list in the vehicle. If thedevice is connected when a song is tagged,the data will automatically be saved in thedevice. To purchase the song, consult theiTunes support page.
Related information
SiriusXM ®
Satellite radio * (p. 446)
Entering characters, letters and words byhand in the center display (p. 126)
Settings for SiriusXM ®
Satellite radio *
(p. 449)
Settings for SiriusXM ®
Satellite radio *
(p. 449)
Connecting a device via the USB port(p. 462)
Page 465 of 643
AUDIO, MEDIA AND INTERNET
}}
* Option/accessory.463
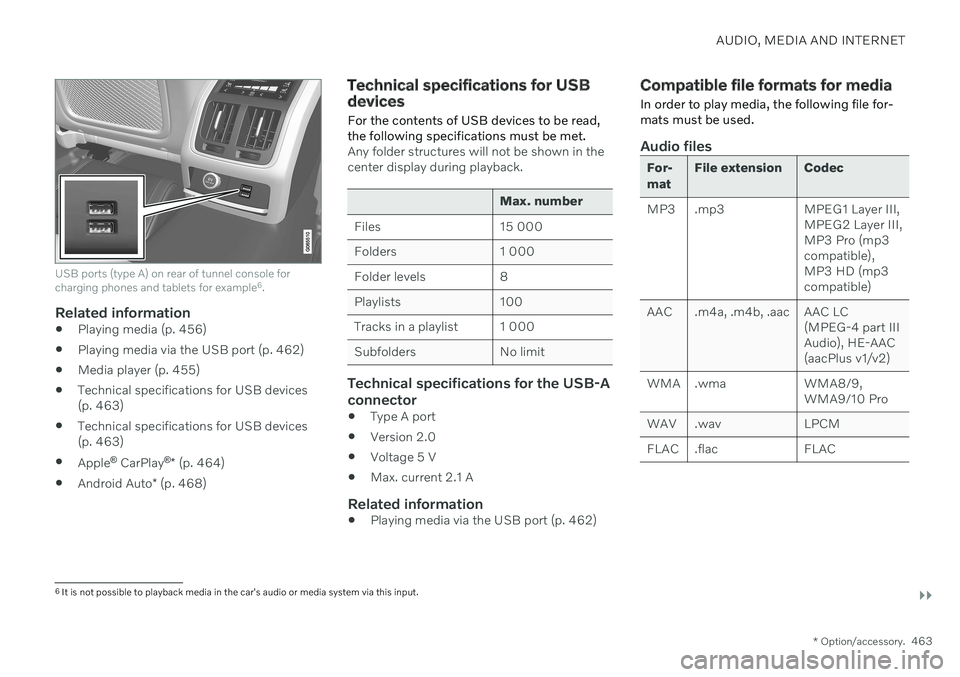
USB ports (type A) on rear of tunnel console for charging phones and tablets for example 6
.
Related information
Playing media (p. 456)
Playing media via the USB port (p. 462)
Media player (p. 455)
Technical specifications for USB devices (p. 463)
Technical specifications for USB devices(p. 463)
Apple ®
CarPlay ®
* (p. 464)
Android Auto
* (p. 468)
Technical specifications for USB devices
For the contents of USB devices to be read, the following specifications must be met.
Any folder structures will not be shown in the center display during playback.
Max. number
Files 15 000
Folders 1 000
Folder levels 8
Playlists 100
Tracks in a playlist 1 000
Subfolders No limit
Technical specifications for the USB-A connector
Type A port
Version 2.0
Voltage 5 V
Max. current 2.1 A
Related information
Playing media via the USB port (p. 462)
Compatible file formats for media
In order to play media, the following file for- mats must be used.
Audio files
For- mat File extension Codec
MP3 .mp3 MPEG1 Layer III, MPEG2 Layer III, MP3 Pro (mp3compatible),MP3 HD (mp3compatible)
AAC .m4a, .m4b, .aac AAC LC (MPEG-4 part IIIAudio), HE-AAC(aacPlus v1/v2)
WMA .wma WMA8/9, WMA9/10 Pro
WAV .wav LPCM
FLAC .flac FLAC
6 It is not possible to playback media in the car's audio or media system via this input.
Page 534 of 643
LOADING, STORAGE AND PASSENGER COMPARTMENT
* Option/accessory.
532
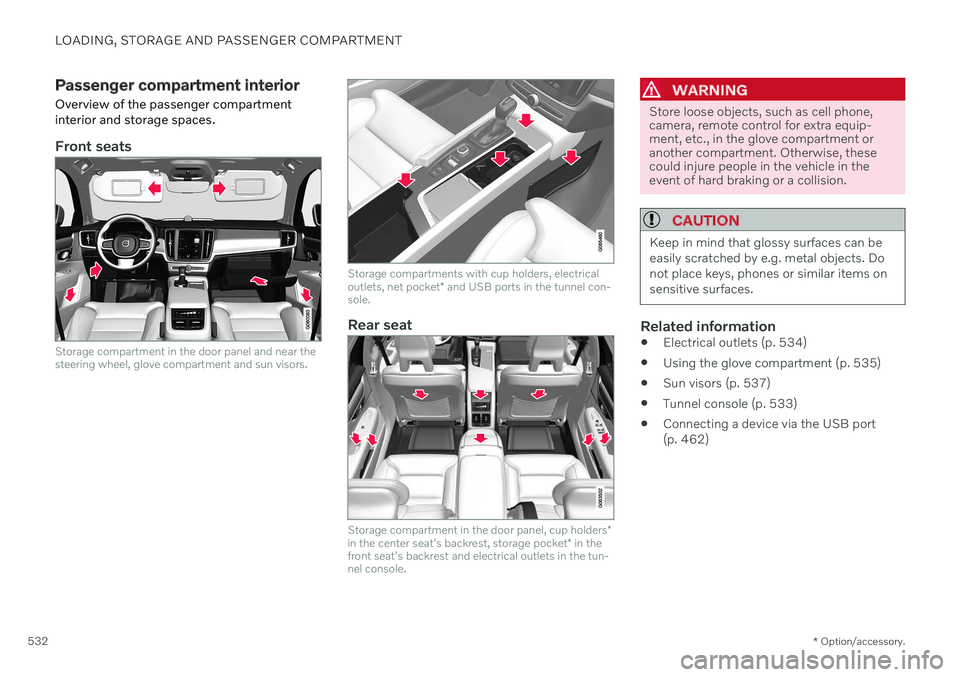
Passenger compartment interior
Overview of the passenger compartment interior and storage spaces.
Front seats
Storage compartment in the door panel and near the steering wheel, glove compartment and sun visors.
Storage compartments with cup holders, electrical outlets, net pocket * and USB ports in the tunnel con-
sole.
Rear seat
Storage compartment in the door panel, cup holders *
in the center seat's backrest, storage pocket * in the
front seat's backrest and electrical outlets in the tun- nel console.
WARNING
Store loose objects, such as cell phone, camera, remote control for extra equip-ment, etc., in the glove compartment oranother compartment. Otherwise, thesecould injure people in the vehicle in theevent of hard braking or a collision.
CAUTION
Keep in mind that glossy surfaces can be easily scratched by e.g. metal objects. Donot place keys, phones or similar items onsensitive surfaces.
Related information
Electrical outlets (p. 534)
Using the glove compartment (p. 535)
Sun visors (p. 537)
Tunnel console (p. 533)
Connecting a device via the USB port (p. 462)
Page 535 of 643
LOADING, STORAGE AND PASSENGER COMPARTMENT
* Option/accessory.533
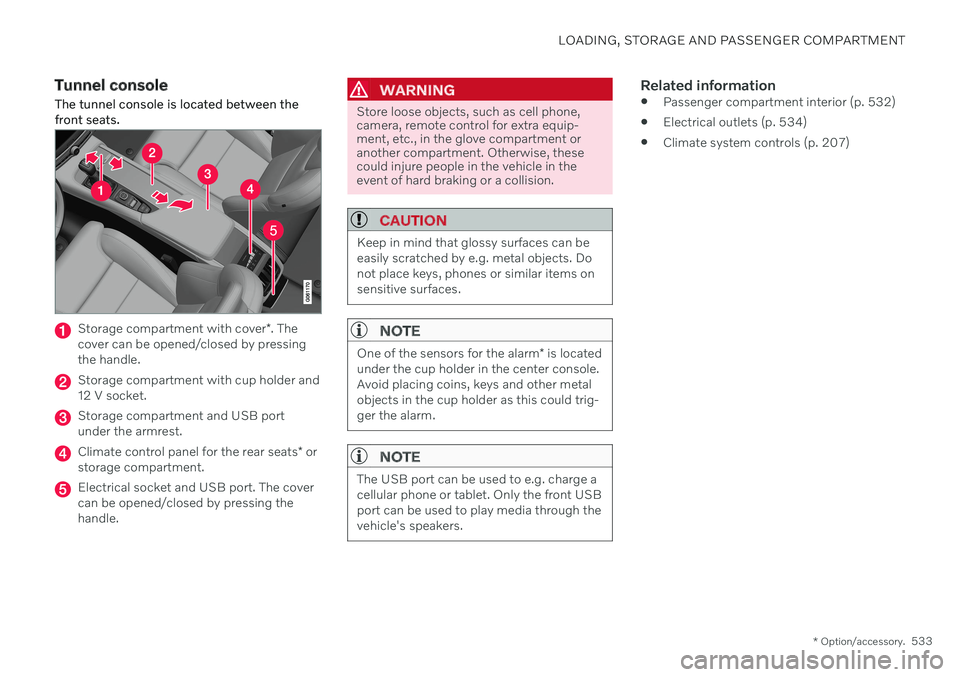
Tunnel console
The tunnel console is located between the front seats.
Storage compartment with cover *. The
cover can be opened/closed by pressing the handle.
Storage compartment with cup holder and 12 V socket.
Storage compartment and USB port under the armrest.
Climate control panel for the rear seats * or
storage compartment.
Electrical socket and USB port. The cover can be opened/closed by pressing thehandle.
WARNING
Store loose objects, such as cell phone, camera, remote control for extra equip-ment, etc., in the glove compartment oranother compartment. Otherwise, thesecould injure people in the vehicle in theevent of hard braking or a collision.
CAUTION
Keep in mind that glossy surfaces can be easily scratched by e.g. metal objects. Donot place keys, phones or similar items onsensitive surfaces.
NOTE
One of the sensors for the alarm * is located
under the cup holder in the center console. Avoid placing coins, keys and other metalobjects in the cup holder as this could trig-ger the alarm.
NOTE
The USB port can be used to e.g. charge a cellular phone or tablet. Only the front USBport can be used to play media through thevehicle's speakers.
Related information
Passenger compartment interior (p. 532)
Electrical outlets (p. 534)
Climate system controls (p. 207)
Page 584 of 643
||
MAINTENANCE AND SERVICE
* Option/accessory.
582
Function Ampere Type
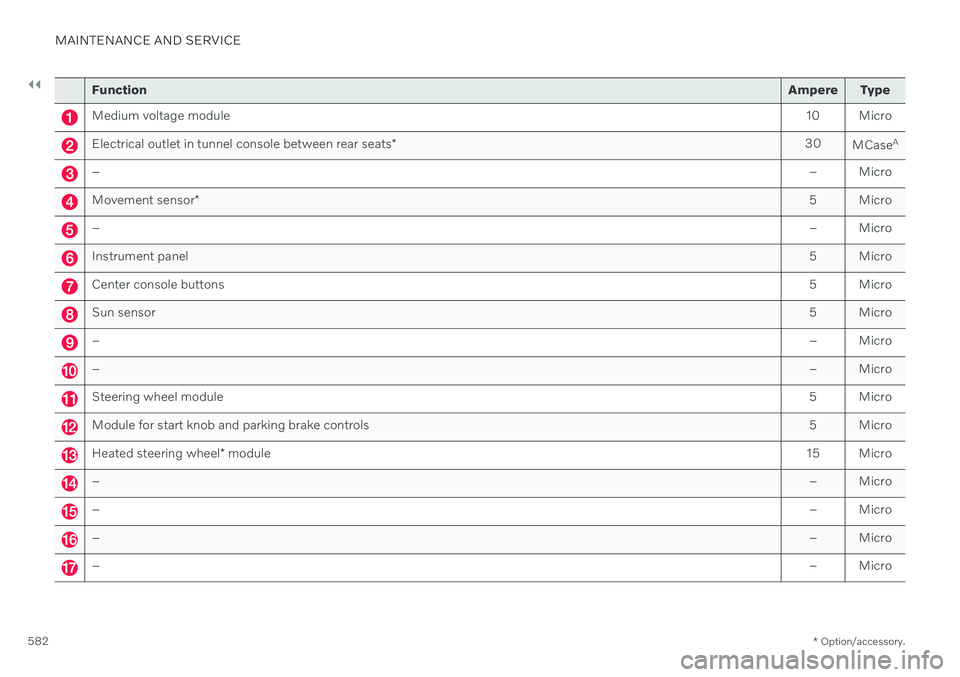
Medium voltage module 10 Micro
Electrical outlet in tunnel console between rear seats* 30
MCaseA
–
– Micro
Movement sensor* 5 Micro
–
– Micro
Instrument panel 5 Micro
Center console buttons5 Micro
Sun sensor5 Micro
–– Micro
–– Micro
Steering wheel module 5 Micro
Module for start knob and parking brake controls5 Micro
Heated steering wheel* module 15 Micro
–
– Micro
–– Micro
–– Micro
–– Micro
Page 585 of 643
MAINTENANCE AND SERVICE
}}
* Option/accessory.583
Function Ampere Type
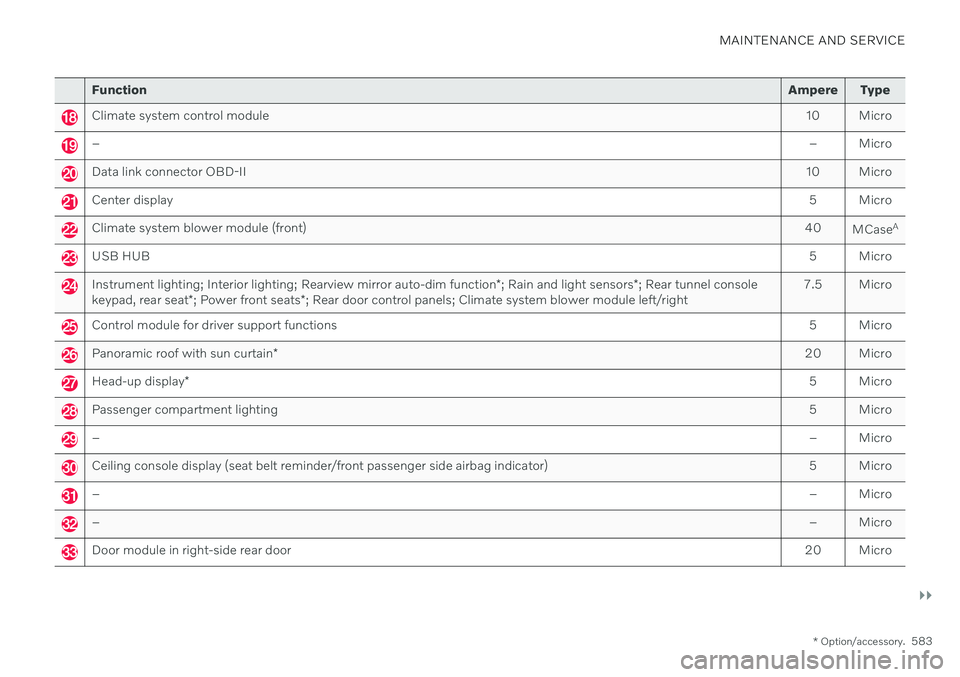
Climate system control module 10 Micro
– – Micro
Data link connector OBD-II10 Micro
Center display 5 Micro
Climate system blower module (front)40
MCaseA
USB HUB
5 Micro
Instrument lighting; Interior lighting; Rearview mirror auto-dim function*; Rain and light sensors *; Rear tunnel console
keypad, rear seat *; Power front seats *; Rear door control panels; Climate system blower module left/right 7.5 Micro
Control module for driver support functions
5 Micro
Panoramic roof with sun curtain* 20 Micro
Head-up display
* 5 Micro
Passenger compartment lighting
5 Micro
–– Micro
Ceiling console display (seat belt reminder/front passenger side airbag indicator) 5 Micro
–– Micro
–– Micro
Door module in right-side rear door20 Micro
Page 601 of 643
MAINTENANCE AND SERVICE
}}
* Option/accessory.599
Automatic car washes
The vehicle should be washed as soon as it becomes dirty. The longer the dirt remains,the more difficult it will be to keep the vehicleclean. It could also lead to paint damage.
Washing your vehicle in an automatic car wash is a fast and easy way to keep your vehi-cle clean, but it does not reach all areas of thevehicle. Volvo recommends washing yourvehicle by hand or supplementing automaticcar washes with a hand wash.
NOTE
Volvo recommends not washing the vehi- cle in an automatic car wash during thefirst few months; the paintwork on newvehicles takes some time to fully harden.
CAUTION
Before driving the vehicle into a car wash, deactivate the Automatic Braking whenStationary and Automatic Parking BrakeApplication functions. If the functions arenot deactivated, the brake system willseize when the vehicle is stationary and thevehicle will not be able to roll.
CAUTION
For automatic car washes in which the vehicle is pulled forward on rolling wheels:
1. Before washing the vehicle, make sure that the automatic rain sensor is deac- tivated. If it is not deactivated andinadvertently starts, the wiper armscould be damaged.
2. To help prevent damage from the auto- matic car wash machinery, make surethat the door mirrors are folded in,antennas retracted or removed, andany auxiliary lights secured.
3. Drive into the automatic car wash.
4. Turn off the "Automatic Braking when Stationary" function using the
but-
ton in the tunnel console.
5. Turn off the "Automatic Parking Brake Application" function in the center dis- play's Top view.
6. Turn off the engine by turning the start knob in the tunnel console clockwise.Hold the knob in position for at least2 seconds.
The vehicle is now ready for the automaticcar wash.
CAUTION
The system will automatically change to P
mode if the above steps are not followed. In P mode, the wheels are locked, which
they should not be when the vehicle isbeing washed in a car wash.
NOTE
Keep in mind that if the vehicle is equipped with the keyless locking and unlocking function *, the doors and tailgate/trunk lid
may open when washing the vehicle if the remote key is within range.
Related information
Cleaning the exterior (p. 596)
Polishing and waxing (p. 596)
Hand washing (p. 597)
High-pressure washing (p. 600)
Cleaning the wiper blades (p. 600)
Cleaning exterior plastic, rubber and trim components (p. 601)
Cleaning rims (p. 602)
Corrosion protection (p. 602)
Auto-hold brakes (p. 389)
Page 626 of 643
INDEX
624Automatic engine stop
auto-stop 404
Automatic high beam 153
Automatic locking 256
Automatic relocking 236, 249
Automatic transmission 391, 392 kickdown 398
oil 618
B
Backrestfront seat, adjusting 182, 183, 186, 187 , 188, 189
rear seat, adjusting 192
Battery jump-start 420
Maintenance 567
recycling 573
start 567
support 571
symbols on the battery 572
BLIS 327 activating/deactivating 328
limitations 329
Symbols and messages 330
Bloweradjusting 217, 218
air distribution 202
air vents 203
Bluetooth connect 462
connecting vehicle to Internet 481
phone 471
settings 479
Book service and repair 547
Booster cushions 72 Brake assist after collision 391
Brake fluid grade 618
Brake functions 382
Brakes 383 anti-lock brakes, ABS 383
automatic when stationary 389
Brake Assist System, BAS 384
brake lights 157
brake system 382
emergency brake lights 157
Maintenance 385
on salted roads 385
on wet roads 384
parking brake 385brake systemfluid 618
C
Camera sensorsee Camera 306
Camera unit 306 limitations 307
maintenance and cleaning 311
Capacity weight 528, 615
Cargo compartment 538 attachment points 540
Car wash 596, 597, 599, 600, 601, 602
Catalytic converter 418 recovery 423
CD player 460
Cell phone, see Phone 472
Center console 533 Center display change appearance 128
cleaning 591
climate controls 207
Function view 119
keyboard 123
messages 137, 138
operation 109, 112, 116, 121