ECO mode VOLVO S90 TWIN ENGINE 2019 Owner's Guide
[x] Cancel search | Manufacturer: VOLVO, Model Year: 2019, Model line: S90 TWIN ENGINE, Model: VOLVO S90 TWIN ENGINE 2019Pages: 669, PDF Size: 14.33 MB
Page 176 of 669
||
WINDOWS, GLASS AND MIRRORS
* Option/accessory.174
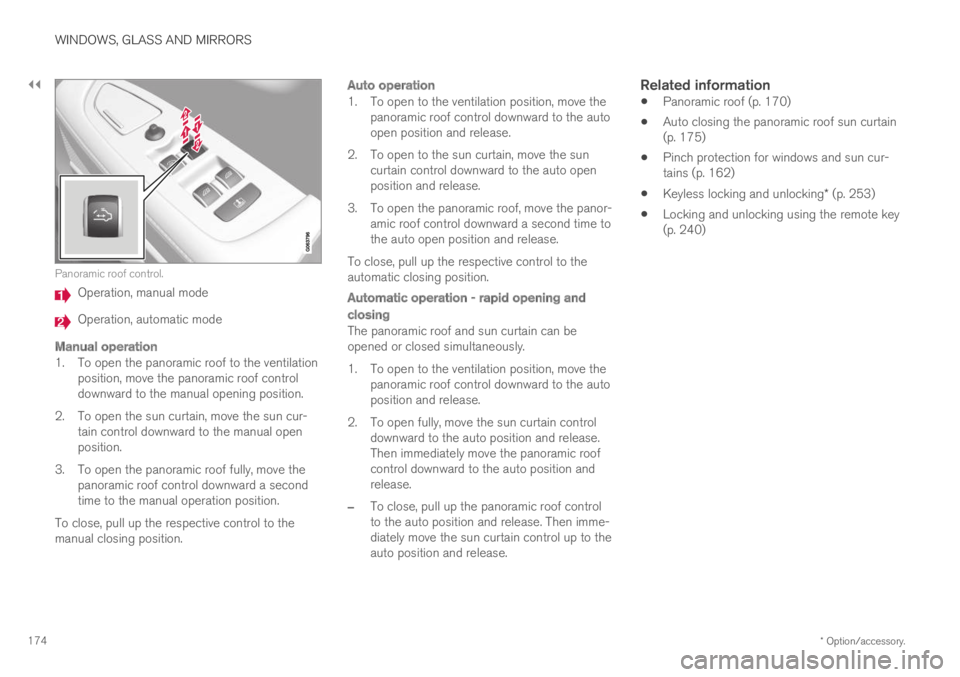
Panoramic roof control.
Operation, manual mode
Operation, automatic mode
Manual operation
1. To open the panoramic roof to the ventilationposition, move the panoramic roof controldownward to the manual opening position.
2. To open the sun curtain, move the sun cur-tain control downward to the manual openposition.
3. To open the panoramic roof fully, move thepanoramic roof control downward a secondtime to the manual operation position.
To close, pull up the respective control to themanual closing position.
Auto operation
1. To open to the ventilation position, move thepanoramic roof control downward to the autoopen position and release.
2. To open to the sun curtain, move the suncurtain control downward to the auto openposition and release.
3. To open the panoramic roof, move the panor-amic roof control downward a second time tothe auto open position and release.
To close, pull up the respective control to theautomatic closing position.
Automatic operation - rapid opening and
closing
The panoramic roof and sun curtain can beopened or closed simultaneously.
1. To open to the ventilation position, move thepanoramic roof control downward to the autoposition and release.
2. To open fully, move the sun curtain controldownward to the auto position and release.Then immediately move the panoramic roofcontrol downward to the auto position andrelease.
–To close, pull up the panoramic roof controlto the auto position and release. Then imme-diately move the sun curtain control up to theauto position and release.
Related information
Panoramic roof (p. 170)
Auto closing the panoramic roof sun curtain(p. 175)
Pinch protection for windows and sun cur-tains (p. 162)
Keyless locking and unlocking* (p. 253)
Locking and unlocking using the remote key(p. 240)
Page 240 of 669
||
KEY, LOCKS AND ALARM
* Option/accessory.238
The keyless system for locking/unlocking thedoors and trunk lid (Passive Entry*) is available asan option. This system has a range in a semicirclewith a radius of approximately 1.5 meter (5 feet)out from the driver's door and approx. 1 meter(3 feet) out from the trunk lid.
With keyless start in combination with keylesslocking and unlocking, the remote key can belocated anywhere in the passenger compartmentor trunk in order to start the engine.
Each remote key supplied with the vehicle can belinked to a driver profile with unique settings forthe vehicle. When a key with a specific profile isused, the vehicle settings are adjusted accordingto that profile.
Buttonless key, Key Tag
For vehicles equipped with keyless locking andunlocking*, a smaller, lighter and button-less key
(Key Tag4) is also provided. It works the sameway as the regular remote key as regard keylessstart and keyless locking and unlocking. The keyis waterproof up to a depth of approx. 10 meters(30 feet) for up to 60 minutes. It does not have adetachable key blade and its battery cannot bereplaced.
Remote key buttons
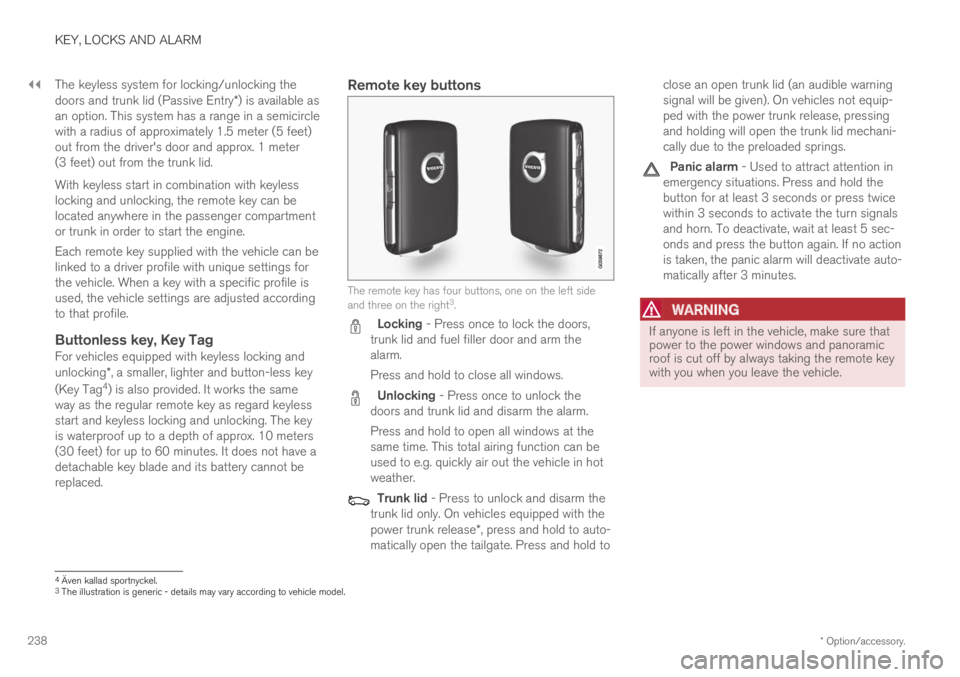
The remote key has four buttons, one on the left sideand three on the right3.
Locking - Press once to lock the doors,trunk lid and fuel filler door and arm thealarm.
Press and hold to close all windows.
Unlocking - Press once to unlock thedoors and trunk lid and disarm the alarm.
Press and hold to open all windows at thesame time. This total airing function can beused to e.g. quickly air out the vehicle in hotweather.
Trunk lid - Press to unlock and disarm thetrunk lid only. On vehicles equipped with thepower trunk release*, press and hold to auto-matically open the tailgate. Press and hold to
close an open trunk lid (an audible warningsignal will be given). On vehicles not equip-ped with the power trunk release, pressingand holding will open the trunk lid mechani-cally due to the preloaded springs.
Panic alarm - Used to attract attention inemergency situations. Press and hold thebutton for at least 3 seconds or press twicewithin 3 seconds to activate the turn signalsand horn. To deactivate, wait at least 5 sec-onds and press the button again. If no actionis taken, the panic alarm will deactivate auto-matically after 3 minutes.
WARNING
If anyone is left in the vehicle, make sure thatpower to the power windows and panoramicroof is cut off by always taking the remote keywith you when you leave the vehicle.
4Även kallad sportnyckel.3The illustration is generic - details may vary according to vehicle model.
Page 268 of 669
KEY, LOCKS AND ALARM
266
Alarm
The alarm emits sound and light signals if any-one without a valid remote key attempts to breakinto the vehicle or interferes with the start batteryor alarm siren.
When armed, the alarm will be triggered if:
the hood, trunk lid or any door is opened.
a battery cable is disconnected.
the alarm siren is disconnected.
Alarm signals
The following occurs if the alarm is triggered:
A siren will sound for 30 seconds or until thealarm is turned off.
All turn signals will flash for 5 minutes oruntil the alarm is turned off.
If the reason the alarm was triggered is not recti-
fied, the alarm cycle will repeat up to 10 times20.
Alarm indicator
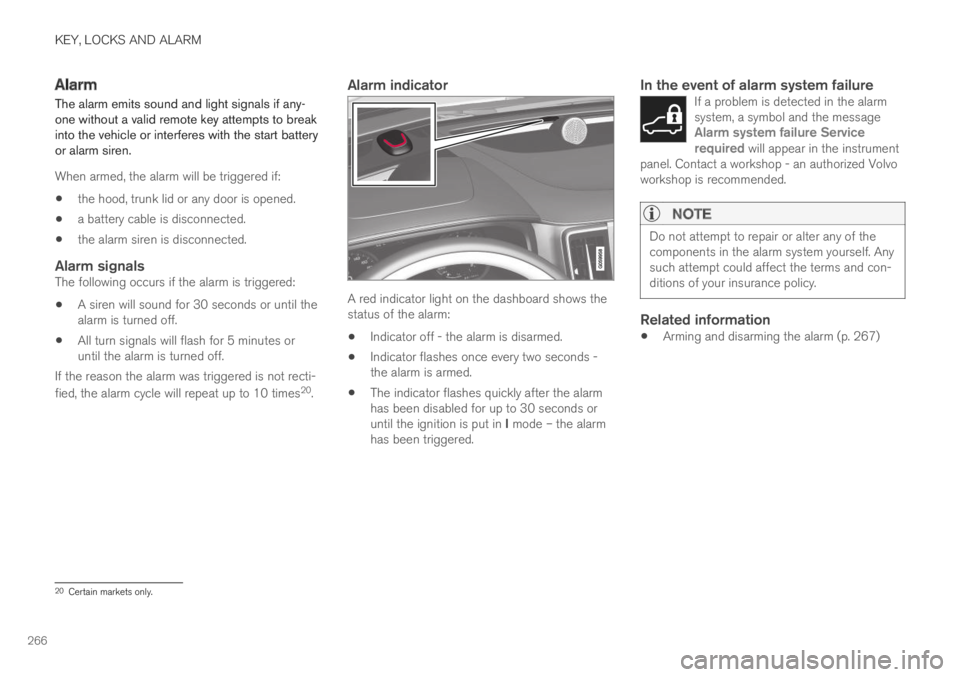
A red indicator light on the dashboard shows thestatus of the alarm:
Indicator off - the alarm is disarmed.
Indicator flashes once every two seconds -the alarm is armed.
The indicator flashes quickly after the alarmhas been disabled for up to 30 seconds oruntil the ignition is put in I mode – the alarmhas been triggered.
In the event of alarm system failure
If a problem is detected in the alarmsystem, a symbol and the messageAlarm system failure Servicerequired will appear in the instrumentpanel. Contact a workshop - an authorized Volvoworkshop is recommended.
NOTE
Do not attempt to repair or alter any of thecomponents in the alarm system yourself. Anysuch attempt could affect the terms and con-ditions of your insurance policy.
Related information
Arming and disarming the alarm (p. 267)
20Certain markets only.
Page 269 of 669

KEY, LOCKS AND ALARM
}}
* Option/accessory.267
Arming and disarming the alarm
The alarm is armed when the vehicle is locked.
Arming the alarm
Lock and arm the vehicle by:
pressing the lock button on the remote key
.
touch the marked surface on the outside ofthe door handle or the rubberized pressure
plate on the trunk lid21.
If the vehicle is equipped with both keyless lock-ing/unlocking* and power trunk lid, the button
on the lower edge of the trunk lid can alsobe used to lock and arm the vehicle.
A red LED light on the dashboard will flash every othersecond when the vehicle is locked and the alarm isarmed.
Disarming the alarm
Unlock and disarm the vehicle alarm by:
pressing the unlock button on the remote
key .
grip a door handle or press the trunk lid's
rubberized pressure plate21.
Disarming the alarm without a functioning
remote key
The vehicle can be unlocked and disarmed evenif the remote key is not functioning, e.g. if thebattery is discharged.
1. Open the driver's door using the detachablekey blade.
> This will trigger the alarm.
Location of the backup key reader in the cup holder.
2. Place the remote key on the key symbol inthe backup reader in the tunnel console'scup holder.
3. Turn the start knob clockwise and release.
>The alarm will be disarmed.
Turning off a triggered alarm
–Press the unlock button on the remote keyor put the ignition into mode I by turning thestart knob clockwise and then releasing it.
NOTE
Remember that the alarm is armed whenthe vehicle is locked.
The alarm will be triggered if any of thedoors is opened from the inside.
Automatically arming and disarming the
alarm
Automatically arming the alarm helps preventinadvertently leaving the vehicle without alarmprotection.
If the vehicle is unlocked using the remote key(and the alarm is disarmed) but none of thedoors or trunk lid is opened within two minutes,the alarm will be automatically rearmed. The vehi-cle will also re-lock.
On some markets, the alarm will be automaticallyarmed following a slight delay after the driver'sdoor has been opened and closed without beinglocked.
21Only vehicles with keyless locking and unlocking* (Passive Entry).
Page 276 of 669

DRIVER SUPPORT
274
Electronic Stability Control symbolsand messages
A number of symbols and messages related toElectronic Stability Control (ESC) may be dis-played in the instrument panel.
Some examples of symbols and messages areshown in the table below.
Symbol MessageMeaning
Steady glow forapprox. 2 seconds.System check when the engine is started.
Flashing light.The ESC is actively operating.
Steady glow.Sport mode is activated.
Note: The ESC system is not deactivated in this mode, but has partially reduced functionality.
ESC
Temporarily off
The ESC system's functionality has been temporarily reduced due to high brake system temperatures. Thefunction will be automatically reactivated when the brakes have cooled.
See the message in the instrument panel.
ESC
Service required
The ESC system is not functioning properly.
Stop the vehicle in a safe place, turn off the engine and then restart it.
Consult a workshop if the message persists ‒ an authorized Volvo workshop is recommended.
A text message can be erased by briefly pressing
the button in the center of the right-sidesteering wheel keypad.
If the message persists: Contact a workshop ‒ anauthorized Volvo workshop is recommended.
Related information
Electronic Stability Control (p. 271)
Page 285 of 669
DRIVER SUPPORT
}}
* Option/accessory.283
Automatic Speed Limiter limitations
Automatic Speed Limiter (ASL) utilizes the
speed limit information provided by the RSI18
function, not from the speed limit signs that thevehicle passes.
If RSI18 is unable to interpret and provide ASLwith speed information, ASL will go into standbymode and switch over to SL. The driver will thenhave to actively brake to bring the vehicle downto the appropriate speed.
ASL will be reactivated when RSI18 is once againable to interpret and provide speed information toASL.
See “Road Sign Information limitations” for moreinformation.
Related information
Speed limiter (p. 275)
Automatic Speed Limiter (p. 279)
Automatic Speed Limiter limitations (p. 283)
Activating/deactivating Road Sign Informa-tion (p. 357)
Cruise control
Cruise Control (CC) helps the driver maintain aneven speed to provide a more relaxing drivingexperience on highways and long, straight roadswith even traffic flows.
Overview
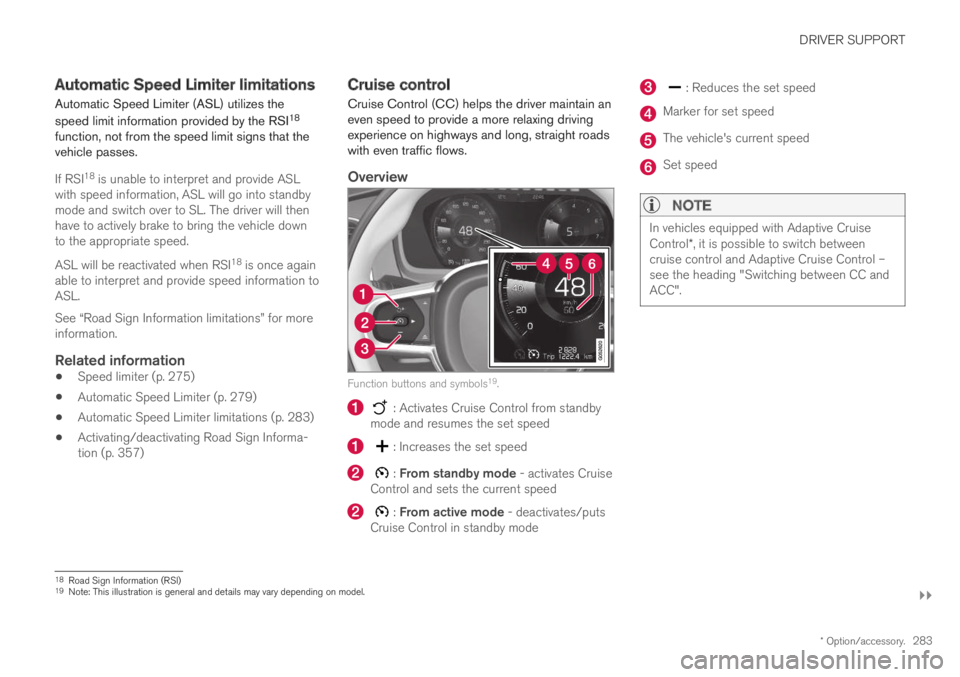
Function buttons and symbols19.
: Activates Cruise Control from standbymode and resumes the set speed
: Increases the set speed
: From standby mode - activates CruiseControl and sets the current speed
: From active mode - deactivates/putsCruise Control in standby mode
: Reduces the set speed
Marker for set speed
The vehicle's current speed
Set speed
NOTE
In vehicles equipped with Adaptive CruiseControl*, it is possible to switch betweencruise control and Adaptive Cruise Control –see the heading "Switching between CC andACC".
18Road Sign Information (RSI)19Note: This illustration is general and details may vary depending on model.
Page 286 of 669
||
DRIVER SUPPORT
284
WARNING
The cruise control function is supplemen-tary driver support intended to facilitatedriving and help make it safer – it cannothandle all situations in all traffic, weatherand road conditions.
The driver is advised to read all sectionsin the Owner's Manual about this functionto learn of its limitations, which the drivermust be aware of before using the func-tion (see the link list at the end of thisarticle).
Cruise control is not a substitute for thedriver's attention and judgment. The driveris always responsible for ensuring thevehicle is driven in a safe manner, at theappropriate speed, with an appropriatedistance to other vehicles, and in accord-ance with current traffic rules and regula-tions.
Related information
Activating and starting Cruise Control(p. 284)
Managing Cruise Control speed (p. 285)
Deactivating and putting Cruise Control instandby mode (p. 286)
Reactivating Cruise Control from standbymode (p. 287)
Switching off Cruise Control (p. 288)
Switching between Cruise Control and Adap-tive Cruise Control (p. 305)Activating and starting CruiseControl
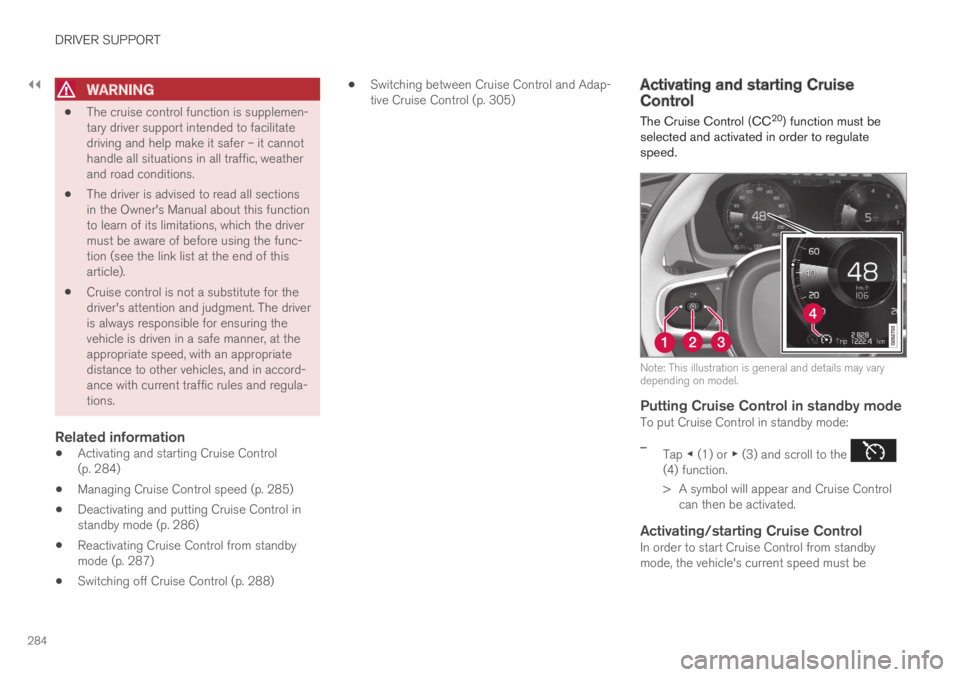
The Cruise Control (CC20) function must beselected and activated in order to regulatespeed.
Note: This illustration is general and details may varydepending on model.
Putting Cruise Control in standby mode
To put Cruise Control in standby mode:
–Tap ◀ (1) or ▶ (3) and scroll to the (4) function.
> A symbol will appear and Cruise Controlcan then be activated.
Activating/starting Cruise Control
In order to start Cruise Control from standbymode, the vehicle's current speed must be
Page 288 of 669

||
DRIVER SUPPORT
286
For vehicles with both CC and ACC
–Change a set speed by pressing the (1)
or (3) buttons briefly or by pressing andholding them:
Press briefly: Press briefly: each presschanges the speed in +/- 5 mph(+/- 5 km/h) increments.
Press and hold: release the button whenthe set speed indicator (4) has moved tothe desired speed.
The most recently set speed will be stored.
If speed is increased by depressing the accelera-
tor pedal while pressing the (1) button onthe steering wheel, the vehicle's speed when thebutton is pressed will be stored as the set speed.
Temporarily increasing speed using the accelera-tor pedal, e.g. when passing another vehicle, willnot affect the setting. The vehicle will return tothe set speed when the accelerator pedal isreleased.
Using engine braking instead of
applying the brakes
Cruise Control regulates speed by lightly applyingthe brakes. On downgrades, it can sometimes bedesirable to roll a bit faster and let speed bereduced instead by engine braking alone. Thedriver can temporarily disengage the Cruise Con-trol braking function.
To disengage CC:
–Press the accelerator pedal about halfwaydown and then release it.
> Cruise Control will automatically disen-gage the automatic brake function andspeed will only be reduced using theengine braking function.
How drive mode affects cruise control
The way the cruise control maintains the vehicle'sspeed can vary depending on the selected drive
mode22.
Cruise Control Eco Cruise with ECO drive
mode
In the ECO drive mode, cruise control's accelera-tion and deceleration will be smoother than inother drive modes to help provide optimal fuelefficiency and reduced environmental impact.Because of this, the vehicle's actual speed maybe slightly above or below the set speed.
Cruise Control Dynamic Cruise
With the Dynamic drive mode, cruise control'sacceleration and deceleration will be faster andmore immediate than in other drive modes.
Related information
Cruise control (p. 283)
Drive modes (p. 446)
Deactivating and putting CruiseControl in standby mode
Cruise Control (CC23) can be temporarily putinto standby mode and then reactivated.
Deactivating and putting Cruise Control
in standby mode
Note: This illustration is general and details may varydepending on model.
To put Cruise Control in standby mode:
–Press the button on the steering wheel(2).
> The Cruise Control markings and symbolswill change from WHITE to GRAY, indicat-ing that Cruise Control is temporarilydeactivated and the driver needs to con-trol the vehicle's speed.
22For more information, see "Drive modes".
Page 289 of 669

DRIVER SUPPORT
287
Standby mode due to action by the driver
Cruise Control will be temporarily deactivated andput in standby mode if:
the brakes are applied
the gear selector is moved to N
the vehicle is driven faster than the setspeed for more than 1 minute
The driver must then control the vehicle's speed.
Temporarily increasing speed using the accelera-tor pedal, e.g. when passing another vehicle, willnot affect the setting. The vehicle will return tothe set speed when the accelerator pedal isreleased.
Automatic standby mode
Cruise Control will be temporarily deactivated andput in standby mode if:
the wheels lose traction
the engine speed (rpm) is too low/high
the temperature in the brake systembecomes too high
the vehicle's speed goes below 30 km/h(20 mph).
The driver must then control the vehicle's speed.
Related information
Cruise control (p. 283)
Reactivating Cruise Control fromstandby mode
Cruise Control (CC24) can be temporarily putinto standby mode and then reactivated.
Reactivating Cruise Control from
standby mode
Note: This illustration is general and details may varydepending on model.
To start Cruise Control from standby mode:
–Press the button on the steering wheel(1).
> The Cruise Control marking in the instru-ment panel will change from GRAY toWHITE and the vehicle will then return tothe most recently set speed.
or
To start Cruise Control from standby mode:
–Press the button on the steering wheel(2).
> The Cruise Control markings and symbolsin the instrument panel will change fromGRAY to WHITE and the vehicle's currentspeed will be set.
WARNING
A noticeable increase in speed may follow
when the speed is resumed with the steering wheel button.
Related information
Cruise control (p. 283)
23Cruise Control24Cruise Control
Page 290 of 669
DRIVER SUPPORT
* Option/accessory.288
Switching off Cruise Control
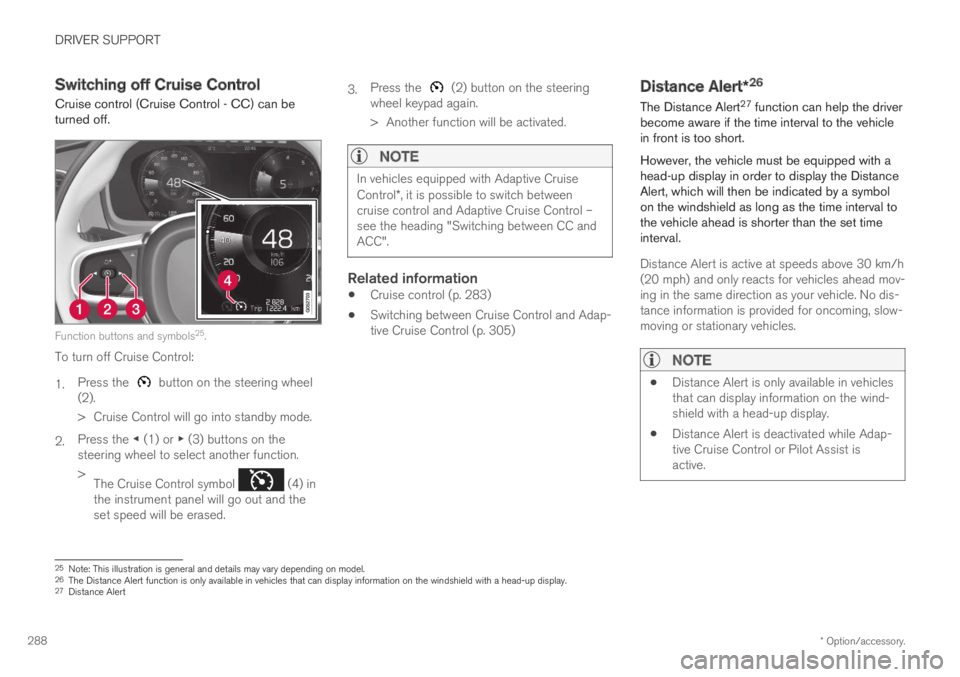
Cruise control (Cruise Control - CC) can beturned off.
Function buttons and symbols25.
To turn off Cruise Control:
1.Press the button on the steering wheel(2).
> Cruise Control will go into standby mode.
2.Press the ◀ (1) or ▶ (3) buttons on thesteering wheel to select another function.
>The Cruise Control symbol (4) inthe instrument panel will go out and theset speed will be erased.
3.Press the (2) button on the steeringwheel keypad again.
> Another function will be activated.
NOTE
In vehicles equipped with Adaptive CruiseControl*, it is possible to switch betweencruise control and Adaptive Cruise Control –see the heading "Switching between CC andACC".
Related information
Cruise control (p. 283)
Switching between Cruise Control and Adap-tive Cruise Control (p. 305)
Distance Alert*26
The Distance Alert27 function can help the driverbecome aware if the time interval to the vehiclein front is too short.
However, the vehicle must be equipped with ahead-up display in order to display the DistanceAlert, which will then be indicated by a symbolon the windshield as long as the time interval tothe vehicle ahead is shorter than the set timeinterval.
Distance Alert is active at speeds above 30 km/h(20 mph) and only reacts for vehicles ahead mov-ing in the same direction as your vehicle. No dis-tance information is provided for oncoming, slow-moving or stationary vehicles.
NOTE
Distance Alert is only available in vehiclesthat can display information on the wind-shield with a head-up display.
Distance Alert is deactivated while Adap-tive Cruise Control or Pilot Assist isactive.
25Note: This illustration is general and details may vary depending on model.26The Distance Alert function is only available in vehicles that can display information on the windshield with a head-up display.27Distance Alert