ECO mode VOLVO S90 TWIN ENGINE 2019 Repair Manual
[x] Cancel search | Manufacturer: VOLVO, Model Year: 2019, Model line: S90 TWIN ENGINE, Model: VOLVO S90 TWIN ENGINE 2019Pages: 669, PDF Size: 14.33 MB
Page 371 of 669

DRIVER SUPPORT
}}
369
Lane Keeping Aid symbols andmessages
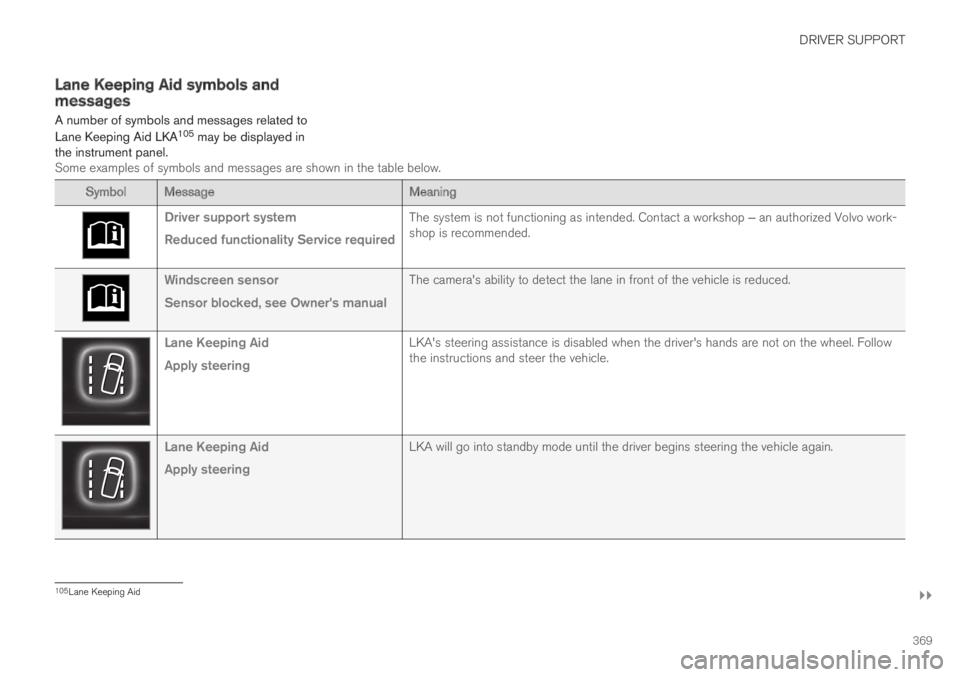
A number of symbols and messages related to
Lane Keeping Aid LKA105 may be displayed inthe instrument panel.Some examples of symbols and messages are shown in the table below.
Symbol MessageMeaning
Driver support system
Reduced functionality Service required
The system is not functioning as intended. Contact a workshop ‒ an authorized Volvo work-shop is recommended.
Windscreen sensor
Sensor blocked, see Owner's manual
The camera's ability to detect the lane in front of the vehicle is reduced.
Lane Keeping Aid
Apply steering
LKA's steering assistance is disabled when the driver's hands are not on the wheel. Followthe instructions and steer the vehicle.
Lane Keeping Aid
Apply steering
LKA will go into standby mode until the driver begins steering the vehicle again.
105Lane Keeping Aid
Page 388 of 669

DRIVER SUPPORT
* Option/accessory.386
Recommended maintenance forPark Assist
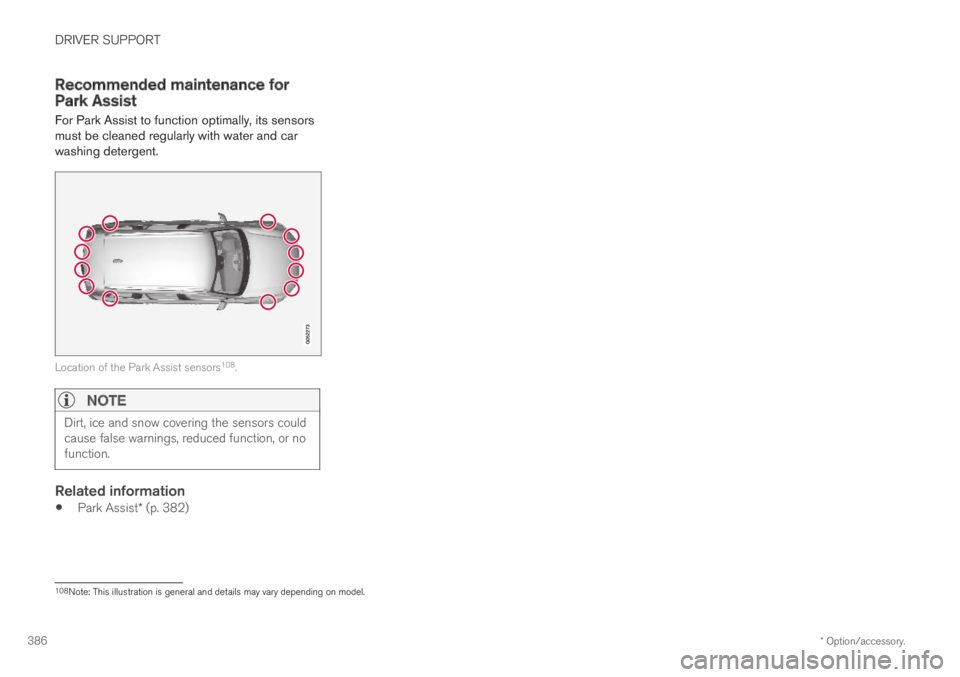
For Park Assist to function optimally, its sensorsmust be cleaned regularly with water and carwashing detergent.
Location of the Park Assist sensors108.
NOTE
Dirt, ice and snow covering the sensors couldcause false warnings, reduced function, or nofunction.
Related information
Park Assist* (p. 382)
108Note: This illustration is general and details may vary depending on model.
Page 407 of 669

DRIVER SUPPORT
* Option/accessory.405
Related information
Park Assist Pilot* (p. 398)
Parking with Park Assist Pilot (p. 400)
Speed-dependent steering wheel resistance(p. 270)
Recommended maintenance forPark Assist Pilot
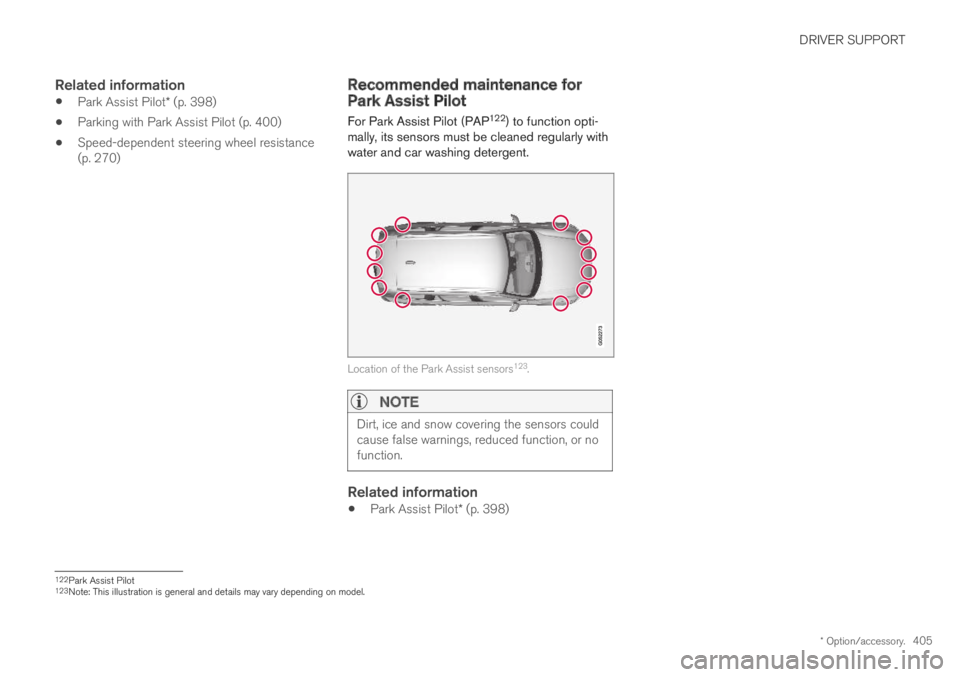
For Park Assist Pilot (PAP122) to function opti-mally, its sensors must be cleaned regularly withwater and car washing detergent.
Location of the Park Assist sensors123.
NOTE
Dirt, ice and snow covering the sensors couldcause false warnings, reduced function, or nofunction.
Related information
Park Assist Pilot* (p. 398)
122Park Assist Pilot123Note: This illustration is general and details may vary depending on model.
Page 410 of 669

HYBRID INFORMATION
408
General information about TwinEngine
Twin Engine vehicles are driven just like anyother vehicle, but certain functions differ from avehicle powered exclusively by gasoline. Theelectric motor powers the vehicle primarily at lowspeeds; the gasoline engine is used at higherspeeds or during more active driving.
The instrument panel displays Twin Engine-spe-cific information - charging information, selecteddrive mode, distance to discharged battery andhybrid battery charge level.
Different drive modes can be selected while driv-ing, e.g. electric power only or, if more power isneeded, a combination of electric and gasolinepower. The vehicle calculates the optimal combi-nation of driveability, driving experience, environ-mental impact and fuel economy for the selecteddrive mode.
In order to function optimally, the hybrid battery(and its electrical drive systems) and the gasolineengine (and its drive systems) must be at thecorrect operating temperature. Battery capacitycan be considerably reduced if the battery is toocold or too hot. Preconditioning prepares thevehicle's drive systems and passenger compart-ment before driving to help reduce both wear andenergy consumption. It also helps increase thehybrid battery's range.
The hybrid battery which powers the electricmotor is recharged using the charging cable. It
can also be recharged during light braking andthrough engine braking in gear position B. Thecombustion engine can also help recharge thehybrid battery.
Important
No electrical current
Keep in mind that if there is no electrical currentto the vehicle, i.e. the ignition is switched off orthe start battery is discharged, certain functionssuch as brakes, power steering, etc. will not work.
WARNING
If the vehicle does not have electrical currentand both the electric motor and the gasolineengine are switched off, the brakes cannot beused to stop the vehicle.
Towing not permitted
Never tow a Twin Engine vehicle behind anothervehicle, as this could damage the electric motor.
Exterior engine noise
WARNING
Please be aware that there is no sound fromthe engine when the vehicle is being poweredby the electric motor and it may be difficult todetect by children, pedestrians, cyclists andanimals. This is especially true at low speeds.
High-voltage electrical current
WARNING
A number of electrical components in TwinEngine Plug-in Hybrid vehicles use high-volt-age current and can be extremely dangerousif handled incorrectly. These components andany orange wiring in the vehicle may only behandled by trained and qualified Volvo servicetechnicians.
Do not touch anything that is not clearly descri-bed in this Owner's Manual.
Related information
Charging the hybrid battery (p. 409)
Hybrid gauge (p. 83)
Drive modes (p. 446)
Starting and stopping preconditioning(p. 225)
Hybrid battery (p. 605)
Factors affecting electric motor range(p. 455)
Page 419 of 669

HYBRID INFORMATION
}}
417
Charging status in the vehicle'scharging socket
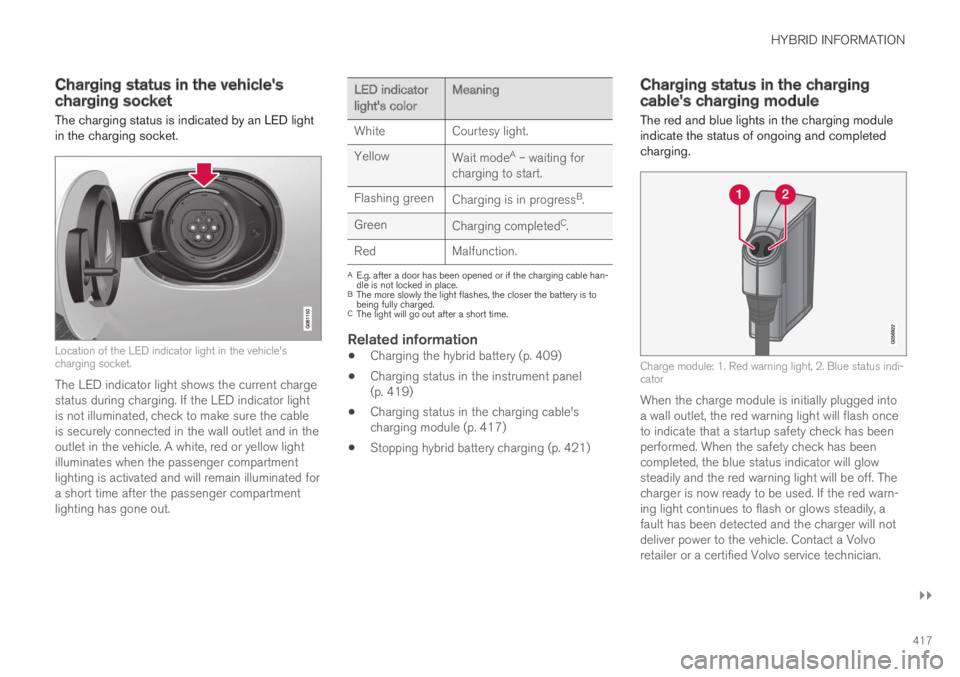
The charging status is indicated by an LED lightin the charging socket.
Location of the LED indicator light in the vehicle'scharging socket.
The LED indicator light shows the current chargestatus during charging. If the LED indicator lightis not illuminated, check to make sure the cableis securely connected in the wall outlet and in theoutlet in the vehicle. A white, red or yellow lightilluminates when the passenger compartmentlighting is activated and will remain illuminated fora short time after the passenger compartmentlighting has gone out.
LED indicatorlight's colorMeaning
WhiteCourtesy light.
YellowWait modeA – waiting forcharging to start.
Flashing greenCharging is in progressB.
GreenCharging completedC.
RedMalfunction.
AE.g. after a door has been opened or if the charging cable han-dle is not locked in place.BThe more slowly the light flashes, the closer the battery is tobeing fully charged.CThe light will go out after a short time.
Related information
Charging the hybrid battery (p. 409)
Charging status in the instrument panel(p. 419)
Charging status in the charging cable'scharging module (p. 417)
Stopping hybrid battery charging (p. 421)
Charging status in the chargingcable's charging module
The red and blue lights in the charging moduleindicate the status of ongoing and completedcharging.
Charge module: 1. Red warning light, 2. Blue status indi-cator
When the charge module is initially plugged intoa wall outlet, the red warning light will flash onceto indicate that a startup safety check has beenperformed. When the safety check has beencompleted, the blue status indicator will glowsteadily and the red warning light will be off. Thecharger is now ready to be used. If the red warn-ing light continues to flash or glows steadily, afault has been detected and the charger will notdeliver power to the vehicle. Contact a Volvoretailer or a certified Volvo service technician.
Page 429 of 669

STARTING AND DRIVING
}}
427
In some situations, such as in cold weather or ifthe hybrid battery's charge level is too low, thegasoline engine will start instead.
The vehicle should not be started with the charg-ing cable connected. However, if the cable can-not be pulled out or if the vehicle incorrectlydetects a cable that is not connected, the vehiclecan be started using an override procedure:
1.Press the brake pedal and turn the startknob clockwise.
2.Charge cable Remove before start willappear in the instrument panel.
3. Turn the start knob clockwise again.
4.Removed? Turn and hold start knob 7swill appear. Turn the knob clockwise and holdit for 7 seconds to start the vehicle.
Location of the backup reader in the tunnel console.
If the Vehicle key not found message is shownin the instrument panel at start, place the remotekey at the backup reader and then make a newstart attempt.
NOTE
When the remote key is placed in the backupreader, make sure that no other vehicle keys,metal objects or electronic devices (e.g. cellu-lar phones, tablets, laptops or chargers) are inthe backup reader. Multiple vehicle keys closeto each other in the backup reader can dis-rupt their functionality.
If Vehicle start System check, wait is dis-played in the instrument panel while attemptingto start the vehicle, wait until the message disap-pears and try again to start the vehicle.
CAUTION
If the engine has not responded after 3attempts – wait for 3 minutes before startinga new attempt. Starting capability increases ifthe starter battery is given time to recover.
NOTE
The vehicle cannot be started if the hybridbattery is discharged.
WARNING
Never remove the remote control key fromthe vehicle while driving.
WARNING
Always remove the remote key from thepassenger compartment when you leavethe vehicle and make sure the ignition isin mode 0.
Always put the gear selector in P andapply the parking brake before leavingthe vehicle. Never leave the vehicle unsu-pervised while the engine is running.
Always open the garage door fully andmake sure that ventilation is very goodbefore starting the engine in a garage.The exhaust fumes produced by the vehi-cle contain carbon monoxide, which isinvisible and odorless but very toxic.
NOTE
With a cold start, idling speed may be consid-erably higher than normal for certain enginetypes. This is done to get the emissions sys-tem up to normal operating temperature asquickly as possible, which minimizes exhaustemissions and protects the environment.
Page 431 of 669

STARTING AND DRIVING
* Option/accessory.429
Ignition modes
The vehicle's ignition can be put in variousmodes (levels) to make different functions availa-ble.
To enable the use of a limited number of func-tions when the engine is not running, the ignitioncan be put in one of three different levels: 0, Iand II. These levels are referred to as "ignitionmodes" in the Owner's Manual.
The following table shows which functions areavailable in each ignition mode:
Mode Functions
0The odometer, clock and tem-
perature gauge are illuminatedA.
The power* seats can beadjusted.
The power windows can be used.
The center display is activated
and can be usedA.
The infotainment system can be
usedA.
In this mode, the functions are availa-ble for a limited time and then switchoff automatically.
IThe panoramic roof, power win-dows, 12-volt electrical socket inthe passenger compartment,Bluetooth, navigation, phone,blower and windshield wipers canbe used.
The power seats can be adjusted.
The 12-volt electrical socket* inthe trunk can be used.
Electrical current will be takenfrom the battery in this ignitionmode.
Mode Functions
IIThe headlights illuminate.
Warning/indicator lights illumi-nate for 5 seconds.
A number of other systems areactivated. However, seat and rearwindow heating can only be acti-vated when the engine is running.
This ignition mode uses a lot ofcurrent from the battery andshould be avoided whenever pos-sible!
AAlso activated when the door is opened.
Related information
Starting the vehicle (p. 426)
Adjusting the steering wheel (p. 193)
Jump starting using another battery (p. 466)
Selecting ignition mode (p. 430)
Page 432 of 669

STARTING AND DRIVING
430
Selecting ignition mode
The vehicle's ignition can be put in variousmodes (levels) to make different functions availa-ble.
Selecting an ignition mode
Start knob in the tunnel console.
Ignition mode 0 - Unlock the vehicle andkeep the remote key in the passenger com-partment.
NOTE
To set level I or II without engine start – donot depress the brake pedal (or clutch pedalfor vehicles with manual transmission) whenselecting this ignition mode.
Ignition mode I - Turn the start knob clock-wise and release it. The control will automati-cally return to the original position.
Ignition mode II - Turn the start knob clock-wise and hold it there for approx. 5 seconds.Release the knob, which will automaticallyreturn to its original position.
Back to ignition mode 0 - To return to igni-tion mode 0 from mode I and II, turn the startknob clockwise and release it. The controlwill automatically return to the original posi-tion.
Related information
Starting the vehicle (p. 426)
Switching off the vehicle (p. 428)
Ignition modes (p. 429)
Adjusting the steering wheel (p. 193)
Jump starting using another battery (p. 466)
Brake functions
The vehicle's brakes are used to reduce speedor prevent the vehicle from rolling.
In addition to the wheel brakes and parkingbrakes, the vehicle is also equipped with a num-ber of automatic brake assist functions. Thesesystems help the driver by e.g. keeping the vehi-cle stationary when the brake pedal is notdepressed (e.g. at a traffic light or intersection),when starting up a hill or when driving down a hill.
Depending on how the vehicle is equipped, thefollowing brake assist functions may be included:
Auto-hold brakes (Auto Hold)
Hill Start Assist (Hill Start Assist)
Braking assist after a collision
City Safety
Related information
Brakes (p. 431)
Parking brake (p. 434)
Auto-hold brakes (p. 437)
Braking assist after a collision (p. 439)
Hill Start Assist (p. 439)
City Safety™ (p. 333)
Page 442 of 669

STARTING AND DRIVING
* Option/accessory.440
Transmission
The transmission is part of the vehicle's driveline(power transmission) between the engine andthe drive wheels. The function of the transmis-sion is to change gears depending on speedand power needs.
The vehicle has an 8-speed automatic transmis-sion and an electric motor for rear-wheel drive.The number of gears allows the engine's torqueand power band to be effectively utilized. Two ofthe gears are overdrive gears that save fuel whendriving at a constant engine speed. The steeringwheel paddles* can be used to shift up or downmanually. The instrument panel shows the gearcurrently in use.
CAUTION
Check the operating temperature of thetransmission to help avoid damage to any ofthe drive system components. If there is a riskof overheating, a warning symbol will appearin the instrument panel and a text messagewill be displayed. Follow the recommenda-tions given.
Symbols in the instrument panel
If a problem should occur with the transmission, asymbol and a message will appear in the instru-ment panel.
Symbol Meaning
Information and messages relatedto the transmission. Follow the rec-ommendations provided.
Hot or overheated transmission.Follow the recommendations provi-ded.
Reduced performance/Acceler-ation performance reduced
In the event of a temporary fault inthe driveline, the vehicle may gointo a "limp home" mode withreduced power output to help avoiddamage to the driveline.
Related information
Gear selector positions for automatic trans-missions (p. 440)
Gear selector positions forautomatic transmissions
In vehicles with an automatic transmission, thesystem selects the optimal gear for the currentdriving conditions. The transmission also has amanual mode.
The instrument panel shows which gear is cur-rently in use:
P, R, N, D or B.
For manual shifting, the gear indicator in theinstrument panel displays the gear currentlybeing used (1-8).
Selecting gears
The gear selector is a shift-by-wire selector,where shifting is done electronically instead ofmechanically. This makes shifting easier and thegear positions more distinct.
Page 444 of 669

||
STARTING AND DRIVING
* Option/accessory.442
Brake - B
B can be selected at any time during a drive. In Bmode, the engine braking function is activatedwhen the accelerator pedal is released, whichhelps charge the hybrid battery. This offers addi-tional opportunities to recharge the hybrid bat-tery, since the battery is charged even when thebrake pedal is not depressed.
B mode in the instrument panel.
From B mode, it is possible to manually shift tolower gears. The currently selected gear (1-8) willbe displayed in the instrument panel.
Pull the gear selector backward once to shiftdown one gear.
Pull the gear selector backward again to shiftdown to lower gears.
To shift manually to a higher gear, the vehiclemust be equipped with steering wheel paddles*.
Push the gear selector forward to return to Dmode.
For smooth shifting and engine performance, thetransmission will shift down automatically if thevehicle's speed becomes too low for the selectedgear.
Related information
Shiftlock (p. 443)
Using the steering wheel paddles* to shift(p. 442)
The kickdown function (p. 444)
Using the steering wheel paddles*to shift
The steering wheel paddles are a supplement tothe gear selector and make it possible to shiftmanually without removing your hands from thesteering wheel.
Activating the steering wheel paddles
In order to shift gears using the paddles, theymust first be activated:
–Pull one of the paddles toward the steeringwheel.
> A number in the instrument panel indi-cates the current gear being used.
Instrument panel when the paddles are activated forshifting.
Change
To shift one gear: