VOLVO S90 TWIN ENGINE 2019 Owners Manual
Manufacturer: VOLVO, Model Year: 2019, Model line: S90 TWIN ENGINE, Model: VOLVO S90 TWIN ENGINE 2019Pages: 669, PDF Size: 14.33 MB
Page 571 of 669
WHEELS AND TIRES
}}
569
The sealing compound bottle must be replacedafter use. Volvo recommends contacting anauthorized Volvo workshop for replacement.
WARNING
After using the tire sealing system, the vehicleshould not be driven farther than approxi-mately 200 km (120 miles).
NOTE
The compressor is an electric device. Followlocal regulations for disposal.
Related information
Recommended tire pressure (p. 551)
Tire sealing system (p. 564)
Inflate tires with the compressor included inthe tire sealing system (p. 569)
Inflate tires with the compressorincluded in the tire sealing system
The vehicle's original tires can be inflated usingthe compressor in the tire sealing system.
1. The compressor must be switched off. Makesure that the switch is in the 0 (Off) positionand take out the electrical cable and thehose.
2. Unscrew the tire's valve cap and screw thehose's valve connector as far as possibleonto the valve.
Be sure the air release valve on the com-pressor's hose is completely closed.
3.Connect the electrical cable to the nearest12 V outlet and start the vehicle.
WARNING
Inhaling exhaust fumes could lead to seriousinjury. Never leave the engine running in anenclosed space or a space without sufficientventilation.
WARNING
Never leave children unattended in the vehiclewhile the engine is running.
4. Start the compressor by moving the switch tothe I (On) position.
CAUTION
Risk of overheating. The compressor shouldnot be running for longer than 10 minutes ata time.
5. Inflate the tire to the pressure specified onthe tire pressure decal on the driver's sidedoor pillar. If the inflation pressure is toohigh, use the air release valve to release air.
6. Switch off the compressor. Remove the hoseand the electrical cable.
7.Screw the valve cap back onto the tire.
NOTE
After inflating a tire, always replace thevalve cap to help prevent valve damagecaused by gravel, dirt, etc.
Use plastic valve caps only. Metal capscould corrode and become difficult toremove.
NOTE
The compressor is an electric device. Followlocal regulations for disposal.
Page 572 of 669

||
WHEELS AND TIRES
570
Related information
Recommended tire pressure (p. 551)
Using the tire sealing system (p. 565)
Tire sealing system (p. 564)
Determining the vehicle's permittedweight
Properly loading your vehicle will provide maxi-mum return of vehicle design performance.
Weight designations
Before loading your vehicle, familiarize yourselfwith the following terms for determining yourvehicle's weight ratings, with or without a trailer,from the vehicle's Federal/Canadian Motor Vehi-cle Safety Standards (FMVSS/CMVSS) label, andthe vehicle's tire information placard:
Curb weight
The weight of the vehicle including a full tank offuel and all standard equipment. It does notinclude passengers, cargo, or optional equipment.
Capacity weight
All weight added to the curb weight, includingcargo and optional equipment. When towing, tow-bar weight is also part of cargo weight.
Permissible axle weight
The maximum allowable weight that can be car-ried by a single axle (front or rear). These num-bers are shown on the Federal/Canadian MotorVehicle Safety Standards (FMVSS/CMVSS) label.The total load on each axle must never exceed itsmaximum permissible weight.
Gross vehicle weight (GVW)
The vehicle's curb weight + cargo + passengers.
Steps for Determining Correct Load
Limit
1. Locate the statement "the combined weightof occupants and cargo should never exceedXXX kg or XXX lbs." on your vehicle's plac-ard.
2. Determine the combined weight of the driverand passengers that will be riding in yourvehicle.
3. Subtract the combined weight of the driverand passengers from XXX kg or XXX lbs.
4. The resulting figure equals the availableamount of cargo and luggage load capacity.For example, if the "XXX" amount equals1400 lbs. and there will be five 150 lb. pas-sengers in your vehicle, the amount of availa-ble cargo and luggage load capacity is 650lbs. (1400 - 750 (5 × 150) = 650 lbs.)
5. Determine the combined weight of luggageand cargo being loaded on the vehicle. Thatweight may not safely exceed the availablecargo and luggage load capacity calculatedin Step 4.
6. If your vehicle will be towing a trailer, loadfrom your trailer will be transferred to yourvehicle. Consult this manual to determinehow this reduces the available cargo and lug-gage load capacity of your vehicle.
Page 573 of 669
WHEELS AND TIRES
571
WARNING
Exceeding the permissible axle weight,gross vehicle weight, or any other weightrating limits can cause tire overheatingresulting in permanent deformation orcatastrophic failure.
Do not use replacement tires with lowerload carrying capacities than the tires thatwere original equipment on the vehiclebecause this will lower the vehicle's GVWrating. Use only tires with the correct loadcarrying capacity. Consult your Volvoretailer for information.
Related information
Loading recommendations (p. 580)
Page 574 of 669

Page 575 of 669
L O A D I N G , S T O R A G E A N D P A S S E N G E R
COM P A R T M E N T
Page 576 of 669
LOADING, STORAGE AND PASSENGER COMPARTMENT
* Option/accessory.574
Passenger compartment interior
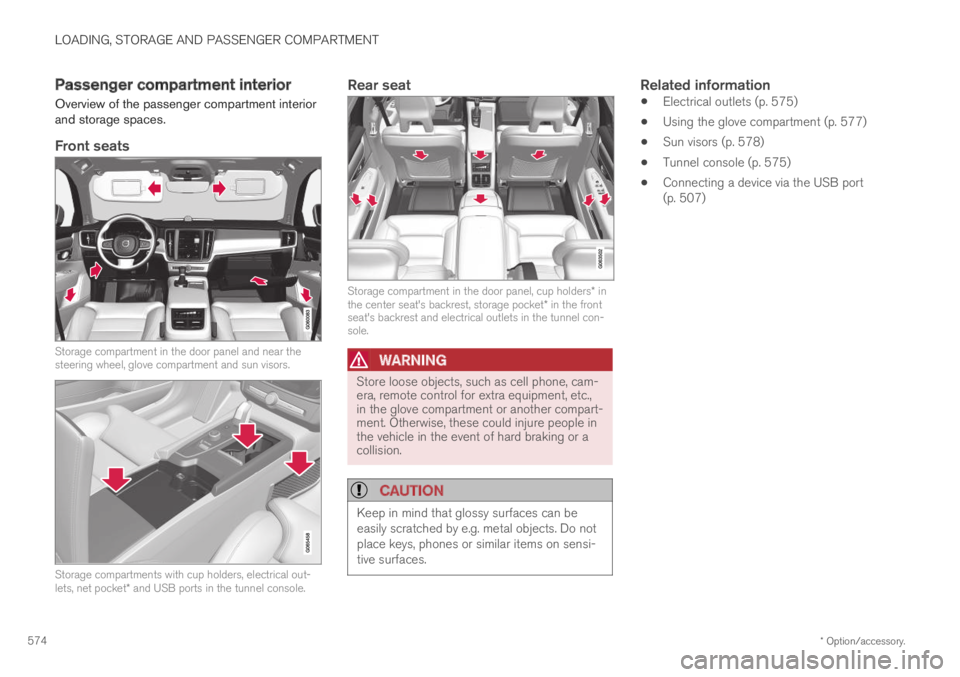
Overview of the passenger compartment interiorand storage spaces.
Front seats
Storage compartment in the door panel and near thesteering wheel, glove compartment and sun visors.
Storage compartments with cup holders, electrical out-lets, net pocket* and USB ports in the tunnel console.
Rear seat
Storage compartment in the door panel, cup holders* inthe center seat's backrest, storage pocket* in the frontseat's backrest and electrical outlets in the tunnel con-sole.
WARNING
Store loose objects, such as cell phone, cam-era, remote control for extra equipment, etc.,in the glove compartment or another compart-ment. Otherwise, these could injure people inthe vehicle in the event of hard braking or acollision.
CAUTION
Keep in mind that glossy surfaces can beeasily scratched by e.g. metal objects. Do notplace keys, phones or similar items on sensi-tive surfaces.
Related information
Electrical outlets (p. 575)
Using the glove compartment (p. 577)
Sun visors (p. 578)
Tunnel console (p. 575)
Connecting a device via the USB port(p. 507)
Page 577 of 669
LOADING, STORAGE AND PASSENGER COMPARTMENT
}}
* Option/accessory.575
Tunnel console
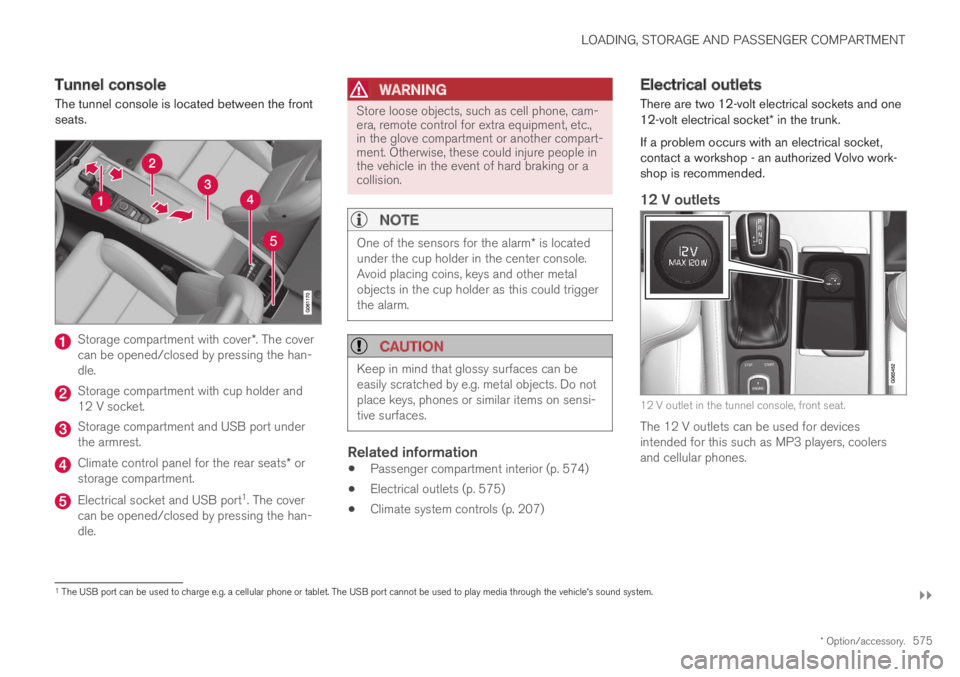
The tunnel console is located between the frontseats.
Storage compartment with cover*. The covercan be opened/closed by pressing the han-dle.
Storage compartment with cup holder and12 V socket.
Storage compartment and USB port underthe armrest.
Climate control panel for the rear seats* orstorage compartment.
Electrical socket and USB port1. The covercan be opened/closed by pressing the han-dle.
WARNING
Store loose objects, such as cell phone, cam-era, remote control for extra equipment, etc.,in the glove compartment or another compart-ment. Otherwise, these could injure people inthe vehicle in the event of hard braking or acollision.
NOTE
One of the sensors for the alarm* is locatedunder the cup holder in the center console.Avoid placing coins, keys and other metalobjects in the cup holder as this could triggerthe alarm.
CAUTION
Keep in mind that glossy surfaces can beeasily scratched by e.g. metal objects. Do notplace keys, phones or similar items on sensi-tive surfaces.
Related information
Passenger compartment interior (p. 574)
Electrical outlets (p. 575)
Climate system controls (p. 207)
Electrical outlets
There are two 12-volt electrical sockets and one12-volt electrical socket* in the trunk.
If a problem occurs with an electrical socket,contact a workshop - an authorized Volvo work-shop is recommended.
12 V outlets
12 V outlet in the tunnel console, front seat.
The 12 V outlets can be used for devicesintended for this such as MP3 players, coolersand cellular phones.
1The USB port can be used to charge e.g. a cellular phone or tablet. The USB port cannot be used to play media through the vehicle's sound system.
Page 578 of 669

||
LOADING, STORAGE AND PASSENGER COMPARTMENT
* Option/accessory.576
12 V outlet in the tunnel console, rear seat.
12 V outlet in trunk/cargo compartment*.
Related information
Passenger compartment interior (p. 574)
Using the electrical outlets (p. 576)
Using the electrical outlets
The 12 V outlet can be used for devicesintended for this such as MP3 players, coolersand cellular phones.
The ignition must be in at least mode I for theoutlets to supply current. The outlets will then beactive as long as there is sufficient charge in thestart battery.
If the engine is turned off and the vehicle islocked, the outlets will be deactivated. If theengine is turned off and the vehicle remainsunlocked, the sockets will remain active for up to7 minutes.
NOTE
Bear in mind that using the electrical outletswhen the engine is off could cause the starterbattery to have too low of a charge level,which could limit other functionality.
Accessories connected to the electrical out-lets can be activated even when the vehicleelectrical system is off or if preconditioning isused. For this reason, disconnect plugs whenthey are not in use to prevent the starter bat-tery from becoming discharged.
WARNING
Do not use accessories with large orheavy plugs – they could damage the out-let or come loose while you are driving.
Do not use accessories that could causedisruptions to e.g. the vehicle's radioreceiver or electrical system.
Position the accessory so that there is norisk of it injuring the driver or passengersin the event of heavy braking or a colli-sion.
Pay attention to connected accessoriesas they can generate heat that could burnpassengers or the interior.
Using 12 V outlets
1. Remove the stopper (tunnel console) or folddown the cover (trunk/cargo compartment)over the socket and plug in the device.
2. Unplug the device and put the stopper backin (tunnel console) or fold up the cover(trunk/cargo compartment) when the socketis not in use or left unattended.
CAUTION
The maximum power is 120 W (10 A) peroutlet.
Page 579 of 669

LOADING, STORAGE AND PASSENGER COMPARTMENT
}}
* Option/accessory.577
Related information
Electrical outlets (p. 575)
Passenger compartment interior (p. 574)
Using the glove compartment
The glove compartment is located on the pas-senger side. The glove compartment can beused to store the Owner's Manual, maps, etc.There is also room for a pen and a card holder.
Locking and unlocking the glove box *
The glove compartment can be locked when thevehicle is left at a workshop, hotel, etc. The glovecompartment can then only be locked/unlockedwith the glove compartment key.
Storage compartment for the key. The illustration isgeneric – the design may vary.
Page 580 of 669

||
LOADING, STORAGE AND PASSENGER COMPARTMENT
* Option/accessory.578
The illustration is generic – the design may vary.
To lock the glove compartment:
Insert the key into the lock on the glove com-partment.
Turn the key 90 degrees clockwise.
Remove the key from the lock.
–To unlock, perform the above steps inreverse.
Using the glove box as a cooled area
The glove compartment can be used to cool e.g.drinks or food. Cooling is possible when the cli-mate system is active (i.e. when the ignition is inmode II or when the engine is running).
The illustration is generic – the design may vary.
Activate cooling
Deactivate cooling
–Activate or deactivate cooling by moving thecontrol as far as possible toward the passen-ger compartment/glove compartment.
Related information
Passenger compartment interior (p. 574)
Private Locking (p. 264)
Sun visors
In the ceiling in front of the driver and front pas-senger, there are sun visors that can be loweredand angled to the side as necessary.
The illustration is generic – the design may vary.
The mirror lighting* comes on automatically whenthe cover is lifted up.
The mirror frame has a holder for e.g. cards ortickets.
Related information
Passenger compartment interior (p. 574)