VOLVO V60 2013 Owners Manual
Manufacturer: VOLVO, Model Year: 2013, Model line: V60, Model: VOLVO V60 2013Pages: 422, PDF Size: 9.59 MB
Page 111 of 422
03 Your driving environment
Alcolock*
03
* Option/accessory, for more information, see Introduction.109 General information on the alcolock
The alcolock's1 function is to prevent the car
from being driven by individuals under the
influence of alcohol. Before the engine can be
started the driver must take a breath test that
verifies that he/she is not under the influence
of alcohol. Alcolock calibration takes place in
accordance with each market's limit value in
force for driving legally.
WARNING
The Alcolock is an aid and does not exempt
the driver from responsibility. It is always the
responsibility of the driver to be sober and
to drive the car safely.
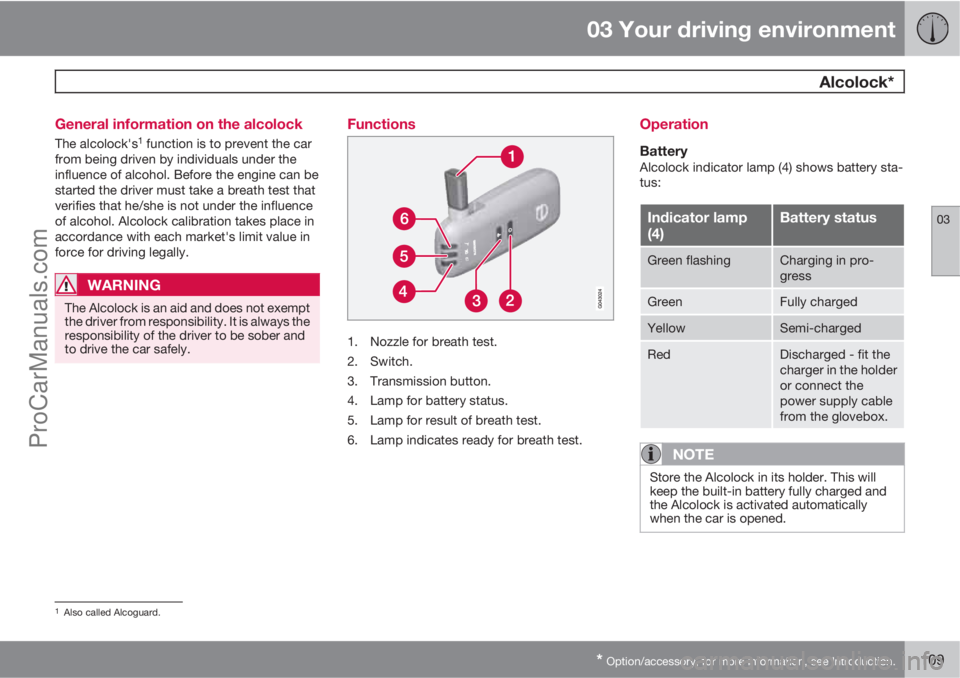
Functions
1. Nozzle for breath test.
2. Switch.
3. Transmission button.
4. Lamp for battery status.
5. Lamp for result of breath test.
6. Lamp indicates ready for breath test.
Operation
BatteryAlcolock indicator lamp (4) shows battery sta-
tus:
Indicator lamp
(4)Battery status
Green flashingCharging in pro-
gress
GreenFully charged
YellowSemi-charged
RedDischarged - fit the
charger in the holder
or connect the
power supply cable
from the glovebox.
NOTE
Store the Alcolock in its holder. This will
keep the built-in battery fully charged and
the Alcolock is activated automatically
when the car is opened.
1Also called Alcoguard.
ProCarManuals.com
Page 112 of 422
03 Your driving environment
Alcolock*
03
110* Option/accessory, for more information, see Introduction.
Storage
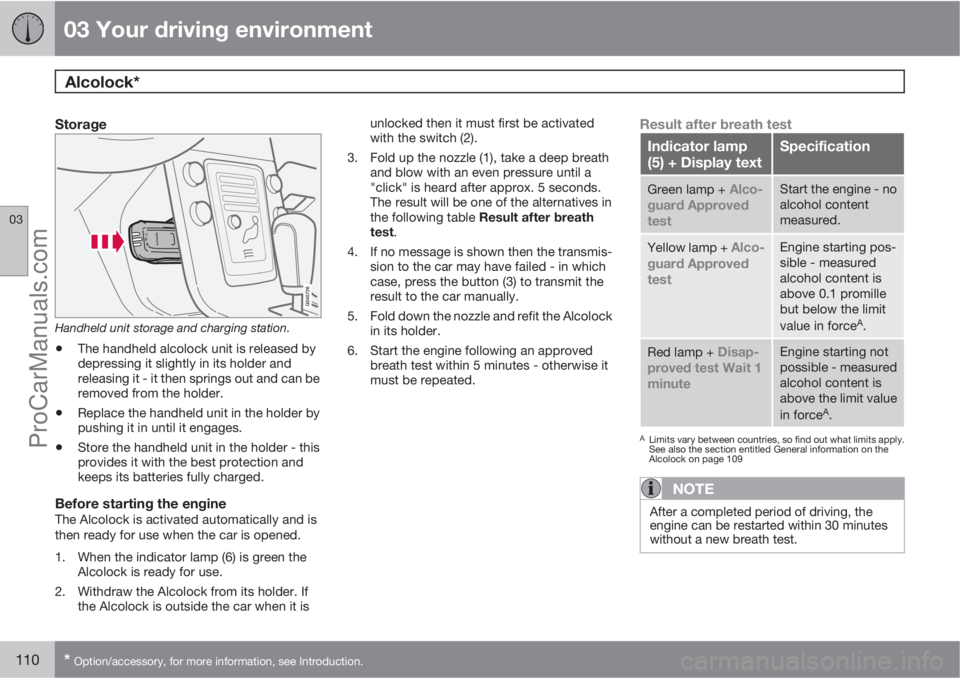
Handheld unit storage and charging station.
•The handheld alcolock unit is released by
depressing it slightly in its holder and
releasing it - it then springs out and can be
removed from the holder.
•Replace the handheld unit in the holder by
pushing it in until it engages.
•Store the handheld unit in the holder - this
provides it with the best protection and
keeps its batteries fully charged.
Before starting the engineThe Alcolock is activated automatically and is
then ready for use when the car is opened.
1. When the indicator lamp (6) is green the
Alcolock is ready for use.
2. Withdraw the Alcolock from its holder. If
the Alcolock is outside the car when it isunlocked then it must first be activated
with the switch (2).
3. Fold up the nozzle (1), take a deep breath
and blow with an even pressure until a
"click" is heard after approx. 5 seconds.
The result will be one of the alternatives in
the following table Result after breath
test.
4. If no message is shown then the transmis-
sion to the car may have failed - in which
case, press the button (3) to transmit the
result to the car manually.
5. Fold down the nozzle and refit the Alcolock
in its holder.
6. Start the engine following an approved
breath test within 5 minutes - otherwise it
must be repeated.
Result after breath test
Indicator lamp
(5) + Display textSpecification
Green lamp + Alco-
guard Approved
testStart the engine - no
alcohol content
measured.
Yellow lamp + Alco-
guard Approved
testEngine starting pos-
sible - measured
alcohol content is
above 0.1 promille
but below the limit
value in force
A.
Red lamp + Disap-
proved test Wait 1
minuteEngine starting not
possible - measured
alcohol content is
above the limit value
in force
A.
ALimits vary between countries, so find out what limits apply.
See also the section entitled General information on the
Alcolock on page 109
NOTE
After a completed period of driving, the
engine can be restarted within 30 minutes
without a new breath test.
ProCarManuals.com
Page 113 of 422
03 Your driving environment
Alcolock*
03
* Option/accessory, for more information, see Introduction.111 To bear in mind
Before the breath testIn order to obtain correct function and as accu-
rate a measurement result as possible:
•Avoid eating or drinking approx.
5 minutes before the breath test.
•Avoid excess windscreen washing - the
alcohol in the washer fluid may result in an
incorrect measurement result.
Change of driverIn order to ensure that a new breath test is car-
ried out in the event of a change of driver -
depress the switch (2) and the send button (3)
simultaneously for approx. 3 seconds. At
which point the car returns to start inhibition
mode and a new approved breath test is
required before starting the engine.
Calibration and serviceThe Alcolock must be checked and calibrated
at a workshop2 every 12 months.
30 days before recalibration is necessary the
display shows
Alcoguard Calibr. required. If
calibration is not carried out within these 30
days then normal engine starting will be
blocked - only starting with the Bypass func-tion will then be possible, see page 111 sec-
tion Emergency situation.
The message can be cleared by pressing the
send button (3) once. Otherwise it goes out on
its own after approx. 2 minutes but then reap-
pears each time the engine is started - only
recalibration at a workshop
2 can clear the mes-
sage permanently.
Cold or hot weatherThe colder the weather the longer it takes
before the Alcolock is ready for use:
Temperature (ºC)Maximum heat-
ing time (sec-
onds)
+10 to +8510
-5 to +1060
-40 to -5180
At temperatures below -20 ºC or above
+60 ºC the Alcolock requires additional power
supply. The display shows
Alcoguard insert
power cable. In which case, connect the
power supply cable from the glovebox and wait
until indicator lamp (6) is green.In extremely cold weather the heating time can
be reduced by taking the Alcolock indoors.
Emergency situationIn the event of an emergency situation or the
Alcolock is out of order, it is possible to bypass
the Alcolock in order to drive the car.
NOTE
All Bypass activation is logged and saved in
memory, see page 8 in the section, Record-
ing data.
After the Bypass function has been activated
the display shows Alcoguard Bypass
enabled the whole time while driving and can
only be reset by a workshop2.
The Bypass function can be tested without the
error message being logged - in which case,
carry out all the steps without starting the car.
The error message is cleared when the car is
locked.
When the Alcolock is installed, either the
Bypass or Emergency function is selected as
the bypassing option. This setting can be
changed afterwards at a workshop
2.
2An authorised Volvo workshop is recommended.
ProCarManuals.com
Page 114 of 422
03 Your driving environment
Alcolock*
03
112* Option/accessory, for more information, see Introduction.
Activating the Bypass function
•Depress and hold the left-hand stalk
switch OK button and the button for haz-
ard warning flashers simultaneously for
approx. 5 seconds - the display first shows
Bypass activated Wait 1 minute and
then Alcoguard Bypass enabled - after
which the engine can be started.
This function can be activated several times.
The error message shown during driving can
only be cleared at a workshop
2.
Activating the Emergency function
•Depress and hold the left-hand stalk
switch OK button and the button for haz-
ard warning flashers simultaneously for
approx. 5 seconds - the display shows
Alcoguard Bypass enabled and the
engine can be started.
This function can be used once, after which a
reset must be made at a workshop
2.
Symbols and display messages
In addition to the previously described mes-
sages, the combined instrument panel's dis-
play can also show the following:
Display textMeaning/Action
Alcoguard Restart
possibleThe engine has been
switched off for less
than 30 minutes -
engine starting pos-
sible without new
test.
Alcoguard Service
requiredContact a work-
shop2.
Alcoguard No sig-
nalTransmission failed -
send manually with
button (3) or take a
new breath test.
Alcoguard Invalid
testTest failed - take a
new breath test.
Alcoguard Blow
longerBlowing too short -
blow for longer.
Alcoguard Blow
softerBlowing too hard -
blow more gently.
Display textMeaning/Action
Alcoguard Blow
harderBlowing too weak -
blow harder.
Alcoguard wait
PreheatingHeating not finished
- wait for text Alco-
guard Blow 5 sec-
onds
.
2An authorised Volvo workshop is recommended.
ProCarManuals.com
Page 115 of 422
03 Your driving environment
Starting the engine
03
* Option/accessory, for more information, see Introduction.113 Petrol and diesel engines
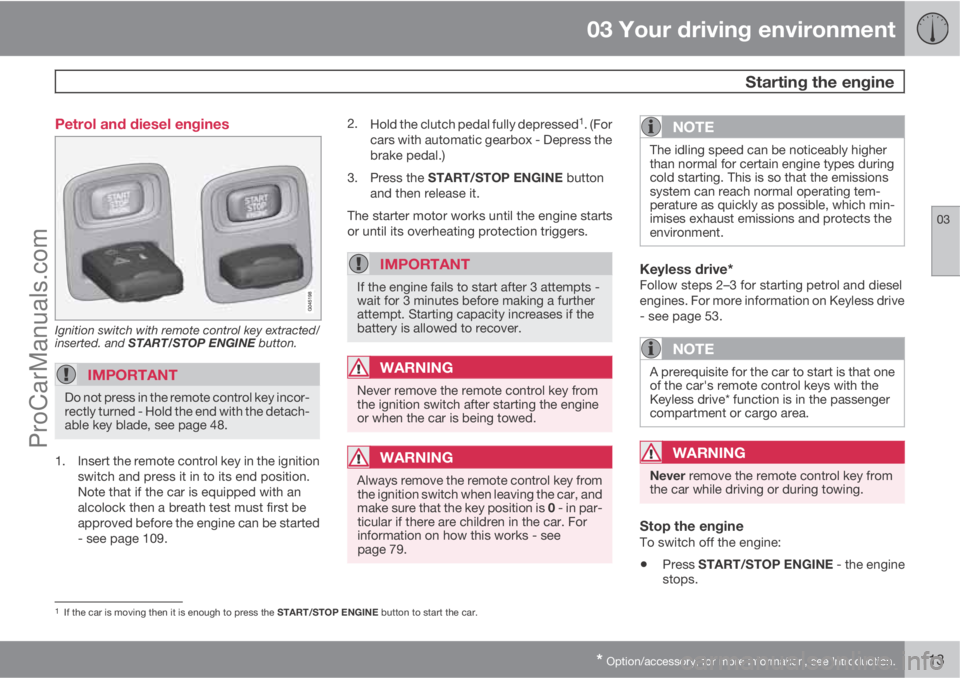
Ignition switch with remote control key extracted/
inserted. and START/STOP ENGINE button.
IMPORTANT
Do not press in the remote control key incor-
rectly turned - Hold the end with the detach-
able key blade, see page 48.
1. Insert the remote control key in the ignition
switch and press it in to its end position.
Note that if the car is equipped with an
alcolock then a breath test must first be
approved before the engine can be started
- see page 109.2.
Hold the clutch pedal fully depressed
1. (For
cars with automatic gearbox - Depress the
brake pedal.)
3.
Press the START/STOP ENGINE button
and then release it.
The starter motor works until the engine starts
or until its overheating protection triggers.
IMPORTANT
If the engine fails to start after 3 attempts -
wait for 3 minutes before making a further
attempt. Starting capacity increases if the
battery is allowed to recover.
WARNING
Never remove the remote control key from
the ignition switch after starting the engine
or when the car is being towed.
WARNING
Always remove the remote control key from
the ignition switch when leaving the car, and
make sure that the key position is 0 - in par-
ticular if there are children in the car. For
information on how this works - see
page 79.
NOTE
The idling speed can be noticeably higher
than normal for certain engine types during
cold starting. This is so that the emissions
system can reach normal operating tem-
perature as quickly as possible, which min-
imises exhaust emissions and protects the
environment.
Keyless drive*Follow steps 2–3 for starting petrol and diesel
engines. For more information on Keyless drive
- see page 53.
NOTE
A prerequisite for the car to start is that one
of the car's remote control keys with the
Keyless drive* function is in the passenger
compartment or cargo area.
WARNING
Never remove the remote control key from
the car while driving or during towing.
Stop the engineTo switch off the engine:
•Press START/STOP ENGINE - the engine
stops.
1If the car is moving then it is enough to press the START/STOP ENGINE button to start the car.
ProCarManuals.com
Page 116 of 422
03 Your driving environment
Starting the engine
03
114* Option/accessory, for more information, see Introduction.
If the gear selector is not in P position or if the
car is moving:
•Press twice on START/STOP ENGINE or
hold the button depressed until the engine
stops.
Steering lockA mechanical noise can be perceived when the
steering lock unlocks or locks.
•The steering lock unlocks when the remote
control key is in the ignition switch2 and the
START/STOP ENGINE button is
depressed.
•The steering lock locks when the driver's
door is opened after the engine has been
switched off.
Key positionsFor information on the remote control key's dif-
ferent key positions - see page 78
Remote start - ERS*
General information on ERSRemote start (ERS – Engine Remote Start)
means that the car's engine can be started
remotely using the remote control key. This is
so that the passenger compartment can be
warmed up/cooled down before departure.
The climate control starts with the same set-
tings that were being used when the car was
parked.
An ERS-started engine is activated for a maxi-
mum of 15 minutes, then it is switched off. After
two ERS-activations the engine must be
started in the normal way before ERS can be
re-used.
The ERS option is only available on cars with
automatic gearbox.
NOTE
Follow local/national rules/regulations on
idling.
WARNING
To remote-start the engine, the following
criteria must be met:
•The car must be supervised
•There must be no people or animals
inside the car
•The car must not be parked in a closed,
unventilated area - the exhaust gases
may seriously injure humans and ani-
mals.
2Cars with Keyless drive must have a remote control key inside the passenger compartment.
ProCarManuals.com
Page 117 of 422
03 Your driving environment
Starting the engine
03
115
Operation
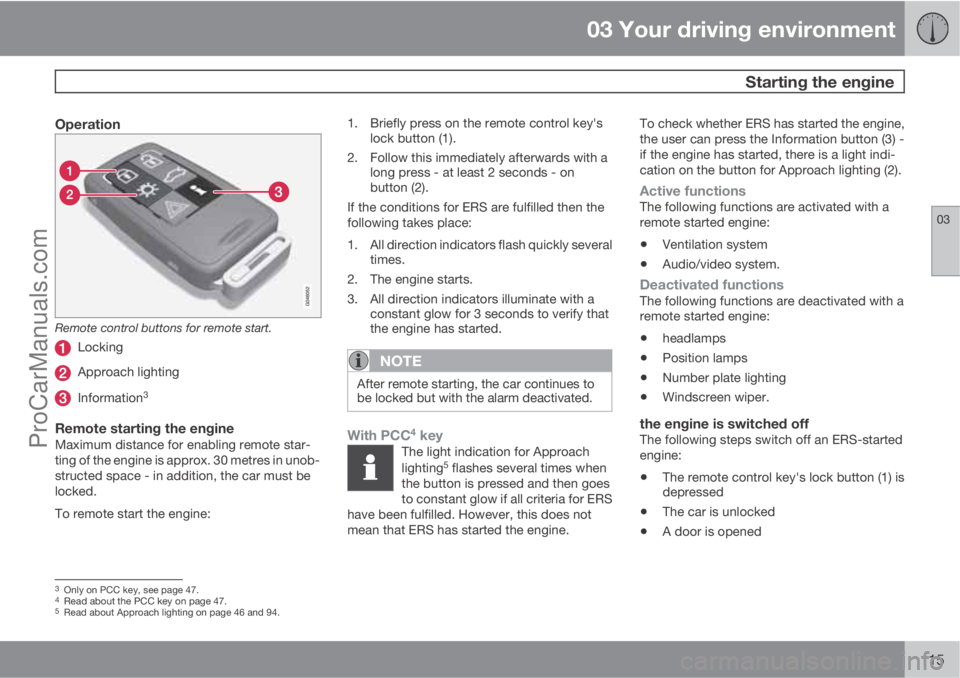
Remote control buttons for remote start.
Locking
Approach lighting
Information3
Remote starting the engineMaximum distance for enabling remote star-
ting of the engine is approx. 30 metres in unob-
structed space - in addition, the car must be
locked.
To remote start the engine:1. Briefly press on the remote control key's
lock button (1).
2. Follow this immediately afterwards with a
long press - at least 2 seconds - on
button (2).
If the conditions for ERS are fulfilled then the
following takes place:
1. All direction indicators flash quickly several
times.
2. The engine starts.
3. All direction indicators illuminate with a
constant glow for 3 seconds to verify that
the engine has started.
NOTE
After remote starting, the car continues to
be locked but with the alarm deactivated.
With PCC4 keyThe light indication for Approach
lighting5 flashes several times when
the button is pressed and then goes
to constant glow if all criteria for ERS
have been fulfilled. However, this does not
mean that ERS has started the engine.
To check whether ERS has started the engine,
the user can press the Information button (3) -
if the engine has started, there is a light indi-
cation on the button for Approach lighting (2).
Active functionsThe following functions are activated with a
remote started engine:
•Ventilation system
•Audio/video system.
Deactivated functionsThe following functions are deactivated with a
remote started engine:
•headlamps
•Position lamps
•Number plate lighting
•Windscreen wiper.
the engine is switched offThe following steps switch off an ERS-started
engine:
•The remote control key's lock button (1) is
depressed
•The car is unlocked
•A door is opened
3Only on PCC key, see page 47.4Read about the PCC key on page 47.5Read about Approach lighting on page 46 and 94.
ProCarManuals.com
Page 118 of 422
03 Your driving environment
Starting the engine
03
116
•Accelerator pedal or brake pedal is
depressed
•The gear selector is moved out of P posi-
tion
•There is less than approx.10 litres left in the
fuel tank
•Active ERS time passes 15 minutes.
When an ERS-started engine is switched off,
all direction indicators illuminate with a con-
stant glow for 3 seconds.
Symbols and messages in the displayIn situations where the ERS function fails or is
interrupted, a symbol is shown on the instru-
ment panel, supplemented by an explanatory
message - Follow any recommendation given.
ERS function unavailable
MessageSpecification
No remote start
door openERS unavailable
because a door/tail-
gate was not closed.
No remote start
car not lockedERS unavailable
because the car was
not locked.
MessageSpecification
No remote start
low batteryERS unavailable due
to low battery volt-
age. Charge the bat-
tery by starting the
engine.
No remote start
driver in carERS unavailable
because someone
was in the passen-
ger compartment.
No remote start
engine warningERS unavailable due
to warning message
from engine. Con-
tact a workshop
A.
No remote start
gear not in PERS unavailable
because gear selec-
tor was not in P posi-
tion.
No remote start
engine coolantERS unavailable due
to error message
from cooling sys-
tem, see page 332.
MessageSpecification
No remote start
low fuel levelERS unavailable
because fuel level
too low.
No remote start
Max 2 startsERS unavailable
because a maximum
of 2 ERS activations
in succession are
allowed.
AAn authorised Volvo workshop is recommended.
Interrupted ERS function
MessageSpecification
Remote start off
low batteryERS interrupted
because battery
voltage too low.
Remote start off
low fuel levelERS interrupted
because fuel level
too low.
Remote start off
engine warningERS interrupted due
to error message
from engine. Con-
tact a workshop
A.
ProCarManuals.com
Page 119 of 422
03 Your driving environment
Starting the engine
03
117
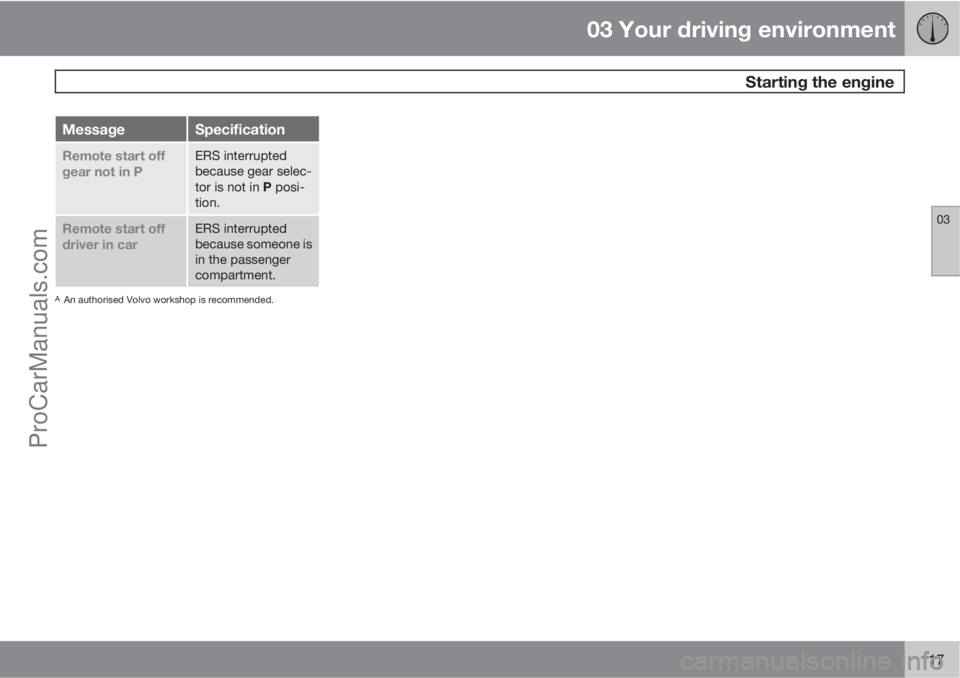
MessageSpecification
Remote start off
gear not in PERS interrupted
because gear selec-
tor is not in P posi-
tion.
Remote start off
driver in carERS interrupted
because someone is
in the passenger
compartment.
AAn authorised Volvo workshop is recommended.
ProCarManuals.com
Page 120 of 422
03 Your driving environment
Starting the engine – Flexifuel
03
118* Option/accessory, for more information, see Introduction.
General information about starting
with Flexifuel
The engine is started in the same way as in a
petrol-engined car.
In the event of starting difficulties
If the engine does not start at the first start
attempt:
•Make further attempts to start with the
START/STOP ENGINE button.
If the engine still does not startThe outside temperature is lower than +5 °C:
1. Connect the engine block heater for at
least 1 hour.
2. Make further attempts to start with the
START/STOP ENGINE button.
IMPORTANT
If the engine does not start despite repeated
start attempts, you are recommended to
contact an authorised Volvo workshop.
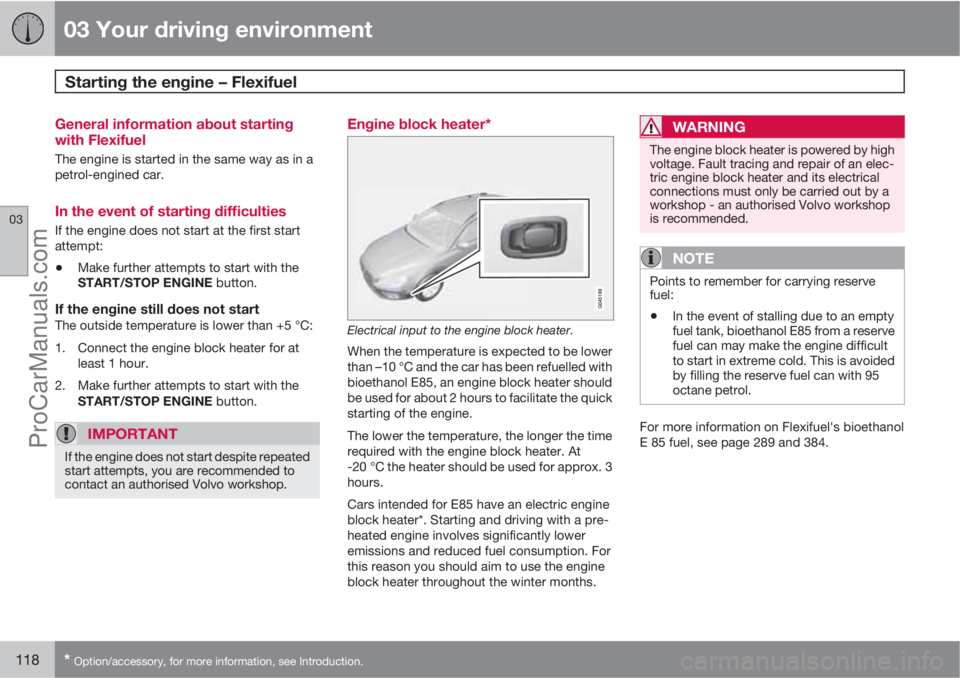
Engine block heater*
Electrical input to the engine block heater.
When the temperature is expected to be lower
than –10 °C and the car has been refuelled with
bioethanol E85, an engine block heater should
be used for about 2 hours to facilitate the quick
starting of the engine.
The lower the temperature, the longer the time
required with the engine block heater. At
-20 °C the heater should be used for approx. 3
hours.
Cars intended for E85 have an electric engine
block heater*. Starting and driving with a pre-
heated engine involves significantly lower
emissions and reduced fuel consumption. For
this reason you should aim to use the engine
block heater throughout the winter months.
WARNING
The engine block heater is powered by high
voltage. Fault tracing and repair of an elec-
tric engine block heater and its electrical
connections must only be carried out by a
workshop - an authorised Volvo workshop
is recommended.
NOTE
Points to remember for carrying reserve
fuel:
•In the event of stalling due to an empty
fuel tank, bioethanol E85 from a reserve
fuel can may make the engine difficult
to start in extreme cold. This is avoided
by filling the reserve fuel can with 95
octane petrol.
For more information on Flexifuel's bioethanol
E 85 fuel, see page 289 and 384.
ProCarManuals.com