ECO mode VOLVO V60 2013 Owners Manual
[x] Cancel search | Manufacturer: VOLVO, Model Year: 2013, Model line: V60, Model: VOLVO V60 2013Pages: 422, PDF Size: 9.59 MB
Page 32 of 422
01 Safety
Safety mode 01
30
Driving after a collision
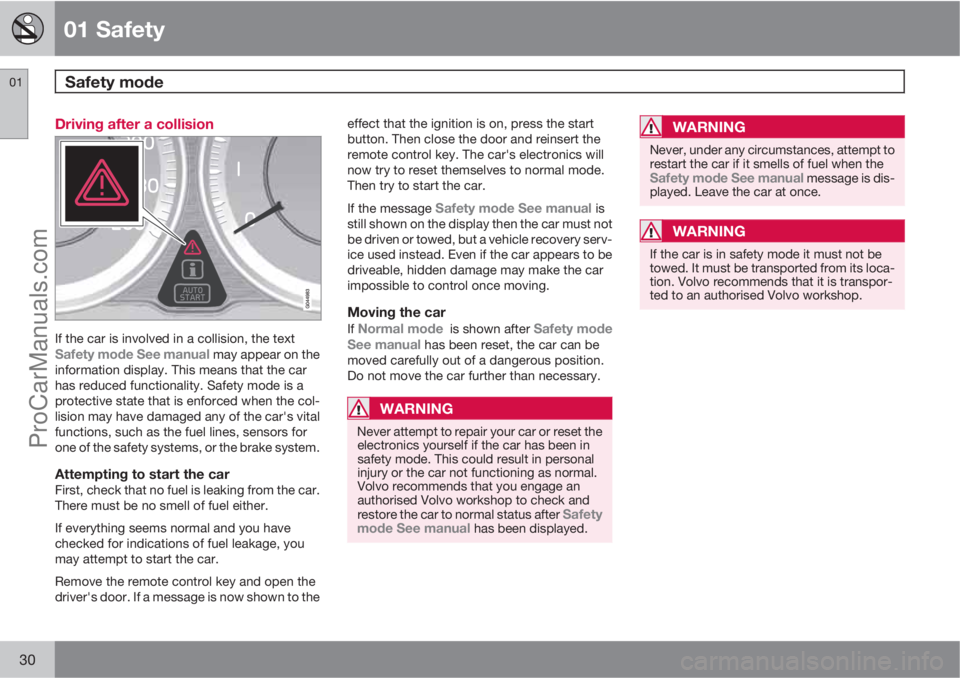
If the car is involved in a collision, the textSafety mode See manual may appear on the
information display. This means that the car
has reduced functionality. Safety mode is a
protective state that is enforced when the col-
lision may have damaged any of the car's vital
functions, such as the fuel lines, sensors for
one of the safety systems, or the brake system.
Attempting to start the carFirst, check that no fuel is leaking from the car.
There must be no smell of fuel either.
If everything seems normal and you have
checked for indications of fuel leakage, you
may attempt to start the car.
Remove the remote control key and open the
driver's door. If a message is now shown to theeffect that the ignition is on, press the start
button. Then close the door and reinsert the
remote control key. The car's electronics will
now try to reset themselves to normal mode.
Then try to start the car.
If the message
Safety mode See manual is
still shown on the display then the car must not
be driven or towed, but a vehicle recovery serv-
ice used instead. Even if the car appears to be
driveable, hidden damage may make the car
impossible to control once moving.
Moving the car
If Normal mode is shown after Safety mode
See manual has been reset, the car can be
moved carefully out of a dangerous position.
Do not move the car further than necessary.
WARNING
Never attempt to repair your car or reset the
electronics yourself if the car has been in
safety mode. This could result in personal
injury or the car not functioning as normal.
Volvo recommends that you engage an
authorised Volvo workshop to check and
restore the car to normal status after
Safety
mode See manual has been displayed.
WARNING
Never, under any circumstances, attempt to
restart the car if it smells of fuel when the
Safety mode See manual message is dis-
played. Leave the car at once.
WARNING
If the car is in safety mode it must not be
towed. It must be transported from its loca-
tion. Volvo recommends that it is transpor-
ted to an authorised Volvo workshop.
ProCarManuals.com
Page 41 of 422
01 Safety
Child safety01
39
WARNING
Never place a child in the passenger seat if
the car is equipped with an activated airbag.
NOTE
If an ISOFIX child seat has no size classifi-
cation then the car model must be included
on the child seat's vehicle list.
NOTE
Volvo recommends that you contact an
authorised Volvo dealer for recommenda-
tions about which ISOFIX child seats Volvo
recommends.
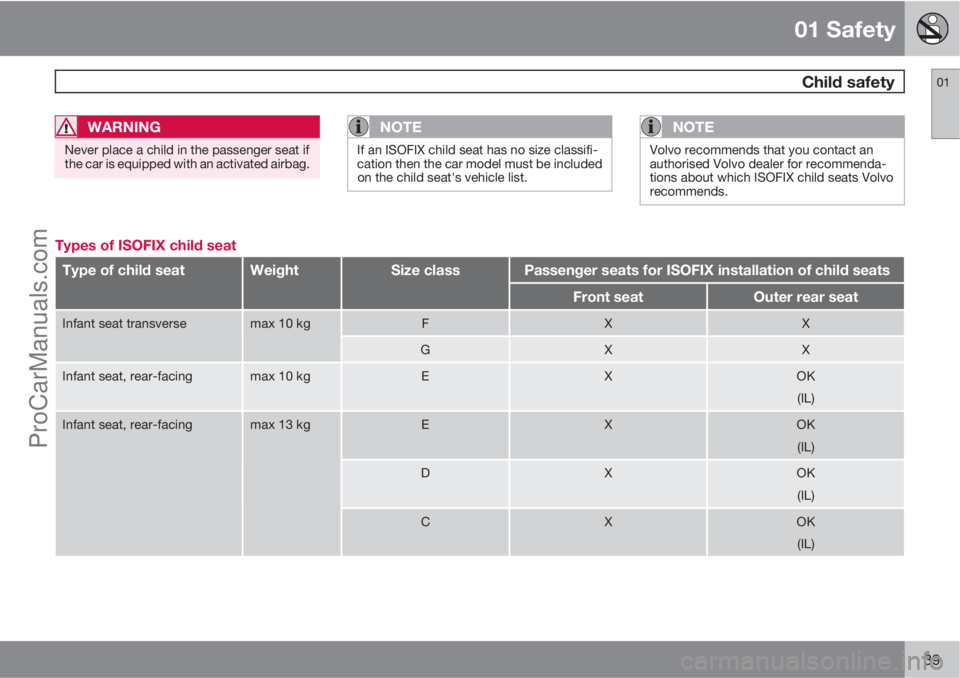
Types of ISOFIX child seat
Type of child seatWeightSize classPassenger seats for ISOFIX installation of child seats
Front seatOuter rear seat
Infant seat transversemax 10 kgFXX
GXX
Infant seat, rear-facingmax 10 kgEXOK
(IL)
Infant seat, rear-facingmax 13 kgEXOK
(IL)
DXOK
(IL)
CXOK
(IL)
ProCarManuals.com
Page 42 of 422
01 Safety
Child safety 01
40
Type of child seatWeightSize classPassenger seats for ISOFIX installation of child seats
Front seatOuter rear seat
Child seat, rear-facing9-18 kgDXOK
(IL)
CXOK
(IL)
Front-facing child seat9-18 kgBXOKA
(IUF)
B1XOKA
(IUF)
AXOKA
(IUF)
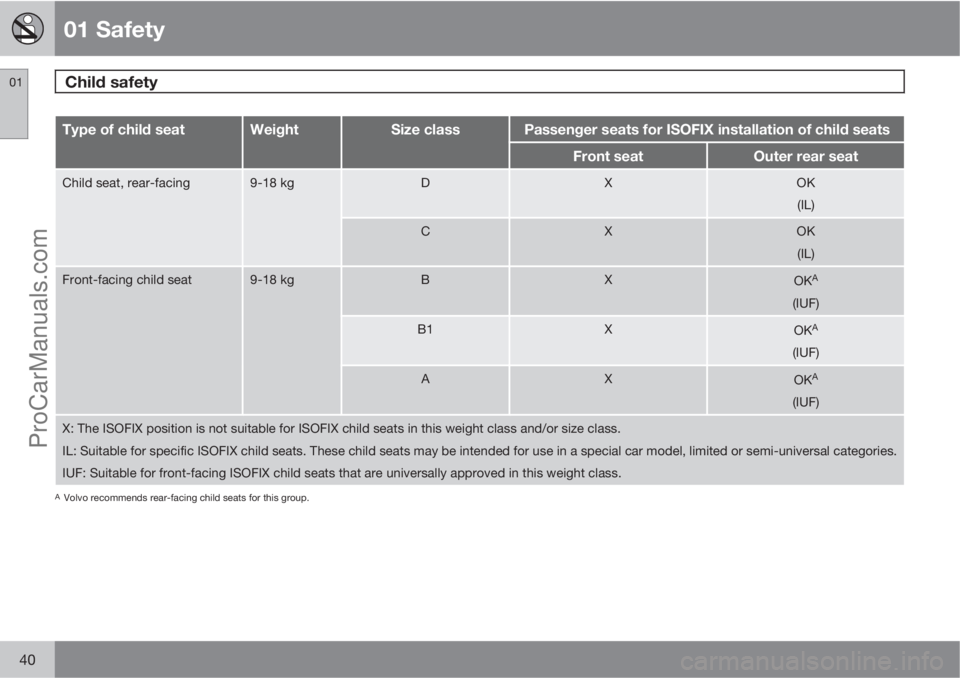
X: The ISOFIX position is not suitable for ISOFIX child seats in this weight class and/or size class.
IL: Suitable for specific ISOFIX child seats. These child seats may be intended for use in a special car model, limited or semi-universal categories.
IUF: Suitable for front-facing ISOFIX child seats that are universally approved in this weight class.
AVolvo recommends rear-facing child seats for this group.
ProCarManuals.com
Page 74 of 422
03 Your driving environment
Instruments and controls
03
72* Option/accessory, for more information, see Introduction.
Meters
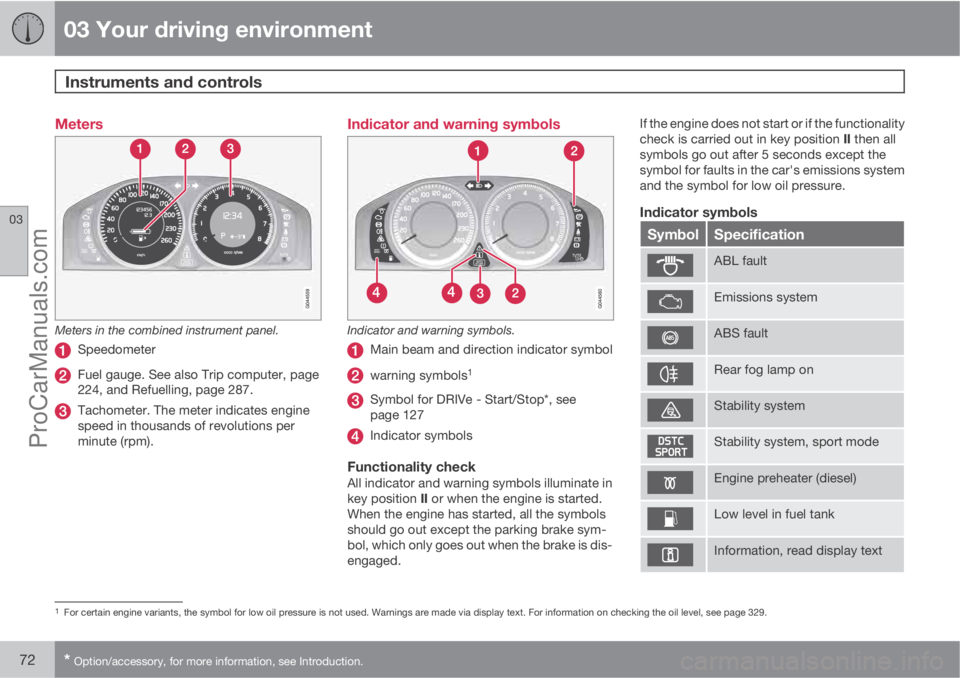
Meters in the combined instrument panel.
Speedometer
Fuel gauge. See also Trip computer, page
224, and Refuelling, page 287.
Tachometer. The meter indicates engine
speed in thousands of revolutions per
minute (rpm).
Indicator and warning symbols
Indicator and warning symbols.
Main beam and direction indicator symbol
warning symbols1
Symbol for DRIVe - Start/Stop*, see
page 127
Indicator symbols
Functionality checkAll indicator and warning symbols illuminate in
key position II or when the engine is started.
When the engine has started, all the symbols
should go out except the parking brake sym-
bol, which only goes out when the brake is dis-
engaged.If the engine does not start or if the functionality
check is carried out in key position II then all
symbols go out after 5 seconds except the
symbol for faults in the car's emissions system
and the symbol for low oil pressure.
Indicator symbols
SymbolSpecification
ABL fault
Emissions system
ABS fault
Rear fog lamp on
Stability system
Stability system, sport mode
Engine preheater (diesel)
Low level in fuel tank
Information, read display text
1For certain engine variants, the symbol for low oil pressure is not used. Warnings are made via display text. For information on checking the oil level, see page 329.
ProCarManuals.com
Page 75 of 422
03 Your driving environment
Instruments and controls
03
* Option/accessory, for more information, see Introduction.73
SymbolSpecification
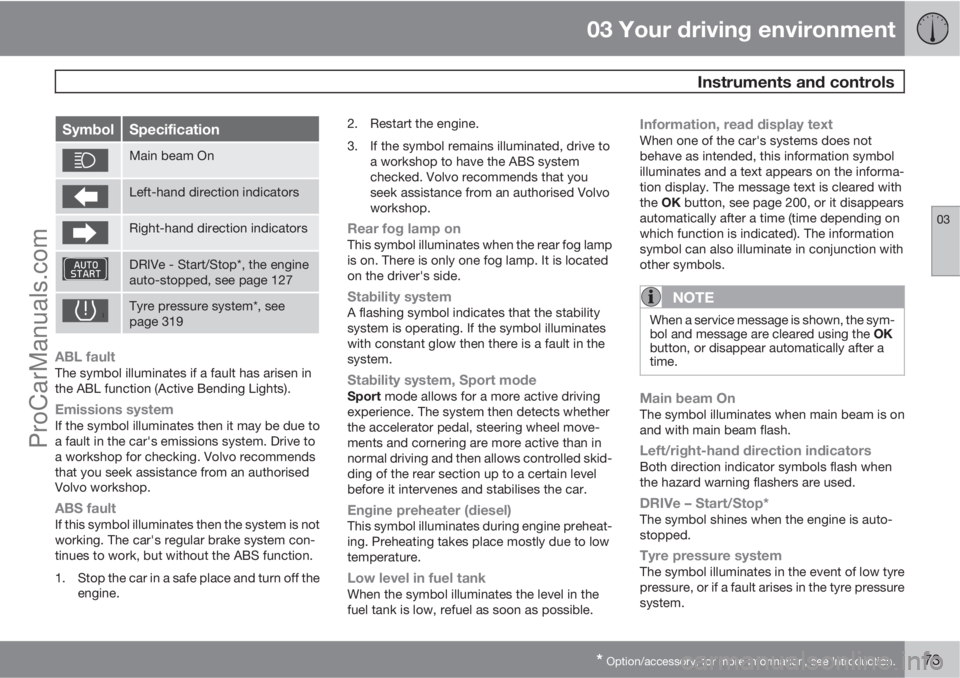
Main beam On
Left-hand direction indicators
Right-hand direction indicators
DRIVe - Start/Stop*, the engine
auto-stopped, see page 127
Tyre pressure system*, see
page 319
ABL faultThe symbol illuminates if a fault has arisen in
the ABL function (Active Bending Lights).
Emissions systemIf the symbol illuminates then it may be due to
a fault in the car's emissions system. Drive to
a workshop for checking. Volvo recommends
that you seek assistance from an authorised
Volvo workshop.
ABS faultIf this symbol illuminates then the system is not
working. The car's regular brake system con-
tinues to work, but without the ABS function.
1. Stop the car in a safe place and turn off the
engine.2. Restart the engine.
3. If the symbol remains illuminated, drive to
a workshop to have the ABS system
checked. Volvo recommends that you
seek assistance from an authorised Volvo
workshop.
Rear fog lamp onThis symbol illuminates when the rear fog lamp
is on. There is only one fog lamp. It is located
on the driver's side.
Stability systemA flashing symbol indicates that the stability
system is operating. If the symbol illuminates
with constant glow then there is a fault in the
system.
Stability system, Sport modeSport mode allows for a more active driving
experience. The system then detects whether
the accelerator pedal, steering wheel move-
ments and cornering are more active than in
normal driving and then allows controlled skid-
ding of the rear section up to a certain level
before it intervenes and stabilises the car.
Engine preheater (diesel)This symbol illuminates during engine preheat-
ing. Preheating takes place mostly due to low
temperature.
Low level in fuel tankWhen the symbol illuminates the level in the
fuel tank is low, refuel as soon as possible.
Information, read display textWhen one of the car's systems does not
behave as intended, this information symbol
illuminates and a text appears on the informa-
tion display. The message text is cleared with
the OK button, see page 200, or it disappears
automatically after a time (time depending on
which function is indicated). The information
symbol can also illuminate in conjunction with
other symbols.
NOTE
When a service message is shown, the sym-
bol and message are cleared using the OK
button, or disappear automatically after a
time.
Main beam OnThe symbol illuminates when main beam is on
and with main beam flash.
Left/right-hand direction indicatorsBoth direction indicator symbols flash when
the hazard warning flashers are used.
DRIVe – Start/Stop*The symbol shines when the engine is auto-
stopped.
Tyre pressure systemThe symbol illuminates in the event of low tyre
pressure, or if a fault arises in the tyre pressure
system.
ProCarManuals.com
Page 90 of 422
03 Your driving environment
Lighting
03
88* Option/accessory, for more information, see Introduction.
PositionSpecification
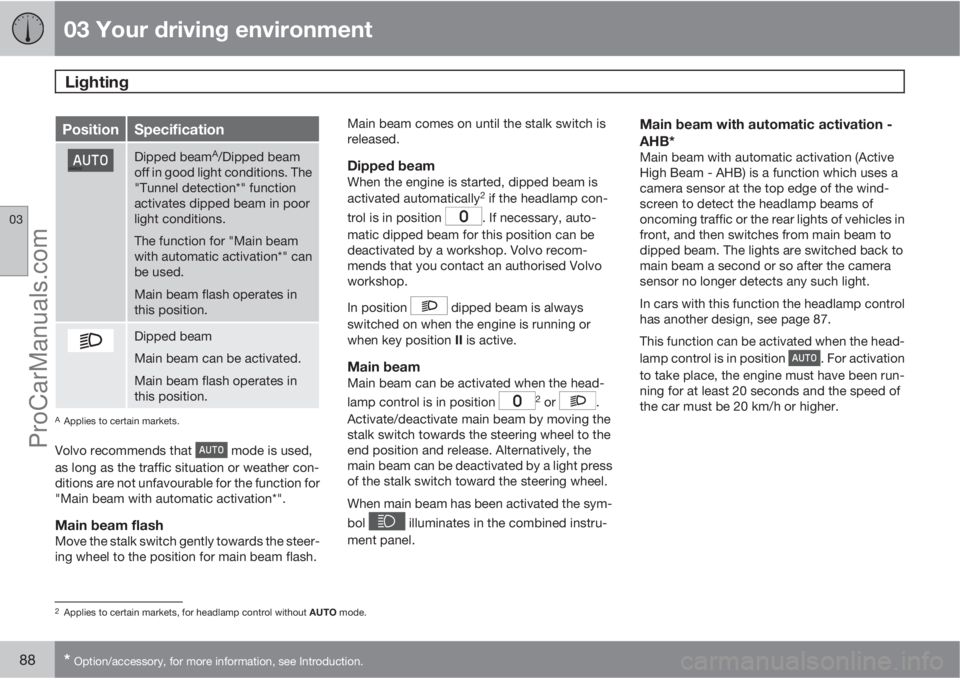
Dipped beamA/Dipped beam
off in good light conditions. The
"Tunnel detection*" function
activates dipped beam in poor
light conditions.
The function for "Main beam
with automatic activation*" can
be used.
Main beam flash operates in
this position.
Dipped beam
Main beam can be activated.
Main beam flash operates in
this position.
AApplies to certain markets.
Volvo recommends that mode is used,
as long as the traffic situation or weather con-
ditions are not unfavourable for the function for
"Main beam with automatic activation*".
Main beam flashMove the stalk switch gently towards the steer-
ing wheel to the position for main beam flash.Main beam comes on until the stalk switch is
released.
Dipped beamWhen the engine is started, dipped beam is
activated automatically2 if the headlamp con-
trol is in position
. If necessary, auto-
matic dipped beam for this position can be
deactivated by a workshop. Volvo recom-
mends that you contact an authorised Volvo
workshop.
In position
dipped beam is always
switched on when the engine is running or
when key position II is active.
Main beamMain beam can be activated when the head-
lamp control is in position 2 or .
Activate/deactivate main beam by moving the
stalk switch towards the steering wheel to the
end position and release. Alternatively, the
main beam can be deactivated by a light press
of the stalk switch toward the steering wheel.
When main beam has been activated the sym-
bol
illuminates in the combined instru-
ment panel.
Main beam with automatic activation -
AHB*
Main beam with automatic activation (Active
High Beam - AHB) is a function which uses a
camera sensor at the top edge of the wind-
screen to detect the headlamp beams of
oncoming traffic or the rear lights of vehicles in
front, and then switches from main beam to
dipped beam. The lights are switched back to
main beam a second or so after the camera
sensor no longer detects any such light.
In cars with this function the headlamp control
has another design, see page 87.
This function can be activated when the head-
lamp control is in position
. For activation
to take place, the engine must have been run-
ning for at least 20 seconds and the speed of
the car must be 20 km/h or higher.
2Applies to certain markets, for headlamp control without AUTO mode.
ProCarManuals.com
Page 113 of 422
03 Your driving environment
Alcolock*
03
* Option/accessory, for more information, see Introduction.111 To bear in mind
Before the breath testIn order to obtain correct function and as accu-
rate a measurement result as possible:
•Avoid eating or drinking approx.
5 minutes before the breath test.
•Avoid excess windscreen washing - the
alcohol in the washer fluid may result in an
incorrect measurement result.
Change of driverIn order to ensure that a new breath test is car-
ried out in the event of a change of driver -
depress the switch (2) and the send button (3)
simultaneously for approx. 3 seconds. At
which point the car returns to start inhibition
mode and a new approved breath test is
required before starting the engine.
Calibration and serviceThe Alcolock must be checked and calibrated
at a workshop2 every 12 months.
30 days before recalibration is necessary the
display shows
Alcoguard Calibr. required. If
calibration is not carried out within these 30
days then normal engine starting will be
blocked - only starting with the Bypass func-tion will then be possible, see page 111 sec-
tion Emergency situation.
The message can be cleared by pressing the
send button (3) once. Otherwise it goes out on
its own after approx. 2 minutes but then reap-
pears each time the engine is started - only
recalibration at a workshop
2 can clear the mes-
sage permanently.
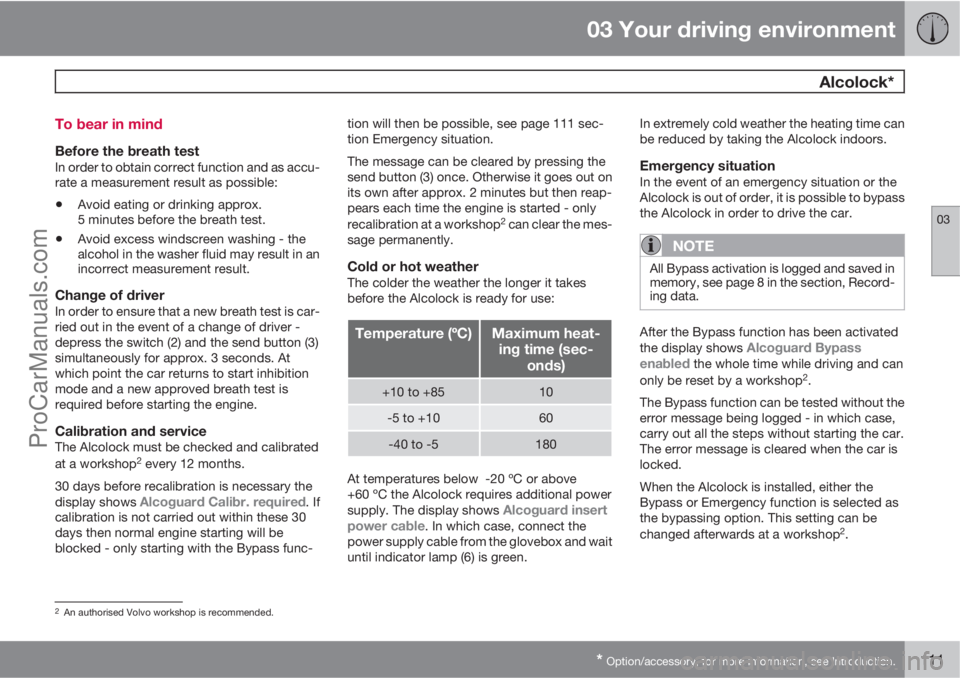
Cold or hot weatherThe colder the weather the longer it takes
before the Alcolock is ready for use:
Temperature (ºC)Maximum heat-
ing time (sec-
onds)
+10 to +8510
-5 to +1060
-40 to -5180
At temperatures below -20 ºC or above
+60 ºC the Alcolock requires additional power
supply. The display shows
Alcoguard insert
power cable. In which case, connect the
power supply cable from the glovebox and wait
until indicator lamp (6) is green.In extremely cold weather the heating time can
be reduced by taking the Alcolock indoors.
Emergency situationIn the event of an emergency situation or the
Alcolock is out of order, it is possible to bypass
the Alcolock in order to drive the car.
NOTE
All Bypass activation is logged and saved in
memory, see page 8 in the section, Record-
ing data.
After the Bypass function has been activated
the display shows Alcoguard Bypass
enabled the whole time while driving and can
only be reset by a workshop2.
The Bypass function can be tested without the
error message being logged - in which case,
carry out all the steps without starting the car.
The error message is cleared when the car is
locked.
When the Alcolock is installed, either the
Bypass or Emergency function is selected as
the bypassing option. This setting can be
changed afterwards at a workshop
2.
2An authorised Volvo workshop is recommended.
ProCarManuals.com
Page 123 of 422
03 Your driving environment
Gearboxes
03
121
IMPORTANT
The operating temperature of the gearbox is
checked in order to prevent damage to any
of the drive system's components. In the
event of a risk of overheating a warning
symbol illuminates on the instrument panel
combined with a text message - In which
case, follow the recommendation given.
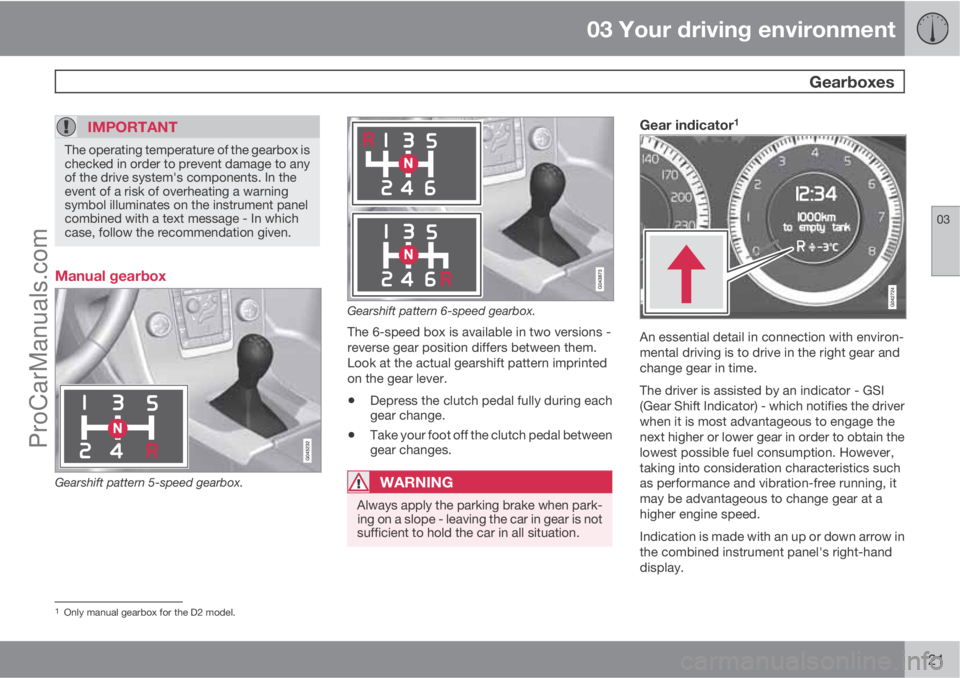
Manual gearbox
Gearshift pattern 5-speed gearbox.
Gearshift pattern 6-speed gearbox.
The 6-speed box is available in two versions -
reverse gear position differs between them.
Look at the actual gearshift pattern imprinted
on the gear lever.
•Depress the clutch pedal fully during each
gear change.
•Take your foot off the clutch pedal between
gear changes.
WARNING
Always apply the parking brake when park-
ing on a slope - leaving the car in gear is not
sufficient to hold the car in all situation.
Gear indicator1
An essential detail in connection with environ-
mental driving is to drive in the right gear and
change gear in time.
The driver is assisted by an indicator - GSI
(Gear Shift Indicator) - which notifies the driver
when it is most advantageous to engage the
next higher or lower gear in order to obtain the
lowest possible fuel consumption. However,
taking into consideration characteristics such
as performance and vibration-free running, it
may be advantageous to change gear at a
higher engine speed.
Indication is made with an up or down arrow in
the combined instrument panel's right-hand
display.
1Only manual gearbox for the D2 model.
ProCarManuals.com
Page 125 of 422
03 Your driving environment
Gearboxes
03
123
Geartronic – Manual gear positions (+/-)The driver can also change gear manually
using the Geartronic automatic gearbox. The
car engine-brakes when the accelerator pedal
is released.
Manual gearshift mode is obtained by moving
the lever to the side from D position to the end
position at +/–. The information display shifts
the indication from
D to one of the figures 1 –6, which is equivalent to the gear that is
engaged just then, see page 71.
•Move the lever forwards towards + (plus)
to change up a gear and release the lever,
which returns to its rest position between
+ and –.
or
•Pull the lever back towards – (minus) to
change down a gear and release it.
The manual gearshift mode (+/–) can be
selected at any time while driving.
Geartronic automatically shifts down if the
driver allows the speed to decrease lower than
a level suitable for the selected gear, in order
to avoid jerking and stalling.
To return to automatic driving mode:
•Move the lever to the side to the end posi-
tion at D.
NOTE
f the gearbox has a Sport programme then
the gearbox will only become manual after
the lever has been moved forwards or back-
wards in its (-+/–) position. The information
display then shifts the indication from
S to
show which of the gears 1-6 is engaged.
Geartronic - Sport mode (S)2
The Sport programme provides sportier cha-
racteristics and allows higher engine speed for
the gears. At the same time it responds more
quickly to acceleration. During active driving,
the use of a lower gear is prioritised, leading to
a delayed upshift.
Sport mode is obtained by moving the lever to
the side from D position to the end position at
+/–. The information display shifts the indica-
tion from
D to S.
Sport mode can be selected at any time while
driving.
Geartronic - Winter modeIt can be easier to pull away on slippery roads
if 3rd gear is engaged manually.
1. Depress the brake pedal and move the
gear lever from D position to the end posi-tion at +/– - the instrument panel display
shifts the indication from
D to the figure 1.
2. Scroll up to gear 3 by pushing the lever
forward towards + (plus) twice - the display
shifts the indication from
1 to 3.
3. Release the brake and accelerate carefully.
The gearbox "winter mode" means that the car
moves off with a lower engine speed and
reduced engine power on the drive wheels.
Kick-downWhen the accelerator pedal is pressed all the
way to the floor (beyond the position normally
regarded as full acceleration) a lower gear is
immediately engaged. This is known as kick-
down.
If the accelerator is released from the kick-
down position, the gearbox automatically
changes up.
Kick-down is used when maximum accelera-
tion is needed, such as for overtaking.
Safety functionTo prevent overrevving the engine, the gearbox
control program has a protective downshift
inhibitor which prevents the kick-down func-
tion.
2Only models D5 and T6.
ProCarManuals.com
Page 127 of 422
03 Your driving environment
Gearboxes
03
* Option/accessory, for more information, see Introduction.125 Automatic gearbox Powershift*
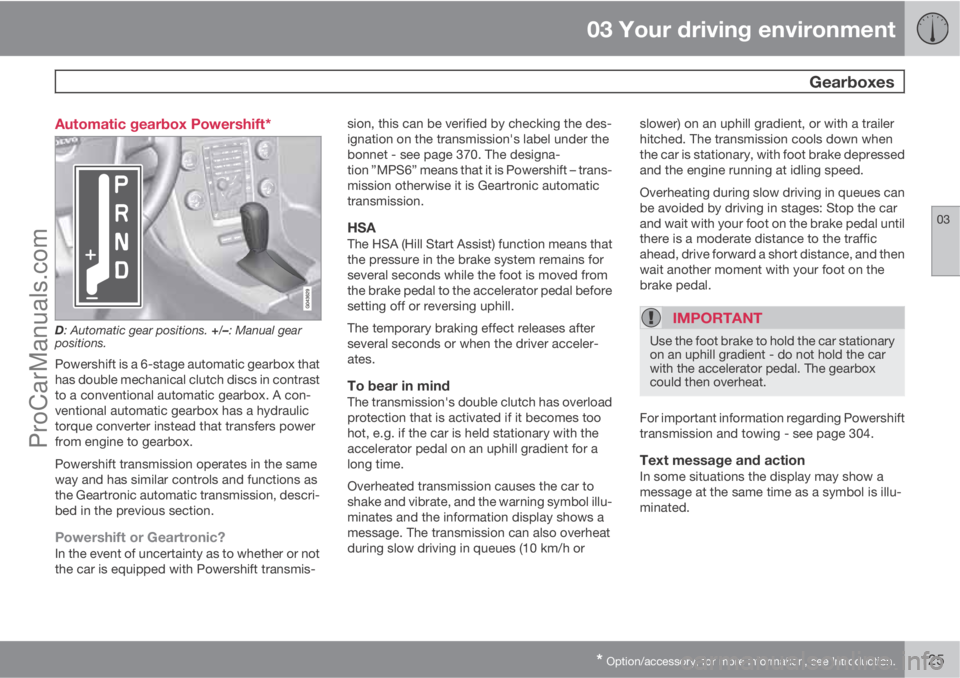
D: Automatic gear positions. +/–: Manual gear
positions.
Powershift is a 6-stage automatic gearbox that
has double mechanical clutch discs in contrast
to a conventional automatic gearbox. A con-
ventional automatic gearbox has a hydraulic
torque converter instead that transfers power
from engine to gearbox.
Powershift transmission operates in the same
way and has similar controls and functions as
the Geartronic automatic transmission, descri-
bed in the previous section.
Powershift or Geartronic?In the event of uncertainty as to whether or not
the car is equipped with Powershift transmis-sion, this can be verified by checking the des-
ignation on the transmission's label under the
bonnet - see page 370. The designa-
tion ”MPS6” means that it is Powershift – trans-
mission otherwise it is Geartronic automatic
transmission.
HSAThe HSA (Hill Start Assist) function means that
the pressure in the brake system remains for
several seconds while the foot is moved from
the brake pedal to the accelerator pedal before
setting off or reversing uphill.
The temporary braking effect releases after
several seconds or when the driver acceler-
ates.
To bear in mindThe transmission's double clutch has overload
protection that is activated if it becomes too
hot, e.g. if the car is held stationary with the
accelerator pedal on an uphill gradient for a
long time.
Overheated transmission causes the car to
shake and vibrate, and the warning symbol illu-
minates and the information display shows a
message. The transmission can also overheat
during slow driving in queues (10 km/h orslower) on an uphill gradient, or with a trailer
hitched. The transmission cools down when
the car is stationary, with foot brake depressed
and the engine running at idling speed.
Overheating during slow driving in queues can
be avoided by driving in stages: Stop the car
and wait with your foot on the brake pedal until
there is a moderate distance to the traffic
ahead, drive forward a short distance, and then
wait another moment with your foot on the
brake pedal.
IMPORTANT
Use the foot brake to hold the car stationary
on an uphill gradient - do not hold the car
with the accelerator pedal. The gearbox
could then overheat.
For important information regarding Powershift
transmission and towing - see page 304.
Text message and actionIn some situations the display may show a
message at the same time as a symbol is illu-
minated.
ProCarManuals.com