key VOLVO V60 2014 User Guide
[x] Cancel search | Manufacturer: VOLVO, Model Year: 2014, Model line: V60, Model: VOLVO V60 2014Pages: 442, PDF Size: 13.85 MB
Page 72 of 442
03 Instruments and controls
03
70* Option/accessory, for more information, see Introduction.
Key positions
The remote control key can be used to set the vehicle's electrical system in different modes/levels so that different functions are available;see Key positions - functions at different lev-els (p. 70).
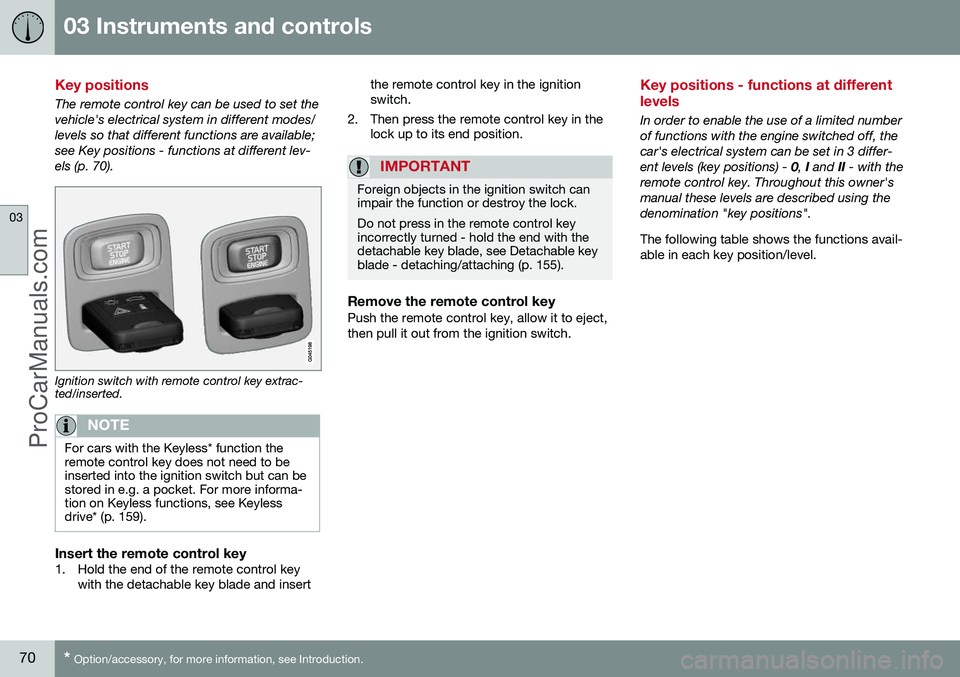
Ignition switch with remote control key extrac- ted/inserted.
NOTE
For cars with the Keyless* function the remote control key does not need to beinserted into the ignition switch but can bestored in e.g. a pocket. For more informa-tion on Keyless functions, see Keylessdrive* (p. 159).
Insert the remote control key1. Hold the end of the remote control key
with the detachable key blade and insert the remote control key in the ignition switch.
2. Then press the remote control key in the lock up to its end position.
IMPORTANT
Foreign objects in the ignition switch can impair the function or destroy the lock. Do not press in the remote control key incorrectly turned - hold the end with thedetachable key blade, see Detachable keyblade - detaching/attaching (p. 155).
Remove the remote control keyPush the remote control key, allow it to eject, then pull it out from the ignition switch.
Key positions - functions at different levels
In order to enable the use of a limited number of functions with the engine switched off, thecar's electrical system can be set in 3 differ-ent levels (key positions) - 0, I and II - with the
remote control key. Throughout this owner'smanual these levels are described using thedenomination "key positions". The following table shows the functions avail- able in each key position/level.
ProCarManuals.co’
Page 73 of 442
03 Instruments and controls
03
* Option/accessory, for more information, see Introduction.71
LevelFunctions
0• Odometer, clock and tem- perature gauge are illumi-nated.
• Power seats can be adjusted.
• The audio system can beused for a limited time - seethe Sensus Infotainment sup-plement.
I•Sunroof, power windows, 12V socket in the passenger com-partment, navigation, phone,ventilation fan and wind-screen wipers can be used.
II•The headlamps come on.
• Warning/indicator lamps illu- minate for 5 seconds.
• Several other systems areactivated. However, heating inseat cushions and the rearwindow can only be activatedafter the engine has beenstarted.
This key position consumes a lot of current from the batteryand should therefore be avoi-ded!
Choosing key position/level
• Key position 0
- Unlock the car - This
means that the car's electrical system is at level 0.
• Key position I
- With the remote control
key fully inserted into the ignition switch 13
- Briefly press START/STOP ENGINE .
NOTE
To reach level I or II without starting the
engine - do not depress the brake/clutch
pedal when these key positions are due to be selected.
• Key position II
- With the remote control
key fully inserted into the ignition switch 13
- Give a long 14
press on START/STOP
ENGINE .
• Back to key position 0 -
To return to key
position 0 from position II and I - Briefly
press on START/STOP ENGINE .
Audio systemFor information on audio system functions with remote control key removed, see theSensus Infotainment supplement.
Starting and stopping the engineFor information about starting/stopping theengine, see Starting the engine (p. 264).
TowingFor important information about the remotecontrol key during towing, see Towing (p.313).
Related information
•Key positions (p. 70)
13
Not necessary for cars with the Keyless* function.
14 Approx. 2 seconds.
ProCarManuals.co’
Page 75 of 442

03 Instruments and controls
03
* Option/accessory, for more information, see Introduction.73
Seats, front - electrically operated
The car's front seats have different setting options for optimum seating comfort. Thepower seat can be moved forward/backwardand up/down. The front edge of the seatcushion can be raised/lowered. The backrestangle can be changed.
Power seat*
Front edge of seat cushion up/down
Seat forward/backward and up/down
Backrest rake
The power front seats have overload protec- tion which is tripped if a seat is blocked by anobject. If this happens, go to key position I or
0 and wait a short time before adjusting the
seat again. Only one movement (forward/back/up/down) can be made at a time.
PreparationsThe seats can be adjusted for a certain timeafter unlocking the door with the remote con-trol key without the key in the ignition switch.Seat adjustment is normally made in keyposition I and can always be made when the
engine is running.
Seat with memory function*
The memory function stores settings for the seat and the door mirrors.
Store settingMemory button
Memory button
Memory button
Button for storing settings
1. Adjust the seat and the door mirrors. 2. Hold the button depressed to store set-
tings while depressing one of the memory buttons.
Using a stored settingHold one of the memory buttons depresseduntil the seat and the door mirrors stop. If yourelease the button then the movement of theseat will stop.
Heated seatsFor heated seats, see Heated front seats* (p.122) and Heated rear seat* (p. 122).
Related information
• Seats, front (p. 72)
• Seats, rear (p. 74)
ProCarManuals.co’
Page 76 of 442
03 Instruments and controls
03
74* Option/accessory, for more information, see Introduction.
Key memory* in remote control key 17
All remote control keys can be used by differ- ent drivers to store the settings for the driver's seat and door mirrors
18
.
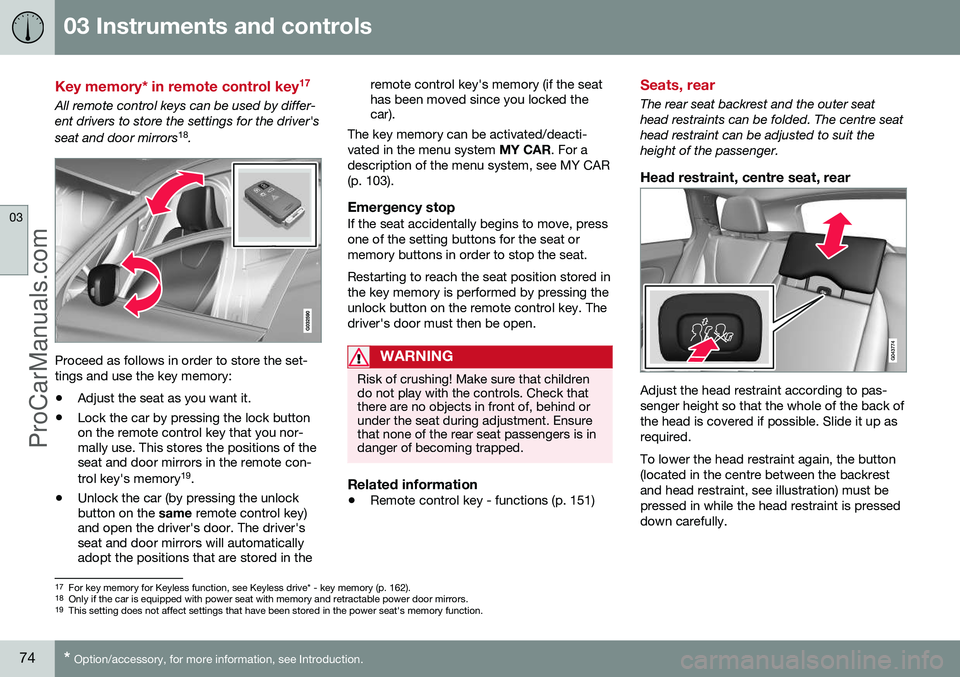
Proceed as follows in order to store the set- tings and use the key memory:
• Adjust the seat as you want it.
• Lock the car by pressing the lock button on the remote control key that you nor-mally use. This stores the positions of theseat and door mirrors in the remote con- trol key's memory 19
.
• Unlock the car (by pressing the unlock button on the
same remote control key)
and open the driver's door. The driver'sseat and door mirrors will automaticallyadopt the positions that are stored in the remote control key's memory (if the seathas been moved since you locked thecar).
The key memory can be activated/deacti- vated in the menu system MY CAR. For a
description of the menu system, see MY CAR(p. 103).
Emergency stopIf the seat accidentally begins to move, pressone of the setting buttons for the seat ormemory buttons in order to stop the seat. Restarting to reach the seat position stored in the key memory is performed by pressing theunlock button on the remote control key. Thedriver's door must then be open.
WARNING
Risk of crushing! Make sure that children do not play with the controls. Check thatthere are no objects in front of, behind orunder the seat during adjustment. Ensurethat none of the rear seat passengers is indanger of becoming trapped.
Related information
• Remote control key - functions (p. 151)
Seats, rear
The rear seat backrest and the outer seat head restraints can be folded. The centre seathead restraint can be adjusted to suit theheight of the passenger.
Head restraint, centre seat, rear
Adjust the head restraint according to pas- senger height so that the whole of the back ofthe head is covered if possible. Slide it up asrequired. To lower the head restraint again, the button (located in the centre between the backrestand head restraint, see illustration) must bepressed in while the head restraint is presseddown carefully.
17
For key memory for Keyless function, see Keyless drive* - key memory (p. 162).
18 Only if the car is equipped with power seat with memory and retractable power door mirrors.
19 This setting does not affect settings that have been stored in the power seat's memory function.
ProCarManuals.co’
Page 78 of 442
||
03 Instruments and controls
03
76* Option/accessory, for more information, see Introduction.
NOTE
When the backrest has been raised, the red indicator should no longer be showing.If it is still showing then the backrest is notlocked in place.
WARNING
Check that the backrests and head restraints in the rear seat are locked prop-erly after being folded up.
Electrical lowering of the rear seat's
outer head restraints*
1. The remote control key must be in key
position II.
2. Press the button to lower the rear outer head restraints to improve rearward visi- bility.
WARNING
Do not lower the outer head restraints if there are any passengers using of theouter seats.
Move the head restraint back manually until a click is heard.
WARNING
The head restraints must be in locked position after being raised.
Related information
• Seats, front (p. 72)
• Seats, front - electrically operated (p. 73)
Steering wheel
The steering wheel can be adjusted in differ- ent positions and has controls for horn andcruise control, as well as menu, audio andphone control.
Adjusting
G021138
Adjusting the steering wheel.
Lever - releasing the steering wheel
Possible steering wheel positions
The steering wheel can be adjusted for both height and depth:
1. Pull the lever towards you to release the steering wheel.
2. Adjust the steering wheel to the position that suits you.
ProCarManuals.co’
Page 79 of 442
03 Instruments and controls
03
* Option/accessory, for more information, see Introduction.77
3. Push back the lever to fix the steering
wheel in place. If the lever is stiff, press the steering wheel lightly at the same timeas you push the lever back.
WARNING
Adjust the steering wheel and fix it before driving away.
With speed related power steering* the level of steering force can be adjusted, see Adjust-able steering force* (p. 257).
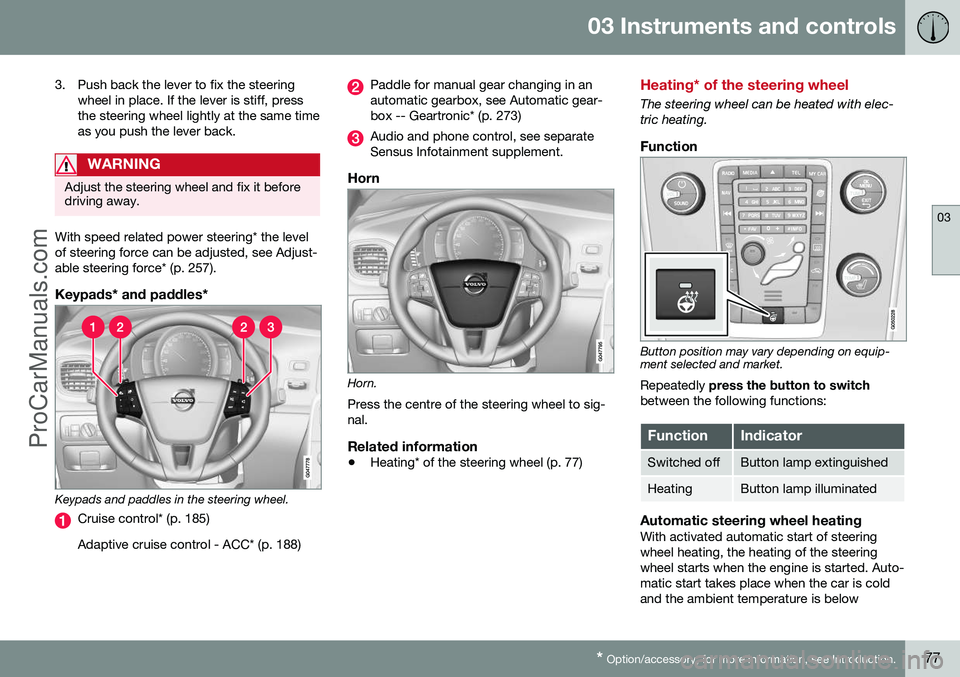
Keypads* and paddles*
Keypads and paddles in the steering wheel.
Cruise control* (p. 185) Adaptive cruise control - ACC* (p. 188)
Paddle for manual gear changing in an automatic gearbox, see Automatic gear-box -- Geartronic* (p. 273)
Audio and phone control, see separate Sensus Infotainment supplement.
Horn
Horn. Press the centre of the steering wheel to sig- nal.
Related information
• Heating* of the steering wheel (p. 77)
Heating* of the steering wheel
The steering wheel can be heated with elec- tric heating.
Function
Button position may vary depending on equip- ment selected and market.
Repeatedly press the button to switch
between the following functions:
FunctionIndicator
Switched offButton lamp extinguished
HeatingButton lamp illuminated
Automatic steering wheel heatingWith activated automatic start of steering wheel heating, the heating of the steeringwheel starts when the engine is started. Auto-matic start takes place when the car is coldand the ambient temperature is below
ProCarManuals.co’
Page 80 of 442
03 Instruments and controls
03
78* Option/accessory, for more information, see Introduction.
approx. 10 °C. Activate/deactivate the func- tion in the menu system MY CAR (p. 103).Light switches
The headlamp control activates and adjusts the external lighting. It is also used to adjustthe display, instrument and passenger com-partment lighting.
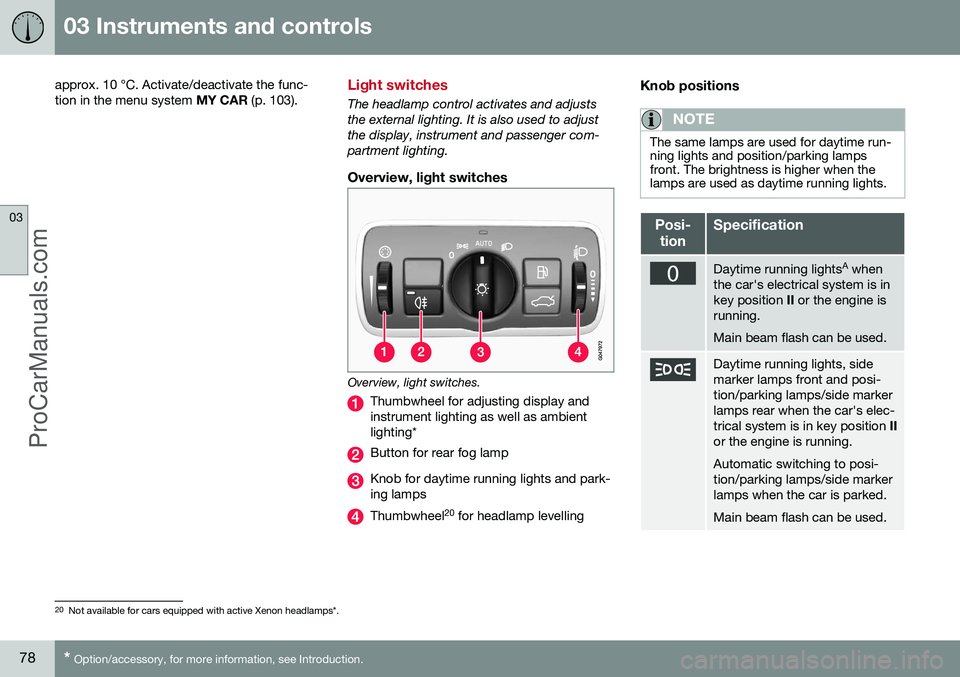
Overview, light switches
Overview, light switches.
Thumbwheel for adjusting display and instrument lighting as well as ambientlighting*
Button for rear fog lamp
Knob for daytime running lights and park- ing lamps
Thumbwheel 20
for headlamp levelling
Knob positions
NOTE
The same lamps are used for daytime run- ning lights and position/parking lampsfront. The brightness is higher when thelamps are used as daytime running lights.
Posi-
tionSpecification
Daytime running lights A
when
the car's electrical system is in key position II or the engine is
running. Main beam flash can be used.
Daytime running lights, side marker lamps front and posi-tion/parking lamps/side markerlamps rear when the car's elec-trical system is in key position II
or the engine is running. Automatic switching to posi- tion/parking lamps/side markerlamps when the car is parked. Main beam flash can be used.
20 Not available for cars equipped with active Xenon headlamps*.
ProCarManuals.co’
Page 81 of 442
03 Instruments and controls
03
* Option/accessory, for more information, see Introduction.79
Posi-
tionSpecification
Daytime running lights, side marker lamps front and posi-tion/parking lamps/side markerlamps rear during the day whenthe car's electrical system is inkey position II or the engine is
running. Automatic switching to dipped beam and position/parkinglamps/side marker lamps inpoor light conditions or whenthe windscreen wipers or rearfog lamps are activated. The tunnel detection (p. 81)* function is activated. The active high beam (p. 82)* function can be used. Main beam can be activated when dipped beam is switchedon. Main beam flash can be used.
Posi-
tionSpecification
Dipped beam and position/ parking lamps/side markerlamps. Main beam can be activated.Main beam flash can be used.
A Fitted in or under the front bumper.
Volvo recommends that
mode is used
when the car is being driven, as long as traffic situations or weather conditions are unfavour-able for the active high beam function*.
Instrument lightingDifferent display and instrument lighting isswitched on depending on key position; seeKey positions - functions at different levels (p.70). The display lighting is automatically subdued in darkness - the sensitivity is set with thethumbwheel. The intensity of the instrument lighting is adjusted with the thumbwheel.
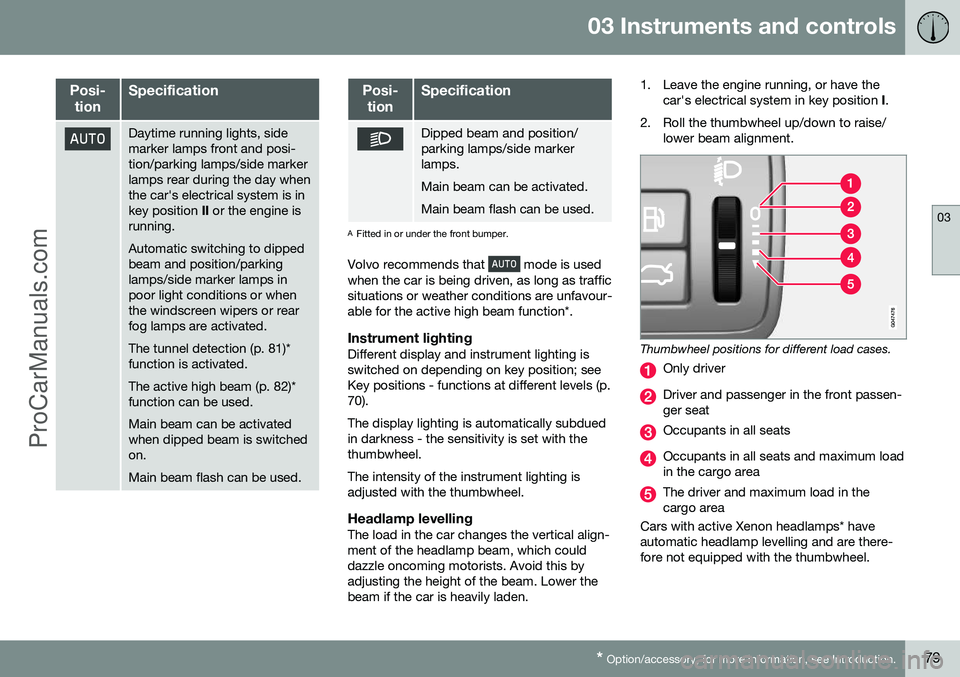
Headlamp levellingThe load in the car changes the vertical align-ment of the headlamp beam, which coulddazzle oncoming motorists. Avoid this byadjusting the height of the beam. Lower thebeam if the car is heavily laden. 1. Leave the engine running, or have the
car's electrical system in key position I.
2. Roll the thumbwheel up/down to raise/ lower beam alignment.
Thumbwheel positions for different load cases.
Only driver
Driver and passenger in the front passen- ger seat
Occupants in all seats
Occupants in all seats and maximum load in the cargo area
The driver and maximum load in the cargo area
Cars with active Xenon headlamps* haveautomatic headlamp levelling and are there-fore not equipped with the thumbwheel.
ProCarManuals.co’
Page 82 of 442
03 Instruments and controls
03
80
Position/parking lamps
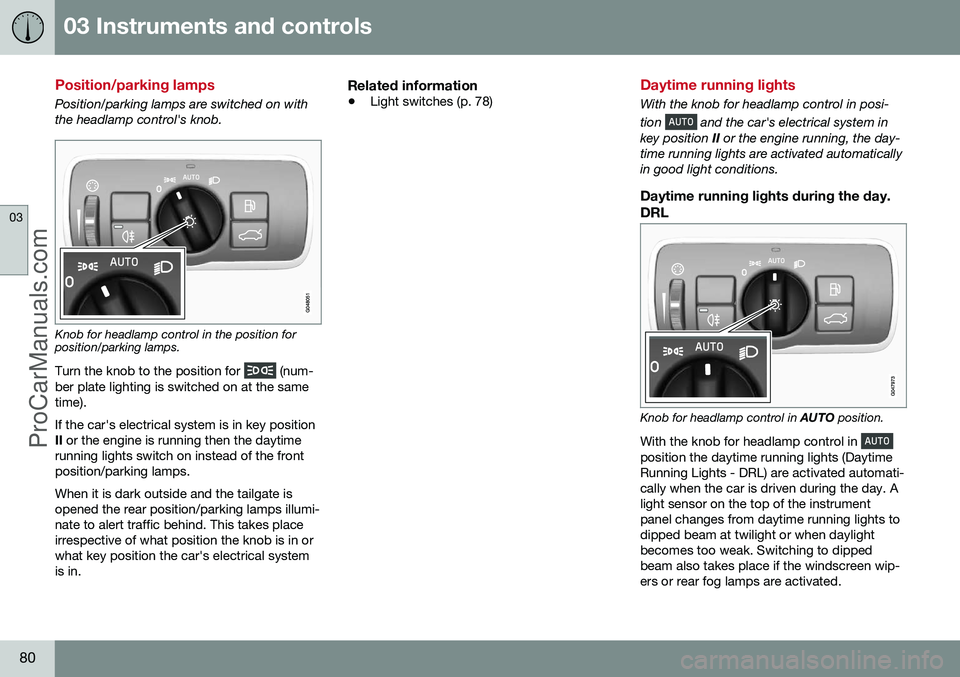
Position/parking lamps are switched on with the headlamp control's knob.
Knob for headlamp control in the position for position/parking lamps.
Turn the knob to the position for
(num-
ber plate lighting is switched on at the same time). If the car's electrical system is in key position II or the engine is running then the daytime
running lights switch on instead of the frontposition/parking lamps. When it is dark outside and the tailgate is opened the rear position/parking lamps illumi-nate to alert traffic behind. This takes placeirrespective of what position the knob is in orwhat key position the car's electrical systemis in.
Related information
• Light switches (p. 78)
Daytime running lights
With the knob for headlamp control in posi- tion
and the car's electrical system in
key position II or the engine running, the day-
time running lights are activated automatically in good light conditions.
Daytime running lights during the day.
DRL
Knob for headlamp control in AUTO position.
With the knob for headlamp control in
position the daytime running lights (Daytime Running Lights - DRL) are activated automati-cally when the car is driven during the day. Alight sensor on the top of the instrumentpanel changes from daytime running lights todipped beam at twilight or when daylightbecomes too weak. Switching to dippedbeam also takes place if the windscreen wip-ers or rear fog lamps are activated.
ProCarManuals.co’
Page 83 of 442
03 Instruments and controls
03
* Option/accessory, for more information, see Introduction.81
WARNING
This system help to save energy - it cannot determine in all situations when daylight istoo weak or sufficiently strong, e.g. in mistand rain. The driver is always responsible for ensur- ing that the car is driven with its lights in acorrect state and in accordance with appli-cable traffic regulations.
Tunnel detection*
In markets without automatic dipped beam, tunnel detection activates dipped beam whendriving into a tunnel. Dipped beam is deacti-vated approx. 20 seconds after the car hasbeen driven out of the tunnel. The tunnel detection function is available in cars with rain sensor*. The sensor detects theentrance to a tunnel and resets the lightingfrom daytime running lights to dipped beam.Approx. 20 seconds after the car has left thetunnel, the lighting returns to daytime runninglights. If the car is driven into another tunnelwithin this time period then dipped beam iskept switched on. This avoids repeatedchanges to the car's light settings. Note that the headlamp control's knob must remain in
position for tunnel detection
to work.
Related information
• Main/dipped beam (p. 81)
• Light switches (p. 78)
Main/dipped beam
With the knob for headlamp control in posi- tion
and the car's electrical system in
key position II or the engine running, the
dipped beam is activated automatically in poor light conditions. With the knob for headlamp control in posi- tion
dipped beam is always switched on
when the engine is running or when key posi- tion II is active.
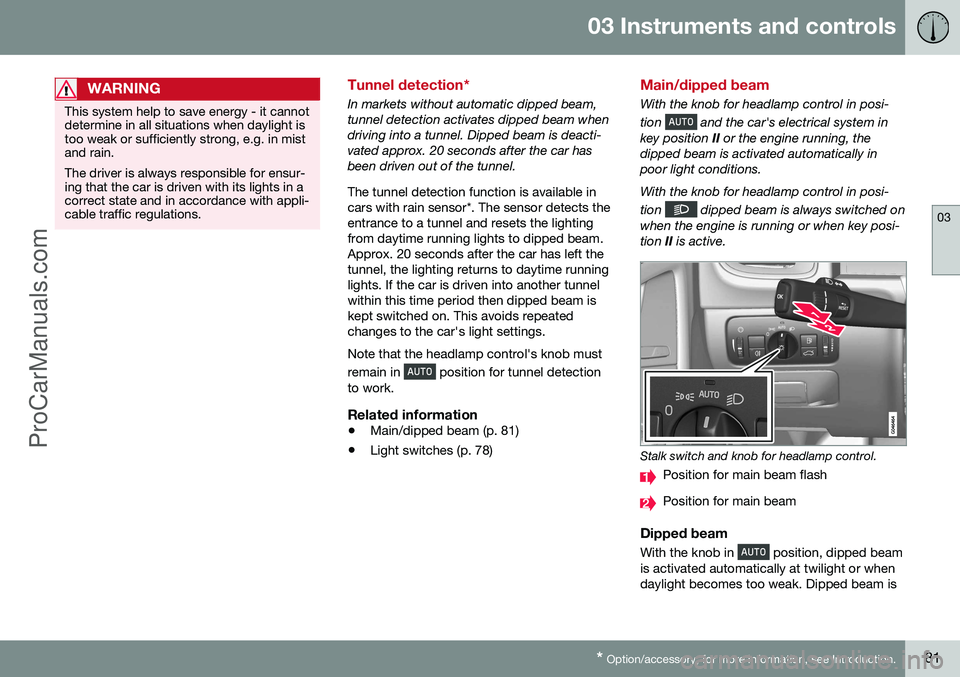
Stalk switch and knob for headlamp control.
Position for main beam flash
Position for main beam
Dipped beam
With the knob in position, dipped beam
is activated automatically at twilight or when daylight becomes too weak. Dipped beam is
ProCarManuals.co’