key VOLVO V60 2014 Owner's Guide
[x] Cancel search | Manufacturer: VOLVO, Model Year: 2014, Model line: V60, Model: VOLVO V60 2014Pages: 442, PDF Size: 13.85 MB
Page 101 of 442

03 Instruments and controls
03
}}
99
OpeningFor maximum sunroof opening, move the control back to the position for automaticopening and release. Open manually by pulling the control back- wards to the point of resistance for manualopening. The sunroof moves to maximumopen position as long as the button is keptdepressed.
ClosingClose manually by pushing the control for-wards to the point of resistance for manualclosing. The sunroof moves to closed posi-tion as long as the button is kept depressed.
WARNING
Risk of crushing when the sunroof is closed. The sunroof's pinch-protectionfunction only operates during automaticclosing, not manual.
Close automatically by pressing the control to the position for automatic closing and thenrelease it. The power supply to the sunroof is switched off by selecting key position 0 and removing
the remote control key from the ignitionswitch.
WARNING
If there are children in the car: Remember to always switch off the power supply to the sunroof by selecting keyposition 0 and then take the remote con-
trol key with you when leaving the car. Forinformation on key positions - see Keypositions - functions at different levels (p.70).
Vertical opening
G028900
Vertical opening, raised at the rear edge.
Open by pressing the rear edge of the control upward.
Close by pulling the rear edge of the con- trol down.
Closing using the remote control key or central locking button
G021345
One long press on the lock button closes the sunroof and all the windows, see Remotecontrol key - functions (p. 151) and Locking/unlocking - from the inside (p. 165). Thedoors and the tailgate are locked. To interruptclosing, press the lock button again.
WARNING
If the sunroof is closed with the remote control key, check that no one risks beingtrapped.
SunscreenThe sunroof features a manual, sliding interior sunscreen. The sunscreen slides back auto-matically when the sunroof is opened. Gripthe handle and slide the screen forward toclose it.
ProCarManuals.co’
Page 102 of 442
||
03 Instruments and controls
03
100
Pinch protectionThe sunroof's pinch protection function is triggered if it is blocked by an object duringautomatic closing. If blocked, the sunroof willstop and automatically open to the previousposition.
Wind deflector
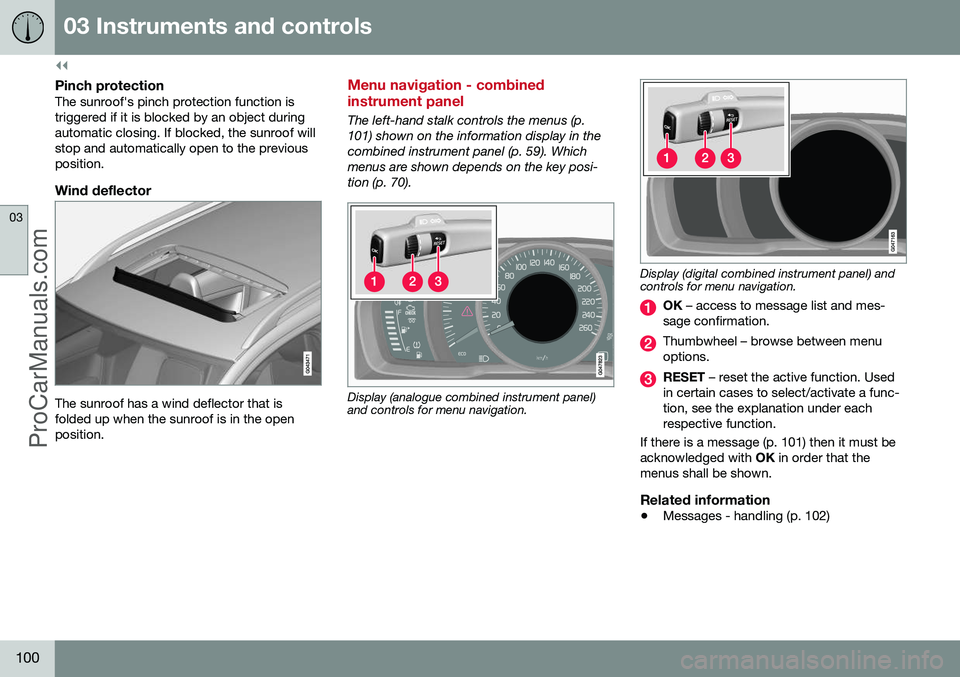
The sunroof has a wind deflector that is folded up when the sunroof is in the openposition.
Menu navigation - combined instrument panel
The left-hand stalk controls the menus (p. 101) shown on the information display in thecombined instrument panel (p. 59). Whichmenus are shown depends on the key posi-tion (p. 70).
Display (analogue combined instrument panel) and controls for menu navigation.
Display (digital combined instrument panel) and controls for menu navigation.
OK – access to message list and mes-
sage confirmation.
Thumbwheel – browse between menu options.
RESET – reset the active function. Used
in certain cases to select/activate a func- tion, see the explanation under eachrespective function.
If there is a message (p. 101) then it must beacknowledged with OK in order that the
menus shall be shown.
Related information
• Messages - handling (p. 102)
ProCarManuals.co’
Page 103 of 442
03 Instruments and controls
03
* Option/accessory, for more information, see Introduction.101
Menu overview - combined instrument panel
Which menus are shown in the combined instrument panel's information displaydepends on the key position (p. 70). Some of the following menu options require the function and hardware to be installed inthe car.
Analogue combined instrument panelDigital speed
Parking heater *
Additional heater *
TC options Service status
Oil level 27
Messages (##) 28
Digital combined instrument panel
Settings
*
Themes
Contrast mode /Colour mode
Service status
Messages 28
Oil level 27 Parking heater
*
Trip computer reset
Related information
• Analogue combined instrument panel - overview (p. 59)
• Digital combined instrument panel - over-view (p. 60)
• Menu navigation - combined instrumentpanel (p. 100)
Messages
When a warning, information or indicator symbol illuminates, a corresponding messageappears on the information display.
MessageSpecification
Stop safelyAStop and switch off the engine. Serious risk ofdamage - consult a work- shop B
.
Stop engineAStop and switch off the engine. Serious risk ofdamage - consult a work- shop B
.
Service urgentAContact a workshop B
to
check the car immedi- ately.
Service requiredAContact a workshop B
to
check the car as soon as possible.
See manualARead the owner's man- ual.
Book time for mainte-nanceTime to book regular service - contact a work- shop B
.
27 Certain engines.
28 The number of messages is indicated in brackets.
ProCarManuals.co’
Page 105 of 442
03 Instruments and controls
03
103
MY CAR
MY CAR is a menu source that handles many of the car's functions, e.g. City Safety, locksand alarm, automatic fan speed, setting theclock, etc. Certain functions are standard, others are optional - the range also varies depending onthe market.
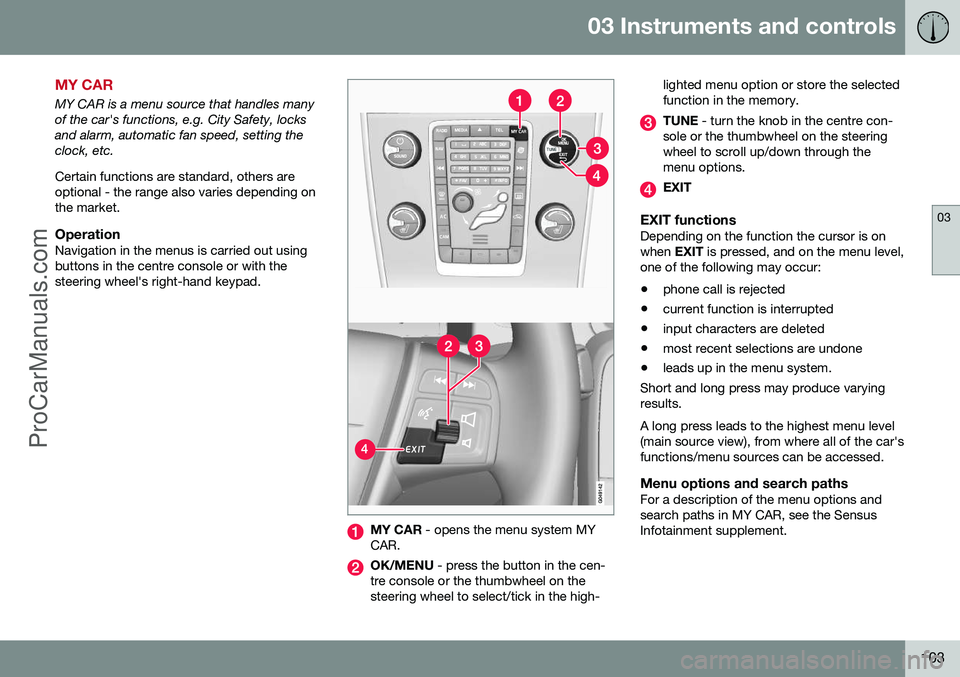
OperationNavigation in the menus is carried out usingbuttons in the centre console or with thesteering wheel's right-hand keypad.
MY CAR - opens the menu system MY
CAR.
OK/MENU - press the button in the cen-
tre console or the thumbwheel on the steering wheel to select/tick in the high- lighted menu option or store the selectedfunction in the memory.
TUNE
- turn the knob in the centre con-
sole or the thumbwheel on the steering wheel to scroll up/down through themenu options.
EXIT
EXIT functionsDepending on the function the cursor is on when EXIT is pressed, and on the menu level,
one of the following may occur:
• phone call is rejected
• current function is interrupted
• input characters are deleted
• most recent selections are undone
• leads up in the menu system.
Short and long press may produce varyingresults. A long press leads to the highest menu level (main source view), from where all of the car'sfunctions/menu sources can be accessed.
Menu options and search pathsFor a description of the menu options andsearch paths in MY CAR, see the SensusInfotainment supplement.
ProCarManuals.co’
Page 106 of 442
03 Instruments and controls
03
104* Option/accessory, for more information, see Introduction.
Trip computer
The car's trip computer can record, calculate and show information while driving. Trip computer content and appearance varies depending on whether the combined instru-ment panel is the "Analog" type or "Digital":
• Trip computer - combined instrument panel "Analogue" (p. 105)
• Trip computer - combined instrumentpanel "Digital" (p. 109)
Checking and settings can be made immedi- ately after the combined instrument panel isautomatically illuminated in connection withunlocking. If none of the trip computer's con-trols are actuated within approx. 30 secondsafter the driver's door has been opened thenthe instrument extinguishes, after whicheither key position II (p. 70) or engine starting
is required in order to operate the trip com-puter.
NOTE
If a warning message appears when the trip computer is used then the messagemust first be acknowledged before the tripcomputer can be reactivated. • Acknowledge the message by briefly pressing the indicator stalk
OK button.
Group menusThe trip computer has two different group menus: • Functions
• Heading in combined instrument panel
The trip computer's functions or headings
are each listed in an infinite loop.
Related information
• Trip computer - trip statistics* (p. 113)
• Trip computer - supplementary informa- tion (p. 112)
ProCarManuals.co’
Page 119 of 442
04 Climate control
04
* Option/accessory, for more information, see Introduction.117
Air cleaning - passenger compartment filter
All air entering the car's passenger compart- ment is cleaned with a filter. The filter must be replaced at regular inter- vals. Follow the Volvo Service Programme forthe recommended replacement intervals. Ifthe car is used in a severely contaminatedenvironment, it may be necessary to replacethe filter more often.
NOTE
There are different types of passenger compartment filter. Make sure that the cor-rect filter is fitted.
Related information
• Air cleaning (p. 116)
Air cleaning - Clean Zone Interior Package (CZIP)*
CZIP comprises a series of modifications that keep the passenger compartment evenclearer from allergy and asthma-inducing sub-stances. The following is included: •An enhanced fan function that means that the fan starts when the car is opened withthe remote control key. The fan fills thepassenger compartment with fresh air.The function starts when required and isdisengaged automatically after a time orwhen one of the passenger compartmentdoors is opened.
• The air quality system IAQS (p. 118) is afully automatic system that cleans the airin the passenger compartment from con-taminants such as particles, hydrocar-bons, nitrous oxides and ground-levelozone.
NOTE
To keep the CZIP standard in cars with CZIP the IAQS filter must be changed after15 000 km or once per year depending onwhichever occurs first. However, up to75 000 km over 5 years. In cars withoutCZIP and where the customer does notwant to keep the CZIP standard the IAQSfilter must be changed at a regular service.
For more information on CZIP, see the bro- chure included with the purchase of the car.
Related information
•
General information on climate control (p. 115)
• Air cleaning (p. 116)
ProCarManuals.co’
Page 136 of 442
04 Climate control
04
134* Option/accessory, for more information, see Introduction.
Additional heater*
In cold climate zones 5
an additional heater
may be required to obtain the correct operat- ing temperature in the engine and to obtainsufficient heating in the passenger compart-ment. A fuel-driven additional heater (p. 134) is fit- ted in cars with diesel engines. In a semi-cold 5
climate zone diesel-driven
cars have an electric additional heater (p. 135) instead of a fuel-driven version. Cars with certain petrol engines 6
have an
electric additional heater integrated into the car's climate control system.
Related information
• Engine and passenger compartment heater* (p. 129)
Fuel-driven additional heater*
The car is equipped with either an electric (p. 135) or a fuel-driven additional heater (p. 134). The heater starts automatically when extra heat is required when the engine is running. The heater is switched off automatically when the correct temperature is reached or whenthe engine is switched off.
NOTE
When the additional heater is active there may be smoke from the right-hand wheelhousing, which is perfectly normal.
Auto mode or shutdownThe additional heater's automatic start sequence can be switched off if required.
NOTE
Volvo recommends that the fuel-driven additional heater should be switched offfor short distances.
1. Before starting the engine: Select key
position I (p. 70).
2. Press OK to access the menu. 3.
Scroll with the thumbwheel to
Additional
heater7 or Settings8 and select with OK.
4. Select one of the options
ON or OFFusing the thumbwheel and confirm with OK.
5. Exit the menu with RESET.
NOTE
The menu options are only visible in key position I - any adjustments must therefore
be made before starting the engine.
Passenger compartment heater*If the additional heater is supplemented with a timer function then it can be used as a pas-senger compartment heater (p. 129).
5 An authorised Volvo dealer has information regarding the geographical areas concerned.
6 An authorised Volvo dealer has information regarding the engines concerned.
7 Analogue combined instrument panel.
8 Digital combined instrument panel.
ProCarManuals.co’
Page 142 of 442
05 Loading and storage
05
140* Option/accessory, for more information, see Introduction.
Glovebox
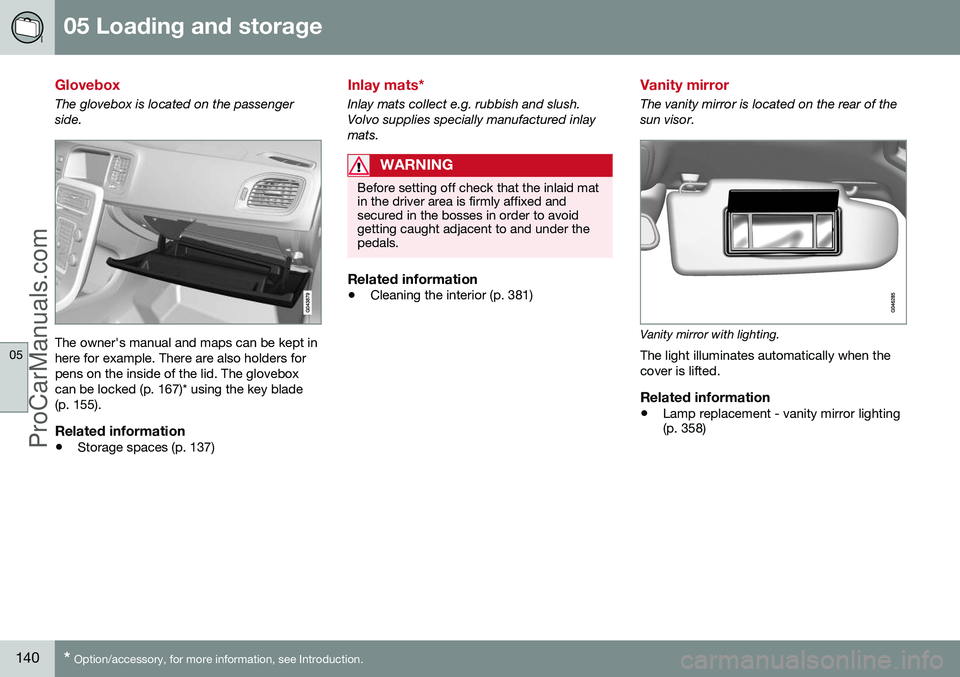
The glovebox is located on the passenger side.
The owner's manual and maps can be kept in here for example. There are also holders forpens on the inside of the lid. The gloveboxcan be locked (p. 167)* using the key blade(p. 155).
Related information
• Storage spaces (p. 137)
Inlay mats*
Inlay mats collect e.g. rubbish and slush. Volvo supplies specially manufactured inlaymats.
WARNING
Before setting off check that the inlaid mat in the driver area is firmly affixed andsecured in the bosses in order to avoidgetting caught adjacent to and under thepedals.
Related information
•Cleaning the interior (p. 381)
Vanity mirror
The vanity mirror is located on the rear of the sun visor.
Vanity mirror with lighting.
The light illuminates automatically when the cover is lifted.
Related information
• Lamp replacement - vanity mirror lighting (p. 358)
ProCarManuals.co’
Page 143 of 442
05 Loading and storage
05
* Option/accessory, for more information, see Introduction.141
Tunnel console - 12 V-sockets
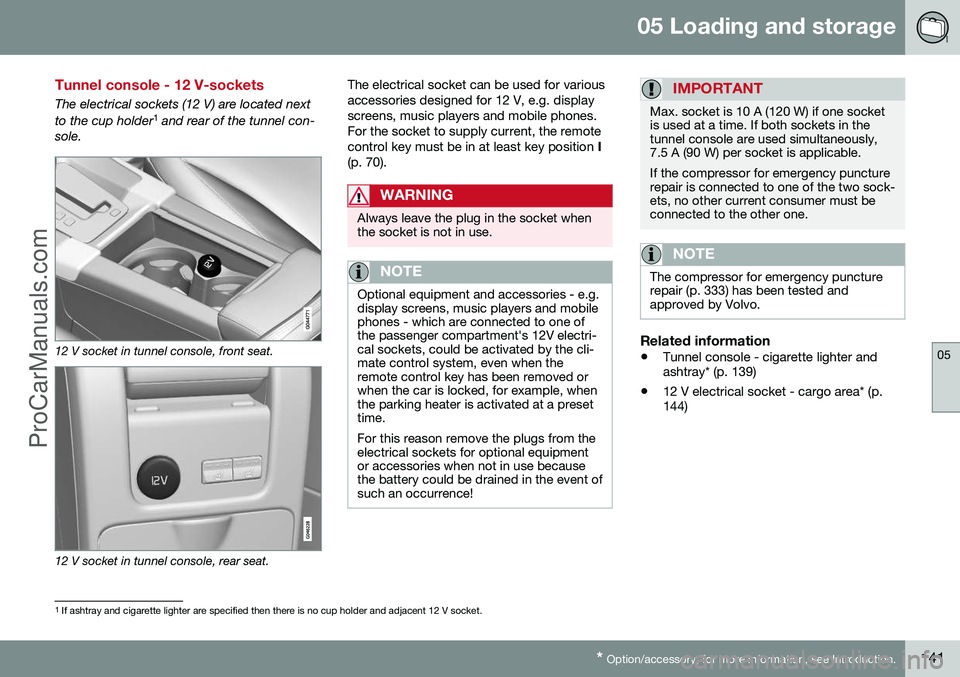
The electrical sockets (12 V) are located next to the cup holder 1
and rear of the tunnel con-
sole.
12 V socket in tunnel console, front seat.
12 V socket in tunnel console, rear seat. The electrical socket can be used for various accessories designed for 12 V, e.g. displayscreens, music players and mobile phones.For the socket to supply current, the remotecontrol key must be in at least key position
I
(p. 70).
WARNING
Always leave the plug in the socket when the socket is not in use.
NOTE
Optional equipment and accessories - e.g. display screens, music players and mobilephones - which are connected to one ofthe passenger compartment's 12V electri-cal sockets, could be activated by the cli-mate control system, even when theremote control key has been removed orwhen the car is locked, for example, whenthe parking heater is activated at a presettime. For this reason remove the plugs from the electrical sockets for optional equipmentor accessories when not in use becausethe battery could be drained in the event ofsuch an occurrence!
IMPORTANT
Max. socket is 10 A (120 W) if one socket is used at a time. If both sockets in thetunnel console are used simultaneously,7.5 A (90 W) per socket is applicable. If the compressor for emergency puncture repair is connected to one of the two sock-ets, no other current consumer must beconnected to the other one.
NOTE
The compressor for emergency puncture repair (p. 333) has been tested andapproved by Volvo.
Related information
• Tunnel console - cigarette lighter and ashtray* (p. 139)
• 12 V electrical socket - cargo area* (p.144)
1
If ashtray and cigarette lighter are specified then there is no cup holder and adjacent 12 V socket.
ProCarManuals.co’
Page 144 of 442
05 Loading and storage
05
142* Option/accessory, for more information, see Introduction.
Loading
Payload depends on the car's kerb weight. Payload depends on the car's kerb weight. The total of the weight of the passengers andall accessories reduces the car's payload bya corresponding weight. For more detailedinformation on weights, see Weights (p. 390).
The tailgate is opened via a buttonon the lighting panel or the remotecontrol key, see Locking/unlocking -
tailgate (p. 167).
WARNING
The car’s driving properties change depending on the weight and positioningof the load.
To bear in mind when loading
• Position the load firmly against the rear seat's backrest.
Note that objects must not prevent the func- tion of the WHIPS system for the front seats ifany of the rear seat's backrests is foldeddown, seeWHIPS - seating position (p. 35).
• Centre the load.
• Heavy objects should be placed as low as possible. Avoid placing heavy loads onlowered backrests.
• Cover sharp edges with something soft toavoid damaging the upholstery. •
Secure all loads to the load retaining eye-lets with straps or web lashings.
WARNING
A loose object weighing 20 kg can, in a frontal collision at a speed of 50 km/h,carry the impact of an item weighing1000 kg.
WARNING
The protection provided by the inflatable curtain in the headlining may be compro-mised or eliminated by high loads.
• Never load cargo above the backrest.
WARNING
Always secure the load. During heavy braking the load may otherwise shift, caus-ing injury to the car's occupants. Cover sharp edges and sharp corners with something soft. Switch off the engine and apply the park- ing brake when loading/unloading longitems. Otherwise you may accidentallyknock the gear lever or gear selector withthe load into a drive position - and the carcould then move off.
Related information
•
Load retaining eyelets (p. 143)
• Safety net* (p. 145) •
Loading - long load (p. 143)
• Roof load (p. 143)
ProCarManuals.co’