sensor VOLVO V60 2014 User Guide
[x] Cancel search | Manufacturer: VOLVO, Model Year: 2014, Model line: V60, Model: VOLVO V60 2014Pages: 442, PDF Size: 13.85 MB
Page 85 of 442
03 Instruments and controls
03
}}
83
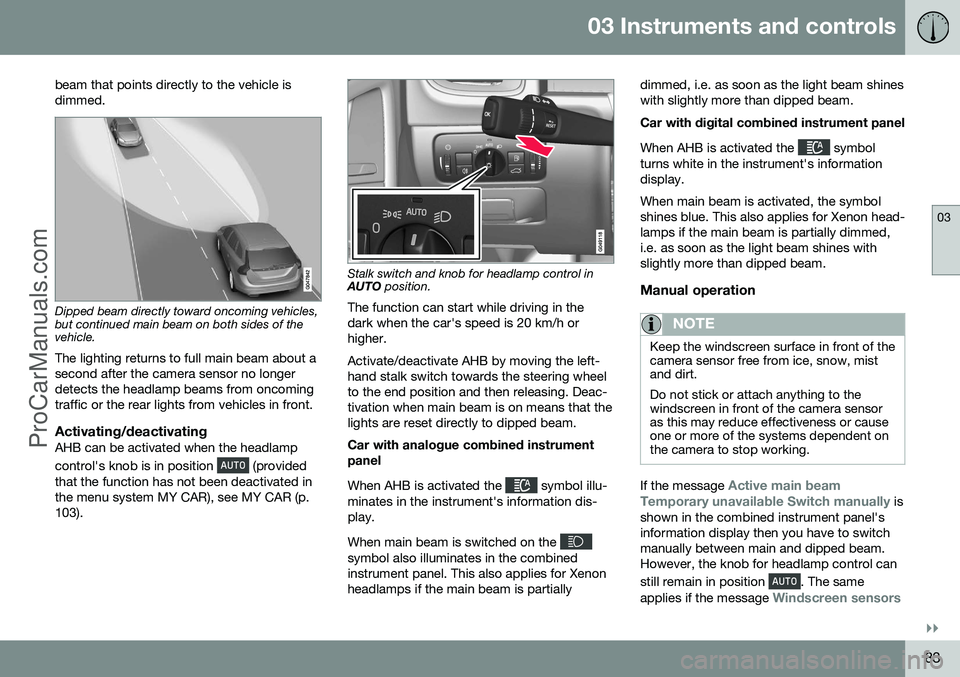
beam that points directly to the vehicle is dimmed.
Dipped beam directly toward oncoming vehicles, but continued main beam on both sides of thevehicle.
The lighting returns to full main beam about a second after the camera sensor no longerdetects the headlamp beams from oncomingtraffic or the rear lights from vehicles in front.
Activating/deactivatingAHB can be activated when the headlamp control's knob is in position
(provided
that the function has not been deactivated in the menu system MY CAR), see MY CAR (p.103).
Stalk switch and knob for headlamp control in AUTO position.
The function can start while driving in the dark when the car's speed is 20 km/h orhigher. Activate/deactivate AHB by moving the left- hand stalk switch towards the steering wheelto the end position and then releasing. Deac-tivation when main beam is on means that thelights are reset directly to dipped beam. Car with analogue combined instrument panel When AHB is activated the
symbol illu-
minates in the instrument's information dis- play. When main beam is switched on the
symbol also illuminates in the combined instrument panel. This also applies for Xenonheadlamps if the main beam is partially dimmed, i.e. as soon as the light beam shineswith slightly more than dipped beam. Car with digital combined instrument panel When AHB is activated the
symbol
turns white in the instrument's information display. When main beam is activated, the symbol shines blue. This also applies for Xenon head-lamps if the main beam is partially dimmed,i.e. as soon as the light beam shines withslightly more than dipped beam.
Manual operation
NOTE
Keep the windscreen surface in front of the camera sensor free from ice, snow, mistand dirt. Do not stick or attach anything to the windscreen in front of the camera sensoras this may reduce effectiveness or causeone or more of the systems dependent onthe camera to stop working.
If the message Active main beam
Temporary unavailable Switch manually is
shown in the combined instrument panel's information display then you have to switchmanually between main and dipped beam.However, the knob for headlamp control can still remain in position
. The same
applies if the message
Windscreen sensors
ProCarManuals.com
Page 86 of 442
||
03 Instruments and controls
03
84* Option/accessory, for more information, see Introduction.
blocked See manual and the symbol
are shown. The
symbol goes out when
these messages are shown. AHB may be temporarily unavailable e.g. in situations with dense fog or heavy rain. WhenAHB becomes available again, or the wind-screen sensors are no longer blocked, the message extinguishes and the
symbol
illuminates.
WARNING
AHB is an aid for using optimum light composition when conditions are favoura-ble. The driver always bears responsibility for manually switching between main anddipped beam when traffic situations orweather conditions so require.
IMPORTANT
Examples of when manual switching between main and dipped beam may berequired:
• In heavy rain or dense fog
• In freezing rain
• In snow flurries or slush
• In moonlight
• When driving in poorly lit built-up areas
• When the traffic ahead has weak light-ing
• If there are pedestrians on or besidethe road
• If there are highly reflective objectssuch as signs in the vicinity of the road
• When the lighting from oncoming traf-fic is obscured by e.g. a crash barrier
• When there is traffic on connectingroads
• On the brow of a hill or in a hollow
• In sharp bends.
For more information on the limitations of the camera sensor, see Collision warning system*- camera sensor limitations (p. 220).
Related information
•
Main/dipped beam (p. 81)
• Light switches (p. 78)
Active Xenon headlamps*
Active Xenon headlamps are designed to pro- vide maximum illumination in bends and junc-tions and so provide increased safety.
Active Xenon headlamps ABL
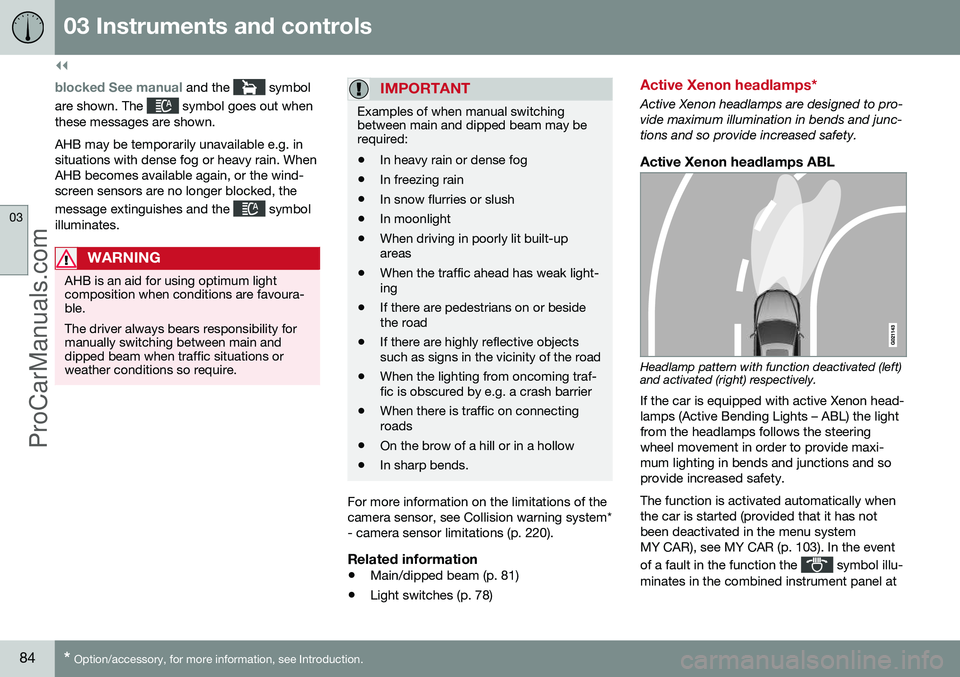
Headlamp pattern with function deactivated (left) and activated (right) respectively.
If the car is equipped with active Xenon head- lamps (Active Bending Lights – ABL) the lightfrom the headlamps follows the steeringwheel movement in order to provide maxi-mum lighting in bends and junctions and soprovide increased safety. The function is activated automatically when the car is started (provided that it has notbeen deactivated in the menu systemMY CAR), see MY CAR (p. 103). In the event of a fault in the function the
symbol illu-
minates in the combined instrument panel at
ProCarManuals.co’
Page 92 of 442
03 Instruments and controls
03
90* Option/accessory, for more information, see Introduction.
Headlamps - adjusting headlamp pattern
If the car is equipped with active Xenon head- lamps and has the Active High Beam functionthen the headlamp pattern must be resetwhen changing from right to left-hand traffic,and vice versa.
Active Xenon headlamps*No headlamp pattern adjustment is requiredfor cars with the function Active High Beam*.The headlamp pattern is designed in such away that oncoming traffic is not dazzled. Headlamp pattern adjustment is required for cars with Active High Beam. The car must bestationary with the engine running when theheadlamp pattern is shifted between right andleft-hand traffic. The headlamp pattern is changed in the menu system MY CAR, see MY CAR (p. 103).
Halogen headlampsNo headlamp pattern adjustment needs to bemade. The headlamp pattern is designed insuch a way that oncoming traffic is not daz-zled.
Wipers and washing
Wipers and washers clean the windscreen and rear window. The headlamps are cleanedwith high-pressure washing.
Windscreen wipers 24
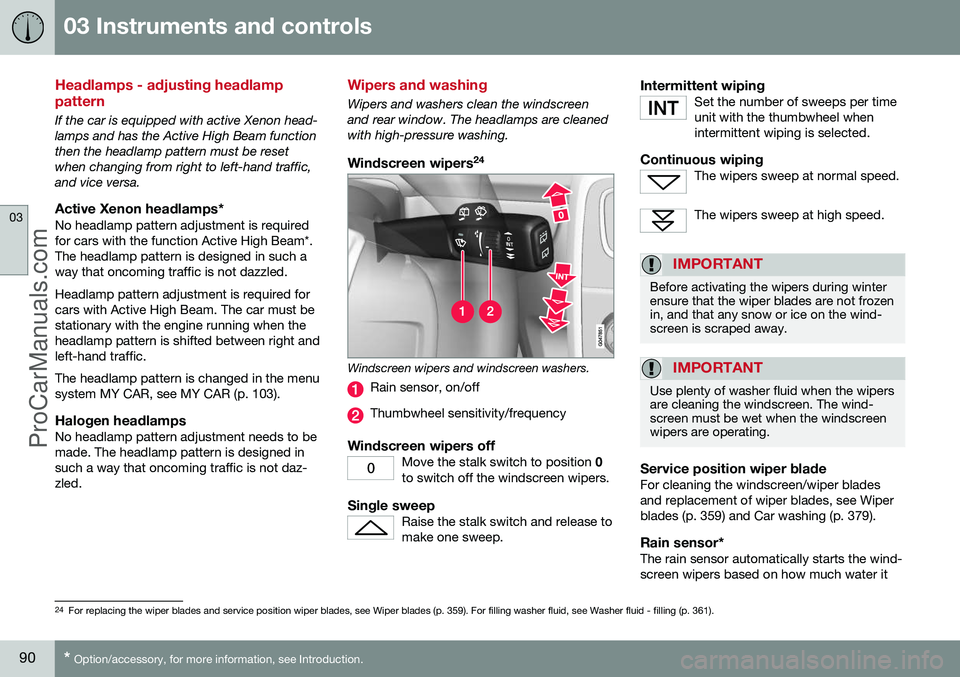
Windscreen wipers and windscreen washers.
Rain sensor, on/off
Thumbwheel sensitivity/frequency
Windscreen wipers offMove the stalk switch to position
0
to switch off the windscreen wipers.
Single sweepRaise the stalk switch and release to make one sweep.
Intermittent wipingSet the number of sweeps per time unit with the thumbwheel whenintermittent wiping is selected.
Continuous wipingThe wipers sweep at normal speed.
The wipers sweep at high speed.
IMPORTANT
Before activating the wipers during winter ensure that the wiper blades are not frozenin, and that any snow or ice on the wind-screen is scraped away.
IMPORTANT
Use plenty of washer fluid when the wipers are cleaning the windscreen. The wind-screen must be wet when the windscreenwipers are operating.
Service position wiper bladeFor cleaning the windscreen/wiper blades and replacement of wiper blades, see Wiperblades (p. 359) and Car washing (p. 379).
Rain sensor*The rain sensor automatically starts the wind-screen wipers based on how much water it
24 For replacing the wiper blades and service position wiper blades, see Wiper blades (p. 359). For filling washer fluid, see Washer fluid - filling (p. 361).
ProCarManuals.co’
Page 93 of 442
03 Instruments and controls
03
}}
* Option/accessory, for more information, see Introduction.91
detects on the windscreen. The sensitivity of the rain sensor can be adjusted using thethumbwheel. When the rain sensor is activated a lamp in the button illuminates and the rain sensor symbol
is shown in the combined
instrument panel.
Activating and setting the sensitivityWhen activating the rain sensor, the car must be running or the remote control key in posi-tion I or II while the windscreen wiper stalk
switch must be in position 0 or in the position
for a single sweep. Activate the rain sensor by pressing the but- ton
. The windscreen wipers make one
sweep. Press the stalk switch up for the wipers to make an extra sweep. Turn the thumbwheel upward for higher sen- sitivity and downward for lower sensitivity.(An extra sweep is made when the thumb-wheel is turned upward.)
DeactivateDeactivate the rain sensor by pressing the button
or move the stalk switch down
to another wiper program. The rain sensor is automatically deactivated when the remote control key is removed from the ignition switch or five minutes after theengine has been switched off.
IMPORTANT
The windscreen wipers could start and be damaged in an automatic car wash.Switch off the rain sensor while the car isin motion or when the remote control keyis in position
I or II. The symbol in the
combined instrument panel and the lampin the button go out.
Washing the headlamps and windows
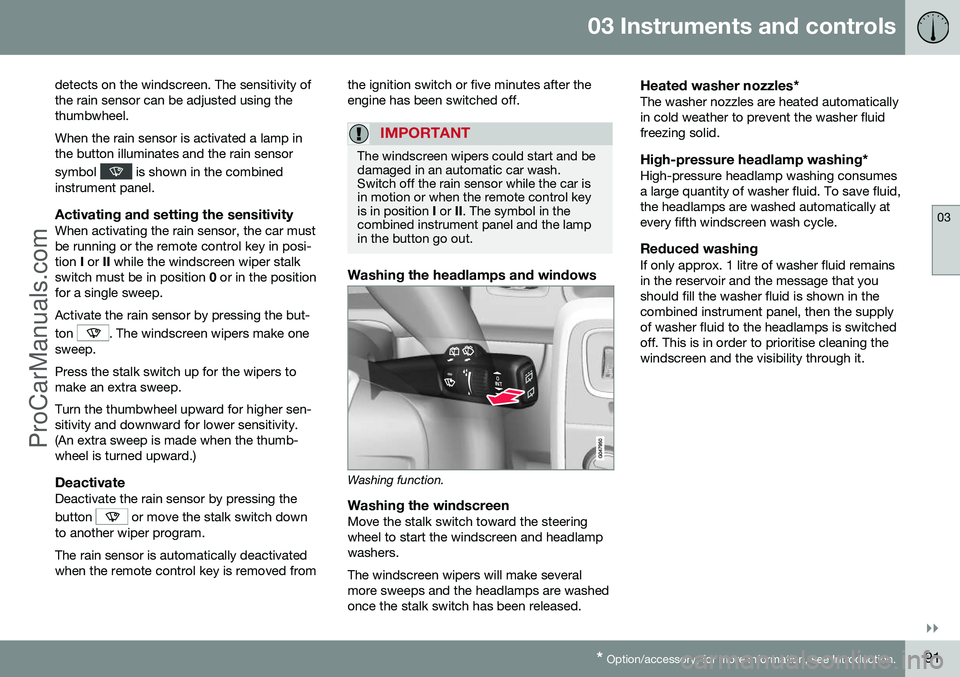
Washing function.
Washing the windscreenMove the stalk switch toward the steering wheel to start the windscreen and headlampwashers. The windscreen wipers will make several more sweeps and the headlamps are washedonce the stalk switch has been released.
Heated washer nozzles*The washer nozzles are heated automaticallyin cold weather to prevent the washer fluidfreezing solid.
High-pressure headlamp washing*High-pressure headlamp washing consumesa large quantity of washer fluid. To save fluid,the headlamps are washed automatically atevery fifth windscreen wash cycle.
Reduced washingIf only approx. 1 litre of washer fluid remainsin the reservoir and the message that youshould fill the washer fluid is shown in thecombined instrument panel, then the supplyof washer fluid to the headlamps is switchedoff. This is in order to prioritise cleaning thewindscreen and the visibility through it.
ProCarManuals.co’
Page 94 of 442
||
03 Instruments and controls
03
92* Option/accessory, for more information, see Introduction.
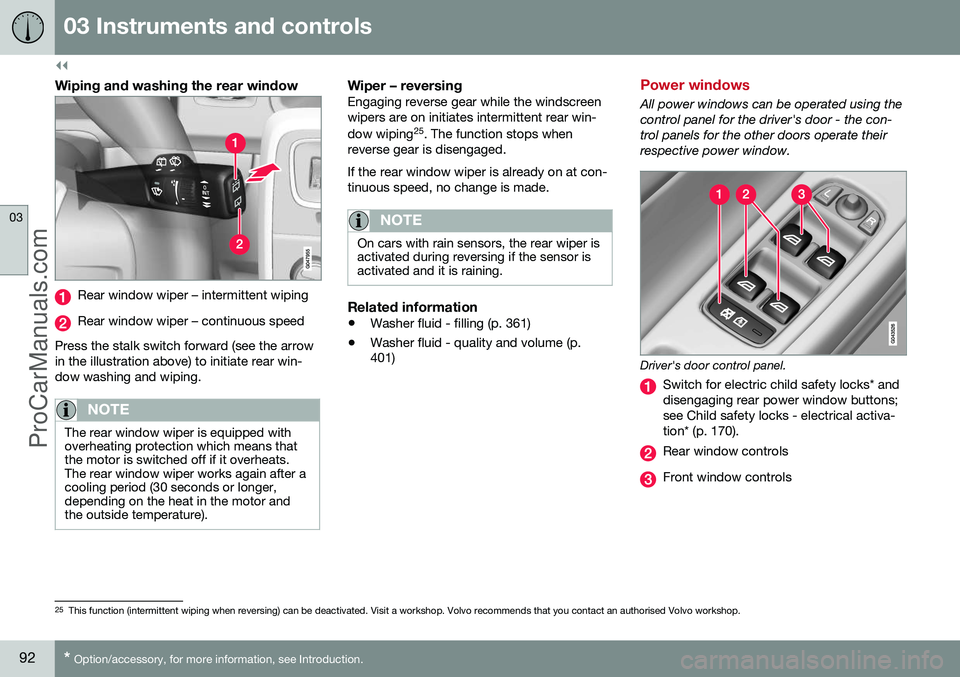
Wiping and washing the rear window
Rear window wiper – intermittent wiping
Rear window wiper – continuous speed
Press the stalk switch forward (see the arrow in the illustration above) to initiate rear win-dow washing and wiping.
NOTE
The rear window wiper is equipped with overheating protection which means thatthe motor is switched off if it overheats.The rear window wiper works again after acooling period (30 seconds or longer,depending on the heat in the motor andthe outside temperature).
Wiper – reversingEngaging reverse gear while the windscreen wipers are on initiates intermittent rear win- dow wiping 25
. The function stops when
reverse gear is disengaged. If the rear window wiper is already on at con- tinuous speed, no change is made.
NOTE
On cars with rain sensors, the rear wiper is activated during reversing if the sensor isactivated and it is raining.
Related information
• Washer fluid - filling (p. 361)
• Washer fluid - quality and volume (p. 401)
Power windows
All power windows can be operated using the control panel for the driver's door - the con-trol panels for the other doors operate theirrespective power window.
Driver's door control panel.
Switch for electric child safety locks* and disengaging rear power window buttons;see Child safety locks - electrical activa-tion* (p. 170).
Rear window controls
Front window controls
25
This function (intermittent wiping when reversing) can be deactivated. Visit a workshop. Volvo recommends that you contact an authorised Volvo workshop.
ProCarManuals.co’
Page 99 of 442
03 Instruments and controls
03
* Option/accessory, for more information, see Introduction.97
Automatic dimming*Bright light from behind is automatically dimmed by the rearview mirror. The controlfor manual dimming is not available on mir-rors with automatic dimming. The rearview mirror contains two sensors - one forward facing and one rearward facing -that work together to identify and eliminatedazzling light. The forward facing sensordetects ambient light, while the rearward fac-ing sensor detects the light from vehicleheadlights behind.
NOTE
If the sensors are obscured by e.g. parking permits, transponders, sun visors orobjects in the seats or in the cargo area insuch a way that light is prevented fromreaching the sensors, then the dimmingfunction of the interior rearview and doormirrors is reduced.
The compass (p. 97) can only be specified for a rearview mirror with automatic dimming.
Related information
• Door mirrors (p. 94)
Compass*
The rearview mirror contains an integrated display that shows the compass direction inwhich the front of the car is pointing.
Operation
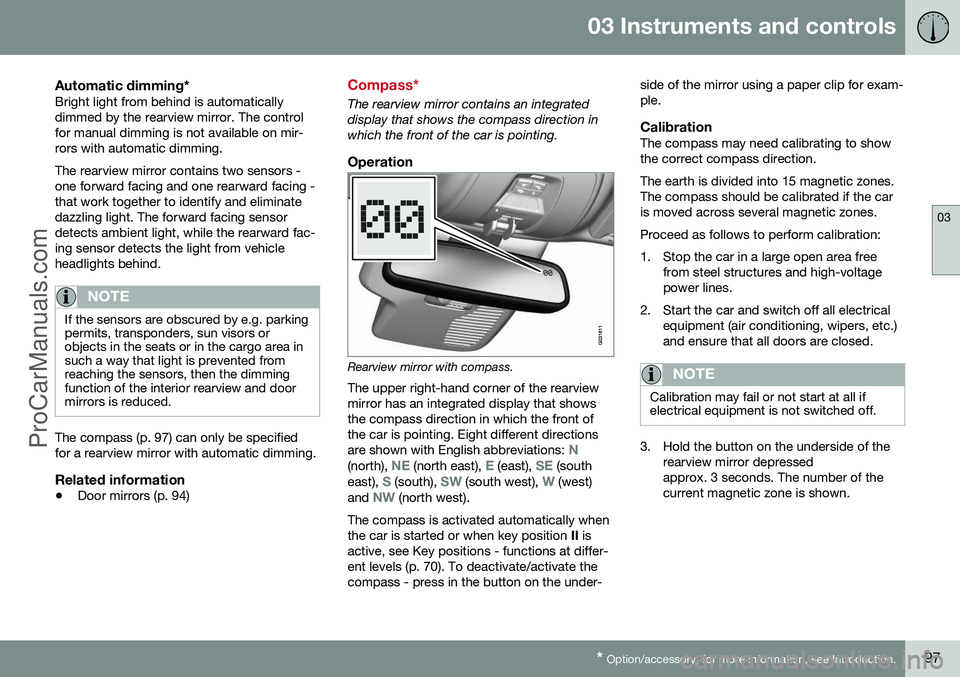
Rearview mirror with compass.
The upper right-hand corner of the rearview mirror has an integrated display that showsthe compass direction in which the front ofthe car is pointing. Eight different directions are shown with English abbreviations:
N(north), NE (north east), E (east), SE (south
east), S (south), SW (south west), W (west)
and NW (north west).
The compass is activated automatically when the car is started or when key position II is
active, see Key positions - functions at differ-ent levels (p. 70). To deactivate/activate thecompass - press in the button on the under- side of the mirror using a paper clip for exam-ple.
CalibrationThe compass may need calibrating to showthe correct compass direction. The earth is divided into 15 magnetic zones. The compass should be calibrated if the caris moved across several magnetic zones. Proceed as follows to perform calibration:
1. Stop the car in a large open area free
from steel structures and high-voltage power lines.
2. Start the car and switch off all electrical equipment (air conditioning, wipers, etc.)and ensure that all doors are closed.
NOTE
Calibration may fail or not start at all if electrical equipment is not switched off.
3. Hold the button on the underside of therearview mirror depressed approx. 3 seconds. The number of thecurrent magnetic zone is shown.
ProCarManuals.co’
Page 118 of 442
04 Climate control
04
116* Option/accessory, for more information, see Introduction.
Actual temperature
The temperature you select in the passenger compartment corresponds to the physicalexperience with reference to factors such asair speed, humidity and solar radiation etc. inand around the car. The system includes a sun sensor (p. 116) which detects on which side the sun is shin-ing into the passenger compartment. Thismeans that the temperature can differbetween the right and left-hand air ventsdespite the controls being set for the sametemperature on both sides.
Related information
• General information on climate control (p. 115)
• Temperature control in the passengercompartment (p. 124)
Sensors - climate control
The climate control system has a number of sensors to help control the temperature (p.116) in the car.
• The sun sensor is located on the top side of the dashboard.
• The temperature sensor for the passen-ger compartment is located below the cli-mate control panel.
• The outside temperature sensor islocated in the door mirror.
• The humidity sensor* is located by theinterior rearview mirror.
NOTE
Do not cover or block the sensors with clothing or other objects.
Related information
•General information on climate control (p. 115)
Air cleaning
The interior in a passenger compartment is designed to be pleasant and comfortable,even for people with contact allergies and forasthma sufferers.
• Passenger compartment filter (p. 117)
• Material in the passenger compart- ment (p. 118)
• Clean Zone Interior Package (CZIP) (p.117)*
• Interior Air Quality System (IAQS) (p.118)*
Related information
• General information on climate control (p.115)
ProCarManuals.co’
Page 120 of 442
04 Climate control
04
118* Option/accessory, for more information, see Introduction.
Air cleaning - IAQS*
The air quality system IAQS separates gases and particles to reduce the levels of odoursand pollution in the passenger compartment. If the outside air is contaminated then the air intake is closed and the air is recirculated. It is possible to activate/deactivate the func- tion in the menu system MY CAR. For a
description of the menu system, see MY CAR(p. 103).
NOTE
The air quality sensor must always be ena- bled to ensure the best air in the passen-ger compartment. In a cold climate recirculation is limited so as to prevent misting. In the event of misting, the air quality sen- sor should be disengaged, and thedefroster functions for the windscreen andside windows, as well as the rear window,should be used.
Related information
• General information on climate control (p. 115)
• Air cleaning (p. 116)
• Air cleaning - Clean Zone Interior Pack-age (CZIP)* (p. 117)
Air cleaning - material
Tested materials have been developed in order to minimise the quantity of dust in thepassenger compartment and to contribute tomaking the passenger compartment easier tokeep clean. The carpets in both the passenger compart- ment and the cargo area are removable andeasy to remove and clean. Use cleaningagents and car care products recommendedby Volvo to clean the interior (p. 381).
Related information
•Air cleaning (p. 116)
Menu settings - climate control
It is possible to activate/deactivate or change the default settings for six of the climate con-trol system's functions via the centre console. •Fan level during automatic climate control (p. 123).
• Recirculation timer (p. 126).
• Automatic start of rear window defroster(p. 96).
• Interior air quality system (p. 118)*.
• Automatic start of seat heating driver (p.122).
• Automatic start of steering wheel heating(p. 77).
More information is available in the descrip-
tion of the menu system (p. 103).
The climate control system's functions can be
reset to default settings in the menu system MY CAR . For a description of the menu sys-
tem, see MY CAR (p. 103).
Related information
• General information on climate control (p. 115)
ProCarManuals.co’
Page 169 of 442
06 Locks and alarm
06
* Option/accessory, for more information, see Introduction.167
Locking/unlocking - glovebox
The glovebox (p. 140) can only be locked/ unlocked using the detachable key blade fromthe remote control key. For information on the key blade, see Detach- able key blade - detaching/attaching (p. 155).
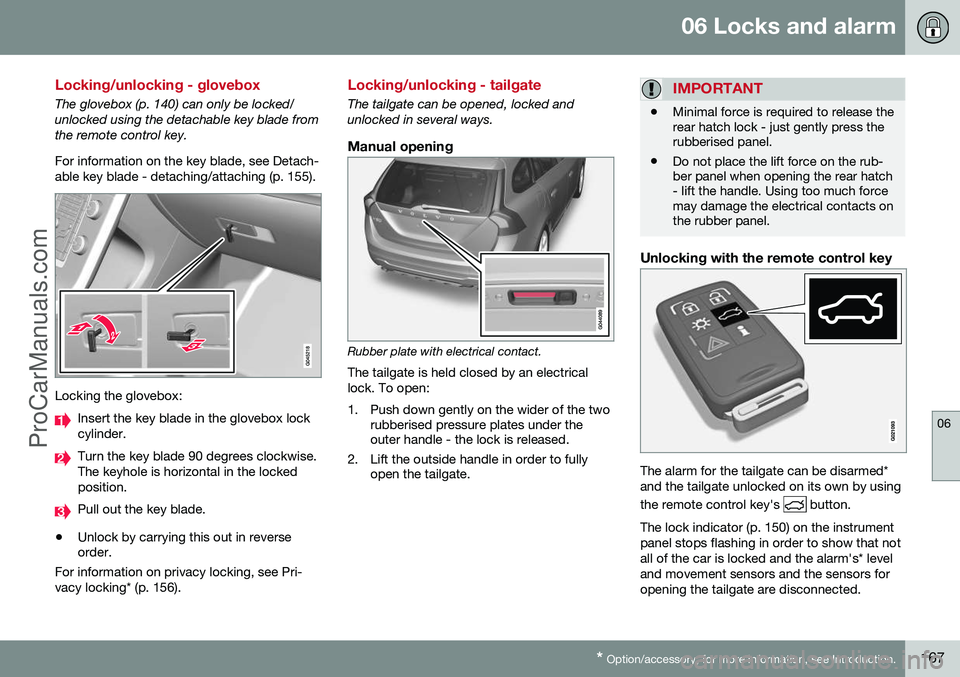
Locking the glovebox:
Insert the key blade in the glovebox lock cylinder.
Turn the key blade 90 degrees clockwise. The keyhole is horizontal in the lockedposition.
Pull out the key blade.
• Unlock by carrying this out in reverse order.
For information on privacy locking, see Pri- vacy locking* (p. 156).
Locking/unlocking - tailgate
The tailgate can be opened, locked and unlocked in several ways.
Manual opening
Rubber plate with electrical contact.
The tailgate is held closed by an electrical lock. To open:
1. Push down gently on the wider of the two rubberised pressure plates under the outer handle - the lock is released.
2. Lift the outside handle in order to fully open the tailgate.
IMPORTANT
• Minimal force is required to release the rear hatch lock - just gently press therubberised panel.
• Do not place the lift force on the rub-ber panel when opening the rear hatch- lift the handle. Using too much forcemay damage the electrical contacts onthe rubber panel.
Unlocking with the remote control key
The alarm for the tailgate can be disarmed* and the tailgate unlocked on its own by using the remote control key's
button.
The lock indicator (p. 150) on the instrument panel stops flashing in order to show that notall of the car is locked and the alarm's* leveland movement sensors and the sensors foropening the tailgate are disconnected.
ProCarManuals.co’
Page 173 of 442
06 Locks and alarm
06
* Option/accessory, for more information, see Introduction.171
Alarm
The alarm is a device that warns in the event of e.g. a break-in in the car. Activated alarm is triggered if:
• a door, the bonnet or the tailgate is opened
• a movement is detected in the passengercompartment (if fitted with a movementdetector*)
• the car is raised or towed away (if fittedwith a tilt detector*)
• the battery's cable is disconnected
• the siren is disconnected.
If there is a fault in the alarm system then the information display in the combined instru-ment panel shows a message. In which case,contact a workshop - an authorised Volvoworkshop is recommended.NOTE
The movement sensors trigger an alarm in the event of movement in the passengercompartment - air currents are also regis-tered. For this reason the alarm is trig-gered if the car is left with a window or thesunroof open or if the passenger compart-ment heater is used. To avoid this: Close the window/sunroof when leaving the car. If the car's inte-grated passenger compartment heater (ora portable electric heater) shall be used -direct the airflow from the air vents so thatthey are not pointing upwards in the pas-senger compartment. Alternatively,reduced alarm level can be used, seeReduced alarm level (p. 173).
NOTE
Do not attempt to repair or alter compo- nents in the alarm system yourself. Anysuch attempts may affect the terms of theinsurance.
Arming the alarm–Press the remote control key lock button.
Deactivate the alarm–Press the remote control key unlock but- ton.
Deactivating a triggered alarm–Press the remote control key unlock but- ton or insert the remote control key in theignition switch.
Related information
• Alarm indicator (p. 172)
• Alarm - automatic re-arming (p. 172)
• Alarm - remote control key not working (p. 172)
ProCarManuals.co’