remote start VOLVO V60 2021 Owner's Manual
[x] Cancel search | Manufacturer: VOLVO, Model Year: 2021, Model line: V60, Model: VOLVO V60 2021Pages: 661, PDF Size: 12.68 MB
Page 440 of 661
STARTING AND DRIVING
438
Towing using a towline
This section refers to one vehicle being towed behind another using a towline.
Before towing another vehicle, check applica- ble speed limit regulations.
Preparations and towing
CAUTION
For some transmission variants, it is not possible to shift from P position if theengine is switched off. Contact an author-ized Volvo workshop for assistance towingor call a professional towing service.
CAUTION
Note that the vehicle must always be towed with the wheels rolling forward.
Do not tow a vehicle with automatictransmission at a speed greater than80 km/h (50 mph) or for a distancegreater than 80 km (50 miles).
WARNING
Ignition mode
II must be active – all
airbags are deactivated in ignition mode I.
Always have the remote key in thevehicle when it is towed.
WARNING
The brake and steering servos do not work when the engine is off – it takesabout 5 times more pressure on the brakepedal and steering requires much moreeffort than normal.
1. Turn on the hazard warning flashers.
2. Attach the towline to the towing eyelet.
3. Put the vehicle in ignition mode II – with-
out pressing the brake pedal, turn the start knob clockwise and hold it there for about4 seconds. Release the knob, which willautomatically return to its original position.
4. Move the gear selector to neutral (N) and release the parking brake. If the battery charge level is too low, it may not be possible to release the parkingbrake. Connect an auxiliary battery to thevehicle if the battery is discharged.
> The towing vehicle can now start driv-ing. 5. Keep the towline taut when the towing
vehicle slows down by applying light pres- sure to the brake pedal. This will helpavoid jarring movements.
6. Be prepared to apply the brakes to stop the vehicle.
Jump startingDo not tow the vehicle to start the engine. Usean auxiliary battery if the start battery's chargelevel is so low that the engine cannot bestarted.
CAUTION
Attempting to tow with the engine running could result in damage to the three-waycatalytic converter.
Related information
Attaching and removing the towing eyelet (p. 439)
Hazard warning flashers (p. 159)
Recovery (p. 440)
Jump starting using another battery(p. 431)
Selecting ignition mode (p. 396)
Transmission (p. 406)
Page 443 of 661
STARTING AND DRIVING
* Option/accessory.441
CAUTION
Note that the vehicle must always be towed with the wheels rolling forward.
Related information
Attaching and removing the towing eyelet (p. 439)
HomeLink ®
*20
HomeLink ®
21
is a programmable remote con-
trol, integrated in the vehicle electrical sys- tem, that can control up to three differentdevices (e.g. garage door opener, alarm sys-tem, outdoor and indoor lighting) and therebyreplace the remote controls for these.
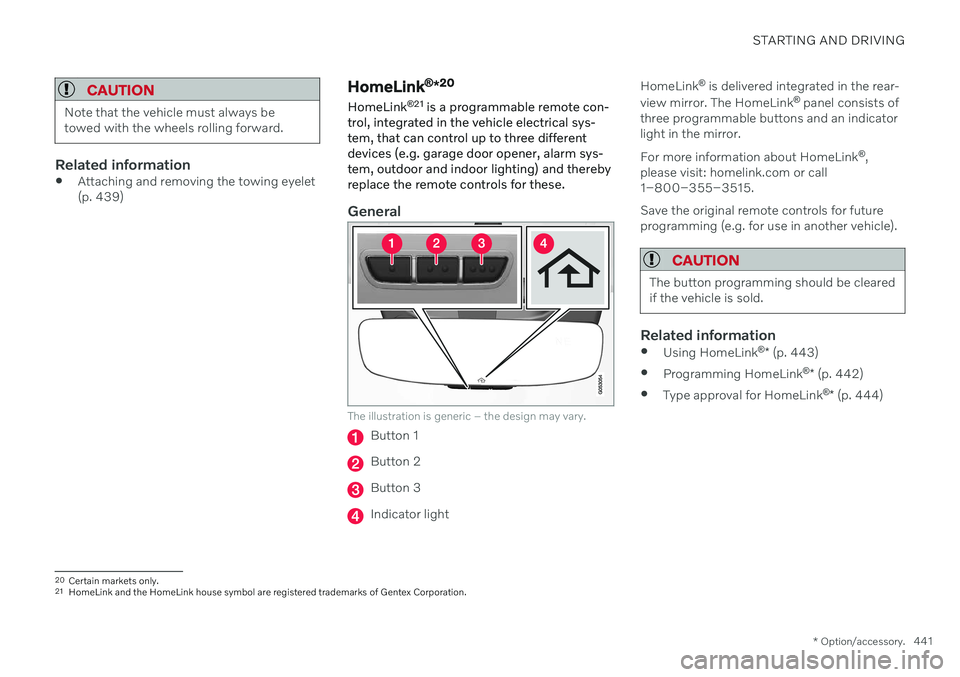
General
The illustration is generic – the design may vary.
Button 1
Button 2
Button 3
Indicator light HomeLink
®
is delivered integrated in the rear-
view mirror. The HomeLink ®
panel consists of
three programmable buttons and an indicator light in the mirror. For more information about HomeLink ®
,
please visit: homelink.com or call 1–800–355–3515. Save the original remote controls for future programming (e.g. for use in another vehicle).
CAUTION
The button programming should be cleared if the vehicle is sold.
Related information
Using HomeLink ®
* (p. 443)
Programming HomeLink ®
* (p. 442)
Type approval for HomeLink ®
* (p. 444)
20
Certain markets only.
21 HomeLink and the HomeLink house symbol are registered trademarks of Gentex Corporation.
Page 444 of 661
STARTING AND DRIVING
* Option/accessory.
442
Programming HomeLink ®
*22
Follow these instructions to program HomeLink ®
, reset all programming, or pro-
gram individual buttons.
NOTE
In some vehicles, the ignition must be on or in the "accessory position" before HomeLink ®
can be programmed or used. It
can be a good idea to put new batteries in the remote control being replaced by HomeLink ®
for faster programming and
better radio signal transmission. TheHomeLink ®
buttons should be reset before
programming.
WARNING
While HomeLink ®
is being programmed,
the garage door or gate being programmed may be activated. Make sure that no one isnear the door or gate during programming.When programming a garage door opener,it is advised to park outside of the garage. 1. Point the remote control at the
HomeLink ®
button to be programmed and
hold it about 2-8 cm (1-3 inches) from the button. Do not obstruct the HomeLink ®
indicator light. Note: Some remote controls are more
effective at programming HomeLink ®
from
a distance of about 15-20 cm (6-12 inches). Keep this in mind if you experi-ence any programming difficulties.
2. Press and hold both the remote control button and the HomeLink ®
button to be
programmed. 3. Do not release the buttons until the indica-
tor light has stopped flashing slowly(about once a second) and either flashesquickly (about 10 times a second) orglows steadily. >If the indicator light glows steadily: Indication that programming is com-plete. Press the programmed buttontwice to activate. If the indicator light flashes quickly: The device being programmed with HomeLink ®
may have a security func-
tion that requires an extra step. Try pressing the programmed button twiceto see whether the programmingworks. Otherwise, continue with thefollowing steps.
22 Certain markets only.
Page 445 of 661
STARTING AND DRIVING
}}
* Option/accessory.443
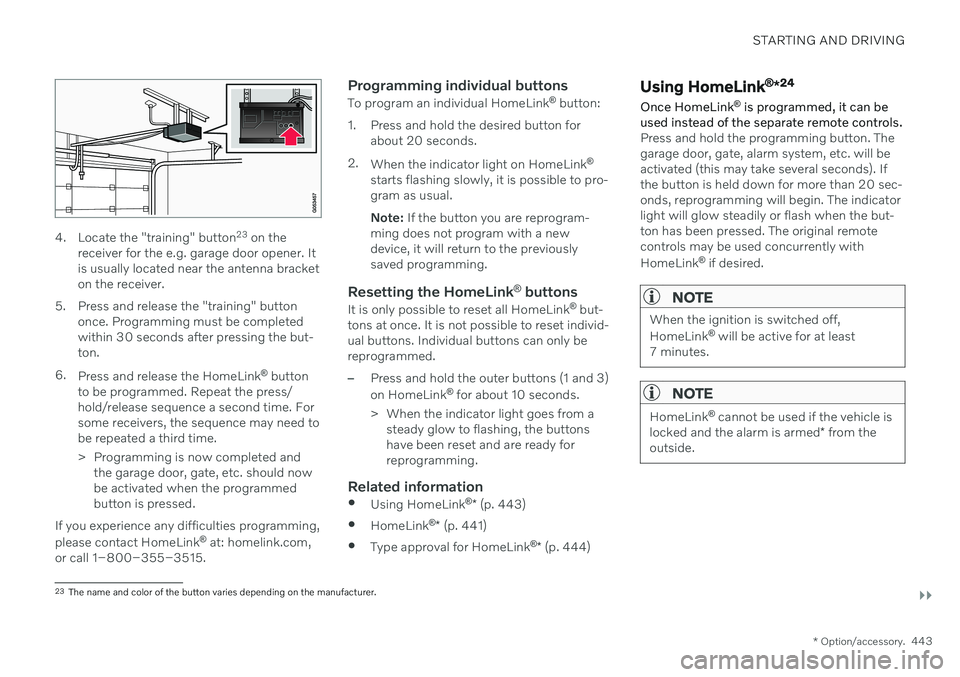
4. Locate the "training" button 23
on the
receiver for the e.g. garage door opener. It is usually located near the antenna bracketon the receiver.
5. Press and release the "training" button once. Programming must be completedwithin 30 seconds after pressing the but-ton.
6. Press and release the HomeLink ®
button
to be programmed. Repeat the press/hold/release sequence a second time. Forsome receivers, the sequence may need tobe repeated a third time.
> Programming is now completed and the garage door, gate, etc. should now be activated when the programmedbutton is pressed.
If you experience any difficulties programming, please contact HomeLink ®
at: homelink.com,
or call 1–800–355–3515.
Programming individual buttons
To program an individual HomeLink ®
button:
1. Press and hold the desired button for about 20 seconds.
2. When the indicator light on HomeLink ®
starts flashing slowly, it is possible to pro- gram as usual. Note: If the button you are reprogram-
ming does not program with a new device, it will return to the previouslysaved programming.
Resetting the HomeLink ®
buttons
It is only possible to reset all HomeLink ®
but-
tons at once. It is not possible to reset individ-ual buttons. Individual buttons can only bereprogrammed.
–Press and hold the outer buttons (1 and 3) on HomeLink ®
for about 10 seconds.
> When the indicator light goes from a steady glow to flashing, the buttons have been reset and are ready forreprogramming.
Related information
Using HomeLink ®
* (p. 443)
HomeLink ®
* (p. 441)
Type approval for HomeLink ®
* (p. 444)
Using HomeLink ®
*24
Once HomeLink ®
is programmed, it can be
used instead of the separate remote controls.
Press and hold the programming button. The garage door, gate, alarm system, etc. will beactivated (this may take several seconds). Ifthe button is held down for more than 20 sec-onds, reprogramming will begin. The indicatorlight will glow steadily or flash when the but-ton has been pressed. The original remotecontrols may be used concurrently with HomeLink ®
if desired.
NOTE
When the ignition is switched off, HomeLink ®
will be active for at least
7 minutes.
NOTE
HomeLink ®
cannot be used if the vehicle is
locked and the alarm is armed * from the
outside.
23 The name and color of the button varies depending on the manufacturer.
Page 619 of 661
MAINTENANCE AND SERVICE
* Option/accessory.617
CAUTION
The system will automatically change to P
mode if the above steps are not followed. In P mode, the wheels are locked, which
they should not be when the vehicle isbeing washed in a car wash.
NOTE
Keep in mind that if the vehicle is equipped with the keyless locking and unlocking function *, the doors and tailgate/trunk lid
may open when washing the vehicle if the remote key is within range.
Testing the brakes
WARNING
Always test the brakes after washing the vehicle, including the parking brake, toensure moisture and corrosion do notattach the brake pads and impair brakefunctionality.
Lightly depress the brake pedal from time to time when driving long distances in rain orslush. The heat from the friction will helpwarm up and dry the brake pads. Do the sameafter starting the vehicle in very damp or coldweather.
Related information
Cleaning the exterior (p. 613)
Polishing and waxing (p. 614)
Hand washing (p. 615)
High-pressure washing (p. 617)
Cleaning the wiper blades (p. 618)
Cleaning exterior plastic, rubber and trimcomponents (p. 618)
Cleaning rims (p. 619)
Corrosion protection (p. 620)
Auto-hold brakes (p. 403)
Settings for automatically activating theparking brake (p. 402)
Keyless and touch-sensitive surfaces
*
(p. 254)
High-pressure washing The vehicle should be washed as soon as it becomes dirty. The longer the dirt remains,the more difficult it will be to keep the vehicleclean. It could also lead to paint damage.Wash the vehicle in a car wash or garagewith an oil separator. Use a car washingdetergent recommended by Volvo.
If washing the vehicle with a high-pressure wash, use sweeping movements and keep thenozzle at least 30 cm (13 in.) from the vehicle.Do not spray directly onto locks.
Related information
Cleaning the exterior (p. 613)
Polishing and waxing (p. 614)
Hand washing (p. 615)
Automatic car washes (p. 616)
Cleaning the wiper blades (p. 618)
Cleaning exterior plastic, rubber and trimcomponents (p. 618)
Cleaning rims (p. 619)
Corrosion protection (p. 620)
Page 644 of 661
INDEX
642Auto-hold brakes 403
activating/deactivating 404
after collision 405
driver support 270
Automatic car wash 616 Automatic engine stop auto-stop 418
Automatic high beam 155
Automatic locking 260
Automatic relocking 241, 255
Automatic transmission 406, 407 kickdown 412
oil 636
Trailer 434
B
Backrestfront seat, adjusting 182, 183, 186, 187 , 188, 189
rear seat, folding 192
Battery jump-start 431
Maintenance 584
recycling 588
starter battery 584
support 586
symbols on the battery 588
Blind Spot Information 344
BLIS 344 activating/deactivating 345
limitations 346
Symbols and messages 347
Blower adjusting 220, 221
air distribution 205
air vents 206
Bluetooth connect 475
connecting vehicle to Internet 501
phone 485
settings 493
Book service and repair 571
Booster cushions 74 Brake assist after collision 405
Brake fluid grade 637
Brake functions 397
Brakes 397 anti-lock brakes, ABS 397
auto-brake with Pilot Assist 315auto-braking with Adaptive Cruise
Control 315automatic when stationary 403
Brake Assist System, BAS 398
brake lights 159
brake system 397
emergency brake lights 159
Maintenance 399
on salted roads 399
on wet roads 399
parking brake 400
brake system fluid 637
C
Camera sensorsee Camera 383
Camera unit 383 limitations 383
maintenance and cleaning 386
Symbols and messages 388
Capacity weight 547, 633 Care Key restricted remote key 248
settings 249
Cargo compartment 555 attachment points 558
cargo net 563
Page 649 of 661
INDEX
647
HomeLink
® remote control
programmable 441
Home safe lighting, Homesafe Lighting, Follow me home lighting, follow-me-
home lighting 160
Honk 195
Hood, opening 576
Horn 195
I
IAQS (Interior Air Quality System) 203
IC (Inflatable Curtain) 63
ID, Volvo 26
Identification number 39
Ignition mode 395, 396
Immobilizer 252 Electronic immobilizer 252
Indicator symbols 93
Individual drive mode 413
Infant seats 70
Inflatable curtain 63
Inflatable Curtain 63
Inflating tires 546
Inflation pressure adjusting 528
Checking 527
decal with recommended pressure 529
Inflation pressure monitoring 529 action 533
save new inflation pressure 531
Status 532
Inflation pressure table 639
Information display 82, 86
Infotainment (Audio and media) 448
Instrument cluster 82 settings 86
Instrument illumination 162
Instrument lighting 162
Instrument panel 82 app menu 102, 103
messages 104
settings 86
Instruments and controls 80 Instruments overview left-hand drive vehicle 80
IntelliSafe driver support 29
Interior Air Quality System 203
Intermittent wiping 175Internet, see Internet-connected vehi- cle 500
Internet-connected vehicle 500 book service and repair 571
No connection or poor connection 505
send car data 572
system updates 569
iPod ®, connecting 476
ISOFIX/LATCH anchors 77
J
Jack 537
Jump-start 431
K
Key 238
Keyboard 124, 127 change language 127
Keyless locking/unlocking 255
settings 256
touch-sensitive surfaces 254
Key tag 238
Page 650 of 661
INDEX
648
L
Labelslocation 628
Laminated glass 164 Lamps changing 607
Trailer 437
Lane Keeping Aid 316 activating/deactivating 318
display 322
limitations 319
see Lane Keeping Aid 316
select assistance option 319
Symbols and messages 320
Language 130
Large Animal Detection (LAD) 327
Launch function 412Leather upholstery, cleaning instruc-
tions 611 Leveling control suspension 422
License agreement 96, 509
Lifting tools 537 Light bulbs changing 607
Light control 150, 162
Lighting Active Bending Lights 156
approach lighting 160
automatic high beam 155
brake lights 159
control, instrument, display 162
controls 150, 160
cornering illumination 157
daytime running lights 152
emergency brake lights 159
front fog lights 157
Hazard warning flashers 159
high beams 154, 155
home safe lighting 160
in passenger compartment 160
low beams 153
position lights 152
rear fog light 158
settings 151
Turn signals 156
Lighting, replacing bulbs 607
Limp home 406 Load anchoring eyelets cargo compartment 558
Load anchoring hooks 557
Load carriers 557
Load index 524Loading general 556
load anchoring eyelets 558
long load 556
Lock indication 236 setting 238
Locking/unlocking Tailgate 243, 256
Locking wheel bolts 537 Locks locking/unlocking 241
Locks and remote keys 236Low battery charge level start battery 431
Low beams 153
M
Maintained climate comfort 231 start/stop 231
Maintenance 566 corrosion protection 620
Max. axle weight 633
Max. roof load 633
Page 653 of 661
INDEX
651
Symbols and messages 388
type approval 381
Radio 452 changing radio waveband and radio
station 454
HD radio 457
RBDS 456
search radio station 454
settings 456SiriusXM ®
Satellite radio 460, 461, 463
start 453
voice control 147
Radio favorites 455
Rain sensor 175, 176
Rain sensor's memory function 176
Rear camera 361
Rear Collision Warning 343 limitations 343
Rear seat blower 221
climate 210
folding backrest 192
head restraint 193
heating 213
temperature 223
Rearview/door mirrors adjusting door mirrors 168
dimming 168
heating 219
interior 167
Rearview mirror 167 dimming 168
Rear window heating 219
washers 178, 179
wipers 178, 179
Recalls 47
Recommendations when driving 424
Recommendations when loading 556
Recovery 440
Refrigerant 576 climate system 637
Refueling filling 426
fuel filler door, fuel flap 425
Regenerative braking 405
Remote immobilizer 252
Remote key 238 battery replacement 244
connecting to driver profile 136
detachable key blade 249
loss 248
Range 243
Remote updates 569
Reporting safety defects 46Resetting door mirrors 168
Resetting settings 132 change of owner 132
Driver profile 137
Resetting trip odometer 90
Road Sign Information 278 activate/deactivate warnings 281
activating/deactivating 279
display 279
limitations 282
Sensus Navigation 280
speed camera information 280
Speed warning 280
Road trip 424
Roll-over protection 271
Roll Stability Control 271
Roof load, max. weight 633
Run-off Mitigation 338
S
Safety 44 pregnancy 45
Safety belt, see Seat belt 49
Safety defects, reporting 46