length VOLVO V90 2017 Owners Manual
[x] Cancel search | Manufacturer: VOLVO, Model Year: 2017, Model line: V90, Model: VOLVO V90 2017Pages: 594, PDF Size: 15.07 MB
Page 120 of 594
INSTRUMENTS AND CONTROLS
* Option/accessory.
118
Voice recognition control of the phone 11
Command for voice recognition control of a Bluetooth-connected mobile phone to e.g. call acontact, a number, or to listen to a message.
To specify a contact in the phone book, the voice recognition command must include contact infor-mation that is entered in the phone book. If a contact, e.g.
Robyn Smith, has several phone
numbers then the number category can also be stated, e.g.
Home or Mobile: "Call Robin
Smith Mobile".
Tap on
and say one of the following com-
mands:
• "
Call [contact]" - dials the selected contact
from the phone book.
• "
Call [phone number]" - dials the phone
number.
• "
Recent calls" - displays the call list.
• "
Read message" - message is read out. If
there are several messages - select which message should be read out.
Related information
• Voice recognition (p. 115)
• Using voice recognition (p. 116)
• Settings for voice recognition (p. 117)
Voice recognition control of radio and media 12
Command for voice recognition control of radio and media player.
Tap on and say one of the following com-
mands:
• "
Media" - starts a dialogue for media and
radio and shows examples of commands.
• "
Play [artist]" - plays back music by the
selected artist.
• "
Play [song title]" - plays back the selected
song.
• "
Play [song title] from [album]" - plays
back the selected song from the selected album.
• "
Play [TV channel name]" - starts the
selected TV channel.
• "
Play [radio station]" - starts playing back
the selected radio channel.
• "
Tune to [frequency]" - starts the selected
radio frequency in the current frequency band. If no radio source is active, the FMband is started by default.
• "
Tune to [frequency] [wavelength]" -
starts the selected radio frequency in the selected frequency band. •
"
Radio" - starts FM radio.
• "
Radio FM" - starts FM radio.
• "
Radio AM" - starts AM radio.
• "
DAB " - starts DAB radio.
• "
TV" - starts playback from TV
*.
• "
CD" - starts playback from CD
*.
• "
USB" - starts playback from USB.
• "
iPod" - starts playback from iPod.
• "
Bluetooth" - starts playback from a Blue-
tooth-connected media source.
• "
Similar music" — plays back music similar
to the music currently playing back from USB devices.
Related information
• Voice recognition (p. 115)
• Using voice recognition (p. 116)
• Settings for voice recognition (p. 117)
11
Applies to certain markets.
12 Applies to certain markets.
Page 123 of 594
INSTRUMENTS AND CONTROLS
* Option/accessory.121
Manual front seat
The car's front seats have different setting options for optimum seating comfort.
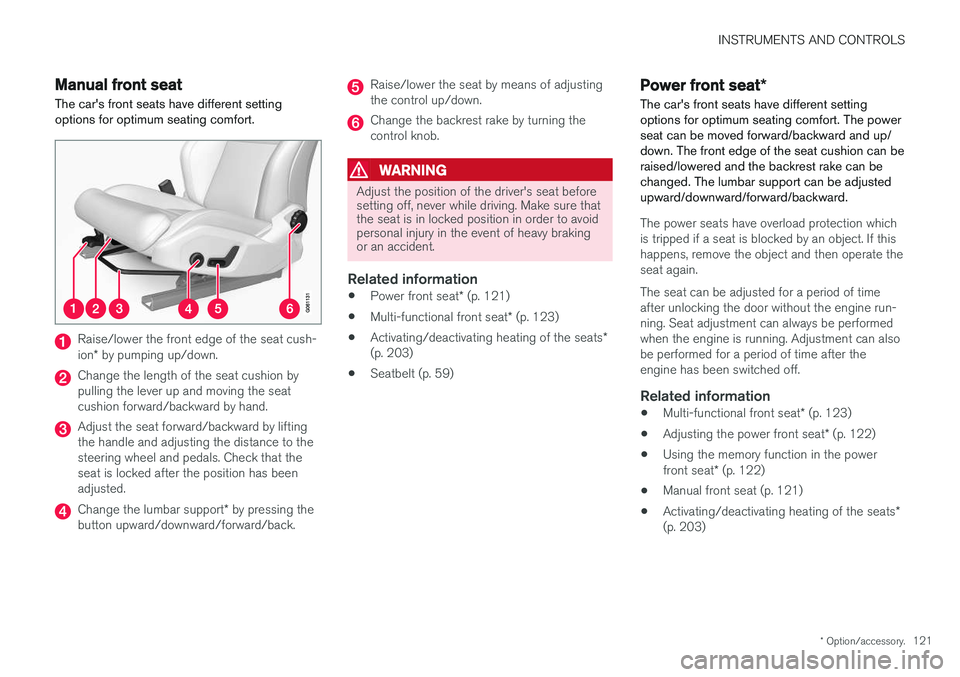
Raise/lower the front edge of the seat cush- ion * by pumping up/down.
Change the length of the seat cushion by pulling the lever up and moving the seatcushion forward/backward by hand.
Adjust the seat forward/backward by lifting the handle and adjusting the distance to thesteering wheel and pedals. Check that theseat is locked after the position has beenadjusted.
Change the lumbar support * by pressing the
button upward/downward/forward/back.
Raise/lower the seat by means of adjusting the control up/down.
Change the backrest rake by turning the control knob.
WARNING
Adjust the position of the driver's seat before setting off, never while driving. Make sure thatthe seat is in locked position in order to avoidpersonal injury in the event of heavy brakingor an accident.
Related information
• Power front seat
* (p. 121)
• Multi-functional front seat
* (p. 123)
• Activating/deactivating heating of the seats
*
(p. 203)
• Seatbelt (p. 59)
Power front seat
*
The car's front seats have different setting options for optimum seating comfort. The powerseat can be moved forward/backward and up/down. The front edge of the seat cushion can beraised/lowered and the backrest rake can bechanged. The lumbar support can be adjustedupward/downward/forward/backward.
The power seats have overload protection which is tripped if a seat is blocked by an object. If thishappens, remove the object and then operate theseat again. The seat can be adjusted for a period of time after unlocking the door without the engine run-ning. Seat adjustment can always be performedwhen the engine is running. Adjustment can alsobe performed for a period of time after theengine has been switched off.
Related information
• Multi-functional front seat
* (p. 123)
• Adjusting the power front seat
* (p. 122)
• Using the memory function in the power front seat
* (p. 122)
• Manual front seat (p. 121)
• Activating/deactivating heating of the seats
*
(p. 203)
Page 125 of 594
INSTRUMENTS AND CONTROLS
}}
* Option/accessory.123
3.
Within three seconds, depress the 1 or 2
button.
> When the position has been stored in the selected memory button an acoustic sig- nal sounds and the light indicator in the M
button extinguishes.
If none of the memory buttons is depressedwithin three seconds then the M button extin-
guishes and no storing takes place. The seat must be adjusted again before a new memory can be set.
Using a stored settingA stored setting can be used with the front dooreither open or closed:
Open front door
–Depress one of the memory buttons 1 or 2
with a short press. Seat, door mirrors and head-up display move and then stop at thepositions stored in the selected memory but-ton.
Closed front door
–Hold one of the memory buttons 1 or 2
depressed until seat, door mirrors and head- up display stop in the positions that arestored in the selected memory button.
If the memory button is released, the movementof the seat, door mirrors and head-up display willbe stopped.
WARNING
Risk of crushing! Make sure that children do not play with the keypad. Check that there areno objects in front of, behind or under theseat during adjustment. Make sure that noneof the passengers in the rear seat is in dangerof becoming trapped.
Related information
• Power front seat
* (p. 121)
• Adjusting the power front seat
* (p. 122)
Multi-functional front seat *
Enhance the seating comfort using the multi- function control.
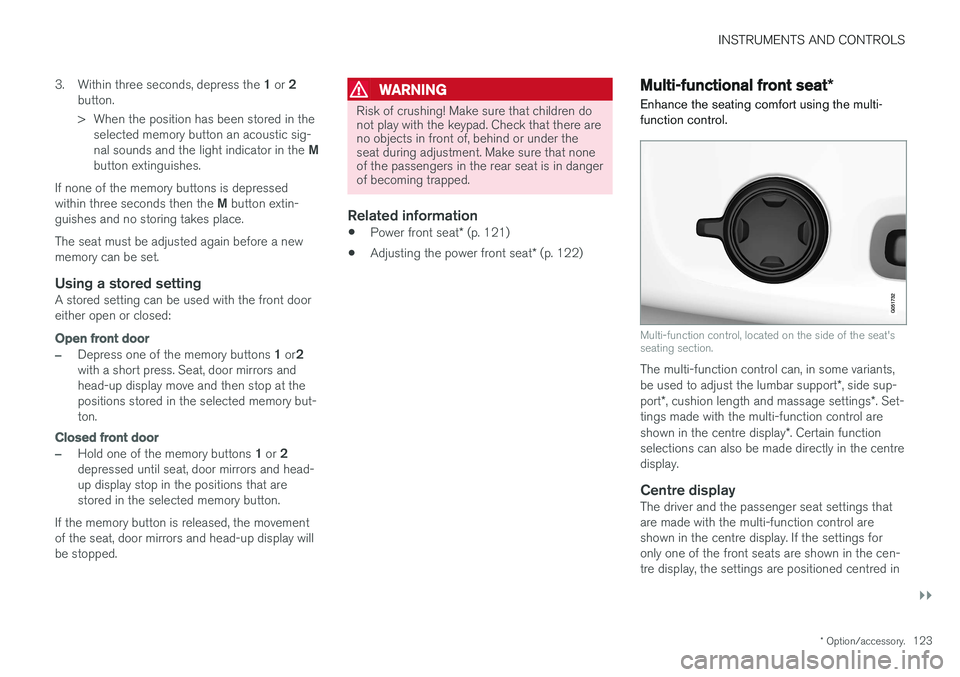
Multi-function control, located on the side of the seat's seating section.
The multi-function control can, in some variants, be used to adjust the lumbar support *, side sup-
port *, cushion length and massage settings *. Set-
tings made with the multi-function control areshown in the centre display *. Certain function
selections can also be made directly in the centre display.
Centre displayThe driver and the passenger seat settings thatare made with the multi-function control areshown in the centre display. If the settings foronly one of the front seats are shown in the cen-tre display, the settings are positioned centred in
Page 128 of 594
||
INSTRUMENTS AND CONTROLS
* Option/accessory.
126 2.
Select
Side bolsters in the seat settings
view.
• Press the front seat button in order to increase the side support.
• Press the rear seat button in order toreduce the side support.
Adjusting the lumbar support
* in the
front seat
The lumbar support can be adjusted upward/downward/forward/backward.
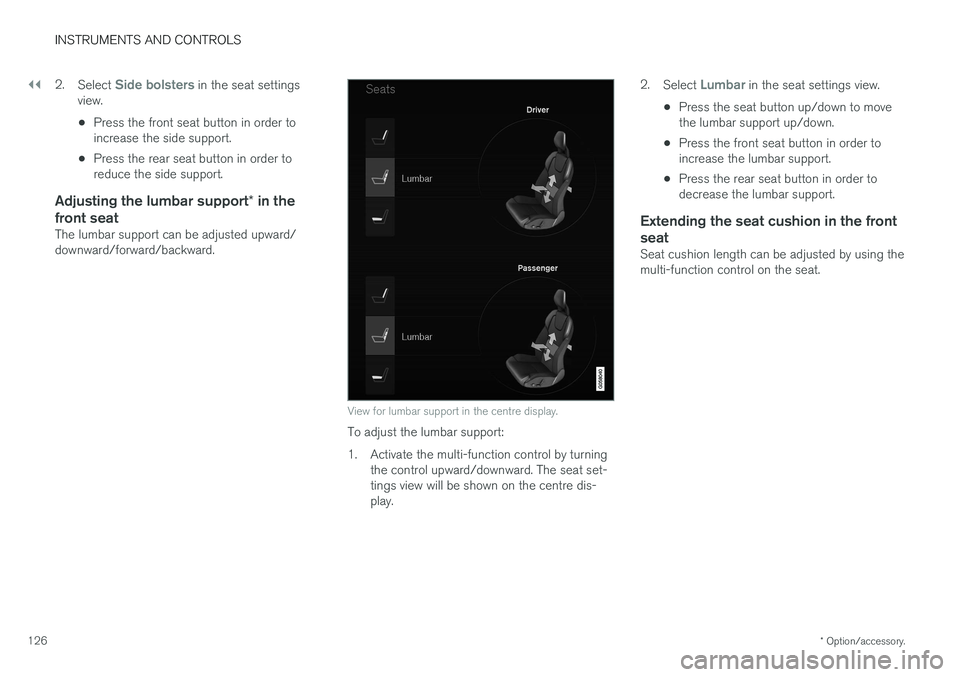
View for lumbar support in the centre display.
To adjust the lumbar support:
1. Activate the multi-function control by turning the control upward/downward. The seat set- tings view will be shown on the centre dis-play. 2.
Select
Lumbar in the seat settings view.
• Press the seat button up/down to move the lumbar support up/down.
• Press the front seat button in order toincrease the lumbar support.
• Press the rear seat button in order todecrease the lumbar support.
Extending the seat cushion in the front seat
Seat cushion length can be adjusted by using the multi-function control on the seat.
Page 150 of 594
INSTRUMENTS AND CONTROLS
* Option/accessory.
148
Home safe light duration
Some of the exterior lighting can be kept switched on to work as home safe lighting afterthe car has been locked.
To activate the function:
1. Switch off the car.
2. Move the left-hand stalk switch forward toward the instrument panel and release.
3. Get out of the car and lock the door.When the function is activated, dipped beam, position lamps, lighting in the outside handles *
and number plate lighting are switched on. The length of time that home safe lighting remains on can be set via the centre display.
Related information
• Approach light duration (p. 148)
• Settings view (p. 169)
Approach light duration
Approach lighting is switched on when the car is unlocked and is used to switch on the car'slighting at a distance.
When the function is activated with the remote control key during unlocking, the position lamps, lighting in outer handles *, number plate lighting,
interior roof lighting and floor lighting will switch on. If a door is opened within the activation time, the time for the lighting in the outside handles *
and the interior lighting will be extended. The function can be deactivated/activated via the centre display.
Related information
• Home safe light duration (p. 148)
• Remote control key (p. 236)
• Settings view (p. 169)
Using windscreen wipers
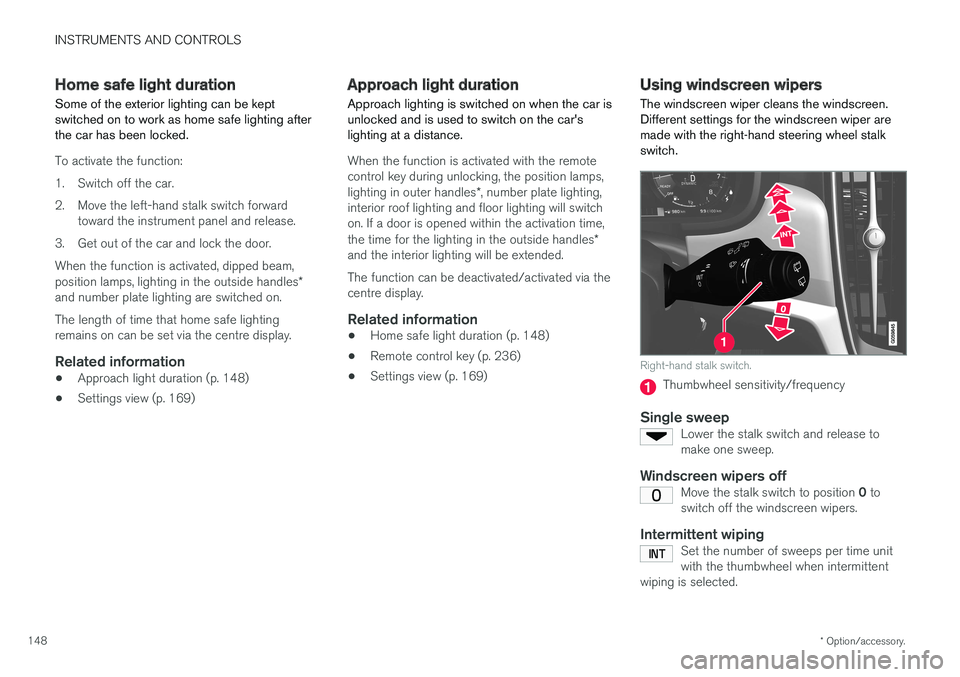
The windscreen wiper cleans the windscreen. Different settings for the windscreen wiper aremade with the right-hand steering wheel stalkswitch.
Right-hand stalk switch.
Thumbwheel sensitivity/frequency
Single sweepLower the stalk switch and release to make one sweep.
Windscreen wipers offMove the stalk switch to position 0 to
switch off the windscreen wipers.
Intermittent wipingSet the number of sweeps per time unit with the thumbwheel when intermittent
wiping is selected.
Page 174 of 594
||
INSTRUMENTS AND CONTROLS
172
Related information
•Settings view (p. 169)
• Changing system settings in the settings view (p. 172)
Changing system settings in the settings view The
System category in the settings view col-
lects general settings and information for car systems, such as language and units.
The system settings under Driver Profile, Date
and Time, Keyboard Layouts, Voice Control,Software Updates, Factory reset, Factory
Reset and Services are described in the corres-
ponding section of the owner's manual.
Changing system language1. Press Settings in the top view in the centre
display.
2. Press
SystemSystem Language.
3. Select system language. Languages that support voice recognition have a voice recog- nition symbol.
> The language in the driver display, centredisplay and head-up display is changed.
Changing system units
Changing length and volume units
1. Press Settings in the top view in the centre
display.
2. Press
SystemUnitsUnits of
Measurement. 3. Select from the following unit standards:
•
Metric - kilometres, litres and degrees
Celsius.
•
Imperial - miles, gallons and degrees
Celsius.
•
US - miles, gallons and degrees Fahren-
heit.
> The units in the driver display, centre dis- play and head-up display are changed.
See storage information1. Press Settings in the top view in the centre
display.
2. Press
SystemStorage.
> Storage information for the car's hard disk is shown, including total capacity, available capacity and how much space installedapplications are using.
See the car's vehicle identification number
1. Press Settings in the top view in the centre
display.
2. Press
SystemVehicle Identification
Number.
> The car's vehicle identification number (VIN 37
) is shown.
37 Vehicle Identification Number.
Page 530 of 594
MAINTENANCE AND SERVICE
528
Replacing a wiper blade
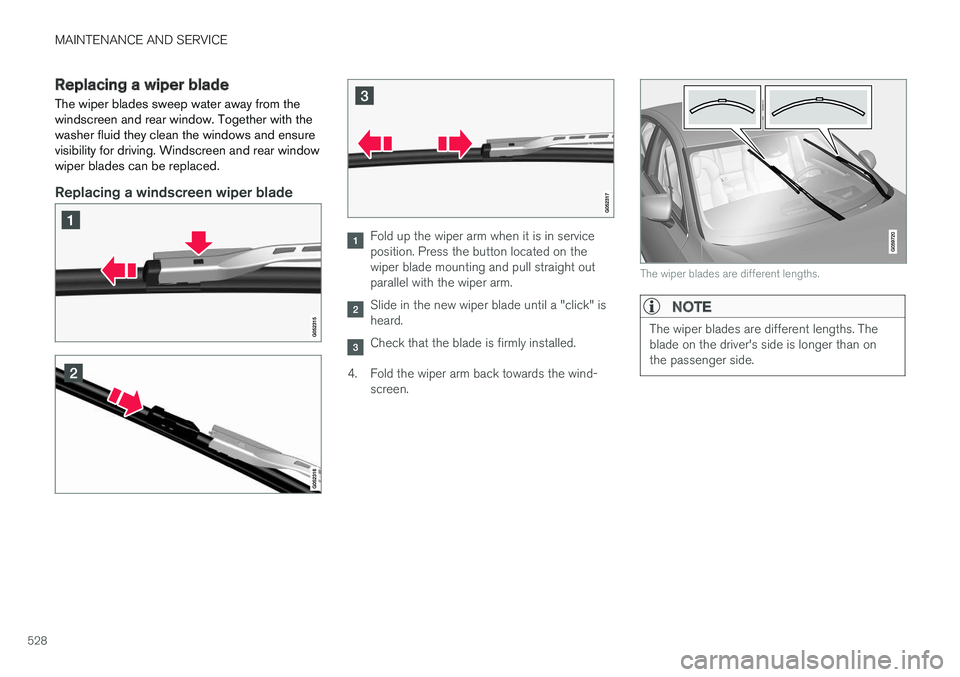
The wiper blades sweep water away from the windscreen and rear window. Together with thewasher fluid they clean the windows and ensurevisibility for driving. Windscreen and rear windowwiper blades can be replaced.
Replacing a windscreen wiper blade
Fold up the wiper arm when it is in service position. Press the button located on thewiper blade mounting and pull straight outparallel with the wiper arm.
Slide in the new wiper blade until a "click" is heard.
Check that the blade is firmly installed.
4. Fold the wiper arm back towards the wind- screen.
The wiper blades are different lengths.
NOTE
The wiper blades are different lengths. The blade on the driver's side is longer than onthe passenger side.
Page 563 of 594
SPECIFICATIONS
}}
561
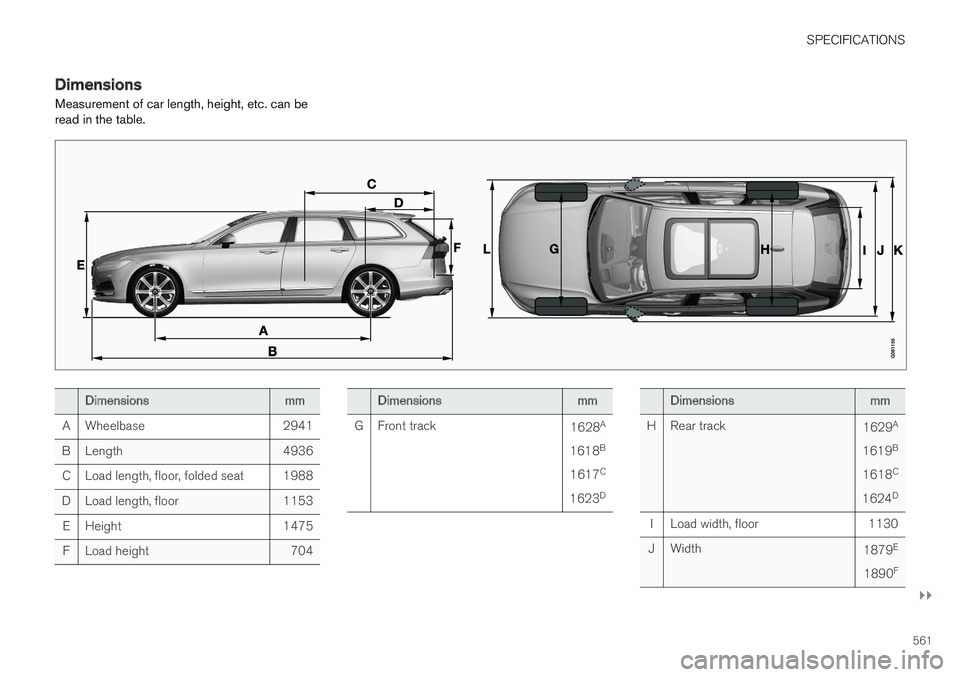
DimensionsMeasurement of car length, height, etc. can be read in the table.
Dimensions mm
A Wheelbase 2941
B Length 4936 C Load length, floor, folded seat 1988
D Load length, floor 1153 E Height 1475F Load height 704Dimensions mm
G Front track 1628A
1618 B
1617 C
1623 DDimensions
mm
H Rear track 1629A
1619 B
1618 C
1624 D
I Load width, floor 1130
J Width 1879E
1890 F