ECO mode VOLVO V90 2017 Owners Manual
[x] Cancel search | Manufacturer: VOLVO, Model Year: 2017, Model line: V90, Model: VOLVO V90 2017Pages: 594, PDF Size: 15.07 MB
Page 4 of 594
2
INTRODUCTION
This is how you find owner's information14
Digital owner's manual in the car 15
Navigating in the digital owner's manual 16
Owner's Manual in mobile devices 18
Volvo Cars support site 19
Reading the owner's manual 19
Recording data 22
Important information on accesso- ries, extra equipment and diagnosticsocket 23
Volvo ID 23
Drive-E - cleaner driving pleasure 25
IntelliSafe-driver support 28
Sensus - connection and maintenance 29
The owner's manual and the environment 32
Windows, glass and mirrors 32
Overview of the centre display 33
Operating the centre display 36
Navigating in the centre display's views 40
Symbols in the centre display's status bar 45
Change settings for the centre display 45
Function view with buttons for carfunctions 47
Using the keyboard in the centre display 49
Writing characters/letters by handon the screen 53
Introduction to vehicle gas (Bi-Fuel)
*
54
SAFETY
Safety
56
Safety during pregnancy 56
Whiplash Protection System 57
Pedestrian Protection System 58
Seatbelt 59
Seatbelt tensioner 59
Fastening/unfastening a seatbelt 60
Door and seatbelt reminder 62
Airbags 63
Driver and passenger airbags 64
Activating/deactivating the passen- ger airbag * 66
Side airbag 68
Inflatable curtain 69
Safety mode 69
Starting/moving the car after safety mode 70
Child safety 71
Child seats 71
Upper mounting points for child seats 73
Lower mounting points for child seats 74
Table for location of child seatsusing the car's seatbelts 75
i-Size/ISOFIX mounting points 77
Table for location of ISOFIX child seats 78
TABLE OF CONTENTS
Page 8 of 594
6
Type approval for the remote control key system265
DRIVER SUPPORT
Speed-dependent steering force
272
Roll Stability Control 272
Electronic stability control 273
Sport mode for electronic stability control 274
Symbols and messages for elec- tronic stability control 275
Speed limiter *
277
Activating and starting the speed limiter 278
Managing speed for the speed limiter 278
Deactivating/reactivating the speedlimiter 279
Switching off the speed limiter 280
Automatic speed limiter *
281
Activating/deactivating the automaticspeed limiter 282
Changing the tolerance for the Auto-matic speed limiter 283
Cruise control 284
Activating and starting the Cruise control 284
Managing speed for the Cruise control 285
Deactivating/reactivating the cruisecontrol 286
Deactivating Cruise Control 287
Distance Warning *
288
Activating and setting the time inter- val for Distance warning *289
Limitations of Distance Warning
*
290
Adaptive cruise control *
290
Activating and starting the adaptive cruise control * 294
Managing the speed of the adaptivecruise control * 295
Setting the time interval for theadaptive cruise control *296
Deactivating/activating the adaptivecruise control * 297
Overtaking assistance with the adap-tive cruise control * or Pilot Assist *298
Change of target and automatic braking with the Adaptive Cruise Control 299
Limitations of the adaptive cruise control *
300
Change between Cruise control and adaptive cruise control *301
Symbols and messages for theadaptive cruise control *302
Pilot Assist *
304
Activating and starting the Pilot Assist *
307
Managing the speed for Pilot Assist *
309
Setting the time interval for Pilot Assist *
310
Deactivating/activating the Pilot Assist *
311
Change of target and automaticbraking with Pilot Assist *313
Limitations of Pilot Assist *
314
Page 10 of 594
8
STARTING AND DRIVING
Alcohol lock*
384
Bypass of the alcohol lock *
384
Before starting the engine with the alcohol lock 384
Ignition positions 385
Starting the car 386
Switching off the car 387
Steering lock 388
Using jump starting with another battery 388
Gearbox 389
Gear positions for automatic gearbox 390
Manual gearbox 392
Gear shift indicator *
392
Gear selector inhibitor 394
Changing gear with steering wheel paddles * 395
Start/Stop 396
Using the Start/Stop function 396
Conditions for the Start/Stop function 398
Drive modes *
400
Drive mode ECO 402
Level control * and shock absorption
405
All-wheel drive *
405
Brake functions 406
Foot brake 406
Emergency brake lights408
Brake assistance 408
Auto braking after a collision 408
Parking brake 409
Using the parking brake 410
In the event of a fault in the parking brake 411
Hill start assist 412
Automatic braking when stationary 412
Driving in water 413
Overheating in the engine and drivesystem 414
Overloading the starter battery 415
Preparations for a long trip 415
Winter driving 416
Opening/closing the fuel filler flapand refuelling 417
Handling of fuel 418
Petrol 419
Diesel 420
Empty tank and diesel engine 420
Diesel particulate filter 421
Economical driving 422
Towing bracket *
422
Extendable/retractable towing brackets *
423
Towing bracket specifications *
425
Driving with a trailer 426
Driving with a trailer under special conditions 428
Trailer Stability Assist *
428
Towing eye 430
Towing 431
Recovering the car 432
Page 21 of 594
INTRODUCTION
}}
* Option/accessory.19
Volvo Cars support site
More information on your car is available on the Volvo Cars website and support site. There you can navigate through to My Volvo 3
, a personal
web page for you and your car.
Support on the Internet
Go to support.volvocars.com to visit the site. The support site is available for most markets. It contains support for functions such as web- based services and functions, Volvo On Call *, the
navigation system * and apps. Videos and step-
by-step instructions explain different procedures, e.g. how to connect the car to the Internet via amobile phone.
Downloadable information
Maps
For cars equipped with Sensus Navigation, there is the facility to download maps from the supportpage.
Owner's manuals as PDF
Owner's manuals are available for download in PDF format. Select car model and model year todownload the manual as required.
ContactThe support site contains contact details to cus-tomer support and your nearest Volvo dealer.
My Volvo on the Internet 3From www.volvocars.com it is possible to navigatethrough to My Volvo Web which is a personalWeb page for you and your car. Create a personal Volvo ID, log in to My Volvo Web and get an overview of service, agreementsand warranties, amongst other things. At MyVolvo Web there is also information about acces-sories and software adapted for your car model.
Related information
•
Volvo ID (p. 23)
Reading the owner's manual
A good way of getting to know your new car is to read the owner's manual, ideally before yourfirst journey.
Reading the owner's manual is a good way to become familiar with new functions, get adviceon how best to handle the car in different situa-tions and learn how to make the best use of allthe car's features. Please pay attention to thesafety instructions contained in the owner's man-ual. Development work is constantly underway in order to improve our product. Modifications maymean that information, descriptions and illustra-tions in the owner's manual differ from the equip-ment in the car. We reserve the right to makemodifications without prior notice. Do not remove this manual from the car - if prob- lems should arise then the necessary informationabout where and how to seek professional helpwill be missing. © Volvo Car Corporation
Options/accessoriesIn addition to standard equipment, the owner's manual also describes options (factory fittedequipment) and certain accessories (retrofittedextra equipment).
3
Applies to certain markets.
Page 29 of 594
INTRODUCTION
* Option/accessory.27
Related information
•Drive modes
* (p. 400)
• The owner's manual and the environment (p. 32)
• Economical driving (p. 422)
• Fuel consumption and CO2 emissions(p. 572)
• Air quality (p. 184)
Page 40 of 594
||
INTRODUCTION
* Option/accessory.
38
Turn off the screen and reactivate it
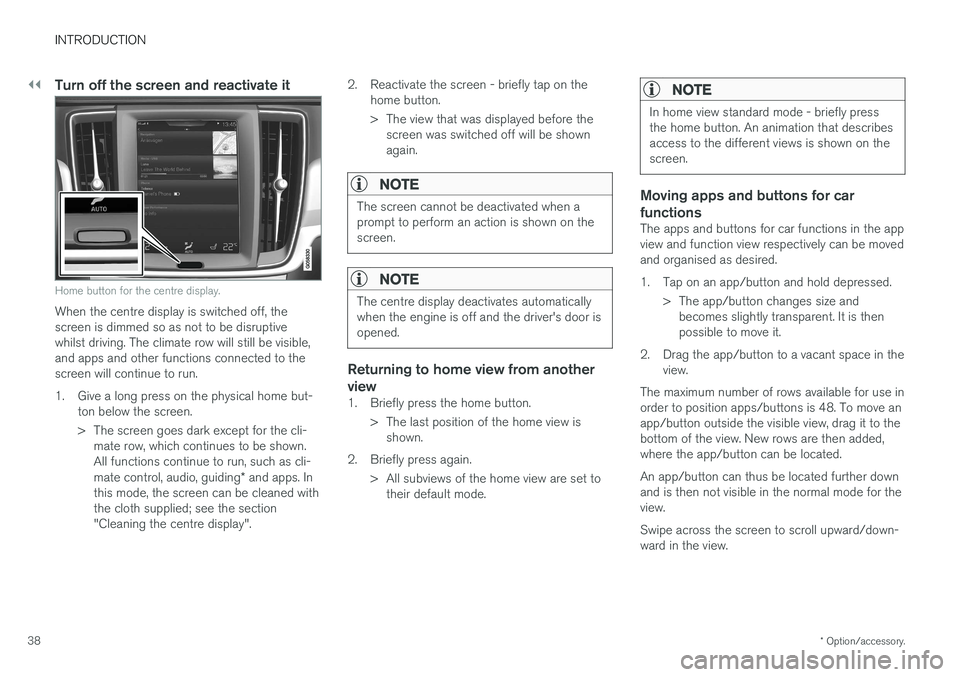
Home button for the centre display.
When the centre display is switched off, the screen is dimmed so as not to be disruptivewhilst driving. The climate row will still be visible,and apps and other functions connected to thescreen will continue to run.
1. Give a long press on the physical home but-
ton below the screen.
> The screen goes dark except for the cli-mate row, which continues to be shown. All functions continue to run, such as cli- mate control, audio, guiding * and apps. In
this mode, the screen can be cleaned with the cloth supplied; see the section"Cleaning the centre display". 2. Reactivate the screen - briefly tap on the
home button.
> The view that was displayed before thescreen was switched off will be shown again.
NOTE
The screen cannot be deactivated when a prompt to perform an action is shown on thescreen.
NOTE
The centre display deactivates automatically when the engine is off and the driver's door isopened.
Returning to home view from another view
1. Briefly press the home button.
> The last position of the home view isshown.
2. Briefly press again. > All subviews of the home view are set totheir default mode.
NOTE
In home view standard mode - briefly press the home button. An animation that describesaccess to the different views is shown on thescreen.
Moving apps and buttons for car functions
The apps and buttons for car functions in the app view and function view respectively can be movedand organised as desired.
1. Tap on an app/button and hold depressed.
> The app/button changes size andbecomes slightly transparent. It is then possible to move it.
2. Drag the app/button to a vacant space in the view.
The maximum number of rows available for use inorder to position apps/buttons is 48. To move anapp/button outside the visible view, drag it to thebottom of the view. New rows are then added,where the app/button can be located. An app/button can thus be located further down and is then not visible in the normal mode for theview. Swipe across the screen to scroll upward/down- ward in the view.
Page 47 of 594
INTRODUCTION
}}
45
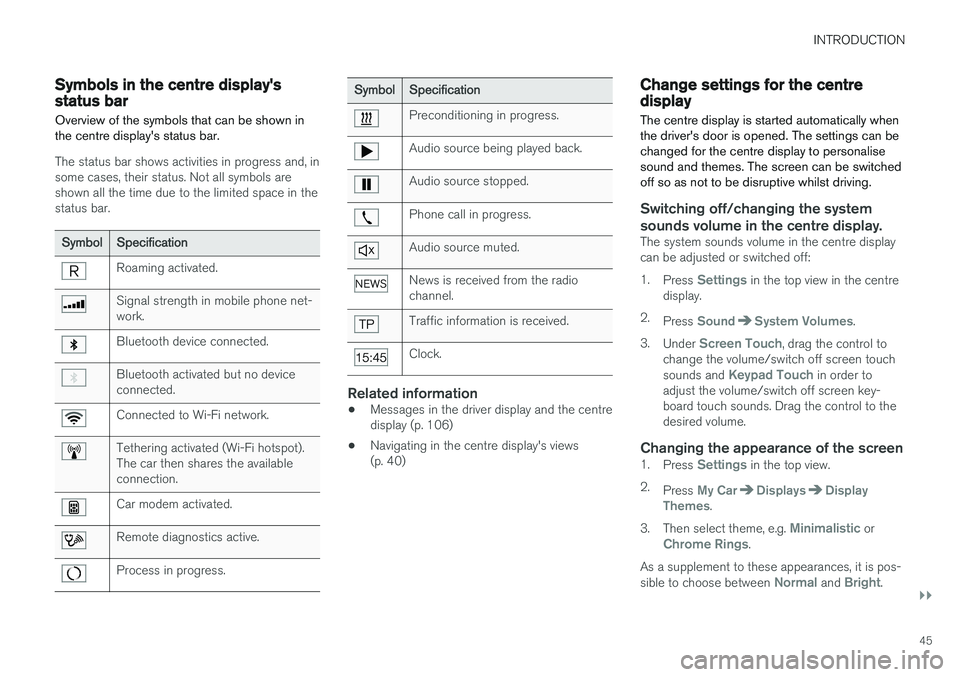
Symbols in the centre display's status bar Overview of the symbols that can be shown in the centre display's status bar.
The status bar shows activities in progress and, in some cases, their status. Not all symbols areshown all the time due to the limited space in thestatus bar.
SymbolSpecification
Roaming activated.
Signal strength in mobile phone net- work.
Bluetooth device connected.
Bluetooth activated but no device connected.
Connected to Wi-Fi network.
Tethering activated (Wi-Fi hotspot). The car then shares the availableconnection.
Car modem activated.
Remote diagnostics active.
Process in progress.
SymbolSpecification
Preconditioning in progress.
Audio source being played back.
Audio source stopped.
Phone call in progress.
Audio source muted.
News is received from the radio channel.
Traffic information is received.
Clock.
Related information
•Messages in the driver display and the centre display (p. 106)
• Navigating in the centre display's views(p. 40)
Change settings for the centre display The centre display is started automatically when the driver's door is opened. The settings can bechanged for the centre display to personalisesound and themes. The screen can be switchedoff so as not to be disruptive whilst driving.
Switching off/changing the system
sounds volume in the centre display.
The system sounds volume in the centre display can be adjusted or switched off: 1. Press
Settings in the top view in the centre
display.
2. Press
SoundSystem Volumes.
3. Under
Screen Touch, drag the control to
change the volume/switch off screen touch sounds and
Keypad Touch in order to
adjust the volume/switch off screen key- board touch sounds. Drag the control to thedesired volume.
Changing the appearance of the screen1. Press Settings in the top view.
2. Press
My CarDisplaysDisplay
Themes.
3. Then select theme, e.g.
Minimalistic orChrome Rings.
As a supplement to these appearances, it is pos- sible to choose between
Normal and Bright.
Page 50 of 594
||
INTRODUCTION
48
The buttons' different modes
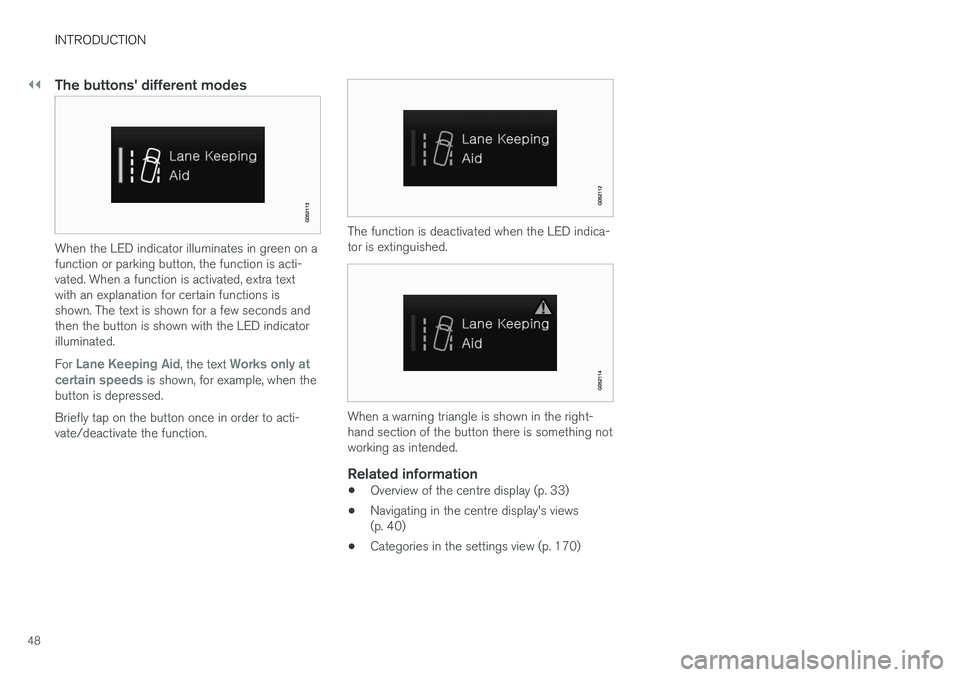
When the LED indicator illuminates in green on a function or parking button, the function is acti-vated. When a function is activated, extra textwith an explanation for certain functions isshown. The text is shown for a few seconds andthen the button is shown with the LED indicatorilluminated. For
Lane Keeping Aid, the text Works only at
certain speeds is shown, for example, when the
button is depressed. Briefly tap on the button once in order to acti- vate/deactivate the function.
The function is deactivated when the LED indica- tor is extinguished.
When a warning triangle is shown in the right- hand section of the button there is something notworking as intended.
Related information
• Overview of the centre display (p. 33)
• Navigating in the centre display's views (p. 40)
• Categories in the settings view (p. 170)
Page 58 of 594
SAFETY
56
Safety
The vehicle is equipped with several safety sys- tems that work together to protect the vehicle'sdriver and passengers in the event of an acci-dent.
The car is equipped with a number of sensors that react in the event of an accident and activatedifferent safety systems, such as different typesof airbags and seatbelt tensioners. Depending onthe specific accident situation, such as collisionsat different angles, rollover or driving off the road,the systems react in different ways to provide thebest protection. There are also mechanical safety systems such as Whiplash Protection System. The car is alsoconstructed so that a large part of the force of acollision is distributed to beams, pillars, floor, roofand other parts of the body. The car's safety mode may be activated after a collision if an important function in the car hasbeen damaged.
Warning symbol in driver displayThe warning symbol is illuminated inthe driver display when the car's elec-trical system is set in ignition position II . The symbol is extinguished after
approx. 6 seconds if the car's safety system is fault-free.
WARNING
If the warning symbol remains illuminated or is switched on during driving and the mes- sage
SRS airbag Service urgent Drive to
workshop is shown in the driver display, it
means that part of one of the safety systems does not have full functionality. Volvo recom-mends that an authorised Volvo workshopshould be contacted as soon as possible.
If the specific warning symbol is broken then the general warning symbol is illu-minated instead and the driver displayshows the same message.
Related information
•Safety during pregnancy (p. 56)
• Seatbelt (p. 59)
• Airbags (p. 63)
• Whiplash Protection System (p. 57)
• Pedestrian Protection System (p. 58)
• Safety mode (p. 69)
• Child safety (p. 71)
Safety during pregnancy It is important that the seatbelt is used correctly during pregnancy, and that pregnant driversadjust their seating position.
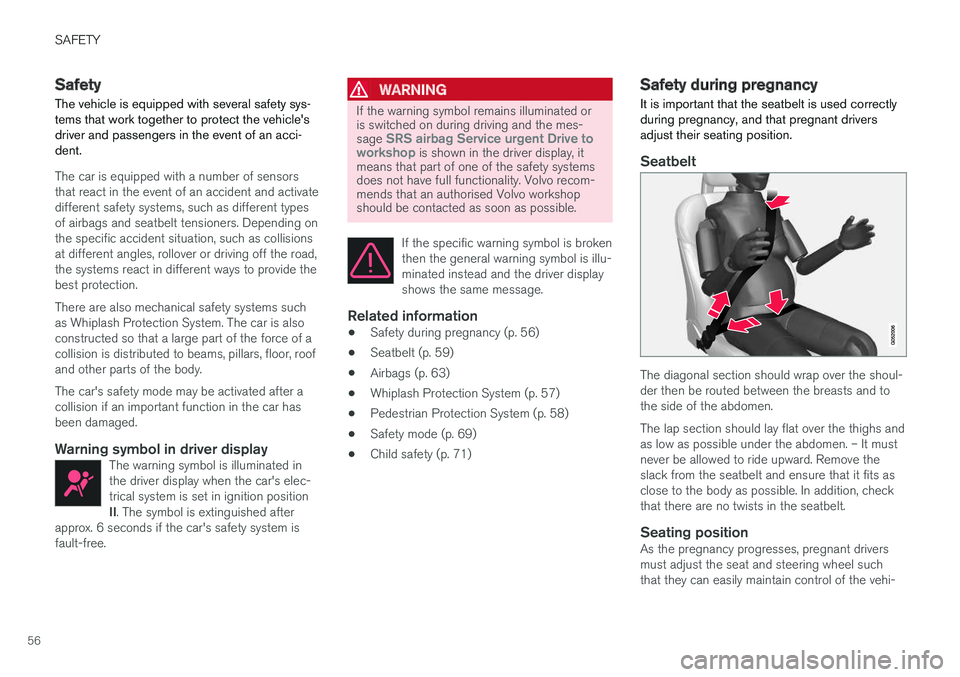
Seatbelt
The diagonal section should wrap over the shoul- der then be routed between the breasts and tothe side of the abdomen. The lap section should lay flat over the thighs and as low as possible under the abdomen. – It mustnever be allowed to ride upward. Remove theslack from the seatbelt and ensure that it fits asclose to the body as possible. In addition, checkthat there are no twists in the seatbelt.
Seating positionAs the pregnancy progresses, pregnant driversmust adjust the seat and steering wheel suchthat they can easily maintain control of the vehi-
Page 71 of 594
SAFETY
}}
69
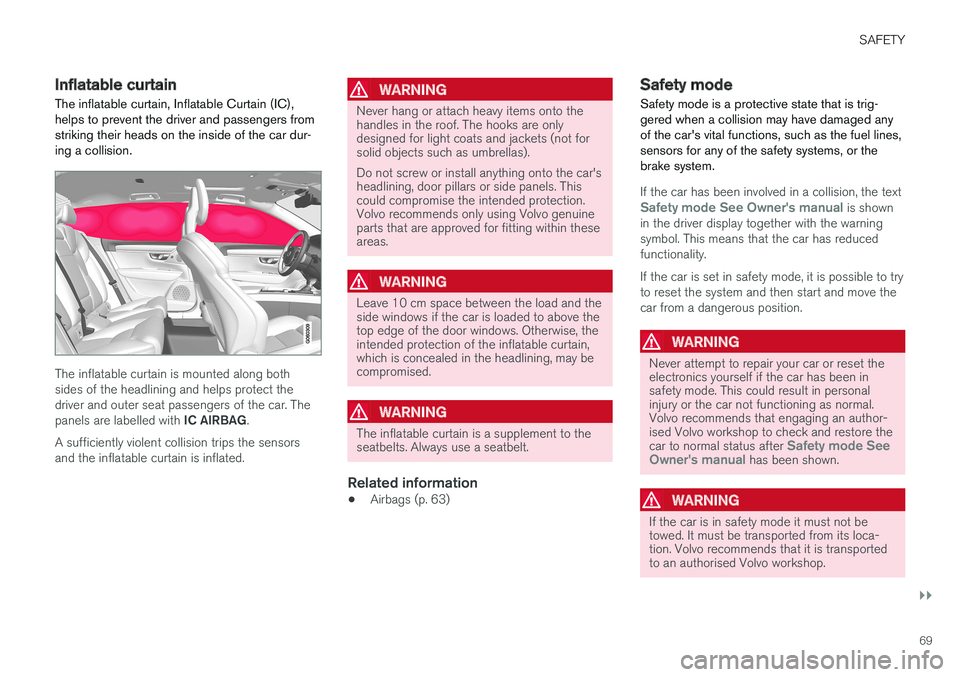
Inflatable curtain The inflatable curtain, Inflatable Curtain (IC), helps to prevent the driver and passengers fromstriking their heads on the inside of the car dur-ing a collision.
The inflatable curtain is mounted along both sides of the headlining and helps protect thedriver and outer seat passengers of the car. The panels are labelled with IC AIRBAG.
A sufficiently violent collision trips the sensors and the inflatable curtain is inflated.
WARNING
Never hang or attach heavy items onto the handles in the roof. The hooks are onlydesigned for light coats and jackets (not forsolid objects such as umbrellas). Do not screw or install anything onto the car's headlining, door pillars or side panels. Thiscould compromise the intended protection.Volvo recommends only using Volvo genuineparts that are approved for fitting within theseareas.
WARNING
Leave 10 cm space between the load and the side windows if the car is loaded to above thetop edge of the door windows. Otherwise, theintended protection of the inflatable curtain,which is concealed in the headlining, may becompromised.
WARNING
The inflatable curtain is a supplement to the seatbelts. Always use a seatbelt.
Related information
• Airbags (p. 63)
Safety mode Safety mode is a protective state that is trig- gered when a collision may have damaged anyof the car's vital functions, such as the fuel lines,sensors for any of the safety systems, or thebrake system.
If the car has been involved in a collision, the textSafety mode See Owner's manual is shown
in the driver display together with the warning symbol. This means that the car has reducedfunctionality. If the car is set in safety mode, it is possible to try to reset the system and then start and move thecar from a dangerous position.
WARNING
Never attempt to repair your car or reset the electronics yourself if the car has been insafety mode. This could result in personalinjury or the car not functioning as normal.Volvo recommends that engaging an author-ised Volvo workshop to check and restore the car to normal status after
Safety mode See
Owner's manual has been shown.
WARNING
If the car is in safety mode it must not be towed. It must be transported from its loca-tion. Volvo recommends that it is transportedto an authorised Volvo workshop.