VOLVO V90 2018 Owner´s Manual
Manufacturer: VOLVO, Model Year: 2018, Model line: V90, Model: VOLVO V90 2018Pages: 656, PDF Size: 11.78 MB
Page 561 of 656
LOADING, STORAGE AND PASSENGER COMPARTMENT
}}
* Option/accessory.559
2. Carefully lift the cover up and out.
> The other end will release automaticallyand the cover can then be lifted out of the cargo compartment.
Related information
• Operating the cargo compartment cover
*
(p. 559)
• Loading recommendations (p. 555)
Operating the cargo compartment
cover
*
The cover can be used in two positions: fully open to completely cover the cargo compart-ment or partially retracted to make it easier toreach further into the cargo compartment.
Fully open
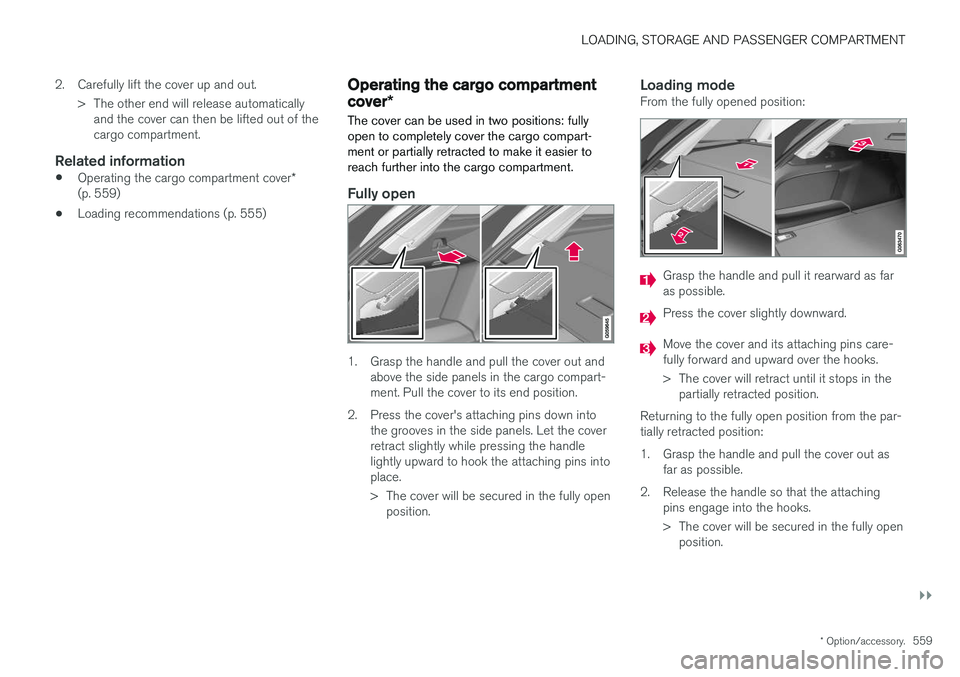
1. Grasp the handle and pull the cover out and above the side panels in the cargo compart- ment. Pull the cover to its end position.
2. Press the cover's attaching pins down into the grooves in the side panels. Let the coverretract slightly while pressing the handlelightly upward to hook the attaching pins intoplace.
> The cover will be secured in the fully openposition.
Loading modeFrom the fully opened position:
Grasp the handle and pull it rearward as far as possible.
Press the cover slightly downward.
Move the cover and its attaching pins care- fully forward and upward over the hooks.
> The cover will retract until it stops in thepartially retracted position.
Returning to the fully open position from the par- tially retracted position:
1. Grasp the handle and pull the cover out as far as possible.
2. Release the handle so that the attaching pins engage into the hooks.
> The cover will be secured in the fully openposition.
Page 562 of 656
||
LOADING, STORAGE AND PASSENGER COMPARTMENT
* Option/accessory.
560 In vehicles equipped with the automatic cargo compartment cover
*, the cover will retract from
the fully open position to the partially retracted position every time the tailgate is opened, and willreturn to the fully open position when the tailgateis closed. The cover will detect if anythingobstructs its movement and automatically retract.
WARNING
Be aware of the risk of injury when opening and closing the electrically operated * cargo
compartment cover.
CAUTION
Do not place objects on top of the cargo compartment cover.
CAUTION
If large or bulky objects are placed in the cargo compartment, put the automatic * cargo
compartment cover in the fully retracted posi- tion to help prevent it from coming into con-tact with the object.
NOTE
Automatic operation of the cargo compart- ment cover may not be possible at low pas-senger compartment temperatures.
Retracting the cover
1. From the fully opened position:
Lift the cover's handle and pull it rearward to release the cover's attaching pins from thegrooves. Let the cover retract. From the partially retracted position:Grasp the handle and pull the cover out of the groves to the fully open position. Lift thehandle and pull it rearward to release thecover's attaching pins from the grooves. Letthe cover retract.
2. Let the cover retract with its attaching pins above the side panels until it stops in thefully retracted position.
Keep in mind that a retracted cover could reducerearward visibility.
Related information
• Installing and removing the cargo compart- ment cover
* (p. 558)
Installing and removing the steel
cargo grid *
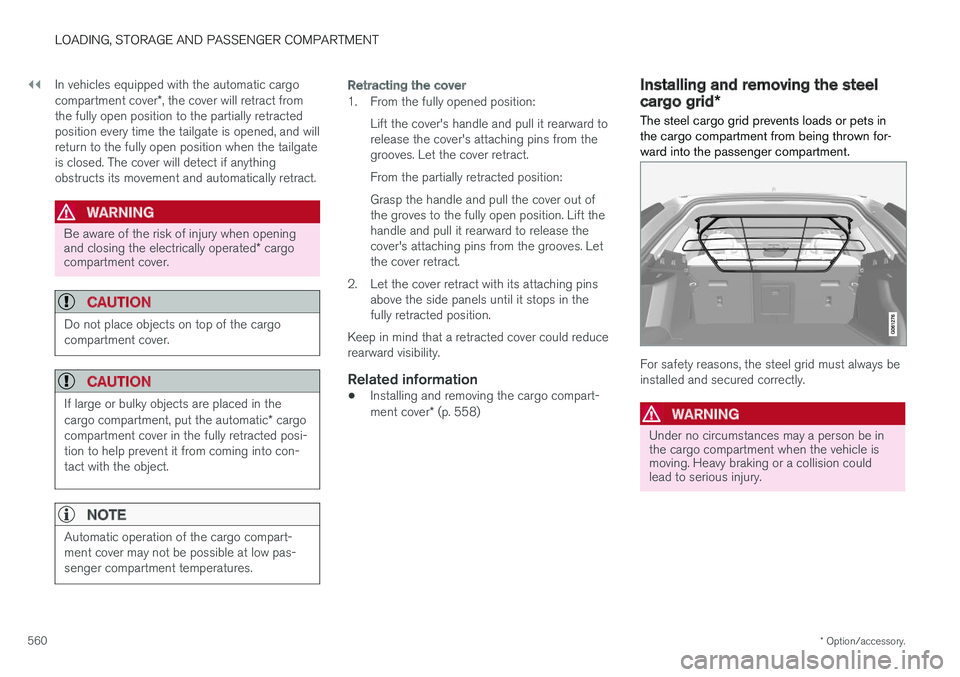
The steel cargo grid prevents loads or pets in the cargo compartment from being thrown for-ward into the passenger compartment.
For safety reasons, the steel grid must always be installed and secured correctly.
WARNING
Under no circumstances may a person be in the cargo compartment when the vehicle ismoving. Heavy braking or a collision couldlead to serious injury.
Page 563 of 656
LOADING, STORAGE AND PASSENGER COMPARTMENT
561
Installation
CAUTION
The steel cargo grid may only be used in the rear position (behind the rear seat) describedhere.
Before installing the steel grid, the existing plas- tic ceiling mounting consoles must be replacedwith steel consoles. Volvo recommends that theceiling consoles are only replaced by an author-ized Volvo workshop or retailer.
1. Fold down the rear seat backrests.
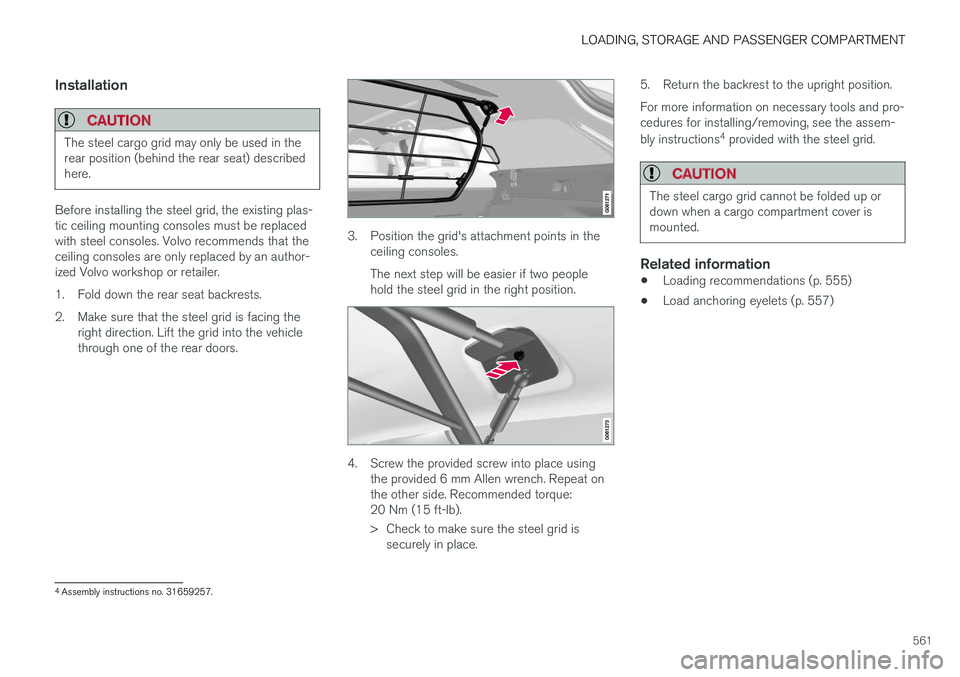
2. Make sure that the steel grid is facing theright direction. Lift the grid into the vehicle through one of the rear doors.
3. Position the grid's attachment points in theceiling consoles. The next step will be easier if two people hold the steel grid in the right position.
4. Screw the provided screw into place usingthe provided 6 mm Allen wrench. Repeat on the other side. Recommended torque:20 Nm (15 ft-lb).
> Check to make sure the steel grid issecurely in place. 5. Return the backrest to the upright position. For more information on necessary tools and pro- cedures for installing/removing, see the assem- bly instructions
4
provided with the steel grid.
CAUTION
The steel cargo grid cannot be folded up or down when a cargo compartment cover ismounted.
Related information
• Loading recommendations (p. 555)
• Load anchoring eyelets (p. 557)
4
Assembly instructions no. 31659257.
Page 564 of 656
LOADING, STORAGE AND PASSENGER COMPARTMENT
* Option/accessory.
562
Installing and removing the cargo
net *
The cargo net helps prevent objects in the cargo compartment from entering the passenger com-partment in the event of a sudden stop or hardbraking.
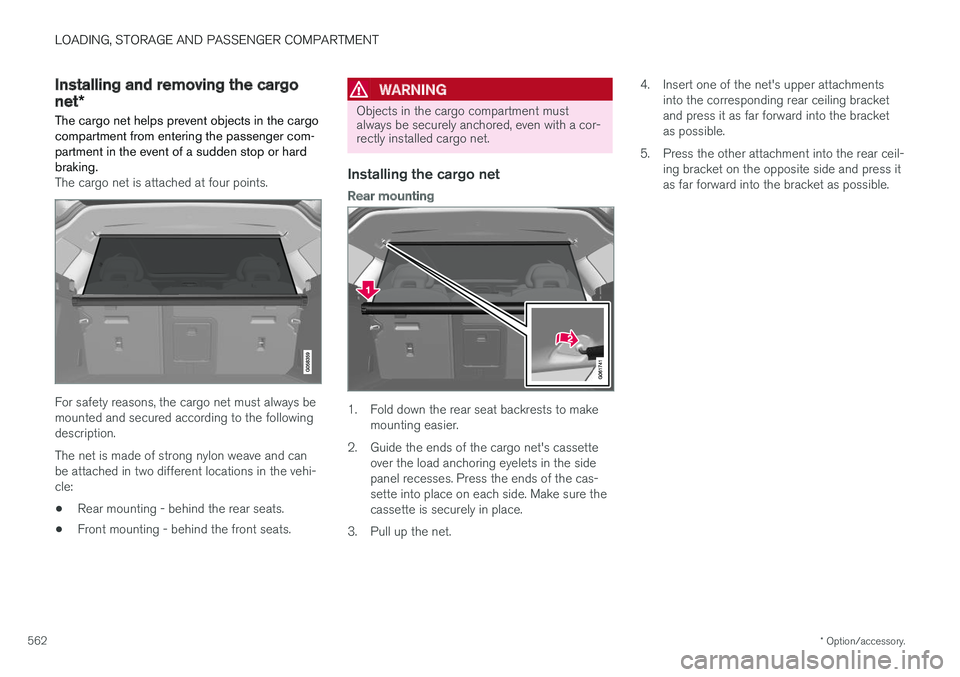
The cargo net is attached at four points.
For safety reasons, the cargo net must always be mounted and secured according to the followingdescription. The net is made of strong nylon weave and can be attached in two different locations in the vehi-cle:
• Rear mounting - behind the rear seats.
• Front mounting - behind the front seats.
WARNING
Objects in the cargo compartment must always be securely anchored, even with a cor-rectly installed cargo net.
Installing the cargo net
Rear mounting
1. Fold down the rear seat backrests to make
mounting easier.
2. Guide the ends of the cargo net's cassette over the load anchoring eyelets in the side panel recesses. Press the ends of the cas-sette into place on each side. Make sure thecassette is securely in place.
3. Pull up the net. 4. Insert one of the net's upper attachments
into the corresponding rear ceiling bracketand press it as far forward into the bracketas possible.
5. Press the other attachment into the rear ceil- ing bracket on the opposite side and press itas far forward into the bracket as possible.
Page 565 of 656
LOADING, STORAGE AND PASSENGER COMPARTMENT
563
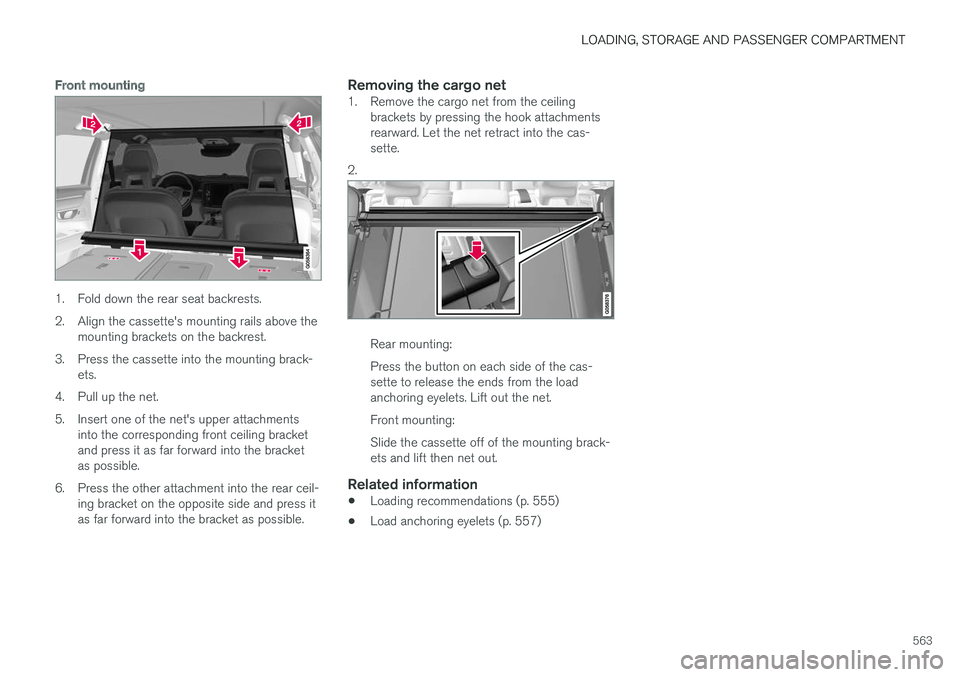
Front mounting
1. Fold down the rear seat backrests.
2. Align the cassette's mounting rails above themounting brackets on the backrest.
3. Press the cassette into the mounting brack- ets.
4. Pull up the net.
5. Insert one of the net's upper attachments into the corresponding front ceiling bracket and press it as far forward into the bracketas possible.
6. Press the other attachment into the rear ceil- ing bracket on the opposite side and press itas far forward into the bracket as possible.
Removing the cargo net1. Remove the cargo net from the ceilingbrackets by pressing the hook attachmentsrearward. Let the net retract into the cas-sette.
2.
Rear mounting: Press the button on each side of the cas- sette to release the ends from the loadanchoring eyelets. Lift out the net. Front mounting:Slide the cassette off of the mounting brack- ets and lift then net out.
Related information
• Loading recommendations (p. 555)
• Load anchoring eyelets (p. 557)
Page 566 of 656

Page 567 of 656
M A I N T E N A N C E A N D S E R V I C E
Page 568 of 656
MAINTENANCE AND SERVICE
566
Volvo's service program
To keep the vehicle as safe and reliable as pos- sible, follow the Volvo service schedule speci-fied in the Warranty and Maintenance RecordsInformation booklet.
Volvo recommends having an authorized Volvo workshop perform service and maintenance.Volvo workshops have the staff, service literatureand special tools to guarantee the highest qualityof service.
CAUTION
To ensure the Volvo warranty is not invalida- ted, check and follow the Service and War-ranty Booklet.
IntroductionThe maintenance services contain several checks that require special instruments and tools andtherefore must be performed by a qualified tech-nician. To keep your Volvo in top condition, spec-ify time-tested and proven Genuine Volvo Partsand Accessories.
The Federal Clean Air Act - U.S.
The Federal Clean Air Act requires vehicle manu- facturers to furnish written instructions to the ulti-mate purchaser to assure the proper servicingand function of the components that controlemissions. These services, which are listed in the"Warranty and Service Records Information" booklet, are not covered by the warranty. You willbe required to pay for labor and material used.
Maintenance
Your Volvo passed several major inspections before it was delivered to you, in accordance withVolvo specifications. The maintenance proce-dures outlined in the Warranty and ServiceRecords Information booklet, many of which willpositively affect your vehicle's emissions, shouldbe performed as indicated. It is recommendedthat receipts for vehicle emission maintenance beretained in case questions arise concerningmaintenance. Inspection and maintenance shouldalso be performed anytime a malfunction isobserved or suspected.
Applicable warranties - U.S./Canada
In accordance with applicable U.S. and Canadian regulations, the following list of warranties is pro-vided.
• New Vehicle Limited Warranty
• Parts and Accessories Limited Warranty
• Corrosion Protection Limited Warranty
• Seat Belt and Supplemental Restraint Sys-tems Limited Warranty
• Emission Design and Defect Warranty
• Emission Performance Warranty
These are federal warranties. Other warrantiesare provided as required by state/provincial law.Refer to your separate Warranty and Service Records Information booklet for detailed informa-tion concerning each of the warranties.
Periodic maintenance helps minimize
emissions
NOTE
•
Refer to your Service and Warranty Book- let for a comprehensive service and main-tenance schedule up to 240,000 km(150,000 miles). This program containsinspections and services necessary forthe proper function of your vehicle andincludes components that affect vehicleemissions.
• The Warranty and Service Records Infor-mation booklet also contains detailedinformation concerning the warrantiesthat apply to your vehicle.
On-board Diagnostic SystemOBD II is part of your vehicle's computerized engine management system. It stores diagnosticinformation about your vehicle's emission con-trols. It can light the Check Engine light (MIL) if itdetects an emission control "fault." A "fault" is acomponent or system that is not performingwithin an expected range. A fault may be perma-nent or temporary. OBD II will store a messageabout any fault.
Page 569 of 656
MAINTENANCE AND SERVICE
}}
567
Emission inspection readiness
How do states use OBD II for emission
inspections?
Many states connect a computer directly to a vehicle's OBD II system. The inspector can thenread "faults." In some states, this type of inspec-tion has replaced the tailpipe emission test.
How can my vehicle fail OBD II emission
inspection?
Your vehicle can fail OBD II emission inspection for any of the following reasons:
• If your Check Engine (MIL) light is lit, yourvehicle may fail inspection.
• If your vehicle's Check Engine light was lit,but went out without any action on your part,OBD II will still have a recorded fault. Yourvehicle may pass or fail, depending on theinspection practices in your area.
• If you had recent service that required dis-connecting the battery, OBD II diagnosticinformation may be incomplete and "notready" for inspection. A vehicle that is notready may fail inspection.
How can I prepare for my next OBD II
emission inspection?
• If your Check Engine (MIL) light is lit - or was lit but went out without service, have your vehicle diagnosed and, if necessary, servicedby a qualified Volvo technician.
• If you recently had service for a lit CheckEngine light, or if you had service thatrequired disconnecting the battery, a periodof driving is necessary to bring the OBD IIsystem to "ready" for inspection. Two half-hour trips of mixed stop-and-go/highwaydriving are typically needed to allow OBD II toreach readiness. Your Volvo retailer can pro-vide you with more information on planning atrip.
• Maintain your vehicle in accordance with yourvehicle's maintenance schedule.
Owner maintenancePeriodic maintenance requirements and intervalsare described in your vehicle's Warranty andService Records Information booklet. The following points can be carried out between the normally scheduled maintenance services.
Each time the car is refueled:
•Check the engine oil level.
• Clean the windshield, windshield wipers, headlights, and taillights.
Monthly:
• Check cold tire pressure in all tires. Inspect the tires for wear.
• Check that engine coolant and other fluidlevels are between the indicated "min" and"max" markings.
• Clean interior glass surfaces with a glasscleaner and soft paper towels.
• Wipe driver information displays with a softcloth.
• Visually inspect battery terminals for corro-sion. Corrosion may indicate a loose terminalconnector, or a battery near the end of itsuseful service life. Consult your Volvo retailerfor additional information.
As needed:
Wash the car, including the undercarriage, to reduce wear that can be caused by a buildup ofdirt, and corrosion that can be caused by salt res-idues. Clean leaves and twigs from air intake vents at the base of the windshield, and from other placeswhere they may collect.
NOTE
Complete service information for qualified technicians is available online for purchase orsubscription at www.volvotechinfo.com.
Page 570 of 656
||
MAINTENANCE AND SERVICE
568
Related information
•Vehicle status (p. 570)
• Scheduling service and repairs (p. 570)
• Connecting equipment to the vehicle's data link connector (p. 36)
• Technician certification (p. 37)
• Climate control system service (p. 576)
• Maintenance of the brake system (p. 407)
• Engine compartment overview (p. 577)
Data transfer between vehicle andworkshop over Wi-Fi
Volvo workshops have a designated Wi-Fi net- work for secure data transfer between your vehi-cle and the workshop. Your visit to the workshopwill be easier and more effective when diagnos-tics information and software can be transferredover the workshop's network.
When you arrive at the workshop, your technician can connect your vehicle to the workshop's Wi-Finetwork to perform troubleshooting and down-load software. For this type of communication,the vehicle only connects to the workshop's net-work. The vehicle can only be connected to thedesignated workshop networks, not to any othernetwork, e.g. your home network.
Manual connection to workshop Wi-FiManual connection is usually performed by aservice technician. Because the technician usesthe buttons on your remote key to connect thevehicle, it is important that you bring a key withbuttons when taking the vehicle in to a workshop.Pressing the lock button on the remote key threetimes will connect the vehicle to the workshop'sWi-Fi network. When the car is connected to a Wi-Fi network, the
symbol appears in the center display.
WARNING
The vehicle may not be driven when it is con- nected to the workshop's networks and sys-tems.
Related information
• Handling system updates via Download Cen- ter (p. 569)
• Scheduling service and repairs (p. 570)