VOLVO V90 CROSS COUNTRY 2017 Owner´s Manual
Manufacturer: VOLVO, Model Year: 2017, Model line: V90 CROSS COUNTRY, Model: VOLVO V90 CROSS COUNTRY 2017Pages: 552, PDF Size: 13.6 MB
Page 201 of 552
CLIMATE
}}
199
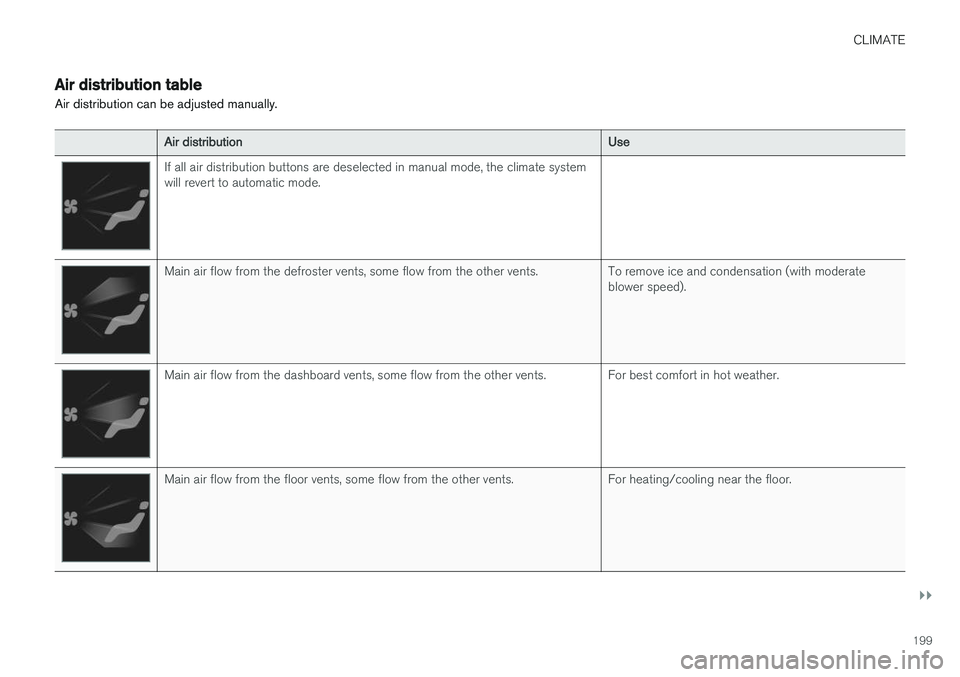
Air distribution table
Air distribution can be adjusted manually.
Air distribution Use
If all air distribution buttons are deselected in manual mode, the climate system will revert to automatic mode.
Main air flow from the defroster vents, some flow from the other vents. To remove ice and condensation (with moderate
blower speed).
Main air flow from the dashboard vents, some flow from the other vents. For best comfort in hot weather.
Main air flow from the floor vents, some flow from the other vents. For heating/cooling near the floor.
Page 202 of 552
||
CLIMATE
200
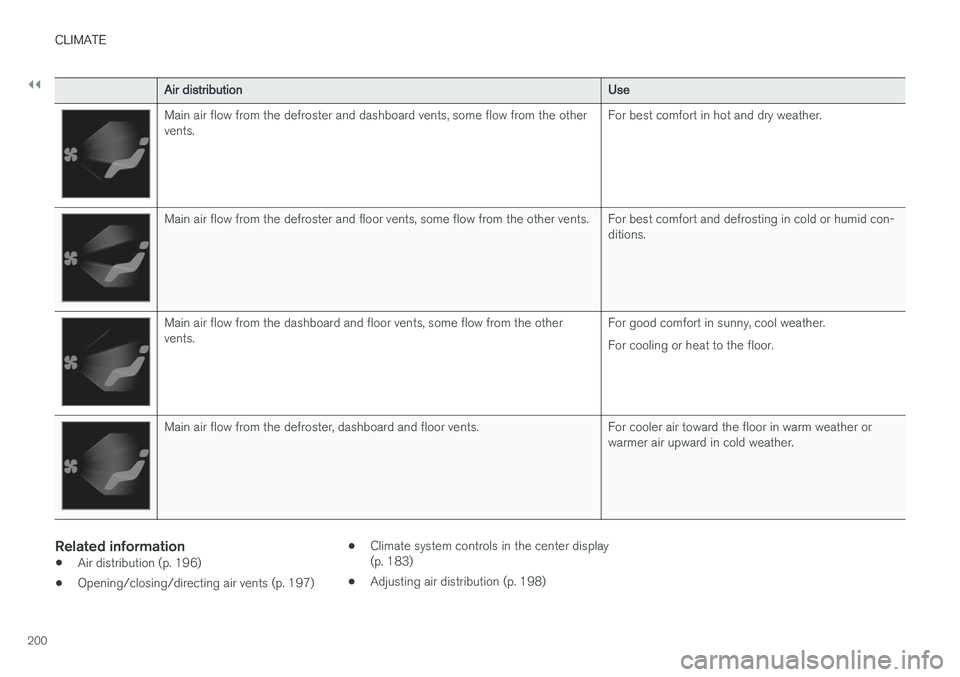
Air distributionUse
Main air flow from the defroster and dashboard vents, some flow from the other vents.For best comfort in hot and dry weather.
Main air flow from the defroster and floor vents, some flow from the other vents. For best comfort and defrosting in cold or humid con-
ditions.
Main air flow from the dashboard and floor vents, some flow from the other vents.For good comfort in sunny, cool weather. For cooling or heat to the floor.
Main air flow from the defroster, dashboard and floor vents. For cooler air toward the floor in warm weather or
warmer air upward in cold weather.
Related information
•Air distribution (p. 196)
• Opening/closing/directing air vents (p. 197) •
Climate system controls in the center display (p. 183)
• Adjusting air distribution (p. 198)
Page 203 of 552

L O A D I N G A N D S T O R A G E
Page 204 of 552
LOADING AND STORAGE
* Option/accessory.
202
Cargo space
The vehicle has flexible cargo capacity that makes it possible to load and secure largeobjects.
By folding down the rear seat backrests, the cargo capacity of the vehicle increases consider-ably. Use the load anchoring eyelets or the gro-cery bag holder to secure objects and the cargocompartment cover to help conceal the load. The jack *, tire sealing system and tools can be
found under the cargo compartment's floor.
Related information
• Loading (p. 202)
• Cargo compartment cover
* (p. 211)
• Cargo net (p. 208)
• Grocery bag holder (p. 207)
• Load anchoring eyelets (p. 211)
• Steel cargo grid
* (p. 209)
• Ski hatch (p. 202)
• Folding down the rear seat backrests (p. 171)
Ski hatch
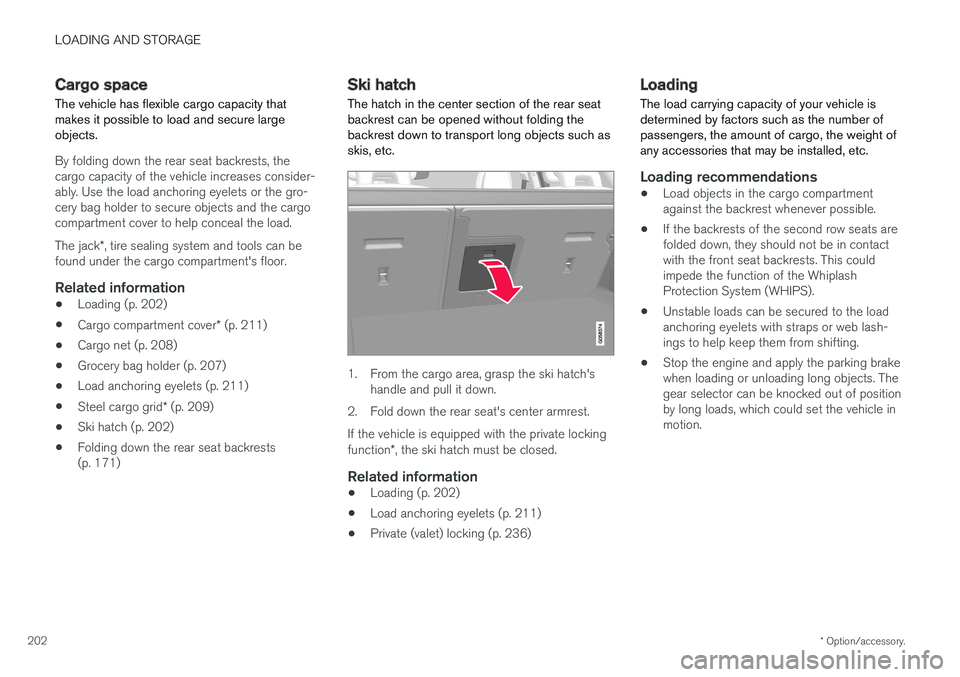
The hatch in the center section of the rear seat backrest can be opened without folding thebackrest down to transport long objects such asskis, etc.
1. From the cargo area, grasp the ski hatch's handle and pull it down.
2. Fold down the rear seat's center armrest. If the vehicle is equipped with the private locking function *, the ski hatch must be closed.
Related information
• Loading (p. 202)
• Load anchoring eyelets (p. 211)
• Private (valet) locking (p. 236)
Loading
The load carrying capacity of your vehicle is determined by factors such as the number ofpassengers, the amount of cargo, the weight ofany accessories that may be installed, etc.
Loading recommendations
• Load objects in the cargo compartment against the backrest whenever possible.
• If the backrests of the second row seats arefolded down, they should not be in contactwith the front seat backrests. This couldimpede the function of the WhiplashProtection System (WHIPS).
• Unstable loads can be secured to the loadanchoring eyelets with straps or web lash-ings to help keep them from shifting.
• Stop the engine and apply the parking brakewhen loading or unloading long objects. Thegear selector can be knocked out of positionby long loads, which could set the vehicle inmotion.
Page 205 of 552
LOADING AND STORAGE
}}
203
WARNING
•Stop the engine, put the gear selector in P
, and apply the parking brake when
loading or unloading long objects.
• The vehicle's driving characteristics may change depending on the weight and dis-tribution of the load.
• A 44-pound (20 kg) object produces aforce of 2,200 pounds (1,000 kg) in ahead-on collision at 30 mph (50 km/h).
• The cargo area and rear seat should notbe loaded to a level higher than 2 in.(5 cm) below the upper edge of the rearside windows. Objects placed higher thanthis level could impede the function ofthe Inflatable Curtain.
WARNING
• Cover sharp edges on long loads to help prevent injury to occupants. Secure theload to help prevent shifting during sud-den stops.
• Always secure large and heavy objectswith a seat belt or cargo retaining straps.
• Always secure the load to help prevent itfrom moving in the event of sudden stops.
• Switch off the engine, apply the parking brake and put the gear selector in
P
when loading and unloading the vehicle.
Extra loading spaceThe rear seat backrests can be folded down to added cargo space or for transporting longobjects. The hatch in the center section of the rear seat backrest can be opened without folding thebackrest down to transport long objects such asskis, etc.
WARNING
• Boxes, suitcases, etc. wedged behind the front seats could impede the function ofthe Whiplash Protection System.
• If the rear seat backrests are foldeddown, cargo must be secured to preventit from sliding forward against the frontseat backrests in the event of a collisionfrom the rear. This could interfere withthe action of the Whiplash ProtectionSystem.
WARNING
•
Cover sharp edges on long loads to help prevent injury to occupants. Secure theload to help prevent shifting during sud-den stops.
• Always secure large and heavy objectswith a seat belt or cargo retaining straps.
• Always secure the load to help prevent itfrom moving in the event of sudden stops.
• Switch off the engine, apply the parking brake and put the gear selector in
P
when loading and unloading the vehicle.
Roof loadsLoad carriers are available as Volvo accessories. Observe the following points when in use:
• To avoid damaging your vehicle and toachieve maximum safety when driving, werecommend using the load carriers that Volvohas developed especially for your vehicle.
• Volvo-approved removable roof racks aredesigned to carry the maximum allowableroof load for this vehicle (see the article"Weights" for specific information).
• Never exceed the rack manufacturer's weighlimits.
• Avoid single-point loads. Distribute loadsevenly.
Page 206 of 552
||
LOADING AND STORAGE
* Option/accessory.
204 •
Place heavier cargo at the bottom of the load.
• Secure the cargo correctly with appropriatetie-down equipment.
• Check periodically that the load carriers andload are properly secured.
• Remember that the vehicle's center of gravityand handling change when you carry a loadon the roof.
• The vehicle's wind resistance and fuel con-sumption will increase with the size of theload.
• Drive smoothly. Avoid rapid starts, fast cor-nering and hard braking.
CAUTION
The optional panoramic roof should not be opened while load carriers are installed onthe vehicle.
See the article "Weights" for information about the maximum permissible load that can be trans-ported on the roof.
Related information
•
Weights (p. 529)
• Cargo net (p. 208)
• Cargo compartment cover
* (p. 211)
• Steel cargo grid
* (p. 209) •
Load anchoring eyelets (p. 211)
• Whiplash protection system (p. 59)
Passenger compartment storage spaces
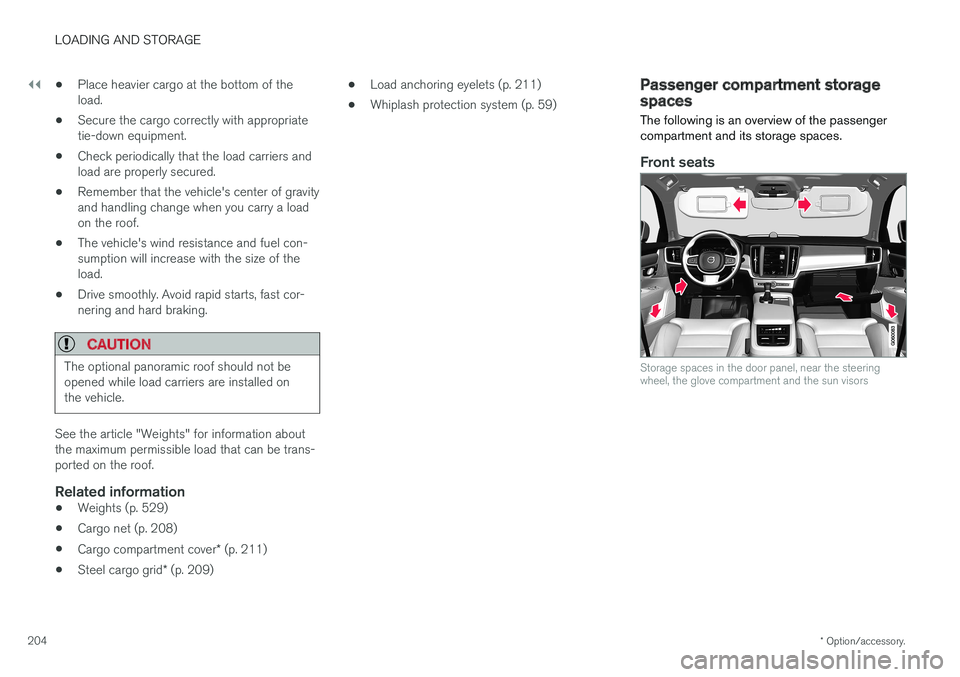
The following is an overview of the passenger compartment and its storage spaces.
Front seats
Storage spaces in the door panel, near the steering wheel, the glove compartment and the sun visors
Page 207 of 552
LOADING AND STORAGE
}}
* Option/accessory.205
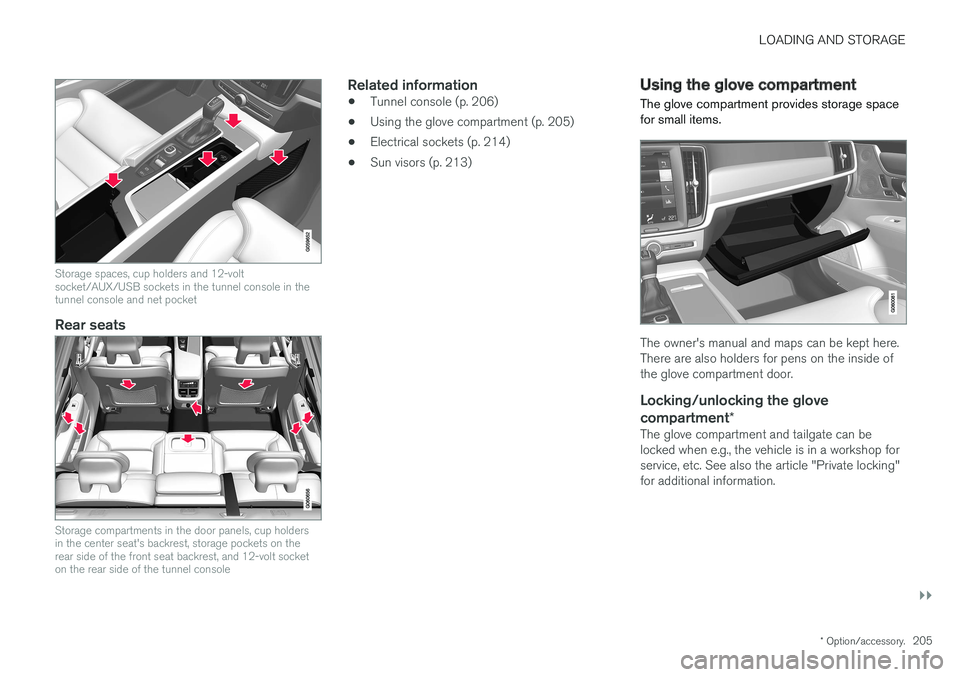
Storage spaces, cup holders and 12-volt socket/AUX/USB sockets in the tunnel console in thetunnel console and net pocket
Rear seats
Storage compartments in the door panels, cup holders in the center seat's backrest, storage pockets on therear side of the front seat backrest, and 12-volt socketon the rear side of the tunnel console
Related information
•Tunnel console (p. 206)
• Using the glove compartment (p. 205)
• Electrical sockets (p. 214)
• Sun visors (p. 213)
Using the glove compartment
The glove compartment provides storage space for small items.
The owner's manual and maps can be kept here. There are also holders for pens on the inside ofthe glove compartment door.
Locking/unlocking the glove
compartment *
The glove compartment and tailgate can belocked when e.g., the vehicle is in a workshop forservice, etc. See also the article "Private locking"for additional information.
Page 208 of 552
||
LOADING AND STORAGE
* Option/accessory.
206
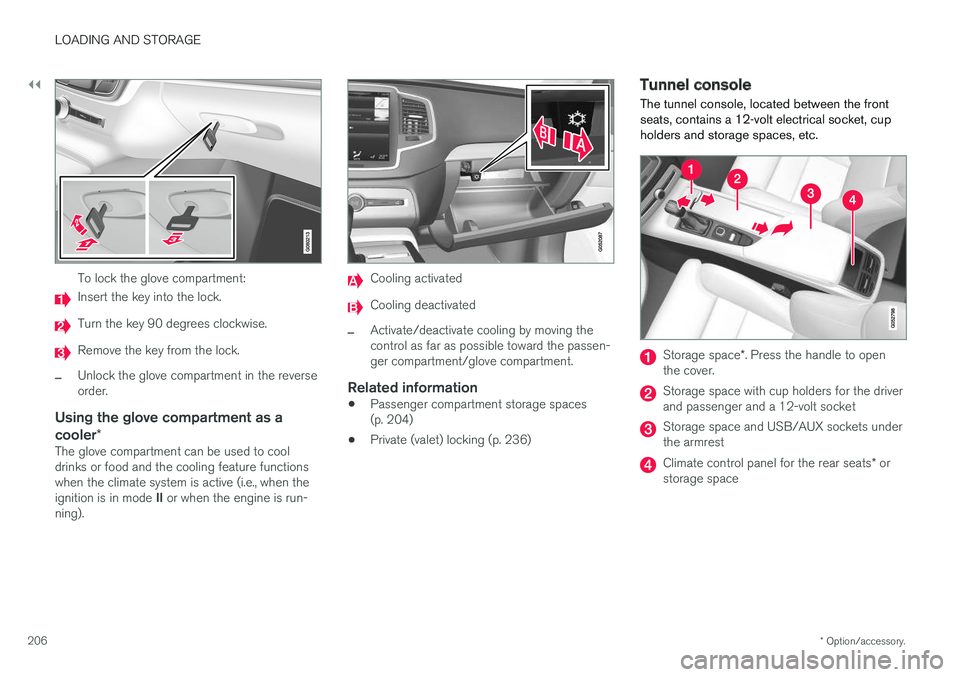
To lock the glove compartment:
Insert the key into the lock.
Turn the key 90 degrees clockwise.
Remove the key from the lock.
–Unlock the glove compartment in the reverse order.
Using the glove compartment as a cooler *
The glove compartment can be used to cool drinks or food and the cooling feature functionswhen the climate system is active (i.e., when the ignition is in mode II or when the engine is run-
ning).
Cooling activated
Cooling deactivated
–Activate/deactivate cooling by moving the control as far as possible toward the passen-ger compartment/glove compartment.
Related information
• Passenger compartment storage spaces(p. 204)
• Private (valet) locking (p. 236)
Tunnel console The tunnel console, located between the front seats, contains a 12-volt electrical socket, cupholders and storage spaces, etc.
Storage space
*. Press the handle to open
the cover.
Storage space with cup holders for the driver and passenger and a 12-volt socket
Storage space and USB/AUX sockets under the armrest
Climate control panel for the rear seats * or
storage space
Page 209 of 552
LOADING AND STORAGE
* Option/accessory.207
NOTE
One of the alarm sensors, which is sensitive to metallic objects, is located under the tunnelconsole cup holders. Avoid leaving coins,keys, etc., in the cup holders because theymay inadvertently trigger the alarm.
Related information
•Passenger compartment storage spaces (p. 204)
• Electrical sockets (p. 214)
• Alarm (p. 239)
• Rear climate system controls on the tunnel console
* (p. 185)
Grocery bag holder
The grocery bag holders (hooks) and elastic strap help keep shopping bags in place.
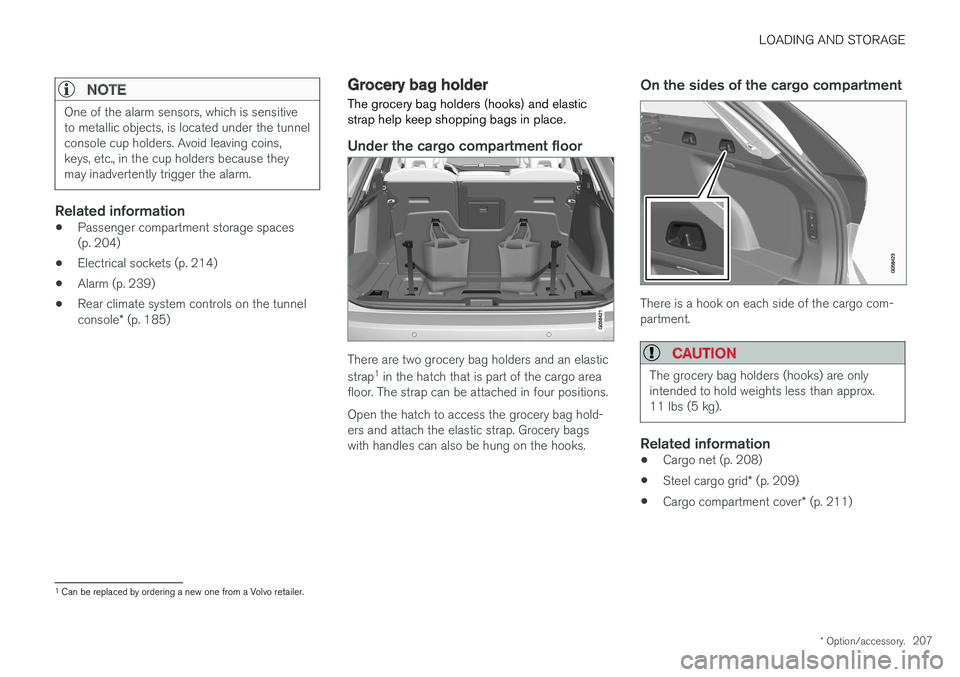
Under the cargo compartment floor
There are two grocery bag holders and an elastic strap 1
in the hatch that is part of the cargo area
floor. The strap can be attached in four positions. Open the hatch to access the grocery bag hold- ers and attach the elastic strap. Grocery bagswith handles can also be hung on the hooks.
On the sides of the cargo compartment
There is a hook on each side of the cargo com- partment.
CAUTION
The grocery bag holders (hooks) are only intended to hold weights less than approx.11 lbs (5 kg).
Related information
• Cargo net (p. 208)
• Steel cargo grid
* (p. 209)
• Cargo compartment cover
* (p. 211)
1
Can be replaced by ordering a new one from a Volvo retailer.
Page 210 of 552
LOADING AND STORAGE
208
Cargo net
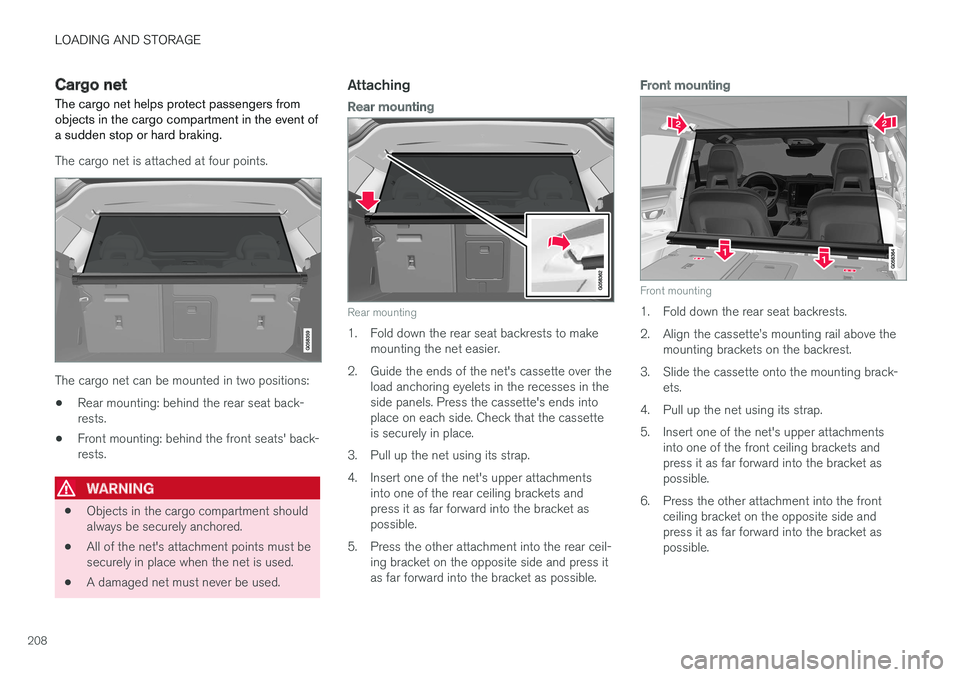
The cargo net helps protect passengers from objects in the cargo compartment in the event ofa sudden stop or hard braking.
The cargo net is attached at four points.
The cargo net can be mounted in two positions: • Rear mounting: behind the rear seat back- rests.
• Front mounting: behind the front seats' back-rests.
WARNING
•
Objects in the cargo compartment should always be securely anchored.
• All of the net's attachment points must besecurely in place when the net is used.
• A damaged net must never be used.
Attaching
Rear mounting
Rear mounting
1. Fold down the rear seat backrests to make
mounting the net easier.
2. Guide the ends of the net's cassette over the load anchoring eyelets in the recesses in the side panels. Press the cassette's ends intoplace on each side. Check that the cassetteis securely in place.
3. Pull up the net using its strap.
4. Insert one of the net's upper attachments into one of the rear ceiling brackets and press it as far forward into the bracket aspossible.
5. Press the other attachment into the rear ceil- ing bracket on the opposite side and press itas far forward into the bracket as possible.
Front mounting
Front mounting
1. Fold down the rear seat backrests.
2. Align the cassette