lock VOLVO V90 CROSS COUNTRY 2021 Service Manual
[x] Cancel search | Manufacturer: VOLVO, Model Year: 2021, Model line: V90 CROSS COUNTRY, Model: VOLVO V90 CROSS COUNTRY 2021Pages: 683, PDF Size: 14.19 MB
Page 177 of 683
WINDOWS, GLASS AND MIRRORS
* Option/accessory.175
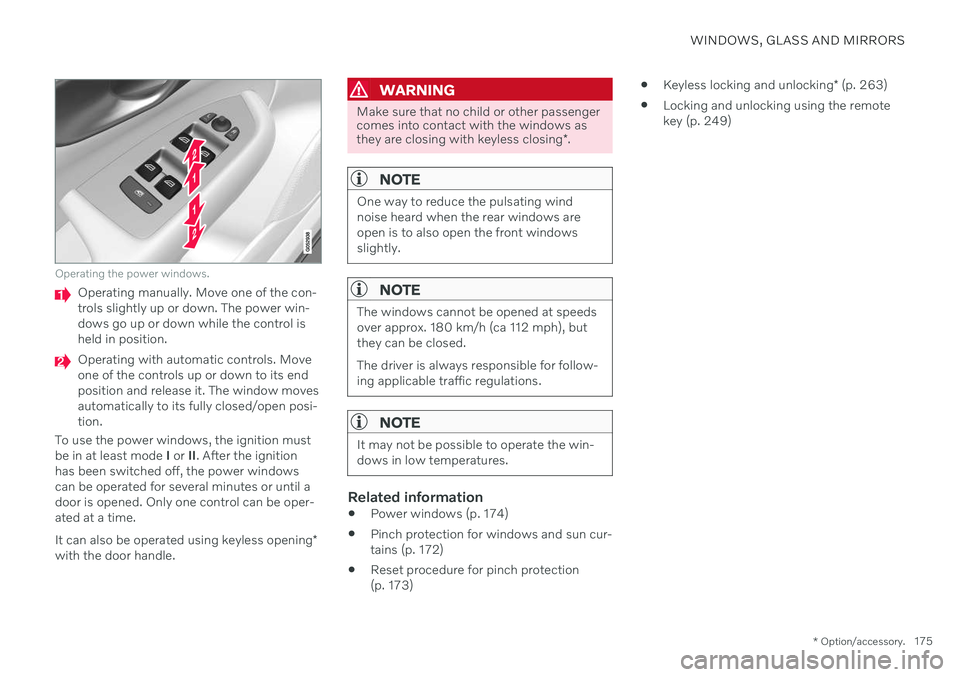
Operating the power windows.
Operating manually. Move one of the con- trols slightly up or down. The power win-dows go up or down while the control isheld in position.
Operating with automatic controls. Move one of the controls up or down to its endposition and release it. The window movesautomatically to its fully closed/open posi-tion.
To use the power windows, the ignition mustbe in at least mode I or II. After the ignition
has been switched off, the power windowscan be operated for several minutes or until adoor is opened. Only one control can be oper-ated at a time. It can also be operated using keyless opening *
with the door handle.
WARNING
Make sure that no child or other passenger comes into contact with the windows as they are closing with keyless closing *.
NOTE
One way to reduce the pulsating wind noise heard when the rear windows areopen is to also open the front windowsslightly.
NOTE
The windows cannot be opened at speeds over approx. 180 km/h (ca 112 mph), butthey can be closed. The driver is always responsible for follow- ing applicable traffic regulations.
NOTE
It may not be possible to operate the win- dows in low temperatures.
Related information
Power windows (p. 174)
Pinch protection for windows and sun cur- tains (p. 172)
Reset procedure for pinch protection(p. 173)
Keyless locking and unlocking
* (p. 263)
Locking and unlocking using the remotekey (p. 249)
Page 178 of 683

WINDOWS, GLASS AND MIRRORS
* Option/accessory.
176
Using sun curtains *
There are integrated sun curtains in each rear door.
Rear door – manually operated
The illustration is generic – the design may vary.
Hook with locking mechanism
–Pull up the sun curtain and hook it to the upper section of the door frame.
The window can be opened and closed whenthe sun curtain is being used.
Related information
Pinch protection for windows and sun cur-tains (p. 172)
Reset procedure for pinch protection(p. 173)
Power windows (p. 174)
Rearview/door mirrors
The rearview mirror and door mirrors can be used to improve the driver's visibility behindthe vehicle.
Rearview mirrorThe rearview mirror is equipped with Home- Link *, auto-dim * and compass *.
The rearview mirror can be adjusted manually.
Door mirrors
WARNING
The door mirror on the passenger side is curved to improve visibility. Objects in themirror may appear farther away than theyactually are.
The joystick in the drivers' door control panel is used to adjust the position of the door mir-rors. There are also several automatic settings that can also be connected to the memory function buttons for the power seat *.
Related information
HomeLink ®
* (p. 454)
Compass
* (p. 458)
Adjusting the rearview mirror dimming function (p. 177)
Adjusting the door mirrors (p. 177)
Storing positions for seats, mirrors and head-up display
* (p. 192)
Activating and deactivating the heated
rear window and door mirrors (p. 227)
Page 180 of 683
||
WINDOWS, GLASS AND MIRRORS
* Option/accessory.
178 3. Press the
L or R button again. The light in
the button will go out.
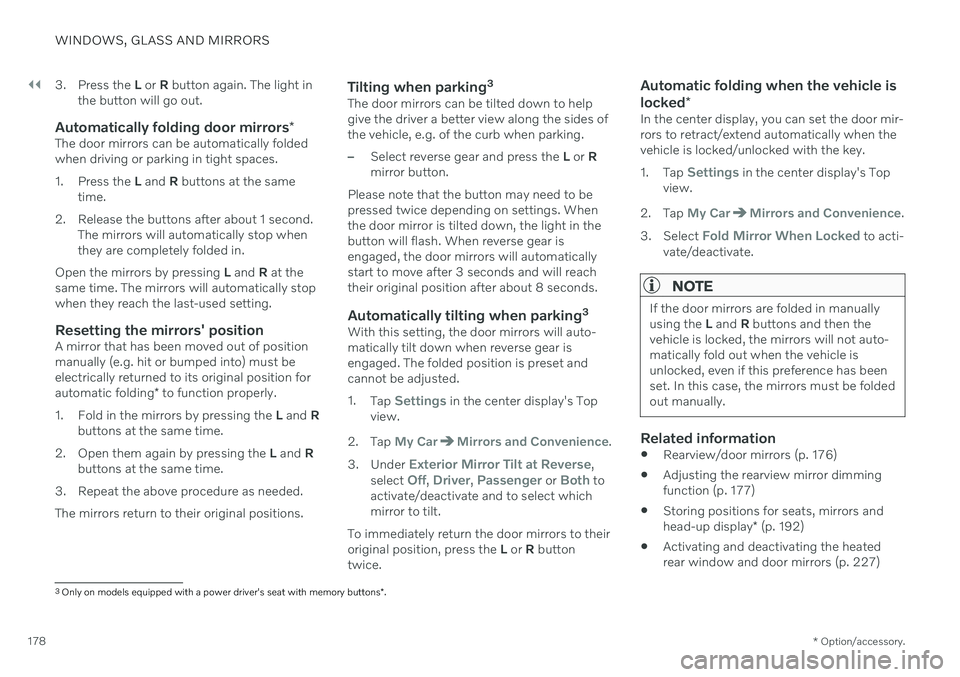
Automatically folding door mirrors *The door mirrors can be automatically folded when driving or parking in tight spaces.
1. Press the L and R buttons at the same
time.
2. Release the buttons after about 1 second. The mirrors will automatically stop when they are completely folded in.
Open the mirrors by pressing L and R at the
same time. The mirrors will automatically stopwhen they reach the last-used setting.
Resetting the mirrors' positionA mirror that has been moved out of positionmanually (e.g. hit or bumped into) must beelectrically returned to its original position for automatic folding * to function properly.
1. Fold in the mirrors by pressing the L and R
buttons at the same time.
2. Open them again by pressing the L and R
buttons at the same time.
3. Repeat the above procedure as needed. The mirrors return to their original positions.
Tilting when parking 3The door mirrors can be tilted down to help give the driver a better view along the sides ofthe vehicle, e.g. of the curb when parking.
–Select reverse gear and press the
L or R
mirror button.
Please note that the button may need to be pressed twice depending on settings. Whenthe door mirror is tilted down, the light in thebutton will flash. When reverse gear isengaged, the door mirrors will automaticallystart to move after 3 seconds and will reachtheir original position after about 8 seconds.
Automatically tilting when parking 3With this setting, the door mirrors will auto-matically tilt down when reverse gear isengaged. The folded position is preset andcannot be adjusted. 1.
Tap
Settings in the center display's Top
view.
2. Tap
My CarMirrors and Convenience.
3. Under
Exterior Mirror Tilt at Reverse,
select Off, Driver, Passenger or Both to
activate/deactivate and to select which mirror to tilt.
To immediately return the door mirrors to theiroriginal position, press the L or R button
twice.
Automatic folding when the vehicle is locked *
In the center display, you can set the door mir- rors to retract/extend automatically when thevehicle is locked/unlocked with the key. 1.
Tap
Settings in the center display's Top
view.
2. Tap
My CarMirrors and Convenience.
3. Select
Fold Mirror When Locked to acti-
vate/deactivate.
NOTE
If the door mirrors are folded in manually using the L and R buttons and then the
vehicle is locked, the mirrors will not auto-matically fold out when the vehicle isunlocked, even if this preference has beenset. In this case, the mirrors must be foldedout manually.
Related information
Rearview/door mirrors (p. 176)
Adjusting the rearview mirror dimming function (p. 177)
Storing positions for seats, mirrors and head-up display
* (p. 192)
Activating and deactivating the heated rear window and door mirrors (p. 227)
3
Only on models equipped with a power driver's seat with memory buttons *.
Page 181 of 683

WINDOWS, GLASS AND MIRRORS
}}
* Option/accessory.179
Panoramic roof *
The panoramic roof is divided into two glass sections. The front section can be openedvertically at the rear edge (ventilation posi-tion) or horizontally (open position). The rearsection cannot be moved. The panoramic roof has a wind deflector and sun curtain made of perforated fabric (locatedbeneath the glass sections) for extra protec-tion in e.g. bright sunlight.
The panoramic roof and sun curtain are oper- ated using the controls in the ceiling. To operate the panoramic roof and sun cur- tain, the ignition must be in mode I or II.
WARNING
Children, other passengers or objects can be trapped by the moving parts.
Always operate the windows with cau- tion.
Do not allow children to play with theoperating controls.
Never leave a child alone in the vehicle.
Remember to always cut the current tothe power windows by setting thevehicle's electrical system to ignitionmode
0 and then taking the key with
you when leaving the vehicle.
Never stick objects or body parts outthrough the windows, even if the vehi-cle electrical system is completelyturned off.
CAUTION
Do not open the panoramic roof when load carriers are installed.
Never place heavy objects on the pan-oramic roof.
CAUTION
Remove ice and snow before opening the panoramic roof. Be careful not toscratch any surfaces or damage thetrim.
Do not operate the panoramic roof if itis frozen in place.
Wind blocker
The panoramic roof is equipped with a wind blocker that folds up when the roof is open.
Related information
Operating the panoramic roof
* (p. 180)
Auto closing the panoramic roof
* sun cur-
tain (p. 182)
Pinch protection for windows and sun cur- tains (p. 172)
Page 182 of 683

WINDOWS, GLASS AND MIRRORS
* Option/accessory.
180
Keyless locking and unlocking
* (p. 263)
Locking and unlocking using the remote key (p. 249)
Operating the panoramic roof
*
The panoramic roof and sun curtain are oper- ated using a control in the ceiling panel, andboth are equipped with pinch protection.
WARNING
Children, other passengers or objects can be trapped by the moving parts.
Always operate the windows with cau- tion.
Do not allow children to play with theoperating controls.
Never leave a child alone in the vehicle.
Remember to always cut the current tothe power windows by setting thevehicle's electrical system to ignitionmode
0 and then taking the key with
you when leaving the vehicle.
Never stick objects or body parts outthrough the windows, even if the vehi-cle electrical system is completelyturned off.
CAUTION
Do not open the panoramic roof when load carriers are installed.
Never place heavy objects on the pan-oramic roof.
CAUTION
Remove ice and snow before opening the panoramic roof. Be careful not toscratch any surfaces or damage thetrim.
Do not operate the panoramic roof if itis frozen in place.
To operate the panoramic roof and sun cur- tain, the ignition must be in mode
I or II.
It can also be operated using keyless opening *
with the door handle.
WARNING
Make sure that no child or other passenger comes into contact with the windows as they are closing with keyless closing *.
Page 184 of 683

||
WINDOWS, GLASS AND MIRRORS
* Option/accessory.
182
Manual operation
1. To open the sun curtain, pull the control
backward to the manual open mode.
2. To open the panoramic roof to the comfort position, pull the control backward a sec- ond time to the manual opening position.
3. To open the panoramic roof fully, pull the control backward a third time to the man-ual opening position.
Close by repeating the above procedure inreverse - push the control forward/down tothe manual closing position.
Auto operation
1. To open the sun curtain to the fully open position, pull the control backward to the auto open mode and release.
2. To open the panoramic roof to the comfort position, pull the control backward a sec-ond time to the automatic opening posi-tion and release.
3. To open the panoramic roof fully, pull the control backward a third time to the auto-matic opening position and release.
Close by repeating the above procedure inreverse - push the control forward/down tothe auto close position.
Automatic operation - rapid opening or closing
The panoramic roof and sun curtain can be opened or closed simultaneously:
–Open - press the control backward twice to the automatic operation position andrelease.
–Close - press the control forward/down twice to the automatic operation positionand release.
Related information
Panoramic roof
* (p. 179)
Auto closing the panoramic roof
* sun cur-
tain (p. 182)
Pinch protection for windows and sun cur-tains (p. 172)
Keyless locking and unlocking
* (p. 263)
Locking and unlocking using the remotekey (p. 249)
Auto closing the panoramic roof
*
sun curtain
With this function, the sun curtain closes automatically 15 minutes after the vehicle hasbeen locked if it is parked in hot weather. Thisis done to lower the passenger compartmenttemperature and protect the upholsteryagainst being bleached by the sun.
The function is deactivated as the default fac- tory setting and can be activated or deacti-vated using the center display. 1. Tap
Settings in the Top view in the center
display.
2. Tap
My CarLocking.
Select
Auto Close Sunroof Curtain to
activate/deactivate.
NOTE
The sun curtain also closes when all win- dows are closed with keyless closing *.
Related information
Panoramic roof
* (p. 179)
Operating the panoramic roof
* (p. 180)
Pinch protection for windows and sun cur- tains (p. 172)
Page 185 of 683
WINDOWS, GLASS AND MIRRORS
}}
* Option/accessory.183
Keyless locking and unlocking
* (p. 263)
Locking and unlocking using the remote key (p. 249)
Wiper blades and washer fluid The wipers and the washer fluid are designed to improve visibility and the headlight pat-tern.
The washer nozzles are heated
* automatically
in cold weather to prevent the washer fluid from freezing. When there is approximately 1 liter (1 qt) of washer fluid remaining, a message to refill willappear in the instrument panel.
Related information
Using the rain sensor (p. 184)
Using the windshield and headlight wash-ers (p. 186)
Using automatic rear window wipingwhen backing up (p. 188)
Activating and deactivating the rain sen-sor's memory function (p. 185)
Using the rear window wiper/washer(p. 187)
Filling washer fluid (p. 646)
Putting the wiper blades in service posi-tion (p. 645)
Replacing windshield wiper blades(p. 644)
Changing rear window wipers (p. 643)
Using the windshield wipers (p. 183)
Using the windshield wipers
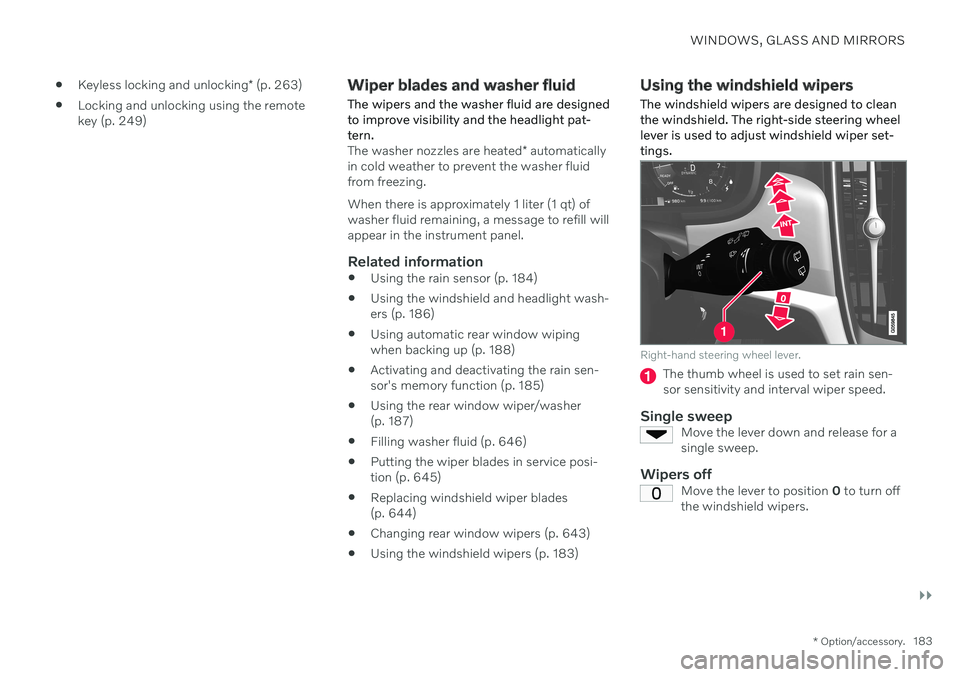
The windshield wipers are designed to clean the windshield. The right-side steering wheellever is used to adjust windshield wiper set-tings.
Right-hand steering wheel lever.
The thumb wheel is used to set rain sen- sor sensitivity and interval wiper speed.
Single sweepMove the lever down and release for asingle sweep.
Wipers offMove the lever to position 0 to turn off
the windshield wipers.
Page 192 of 683

SEATS AND STEERING WHEEL
* Option/accessory.
190
Manual front seats
The front seats can be adjusted in a number of different ways to help enhance your seat-ing comfort.
Raise/lower the front edge of the seat cushion * by moving the control up/down. 1
Change the length of the seat cushion
* by
pulling up the lever and moving the cush- ion forward/backward.
Move the seat forward/backing by lifting the handle and moving the seat to a suita-ble distance from the steering wheel andpedals. Check to make sure the seat issecurely locked into place after its settinghas been changed.
Adjust lumbar support * by pressing the
button up/down/forward/rearward. 2
Raise/lower the seat by moving the con- trol up/down.
Change the backrest tilt by turning the knob on the backrest.
WARNING
Do not adjust the seat while driving. The seat should be adjusted so that thebrake pedal can be depressed fully. Inaddition, position the seat as far rear-ward as comfort and control allow.
Check that the seat is securely lockedinto position after adjusting.
Related information
Power
* front seats (p. 191)
Adjusting the power
* front seats (p. 191)
Storing positions for seats, mirrors and head-up display
* (p. 192)
Using stored positions for seats, mirrorsand head-up display
* (p. 193)
Adjusting front seat massage settings
*
(p. 195)
Adjusting
* front seat cushion length
(p. 196)
Front seat massage
* settings (p. 194)
Adjusting front seat side bolster settings
*
(p. 197)
Adjusting front seat lumbar support
*
(p. 197)
Adjusting the passenger seat from thedriver's seat
* (p. 199)
1
Only applies to the driver's seat.
2 Applies for four-way lumbar support *. Two-way lumbar support * is adjusted forward/rearward.
Page 193 of 683

SEATS AND STEERING WHEEL
}}
* Option/accessory.191
Power* front seats
The front seats can be adjusted in a number of different ways to help enhance your seat-ing comfort. The power seat can be movedforward/backward and up/down. The height and length * of the seat cushion and the tilt of
the backrest can be adjusted. Lumbar sup-port * can be adjusted up, down, forward and
backward. 3
The seats can be adjusted when the engine is running and for a certain period of time afterthe door has been unlocked without theengine running. They can also be adjusted fora short period after the engine is turned off.
CAUTION
The power seats have an overload protec- tor that is triggered if a seat is blocked byany object. If this occurs, remove theobject and attempt to adjust the seatagain.
Related information
Manual front seats (p. 190)
Adjusting the power
* front seats (p. 191)
Storing positions for seats, mirrors and head-up display
* (p. 192)
Using stored positions for seats, mirrorsand head-up display
* (p. 193)
Adjusting front seat massage settings
*
(p. 195)
Adjusting
* front seat cushion length
(p. 196)
Front seat massage
* settings (p. 194)
Adjusting front seat side bolster settings
*
(p. 197)
Adjusting front seat lumbar support
*
(p. 197)
Adjusting the passenger seat from thedriver's seat
* (p. 199)
Adjusting the power * front seats
Set the desired seating position using the controls on the front seat cushion. To set theconvenience functions, turn the multifunction control 4
upward/downward.
The illustration shows the controls in a vehicle with four-way lumbar support *. Vehicles with two-way
lumbar support * do not have the rotary multifunction
control.
In vehicles with four-way lumbar support *,
turn the multifunction control 4
up/down to
set the convenience functions. In vehicles with two-way lumbar support *, use the
round button to adjust the lumbar support forward/rearward.
Raise/lower the front edge of the seat cushion by moving the control up/down.
3 Applies for four-way lumbar support *. Two-way lumbar support * is adjusted forward/rearward.
Page 198 of 683

SEATS AND STEERING WHEEL
* Option/accessory.
196
Adjusting * front seat cushion
length Depending on the selected equipment level, the length of the seat cushion can either be adjusted using the multifunction control * on
the side of the seat cushion, or manually adjusted using the control on the front of theseat cushion.
Adjusting seat cushion length using the multifunction control
The multifunction control, located on the side of the seat cushion.
1. Activate the multifunction control by turn-
ing the control
upward/downward. The
seat settings view will appear in the center display. 2.
Select
Cushion extension in the seat set-
tings view.
Push in the front part of the four-way button
to extend the seat cushion.
Press the rear part of the four-way but- ton
to shorten the seat cushion.
Manually adjusting seat cushion length
Control for adjusting seat cushion.
1. Grasp the handle on the front of the
seat and pull upward.
2. Adjust the length of the seat cushion.
3. Release the handle and make sure the seat cushion locks into position.
Related information
Manual front seats (p. 190)
Power
* front seats (p. 191)
Adjusting the power
* front seats (p. 191)
Storing positions for seats, mirrors and head-up display
* (p. 192)
Using stored positions for seats, mirrorsand head-up display
* (p. 193)
Adjusting front seat massage settings
*
(p. 195)
Front seat massage
* settings (p. 194)
Adjusting front seat side bolster settings
*
(p. 197)
Adjusting front seat lumbar support
*
(p. 197)
Adjusting the passenger seat from thedriver's seat
* (p. 199)