rear control panel VOLVO XC60 2015 Owner´s Manual
[x] Cancel search | Manufacturer: VOLVO, Model Year: 2015, Model line: XC60, Model: VOLVO XC60 2015Pages: 406, PDF Size: 11.03 MB
Page 57 of 406
01 Safety
Child safety locks01
* Option/accessory, for more information, see Introduction.55
Manual child safety locks
G021077
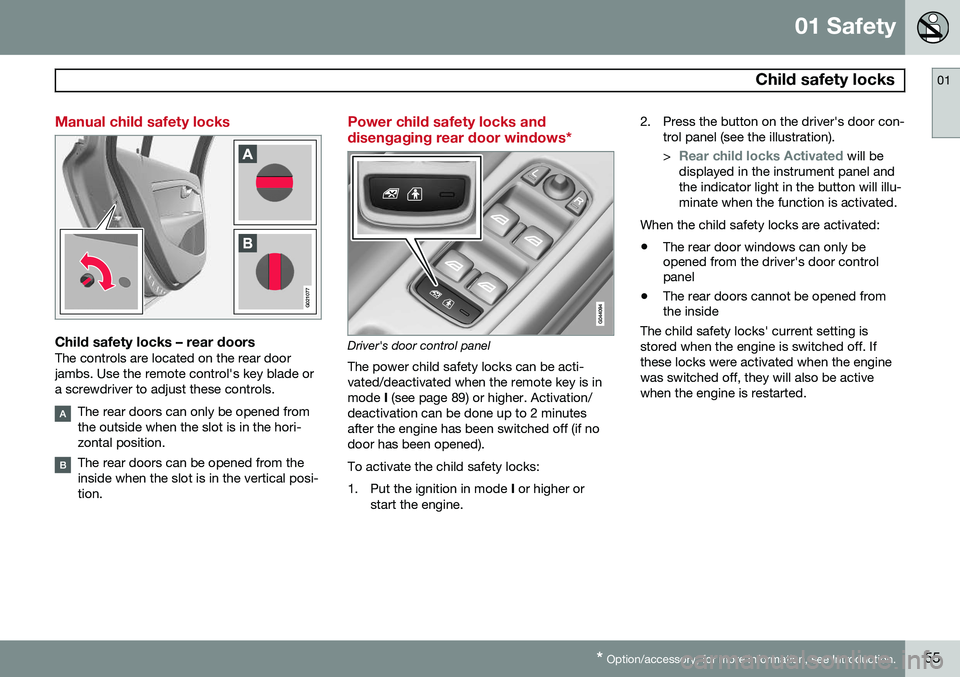
Child safety locks – rear doorsThe controls are located on the rear door jambs. Use the remote control's key blade ora screwdriver to adjust these controls.
The rear doors can only be opened from the outside when the slot is in the hori-zontal position.
The rear doors can be opened from the inside when the slot is in the vertical posi-tion.
Power child safety locks and disengaging rear door windows*
Driver's door control panel
The power child safety locks can be acti- vated/deactivated when the remote key is inmode I (see page 89) or higher. Activation/
deactivation can be done up to 2 minutesafter the engine has been switched off (if nodoor has been opened). To activate the child safety locks:
1. Put the ignition in mode I or higher or
start the engine. 2. Press the button on the driver's door con-
trol panel (see the illustration). >
Rear child locks Activated will be
displayed in the instrument panel and the indicator light in the button will illu-minate when the function is activated.
When the child safety locks are activated:
• The rear door windows can only be opened from the driver's door controlpanel
• The rear doors cannot be opened fromthe inside
The child safety locks' current setting is stored when the engine is switched off. Ifthese locks were activated when the enginewas switched off, they will also be activewhen the engine is restarted.
Page 84 of 406
03 Your driving environment
Instruments and controls
03
82* Option/accessory, for more information, see Introduction.
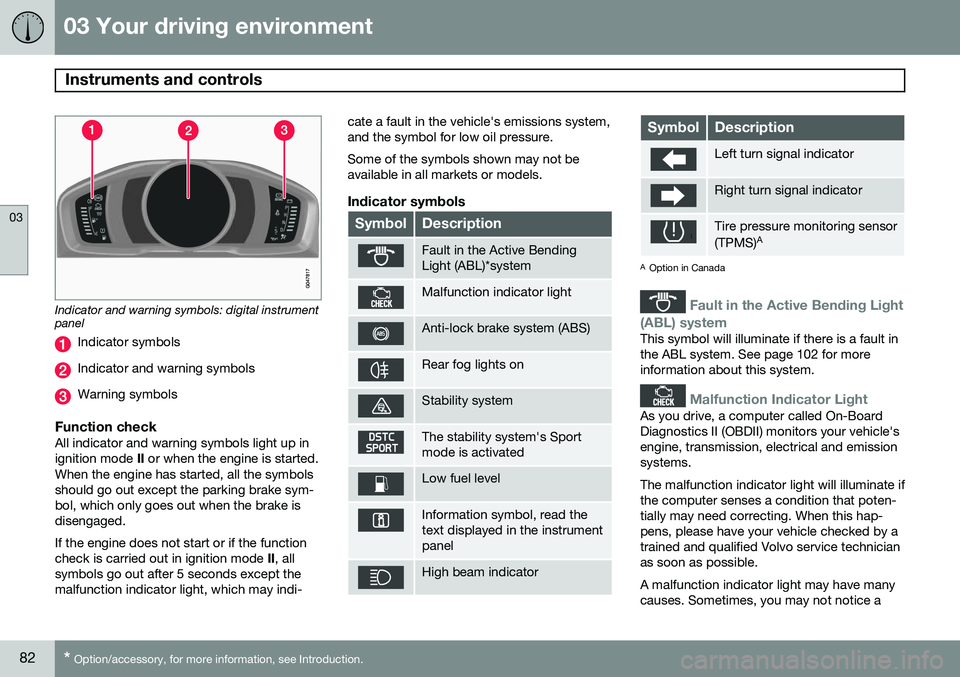
Indicator and warning symbols: digital instrument panel
Indicator symbols
Indicator and warning symbols
Warning symbols
Function checkAll indicator and warning symbols light up in ignition mode II or when the engine is started.
When the engine has started, all the symbolsshould go out except the parking brake sym-bol, which only goes out when the brake isdisengaged. If the engine does not start or if the function check is carried out in ignition mode II, all
symbols go out after 5 seconds except themalfunction indicator light, which may indi- cate a fault in the vehicle's emissions system,and the symbol for low oil pressure. Some of the symbols shown may not be available in all markets or models.
Indicator symbols
SymbolDescription
Fault in the Active Bending Light (ABL)*system
Malfunction indicator light
Anti-lock brake system (ABS)
Rear fog lights on
Stability system
The stability system's Sport mode is activated
Low fuel level
Information symbol, read the text displayed in the instrumentpanel
High beam indicator
SymbolDescription
Left turn signal indicator
Right turn signal indicator
Tire pressure monitoring sensor (TPMS)
A
A
Option in Canada
Fault in the Active Bending Light
(ABL) system
This symbol will illuminate if there is a fault in the ABL system. See page 102 for moreinformation about this system.
Malfunction Indicator Light
As you drive, a computer called On-Board Diagnostics II (OBDII) monitors your vehicle'sengine, transmission, electrical and emissionsystems. The malfunction indicator light will illuminate if the computer senses a condition that poten-tially may need correcting. When this hap-pens, please have your vehicle checked by atrained and qualified Volvo service technicianas soon as possible. A malfunction indicator light may have many causes. Sometimes, you may not notice a
Page 92 of 406
03 Your driving environment
Seats
03
90* Option/accessory, for more information, see Introduction.
Front seats
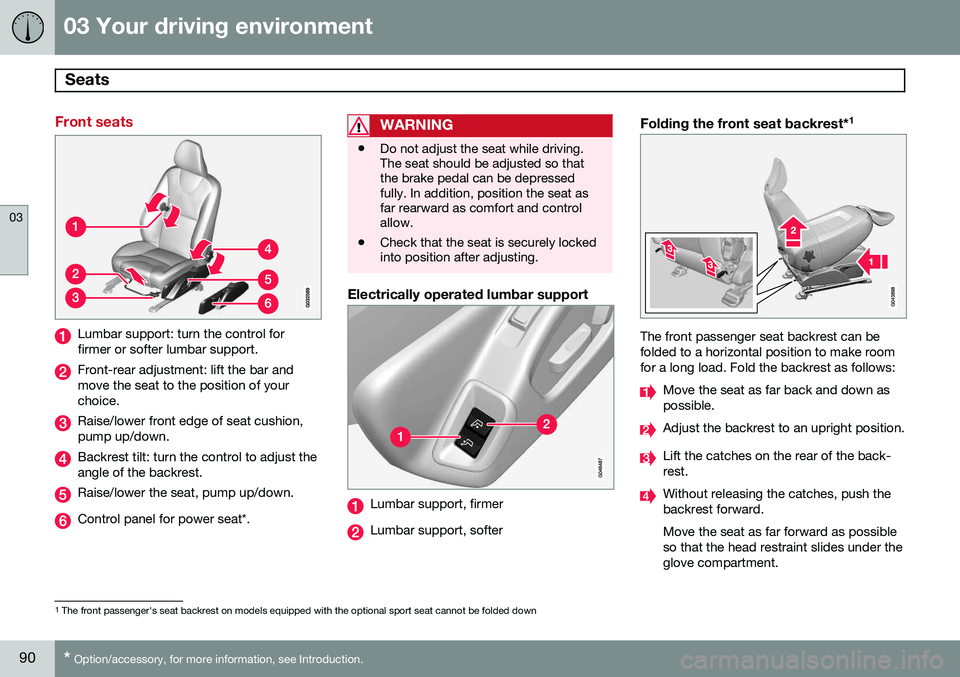
Lumbar support: turn the control for firmer or softer lumbar support.
Front-rear adjustment: lift the bar and move the seat to the position of yourchoice.
Raise/lower front edge of seat cushion, pump up/down.
Backrest tilt: turn the control to adjust the angle of the backrest.
Raise/lower the seat, pump up/down.
Control panel for power seat*.
WARNING
• Do not adjust the seat while driving. The seat should be adjusted so thatthe brake pedal can be depressedfully. In addition, position the seat asfar rearward as comfort and controlallow.
• Check that the seat is securely lockedinto position after adjusting.
Electrically operated lumbar support
Lumbar support, firmer
Lumbar support, softer
Folding the front seat backrest* 1
The front passenger seat backrest can be folded to a horizontal position to make roomfor a long load. Fold the backrest as follows:
Move the seat as far back and down as possible.
Adjust the backrest to an upright position.
Lift the catches on the rear of the back- rest.
Without releasing the catches, push the backrest forward. Move the seat as far forward as possible so that the head restraint slides under theglove compartment.
1
The front passenger's seat backrest on models equipped with the optional sport seat cannot be folded down
Page 95 of 406
03 Your driving environment
Seats
03
}}
* Option/accessory, for more information, see Introduction.93
2. Exit the vehicle and lock the doors with
the remote key (or close the driver's door and press the lock button on the doorhandle with the remote key in your pos-session on vehicles with the optional key-less drive).
> The positions of the power driver'sseat and door mirrors are now stored in the remote key's memory.
NOTE
The remote key's memory feature and the power driver's seat memory function (thesettings made using the buttons on theside of the seat, see the section "Powerseat memory function" on page 91) workindependently of each other.
Returning the seat/mirrors to the stored positions
To move the seat and door mirrors to the position stored in the remote key:
1. Unlock the driver's door with the same
remote key (the one used to lock the doors). For models equipped with theoptional keyless drive, you must have thesame remote key in your possession.
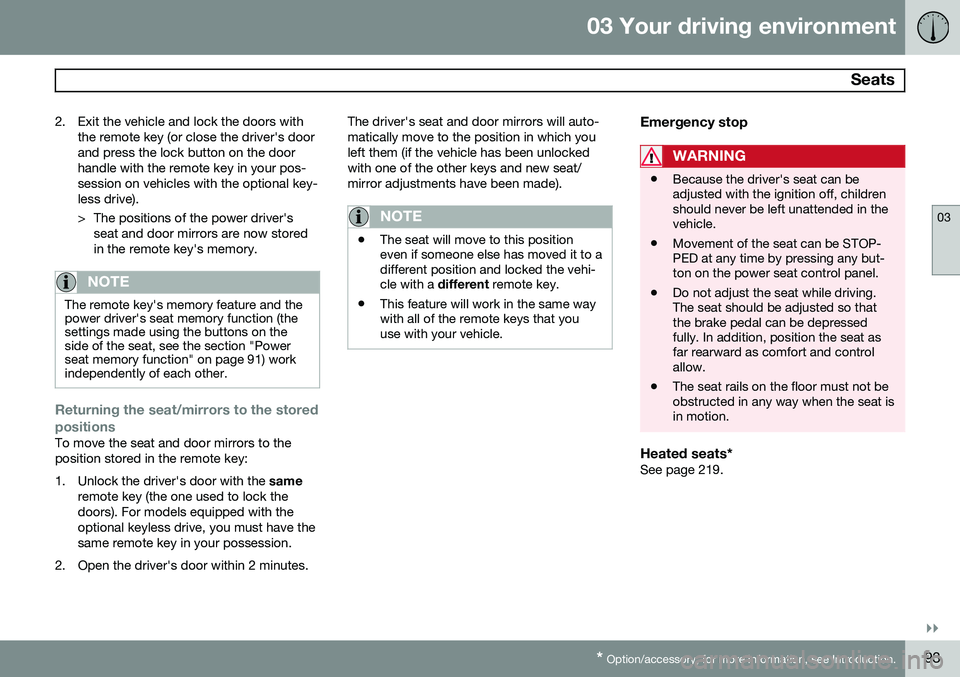
2. Open the driver's door within 2 minutes. The driver's seat and door mirrors will auto-matically move to the position in which youleft them (if the vehicle has been unlockedwith one of the other keys and new seat/mirror adjustments have been made).
NOTE
•
The seat will move to this position even if someone else has moved it to adifferent position and locked the vehi-cle with a
different remote key.
• This feature will work in the same waywith all of the remote keys that youuse with your vehicle.
Emergency stop
WARNING
•Because the driver's seat can be adjusted with the ignition off, childrenshould never be left unattended in thevehicle.
• Movement of the seat can be STOP-PED at any time by pressing any but-ton on the power seat control panel.
• Do not adjust the seat while driving.The seat should be adjusted so thatthe brake pedal can be depressedfully. In addition, position the seat asfar rearward as comfort and controlallow.
• The seat rails on the floor must not beobstructed in any way when the seat isin motion.
Heated seats*See page 219.
Page 105 of 406
03 Your driving environment
Lighting
03
}}
103
The intensity of the instrument lighting is adjusted with the thumb wheel.
"Theater" lightingWhen the overhead courtesy lighting hasgone out and the engine is running, severalLEDs located near the roof console illuminateto provide faint lighting for the occupants ofthe front seats. This lighting goes out justafter the overhead courtesy lighting when thevehicle is locked.
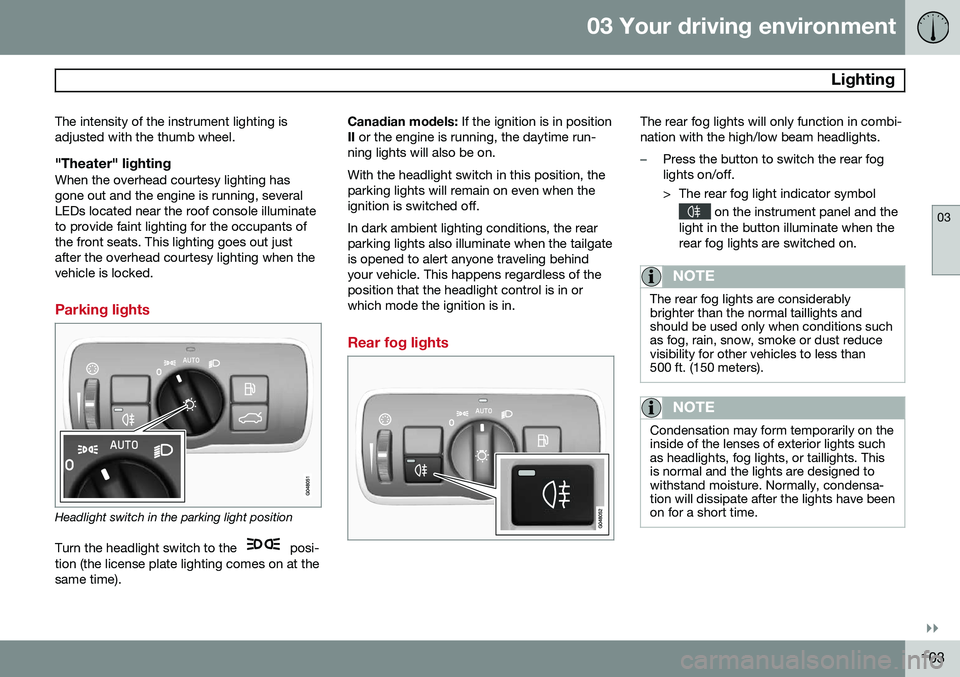
Parking lights
Headlight switch in the parking light position
Turn the headlight switch to the
posi-
tion (the license plate lighting comes on at the same time). Canadian models:
If the ignition is in position
II or the engine is running, the daytime run-
ning lights will also be on. With the headlight switch in this position, the parking lights will remain on even when theignition is switched off. In dark ambient lighting conditions, the rear parking lights also illuminate when the tailgateis opened to alert anyone traveling behindyour vehicle. This happens regardless of theposition that the headlight control is in orwhich mode the ignition is in.
Rear fog lights
The rear fog lights will only function in combi- nation with the high/low beam headlights.
–Press the button to switch the rear fog lights on/off.
> The rear fog light indicator symbol
on the instrument panel and the
light in the button illuminate when the rear fog lights are switched on.
NOTE
The rear fog lights are considerably brighter than the normal taillights andshould be used only when conditions suchas fog, rain, snow, smoke or dust reducevisibility for other vehicles to less than500 ft. (150 meters).
NOTE
Condensation may form temporarily on the inside of the lenses of exterior lights suchas headlights, fog lights, or taillights. Thisis normal and the lights are designed towithstand moisture. Normally, condensa-tion will dissipate after the lights have beenon for a short time.
Page 112 of 406
03 Your driving environment
Windows
03
110* Option/accessory, for more information, see Introduction.
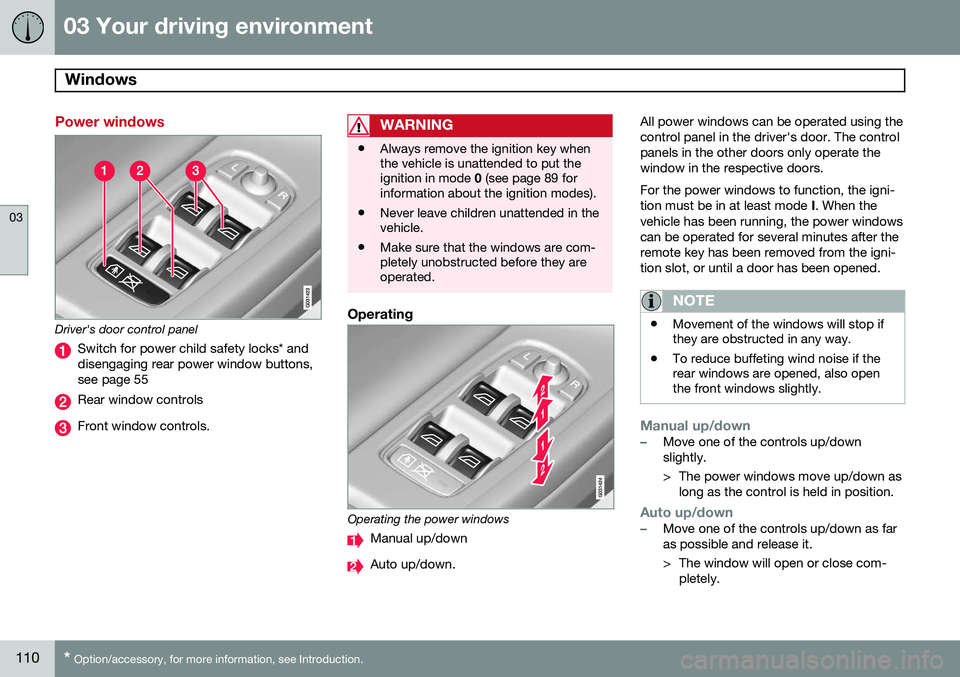
Power windows
Driver's door control panel
Switch for power child safety locks* and disengaging rear power window buttons,see page 55
Rear window controls
Front window controls.
WARNING
• Always remove the ignition key when the vehicle is unattended to put theignition in mode
0 (see page 89 for
information about the ignition modes).
• Never leave children unattended in thevehicle.
• Make sure that the windows are com-pletely unobstructed before they areoperated.
Operating
Operating the power windows
Manual up/down
Auto up/down. All power windows can be operated using the control panel in the driver's door. The controlpanels in the other doors only operate thewindow in the respective doors. For the power windows to function, the igni- tion must be in at least mode
I. When the
vehicle has been running, the power windowscan be operated for several minutes after theremote key has been removed from the igni-tion slot, or until a door has been opened.
NOTE
• Movement of the windows will stop if they are obstructed in any way.
• To reduce buffeting wind noise if therear windows are opened, also openthe front windows slightly.
Manual up/down–Move one of the controls up/down slightly.
> The power windows move up/down as
long as the control is held in position.
Auto up/down–Move one of the controls up/down as far as possible and release it.
> The window will open or close com-pletely.
Page 175 of 406
04 Driver support
City Safety™
04
}}
173
Press
My Car in the center console control
panel and go to
SettingsCar settings
Driver support systemsCity Safety.
Select
Off.
If the engine is switched off, City Safety™ will reactivate when the engine is restarted.
WARNING
The laser sensor emits light when the igni- tion is in mode II or higher, even if City
Safety™ has been switched off.
To switch City Safety™ on again:
• Follow the same procedure as for switch- ing City Safety™ off but select
On.
Limitations
The sensor used by City Safety™ is designed to detect cars and other larger motor vehiclesahead of your vehicle in both daylight anddarkness.
WARNING
The laser sensor has certain limitations and its function may be reduced (or it maynot function at all) in conditions such asheavy rain or snowfall, or by dense fog orthick, blowing dust or snow. Condensa-tion, dirt, ice or snow on the windshieldmay also interfere with the sensor’s func-tion.
Objects such as warning flags hanging from long objects on the roof or accessories suchas auxiliary lights or protective arches on thefront of the vehicle that are higher than thehood may also impede the sensor’s function. Braking distance to the vehicle ahead increa- ses on slippery road surfaces, which mayreduce City Safety’s capacity to avoid a colli-sion. In situations like this, the DSTC system(see page 150) will help provide the best pos-sible braking capacity and stability. City Safety™ emits a laser beam and meas- ures the way in which the light is reflected.Therefore, vehicles or objects with low-reflec-tive surfaces may not be detected. Normally,the license plate and taillight reflectors givethe rear section of a vehicle ahead sufficientreflective surfaces to be detected.
NOTE
•Keep the windshield in front of the laser sensor free of ice, snow, dirt, etc.See page 172.
• Snow or ice on the hood deeper than2 inches (5 cm) may obstruct the sen-sor. Keep the hood free of ice andsnow.
• Do not mount or in any way attachanything on the windshield that couldobstruct the laser sensor.
Troubleshooting
If Windscreen Sensors blocked appears in
the information display, this indicates that the City Safety™ laser sensor is obstructed insome way and cannot detect vehicles aheadof you, which means that the system is notfunctioning. However, this message will not be displayed in all situations in which the sensor isobstructed. For this reason, the driver mustensure that the area of the windshield in frontof the sensor is always kept clean. The following table shows some of the situa- tions that can cause the message to be dis-played and suggested actions.
Page 199 of 406
04 Driver support
Rear Park Assist Camera (PAC)*
04
}}
* Option/accessory, for more information, see Introduction.197
Using PAC
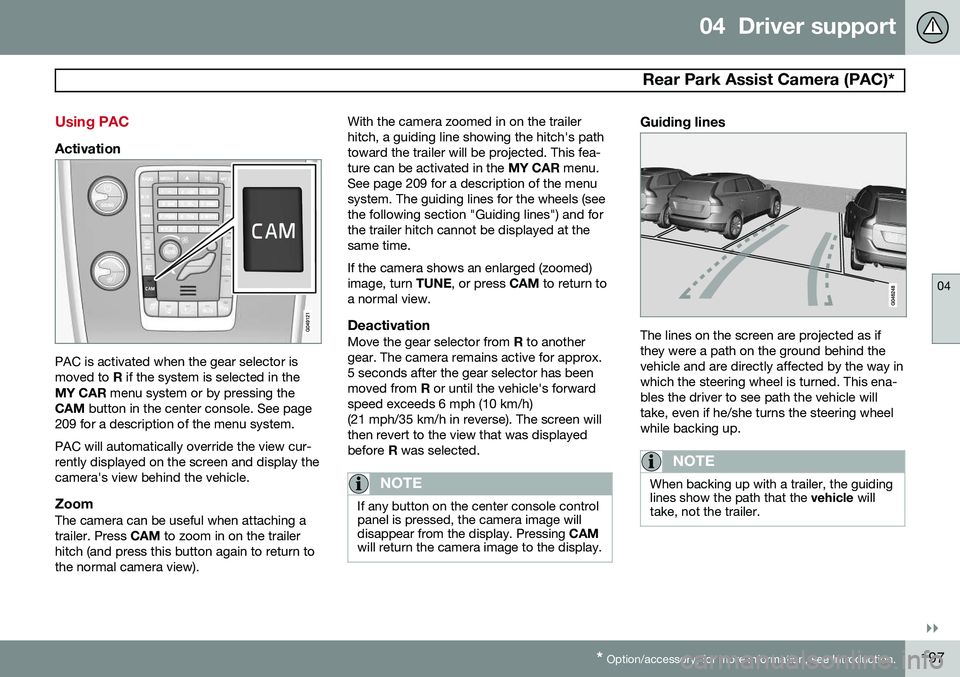
Activation
PAC is activated when the gear selector is moved to R if the system is selected in the
MY CAR menu system or by pressing the
CAM button in the center console. See page
209 for a description of the menu system. PAC will automatically override the view cur- rently displayed on the screen and display thecamera's view behind the vehicle.
ZoomThe camera can be useful when attaching atrailer. Press CAM to zoom in on the trailer
hitch (and press this button again to return tothe normal camera view). With the camera zoomed in on the trailerhitch, a guiding line showing the hitch's pathtoward the trailer will be projected. This fea-ture can be activated in the
MY CAR menu.
See page 209 for a description of the menusystem. The guiding lines for the wheels (seethe following section "Guiding lines") and forthe trailer hitch cannot be displayed at thesame time. If the camera shows an enlarged (zoomed) image, turn TUNE, or press CAM to return to
a normal view.
DeactivationMove the gear selector from R to another
gear. The camera remains active for approx.5 seconds after the gear selector has beenmoved from R or until the vehicle's forward
speed exceeds 6 mph (10 km/h)(21 mph/35 km/h in reverse). The screen willthen revert to the view that was displayedbefore R was selected.
NOTE
If any button on the center console control panel is pressed, the camera image willdisappear from the display. Pressing CAM
will return the camera image to the display.
Guiding lines
The lines on the screen are projected as if they were a path on the ground behind thevehicle and are directly affected by the way inwhich the steering wheel is turned. This ena-bles the driver to see path the vehicle willtake, even if he/she turns the steering wheelwhile backing up.
NOTE
When backing up with a trailer, the guiding lines show the path that the vehicle will
take, not the trailer.
Page 217 of 406
05 Comfort and driving pleasure
Climate system
05
}}
* Option/accessory, for more information, see Introduction.215
Introduction
Air conditioningThe vehicle is equipped with Electronic Cli- mate Control (ECC). The climate control sys-tem cools, heats or dehumidifies the air in thepassenger compartment.
NOTE
• The air conditioning can be switched off, but to ensure the best possible cli-mate comfort in the passenger com-partment and to prevent the windowsfrom misting, it should always be on.
• In warm weather, a small amount ofwater may accumulate under the carwhen it has been parked. This water iscondensation from the A/C systemand is normal.
Sensor location
•
The sunlight sensor is located on the top side of the dashboard.
NOTE
The sunlight sensor monitors which side of the car that is most exposed to sunlight.This can mean that the temperature maydiffer between the right and left-side airvents, even if the temperatures set for bothsides of the passenger compartment arethe same.
•The temperature sensor for the passen- ger compartment is located below the cli-mate control panel.
• The outside (ambient) temperature sensoris located on the door mirror.
• The humidity sensor* is located in theinterior rearview mirror.
NOTE
Do not cover or block the sensors with clothing or other objects.
Side windows and laminated panoramic roof
To ensure that the air conditioning works optimally, the side windows, and the lamina-ted panoramic roof should be closed.
Fog on the inside of the windowsThe defroster function should be used toremove fog or mist from the inside of the win-dows. Keeping the windows clean with a commercially available window washingspray will also help prevent fogging or mist-ing.
Temporary shut-off of the air
conditioning
The air conditioning is momentarily disen-gaged during full acceleration or when drivinguphill with a trailer. This may result in a tem-porary increase in cabin temperature.
Ice and snowAlways keep the air intake grille at the base ofthe windshield free of snow.
Climate system maintenanceSpecial tools and equipment are required tomaintain and carry out repairs on the climatesystem. Work of this type should only bedone by a trained and qualified Volvo servicetechnician.
RefrigerantVolvo cares about the environment. The airconditioning system in your car contains aCFC-free refrigerant – R134a. This substancewill not deplete the ozone layer. See page386 for the amount of refrigerant in the A/Csystem. The system uses PAG oil.
Page 241 of 406
06 Infotainment
Introduction
06
}}
* Option/accessory, for more information, see Introduction.239
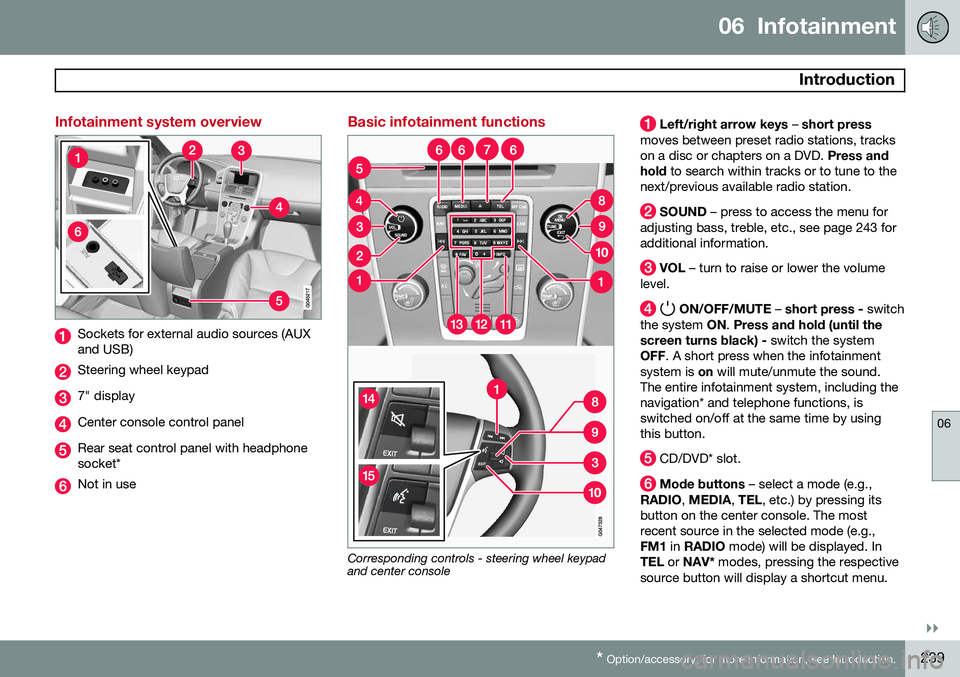
Infotainment system overview
Sockets for external audio sources (AUX and USB)
Steering wheel keypad
7" display
Center console control panel
Rear seat control panel with headphone socket*
Not in use
Basic infotainment functions
Corresponding controls - steering wheel keypad and center console
Left/right arrow keys – short press
moves between preset radio stations, tracks on a disc or chapters on a DVD. Press and
hold to search within tracks or to tune to the
next/previous available radio station.
SOUND – press to access the menu for
adjusting bass, treble, etc., see page 243 for additional information.
VOL – turn to raise or lower the volume
level.
ON/OFF/MUTE – short press - switch
the system ON. Press and hold (until the
screen turns black) - switch the system
OFF . A short press when the infotainment
system is on will mute/unmute the sound.
The entire infotainment system, including the navigation* and telephone functions, isswitched on/off at the same time by usingthis button.
CD/DVD* slot.
Mode buttons – select a mode (e.g.,
RADIO , MEDIA , TEL , etc.) by pressing its
button on the center console. The most recent source in the selected mode (e.g.,FM1 in RADIO mode) will be displayed. In
TEL or NAV* modes, pressing the respective
source button will display a shortcut menu.