key VOLVO XC60 2017 Owner´s Manual
[x] Cancel search | Manufacturer: VOLVO, Model Year: 2017, Model line: XC60, Model: VOLVO XC60 2017Pages: 398, PDF Size: 9.17 MB
Page 82 of 398
||
INSTRUMENTS AND CONTROLS
* Option/accessory, for more information, see Introduction.
80
CAUTION
Foreign objects in the ignition slot can impair function or cause damage.
Removing the remote keyThe remote key can be removed from the ignition slot by pulling it out.
Related information
• Ignition modes (p. 80)
Ignition modes
The vehicle's ignition has 3 modes: 0, I, and II
that can be used without starting the engine. The following table shows examples of whichfunctions are available in the respective modes.
NOTE
To access ignition modes I or II without star-
ting the engine, the brake pedal must not be
depressed.
ModeFunction
0The odometer, clock and temperature gauge are illuminated. Power seats *
can be adjusted and the infotainment system can be used for a limited time(to minimize battery drain, see theSensus Infotainment Supplement).
IThe laminated panoramic roof, power windows,12-volt sockets in the pas-senger compartment, navigation sys- tem *, climate system blower, wind-
shield wipers can be used.
IIThe headlights/taillights illuminate. Warning/indicator lights illuminate for5 seconds. Other systems are acti- vated. However, the heated seats * and
heated rear window function can only be activated when the engine is run- ning. Mode II should only be used
for very short periods to help avoid draining the battery.
Ignition modes
Ignition mode 0
–The vehicle is unlocked.
Page 83 of 398
INSTRUMENTS AND CONTROLS
* Option/accessory, for more information, see Introduction.81
Ignition mode I
–With the remote key fully pressed into the ignition slot8
, press START/STOP ENGINE
briefly.
Ignition mode II
–With the remote key fully pressed into the ignition slot 8
, press START/STOP ENGINE
for approximately 2 seconds.
Returning to mode 0
To return to mode 0 from mode II or I, press
START/STOP ENGINE briefly.
Starting and stopping the engineSee Starting the engine (p. 248) and Switching off the engine (p. 249) for information on star-ting the engine and switching it off.
Emergency towingSee Towing the vehicle (p. 282) for importantinformation about the remote key when the vehi-cle is being towed.
Related information
•Inserting/removing remote key (p. 79)
Front seats
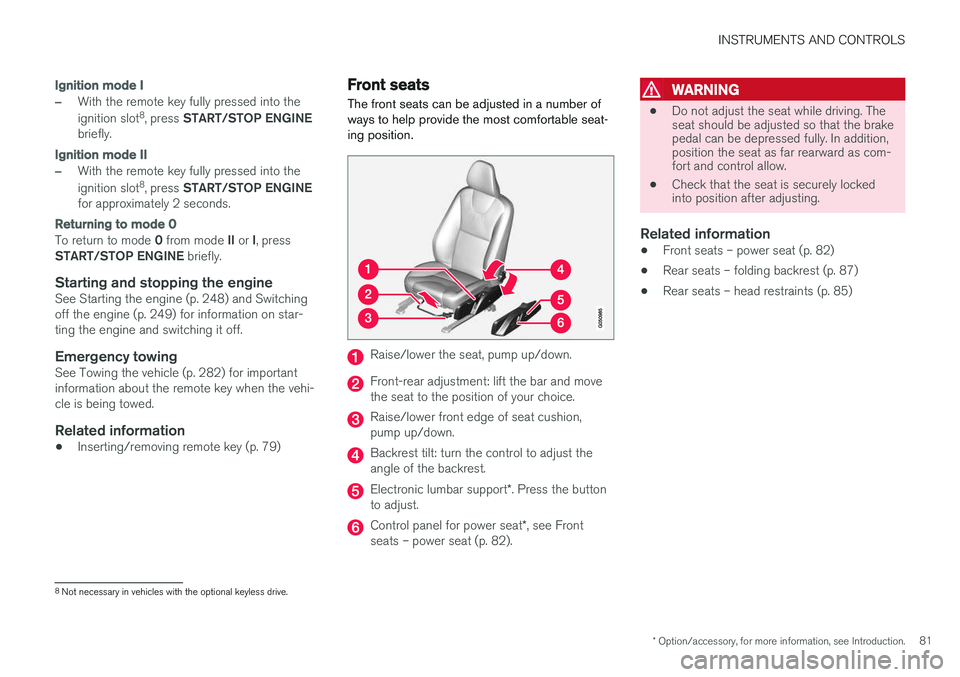
The front seats can be adjusted in a number of ways to help provide the most comfortable seat-ing position.
Raise/lower the seat, pump up/down.
Front-rear adjustment: lift the bar and move the seat to the position of your choice.
Raise/lower front edge of seat cushion, pump up/down.
Backrest tilt: turn the control to adjust the angle of the backrest.
Electronic lumbar support *. Press the button
to adjust.
Control panel for power seat *, see Front
seats – power seat (p. 82).
WARNING
• Do not adjust the seat while driving. The seat should be adjusted so that the brakepedal can be depressed fully. In addition,position the seat as far rearward as com-fort and control allow.
• Check that the seat is securely lockedinto position after adjusting.
Related information
• Front seats – power seat (p. 82)
• Rear seats – folding backrest (p. 87)
• Rear seats – head restraints (p. 85)
8
Not necessary in vehicles with the optional keyless drive.
Page 84 of 398
INSTRUMENTS AND CONTROLS
* Option/accessory, for more information, see Introduction.
82
Front seats – folding backrest *10
The front passenger's seat backrest can be folded down to make it easier to transport longobjects.
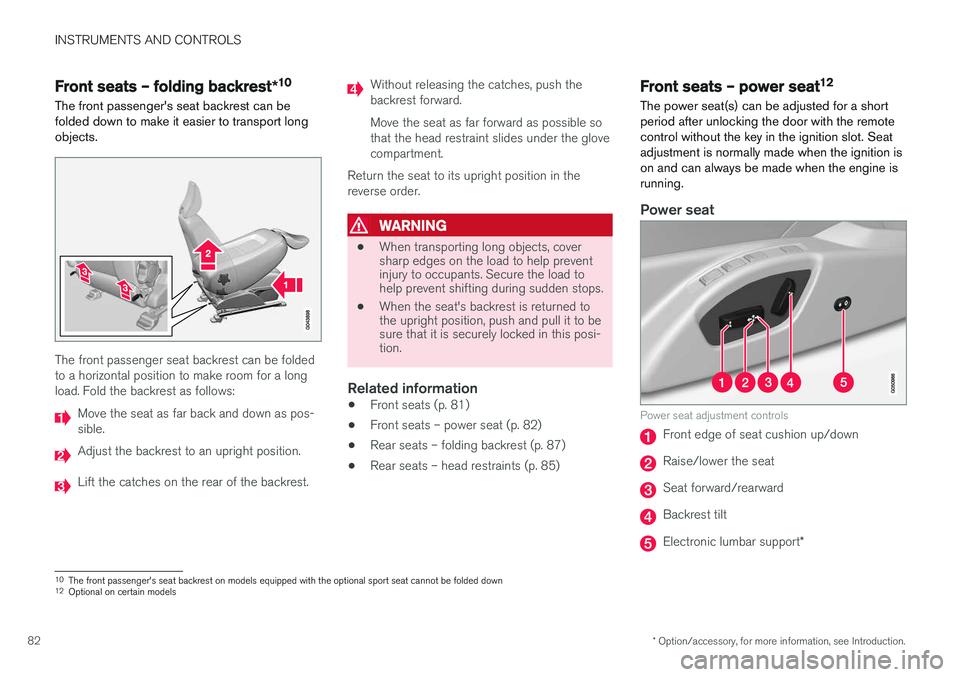
The front passenger seat backrest can be folded to a horizontal position to make room for a longload. Fold the backrest as follows:
Move the seat as far back and down as pos- sible.
Adjust the backrest to an upright position.
Lift the catches on the rear of the backrest.
Without releasing the catches, push the backrest forward. Move the seat as far forward as possible so that the head restraint slides under the glovecompartment.
Return the seat to its upright position in thereverse order.
WARNING
• When transporting long objects, cover sharp edges on the load to help preventinjury to occupants. Secure the load tohelp prevent shifting during sudden stops.
• When the seat's backrest is returned tothe upright position, push and pull it to besure that it is securely locked in this posi-tion.
Related information
•
Front seats (p. 81)
• Front seats – power seat (p. 82)
• Rear seats – folding backrest (p. 87)
• Rear seats – head restraints (p. 85)
Front seats – power seat 12
The power seat(s) can be adjusted for a short period after unlocking the door with the remotecontrol without the key in the ignition slot. Seatadjustment is normally made when the ignition ison and can always be made when the engine isrunning.
Power seat
Power seat adjustment controls
Front edge of seat cushion up/down
Raise/lower the seat
Seat forward/rearward
Backrest tilt
Electronic lumbar support *
10
The front passenger's seat backrest on models equipped with the optional sport seat cannot be folded down
12 Optional on certain models
Page 85 of 398
INSTRUMENTS AND CONTROLS
* Option/accessory, for more information, see Introduction.83
Operation
NOTE
•Only one of the power seat's controls can be used at the same time.
• The power seats have an overload pro-tector that activates if a seat is blockedby any object. If this occurs, switch off the ignition (key in position
0) and wait for a
short period before operating the seat again.
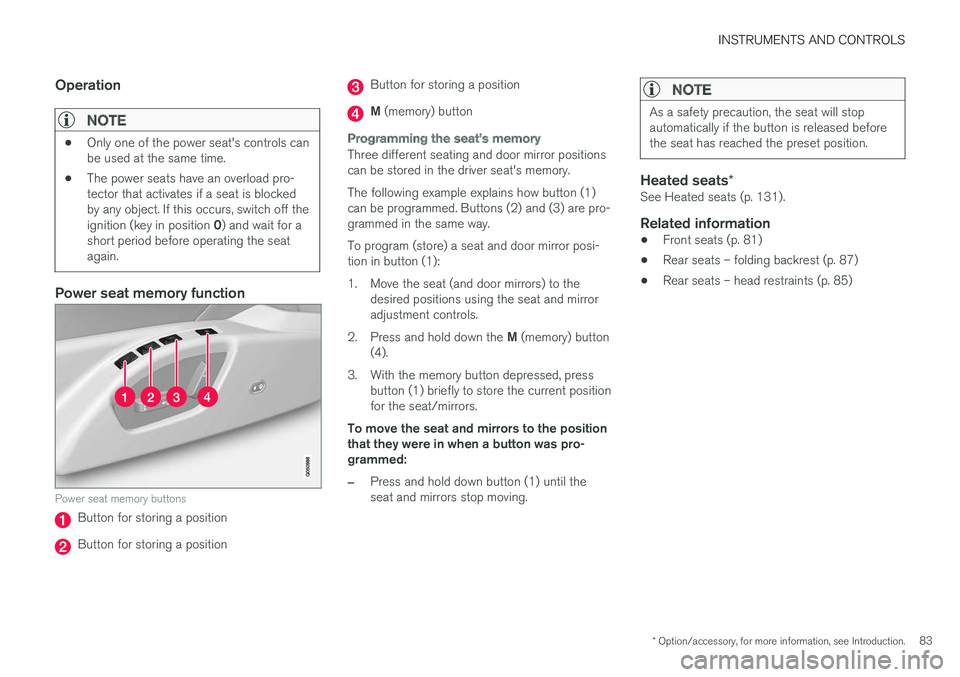
Power seat memory function
Power seat memory buttons
Button for storing a position
Button for storing a position
Button for storing a position
M (memory) button
Programming the seat's memory
Three different seating and door mirror positions can be stored in the driver seat's memory. The following example explains how button (1) can be programmed. Buttons (2) and (3) are pro-grammed in the same way. To program (store) a seat and door mirror posi- tion in button (1):
1. Move the seat (and door mirrors) to the
desired positions using the seat and mirror adjustment controls.
2. Press and hold down the M (memory) button
(4).
3. With the memory button depressed, press button (1) briefly to store the current positionfor the seat/mirrors.
To move the seat and mirrors to the positionthat they were in when a button was pro-grammed:
–Press and hold down button (1) until the seat and mirrors stop moving.
NOTE
As a safety precaution, the seat will stop automatically if the button is released beforethe seat has reached the preset position.
Heated seats *See Heated seats (p. 131).
Related information
•Front seats (p. 81)
• Rear seats – folding backrest (p. 87)
• Rear seats – head restraints (p. 85)
Page 86 of 398
INSTRUMENTS AND CONTROLS
* Option/accessory, for more information, see Introduction.
84
Key memory – power driver's seat *
and door mirrors
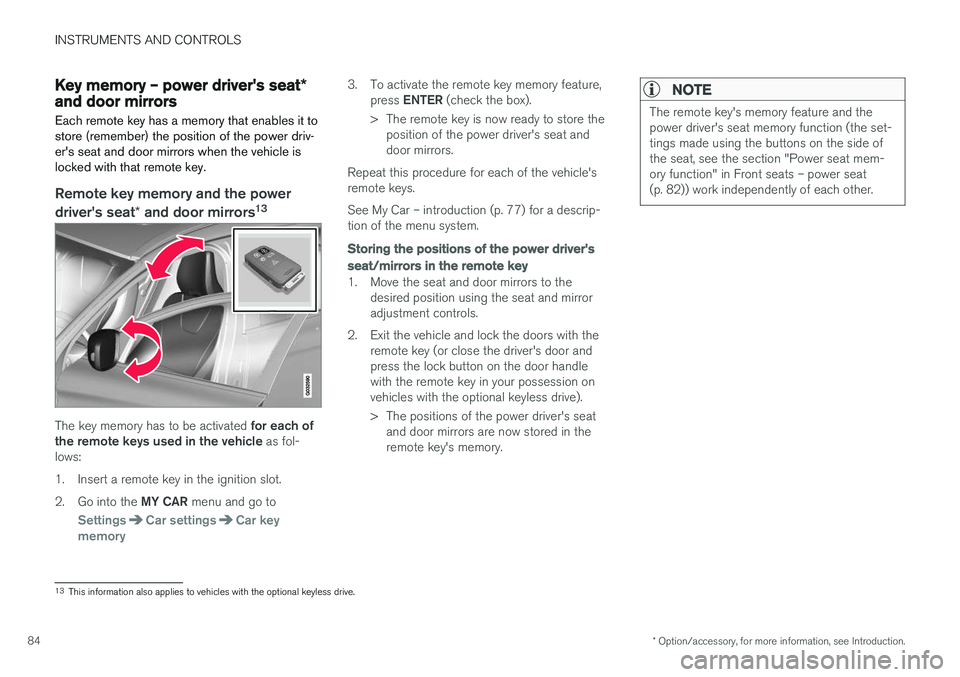
Each remote key has a memory that enables it to store (remember) the position of the power driv-er's seat and door mirrors when the vehicle islocked with that remote key.
Remote key memory and the power
driver's seat * and door mirrors 13
The key memory has to be activated
for each of
the remote keys used in the vehicle as fol-
lows:
1. Insert a remote key in the ignition slot.2. Go into the MY CAR menu and go to
SettingsCar settingsCar key
memory
3. To activate the remote key memory feature, press ENTER (check the box).
> The remote key is now ready to store the position of the power driver's seat and door mirrors.
Repeat this procedure for each of the vehicle'sremote keys. See My Car – introduction (p. 77) for a descrip- tion of the menu system.
Storing the positions of the power driver's seat/mirrors in the remote key
1. Move the seat and door mirrors to the desired position using the seat and mirror adjustment controls.
2. Exit the vehicle and lock the doors with the remote key (or close the driver's door andpress the lock button on the door handlewith the remote key in your possession onvehicles with the optional keyless drive).
> The positions of the power driver's seatand door mirrors are now stored in the remote key's memory.
NOTE
The remote key's memory feature and the power driver's seat memory function (the set-tings made using the buttons on the side ofthe seat, see the section "Power seat mem-ory function" in Front seats – power seat(p. 82)) work independently of each other.
13This information also applies to vehicles with the optional keyless drive.
Page 87 of 398
INSTRUMENTS AND CONTROLS
}}
85
Returning the seat/mirrors to the stored positions
To move the seat and door mirrors to the position stored in the remote key: 1.Unlock the driver's door with the same
remote key (the one used to lock the doors). For models equipped with the optional key-less drive, you must have the same remotekey in your possession.
2. Open the driver's door within 2 minutes. The driver's seat and door mirrors will automati- cally move to the position in which you left them(if the vehicle has been unlocked with one of theother keys and new seat/mirror adjustments havebeen made).
NOTE
• The seat will move to this position even if someone else has moved it to a different position and locked the vehicle with a
dif-
ferent remote key.
• This feature will work in the same way with all of the remote keys that you usewith your vehicle.
Emergency stop
WARNING
•
Because the driver's seat can be adjusted with the ignition off, children should neverbe left unattended in the vehicle.
• Movement of the seat can be STOPPEDat any time by pressing any button on thepower seat control panel.
• Do not adjust the seat while driving. Theseat should be adjusted so that the brakepedal can be depressed fully. In addition,position the seat as far rearward as com-fort and control allow.
• The seat rails on the floor must not beobstructed in any way when the seat is inmotion.
Related information
• Remote key – functions (p. 153)
Rear seats – head restraints The rear seat head restraints can be folded down. The center head restraint can be raised/lowered according to the passenger's height.
Rear center head restraint
Page 91 of 398
INSTRUMENTS AND CONTROLS
* Option/accessory, for more information, see Introduction.89
Steering wheel The steering wheel can be adjusted to various positions and has controls for the horn, cruise control*, menus, the infotainment system and
Bluetooth ®
-connected cell phone.
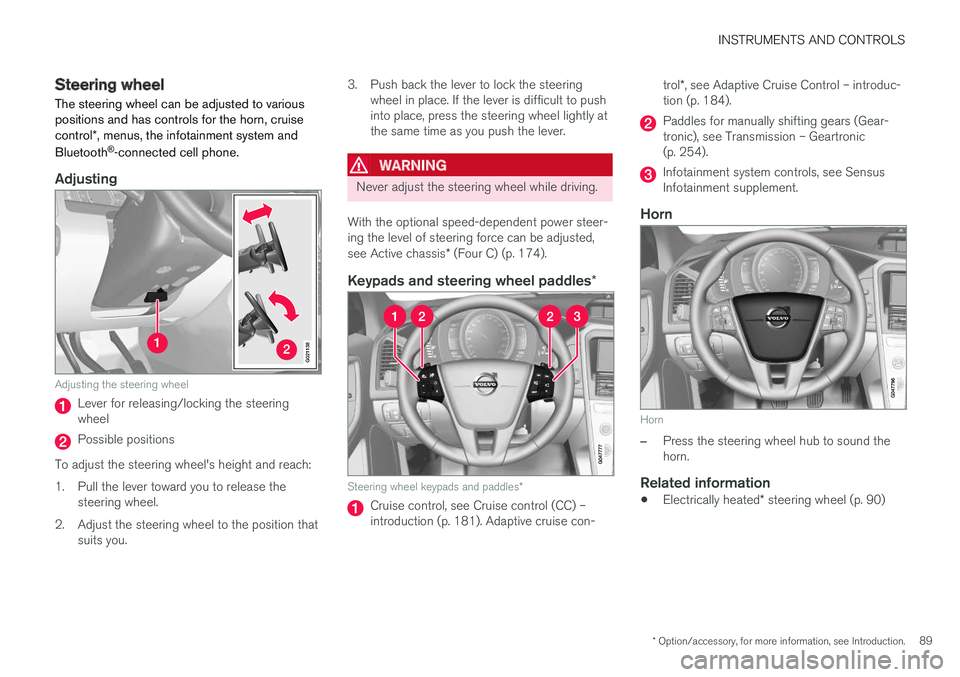
Adjusting
G021138
Adjusting the steering wheel
Lever for releasing/locking the steering wheel
Possible positions
To adjust the steering wheel's height and reach:
1. Pull the lever toward you to release the steering wheel.
2. Adjust the steering wheel to the position that suits you. 3. Push back the lever to lock the steering
wheel in place. If the lever is difficult to push into place, press the steering wheel lightly atthe same time as you push the lever.
WARNING
Never adjust the steering wheel while driving.
With the optional speed-dependent power steer- ing the level of steering force can be adjusted, see Active chassis * (Four C) (p. 174).
Keypads and steering wheel paddles *
Steering wheel keypads and paddles*
Cruise control, see Cruise control (CC) – introduction (p. 181). Adaptive cruise con- trol
*, see Adaptive Cruise Control – introduc-
tion (p. 184).
Paddles for manually shifting gears (Gear- tronic), see Transmission – Geartronic(p. 254).
Infotainment system controls, see Sensus Infotainment supplement.
Horn
Horn
–Press the steering wheel hub to sound the horn.
Related information
• Electrically heated
* steering wheel (p. 90)
Page 100 of 398
||
INSTRUMENTS AND CONTROLS
* Option/accessory, for more information, see Introduction.
98
Overhead courtesy lighting
The passenger compartment lighting is switched on and off automatically when button (3) is in theneutral position. The lighting comes on and remains on for 30 seconds if:
• the vehicle is unlocked from the outside withthe key or remote control
• the engine is switched off and the ignition is in mode
0.
The lighting switches off when:
• the engine is started
• the vehicle is locked from the outside.
The lighting comes on and remains on for two minutes if one of the doors is open. The passenger compartment lighting can be switched on and off manually within 30 minutesafter the vehicle has been unlocked. If the lighting is switched on manually and the vehicle is locked, the courtesy lighting will switchoff automatically after one minute.
Courtesy lights/door step lighting *
The courtesy lights/door step lighting switch on/off automatically when one of the front doorsis opened/closed.
Glove compartment lighting
The glove compartment lighting switches on/off automatically when the lid is opened/closed.
Related information
•Rear interior lighting (p. 98)
Rear interior lighting
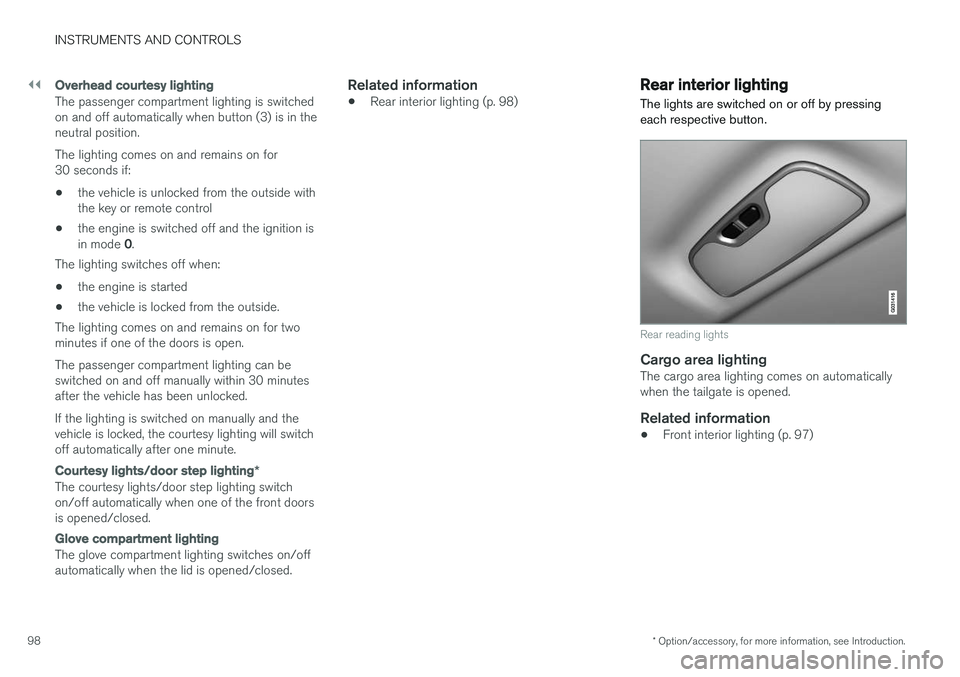
The lights are switched on or off by pressing each respective button.
Rear reading lights
Cargo area lightingThe cargo area lighting comes on automatically when the tailgate is opened.
Related information
• Front interior lighting (p. 97)
Page 101 of 398
INSTRUMENTS AND CONTROLS
}}
* Option/accessory, for more information, see Introduction.99
Home safe lighting
When you leave your vehicle at night, you can make use of the home safe lighting function toilluminate the area in front of the vehicle.
This function illuminates the headlights, parking lights, lights in the door mirrors, license platelights, front ceiling lighting and footwell lighting. These lights will remain on for 30 18
, 60 or
90 seconds. The time interval can be set in MY CAR under
SettingsCar settings
Light settingsHome safe light duration.
See My Car – introduction (p. 77) for a descrip- tion of the menu system.
1. Remove the key from the ignition slot to put
the ignition in mode 0 (see Ignition modes
(p. 80) for information about the ignition modes).
2. Pull the turn signal lever as far as possible towards the steering wheel and release it.
3. Exit the vehicle and lock the doors.
Related information
• Approach lighting (p. 99)
Approach lighting
Approach lighting activates the parking lights, door mirror lights, license plate lighting, domelighting and door step lighting when youapproach the vehicle.
This function is activated by pressing the approach light button on the remote key (see theillustration in Remote key – functions (p. 153)). The time interval for this lighting can be set by pressing MY CAR and going to
Car settings
Light settingsApproach light duration. See
My Car – introduction (p. 77) for a description of the menu system.
Related information
• Home safe lighting (p. 99)
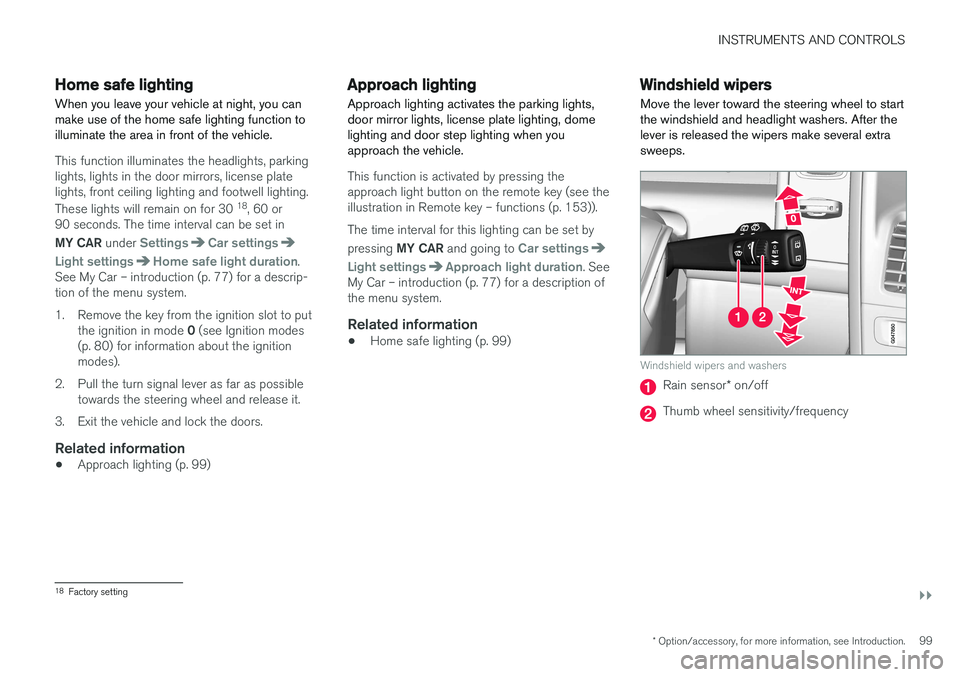
Windshield wipers Move the lever toward the steering wheel to start the windshield and headlight washers. After thelever is released the wipers make several extrasweeps.
Windshield wipers and washers
Rain sensor
* on/off
Thumb wheel sensitivity/frequency
18
Factory setting
Page 103 of 398
INSTRUMENTS AND CONTROLS
* Option/accessory, for more information, see Introduction.101
Deactivating
Deactivate the rain sensor by pressing the button
or press the lever down to another wiper
position. The rain sensor is automatically deactivated when the key is removed from the ignition slot or fiveminutes after the ignition has been switched off.
CAUTION
The rain sensor should be deactivated when washing the car in an automatic car wash, etc.If the rain sensor function is left on, the wip-ers will start inadvertently in the car wash andcould be damaged.
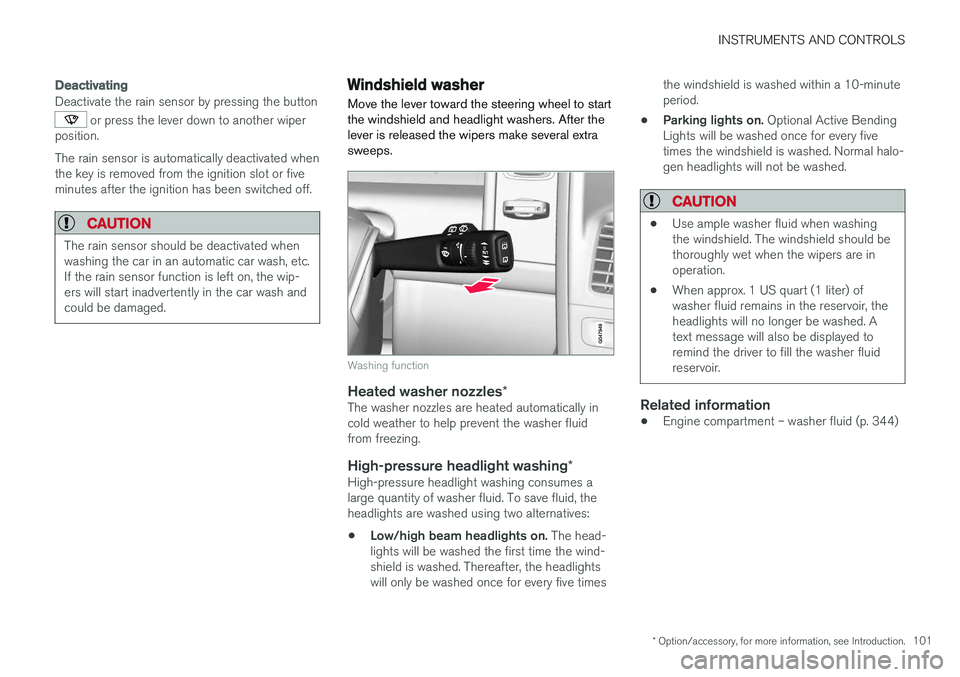
Windshield washer
Move the lever toward the steering wheel to start the windshield and headlight washers. After thelever is released the wipers make several extrasweeps.
Washing function
Heated washer nozzles *The washer nozzles are heated automatically in cold weather to help prevent the washer fluidfrom freezing.
High-pressure headlight washing *High-pressure headlight washing consumes alarge quantity of washer fluid. To save fluid, theheadlights are washed using two alternatives:
• Low/high beam headlights on.
The head-
lights will be washed the first time the wind-shield is washed. Thereafter, the headlightswill only be washed once for every five times the windshield is washed within a 10-minuteperiod.
• Parking lights on.
Optional Active Bending
Lights will be washed once for every fivetimes the windshield is washed. Normal halo-gen headlights will not be washed.
CAUTION
• Use ample washer fluid when washing the windshield. The windshield should bethoroughly wet when the wipers are inoperation.
• When approx. 1 US quart (1 liter) ofwasher fluid remains in the reservoir, theheadlights will no longer be washed. Atext message will also be displayed toremind the driver to fill the washer fluidreservoir.
Related information
•Engine compartment – washer fluid (p. 344)