steering wheel controls VOLVO XC60 2018 Owner´s Manual
[x] Cancel search | Manufacturer: VOLVO, Model Year: 2018, Model line: XC60, Model: VOLVO XC60 2018Pages: 660, PDF Size: 11.77 MB
Page 7 of 660
5
SEATS AND STEERING WHEEL
Manual front seats184
Power front seats *
185
Adjusting the power front seats *
185
Storing memory settings in power front seats * 186
Using stored memory in a powered front seat 187
Front seat massage settings *
188
Adjusting front seat massage settings *
188
Adjusting front seat cushion length 189
Adjusting front seat side bolster settings *
190
Adjusting front seat lumbar support *
190
Adjusting the passenger seat from the driver's seat * 191
Folding down the rear seat backrests 192
Adjusting the rear seat head restraints 195
Steering wheel controls and horn 196
Adjusting the steering wheel 197
CLIMATE CONTROL
Climate200
Climate zones 200
Climate control sensors 201
Perceived temperature 201
Climate control system voice commands 202
Air quality 203
Clean Zone *
203
Clean Zone Interior Package *
204
Interior Air Quality System *
204
Activating and deactivating the air quality sensor * 205
Passenger compartment air filter 205
Air distribution 206
Adjusting air distribution 206
Opening, closing and directing air vents 207
Air distribution options 209
Climate system controls 212
Activating and deactivating powerfront seats * 214
Activating and deactivating theheated front seat * 215
Activating and deactivating theheated rear seats * 215
Activating and deactivating front seatventilation * 216
Activating and deactivating the heated steering wheel
*217
Activating and deactivating automaticsteering wheel heating *218
Activating auto climate control 218
Activating and deactivating recirculation 219
Activating and deactivating the recir- culation timer setting 219
Activating and deactivating max defroster 220
Activating and deactivating the heated windshield * 221
Activating and deactivating automaticwindshield heating * 222
Activating and deactivating the heated rear window and door mirrors 222
Automatically activating and deacti-vating the heated rear window anddoor mirrors 223
Setting the blower speed for thefront seats 223
Setting the blower speed for the rear seats * 224
Setting the temperature for the front seats 225
Setting the temperature for the rear seats * 226
Synchronize temperature 227
Activating and deactivating air condi- tioning 227
Page 80 of 660
DISPLAYS AND VOICE CONTROL
* Option/accessory.
78
Instruments and controls in left-hand drive vehicles
The overviews show the location of the vehicle's
displays and controls.
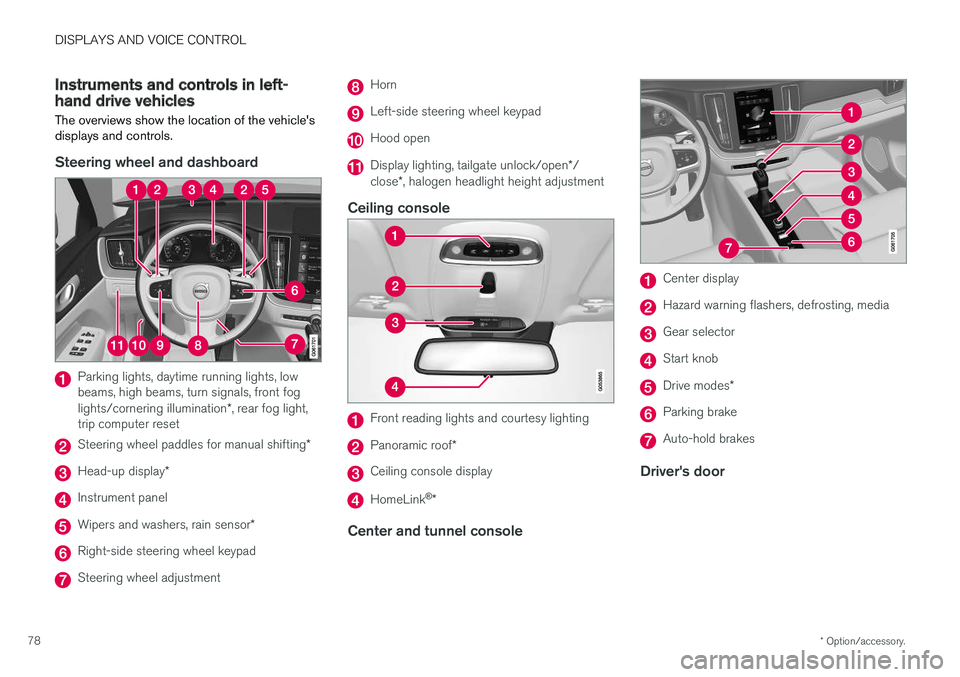
Steering wheel and dashboard
Parking lights, daytime running lights, low beams, high beams, turn signals, front fog lights/cornering illumination *, rear fog light,
trip computer reset
Steering wheel paddles for manual shifting *
Head-up display*
Instrument panel
Wipers and washers, rain sensor *
Right-side steering wheel keypad
Steering wheel adjustment
Horn
Left-side steering wheel keypad
Hood open
Display lighting, tailgate unlock/open */
close *, halogen headlight height adjustment
Ceiling console
Front reading lights and courtesy lighting
Panoramic roof *
Ceiling console display
HomeLink®
*
Center and tunnel console
Center display
Hazard warning flashers, defrosting, media
Gear selector
Start knob
Drive modes *
Parking brake
Auto-hold brakes
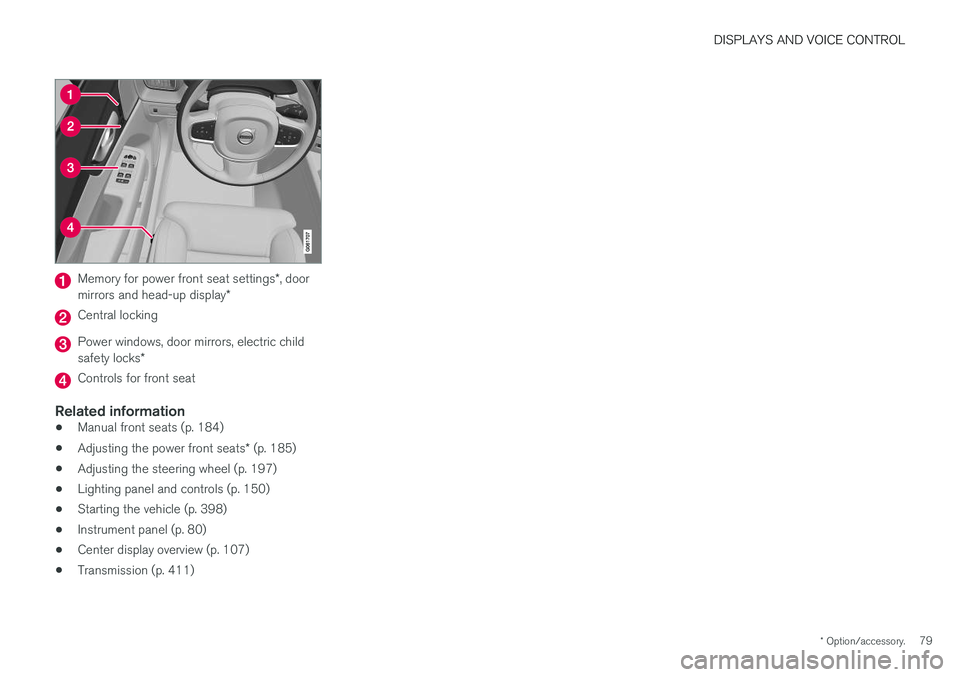
Driver's door
Page 81 of 660
DISPLAYS AND VOICE CONTROL
* Option/accessory.79
Memory for power front seat settings *, door
mirrors and head-up display *
Central locking
Power windows, door mirrors, electric child safety locks*
Controls for front seat
Related information
•Manual front seats (p. 184)
• Adjusting the power front seats
* (p. 185)
• Adjusting the steering wheel (p. 197)
• Lighting panel and controls (p. 150)
• Starting the vehicle (p. 398)
• Instrument panel (p. 80)
• Center display overview (p. 107)
• Transmission (p. 411)
Page 111 of 660
DISPLAYS AND VOICE CONTROL
* Option/accessory.109
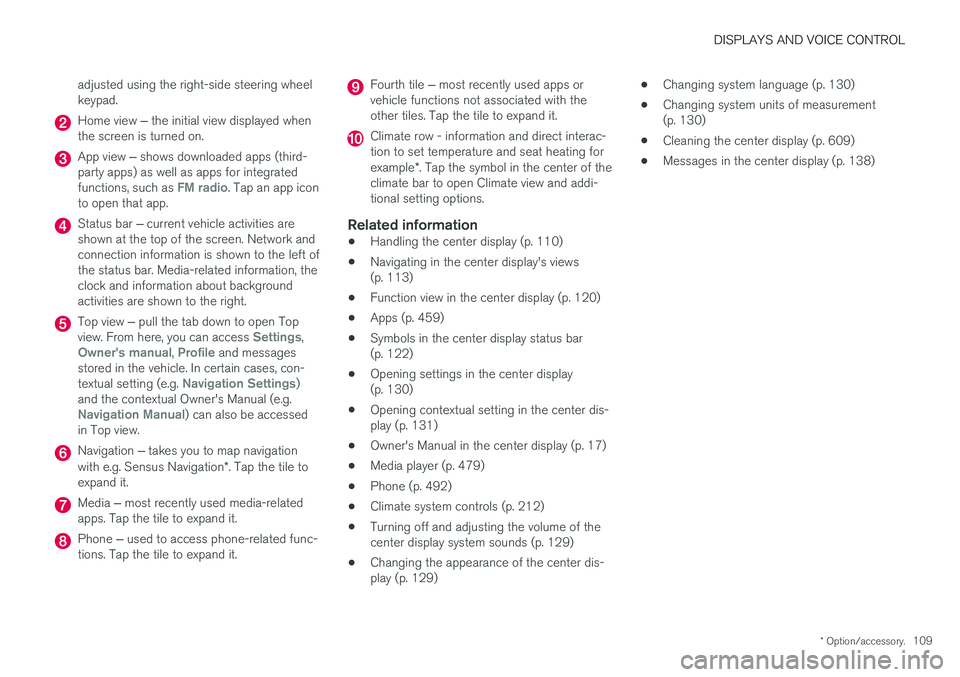
adjusted using the right-side steering wheel keypad.
Home view
‒ the initial view displayed when
the screen is turned on.
App view ‒ shows downloaded apps (third-
party apps) as well as apps for integrated functions, such as
FM radio. Tap an app icon
to open that app.
Status bar ‒ current vehicle activities are
shown at the top of the screen. Network and connection information is shown to the left ofthe status bar. Media-related information, theclock and information about backgroundactivities are shown to the right.
Top view ‒ pull the tab down to open Top
view. From here, you can access Settings,Owner's manual, Profile and messages
stored in the vehicle. In certain cases, con- textual setting (e.g.
Navigation Settings)
and the contextual Owner's Manual (e.g.
Navigation Manual) can also be accessed
in Top view.
Navigation ‒ takes you to map navigation
with e.g. Sensus Navigation *. Tap the tile to
expand it.
Media ‒ most recently used media-related
apps. Tap the tile to expand it.
Phone ‒ used to access phone-related func-
tions. Tap the tile to expand it.
Fourth tile ‒ most recently used apps or
vehicle functions not associated with the other tiles. Tap the tile to expand it.
Climate row - information and direct interac- tion to set temperature and seat heating for example *. Tap the symbol in the center of the
climate bar to open Climate view and addi- tional setting options.
Related information
• Handling the center display (p. 110)
• Navigating in the center display's views(p. 113)
• Function view in the center display (p. 120)
• Apps (p. 459)
• Symbols in the center display status bar(p. 122)
• Opening settings in the center display(p. 130)
• Opening contextual setting in the center dis-play (p. 131)
• Owner's Manual in the center display (p. 17)
• Media player (p. 479)
• Phone (p. 492)
• Climate system controls (p. 212)
• Turning off and adjusting the volume of thecenter display system sounds (p. 129)
• Changing the appearance of the center dis-play (p. 129) •
Changing system language (p. 130)
• Changing system units of measurement(p. 130)
• Cleaning the center display (p. 609)
• Messages in the center display (p. 138)
Page 152 of 660
LIGHTING
* Option/accessory.
150
Lighting panel and controls
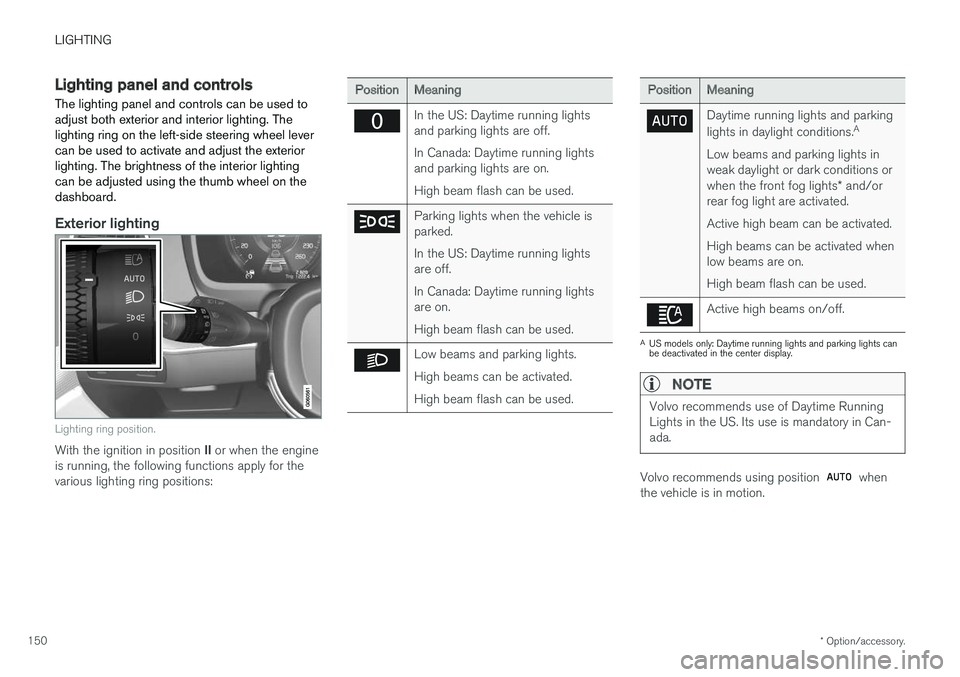
The lighting panel and controls can be used to adjust both exterior and interior lighting. Thelighting ring on the left-side steering wheel levercan be used to activate and adjust the exteriorlighting. The brightness of the interior lightingcan be adjusted using the thumb wheel on thedashboard.
Exterior lighting
Lighting ring position.
With the ignition in position II or when the engine
is running, the following functions apply for the various lighting ring positions:
PositionMeaning
In the US: Daytime running lights and parking lights are off. In Canada: Daytime running lights and parking lights are on. High beam flash can be used.
Parking lights when the vehicle is parked. In the US: Daytime running lights are off. In Canada: Daytime running lights are on. High beam flash can be used.
Low beams and parking lights. High beams can be activated.High beam flash can be used.
PositionMeaning
Daytime running lights and parking lights in daylight conditions. A
Low beams and parking lights in weak daylight or dark conditions or when the front fog lights * and/or
rear fog light are activated. Active high beam can be activated.High beams can be activated when low beams are on. High beam flash can be used.
Active high beams on/off.
A US models only: Daytime running lights and parking lights can be deactivated in the center display.
NOTE
Volvo recommends use of Daytime Running Lights in the US. Its use is mandatory in Can-ada.
Volvo recommends using position when
the vehicle is in motion.
Page 154 of 660
LIGHTING
152
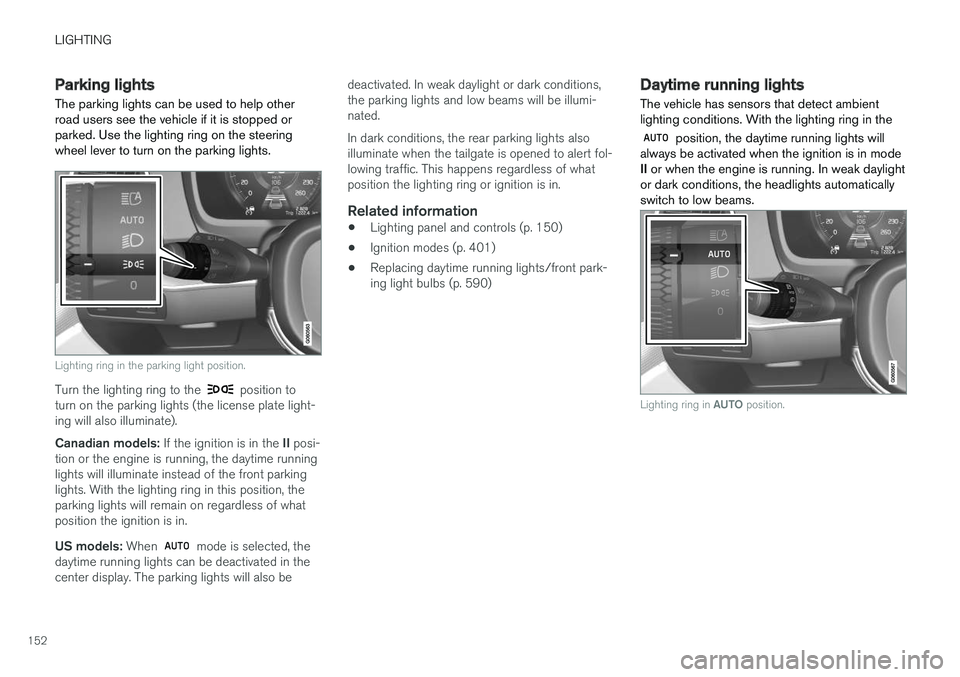
Parking lights The parking lights can be used to help other road users see the vehicle if it is stopped orparked. Use the lighting ring on the steeringwheel lever to turn on the parking lights.
Lighting ring in the parking light position.
Turn the lighting ring to the position to
turn on the parking lights (the license plate light- ing will also illuminate). Canadian models: If the ignition is in the II posi-
tion or the engine is running, the daytime running lights will illuminate instead of the front parkinglights. With the lighting ring in this position, theparking lights will remain on regardless of whatposition the ignition is in. US models: When
mode is selected, the
daytime running lights can be deactivated in the center display. The parking lights will also be deactivated. In weak daylight or dark conditions,the parking lights and low beams will be illumi-nated. In dark conditions, the rear parking lights also illuminate when the tailgate is opened to alert fol-lowing traffic. This happens regardless of whatposition the lighting ring or ignition is in.
Related information
•
Lighting panel and controls (p. 150)
• Ignition modes (p. 401)
• Replacing daytime running lights/front park-ing light bulbs (p. 590)
Daytime running lights The vehicle has sensors that detect ambient lighting conditions. With the lighting ring in the
position, the daytime running lights will
always be activated when the ignition is in mode II or when the engine is running. In weak daylight
or dark conditions, the headlights automaticallyswitch to low beams.
Lighting ring in AUTO position.
Page 155 of 660
LIGHTING
}}
* Option/accessory.153
With the steering wheel lever's lighting ring in the
position, the daytime running lights (DRL
1
)
will illuminate when the vehicle is driven in day- light conditions. The headlights will switch auto-matically from daytime running lights to lowbeams in weak daylight or dark conditions. Theheadlights will also switch to low beams if the front fog lights * and/or rear fog light are acti-
vated. US models : When
mode is selected, the
daytime running lights can be deactivated in the center display. The parking lights will also bedeactivated. In weak daylight or dark conditions,the parking lights and low beams will be illumi-nated. In the US: With the lighting ring in the
or
position, the daytime running lights will be
off .
In Canada : With the lighting ring in the
or
position, the daytime running lights will be
on.
NOTE
Volvo recommends use of Daytime Running Lights in the US. Its use is mandatory in Can-ada.
WARNING
The system is an energy saving aid – it cannot in all situations determine when the daylight istoo weak or not strong enough, e.g. whenthere is fog or rain. The driver is always responsible for driving the vehicle with lighting that is safe for the trafficconditions and as specified by applicable traf-fic regulations.
Related information
• Lighting panel and controls (p. 150)
• Ignition modes (p. 401)
• Low beams (p. 153)
• Replacing daytime running lights/front park- ing light bulbs (p. 590)
Low beams
When driving with the lighting ring in the
position, low beam will be automatically acti- vated in weak daylight or dark conditions, whenthe ignition is in II position or when the engine is
running.
Lighting ring in AUTO position.
With the lighting ring in the position, the
low beams will be automatically activated if:
• the front fog lights
* are activated
• the rear fog light is activated
• the rear and front fog lights are activated.
With the lighting ring in the
position, the
low beams will always be activated when the igni- tion is in mode II or when the engine is running.
1
Daytime Running Lights
Page 156 of 660
||
LIGHTING
154
Tunnel detection
The vehicle will detect if it enters a tunnel and shift from daytime running lights to low beams. Note that the left-hand steering wheel lever must be in
position for tunnel detection to work.
Related information
•Lighting panel and controls (p. 150)
• Ignition modes (p. 401)
• Daytime running lights (p. 152)
• Replacing the low beam headlight bulbs (p. 589)
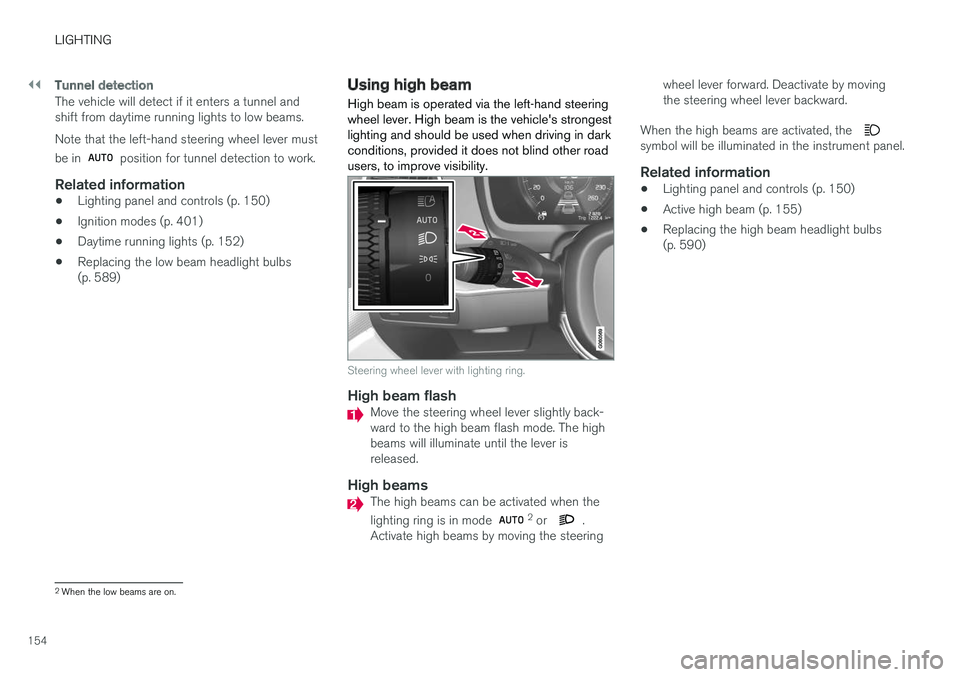
Using high beam High beam is operated via the left-hand steering wheel lever. High beam is the vehicle's strongestlighting and should be used when driving in darkconditions, provided it does not blind other roadusers, to improve visibility.
Steering wheel lever with lighting ring.
High beam flashMove the steering wheel lever slightly back- ward to the high beam flash mode. The highbeams will illuminate until the lever isreleased.
High beamsThe high beams can be activated when the lighting ring is in mode 2
or .
Activate high beams by moving the steering wheel lever forward. Deactivate by moving the steering wheel lever backward.
When the high beams are activated, the
symbol will be illuminated in the instrument panel.
Related information
• Lighting panel and controls (p. 150)
• Active high beam (p. 155)
• Replacing the high beam headlight bulbs (p. 590)
2
When the low beams are on.
Page 158 of 660
||
LIGHTING
156
Related information
•Lighting panel and controls (p. 150)
• Using high beam (p. 154)
• Camera limitations (p. 324)
Using turn signals
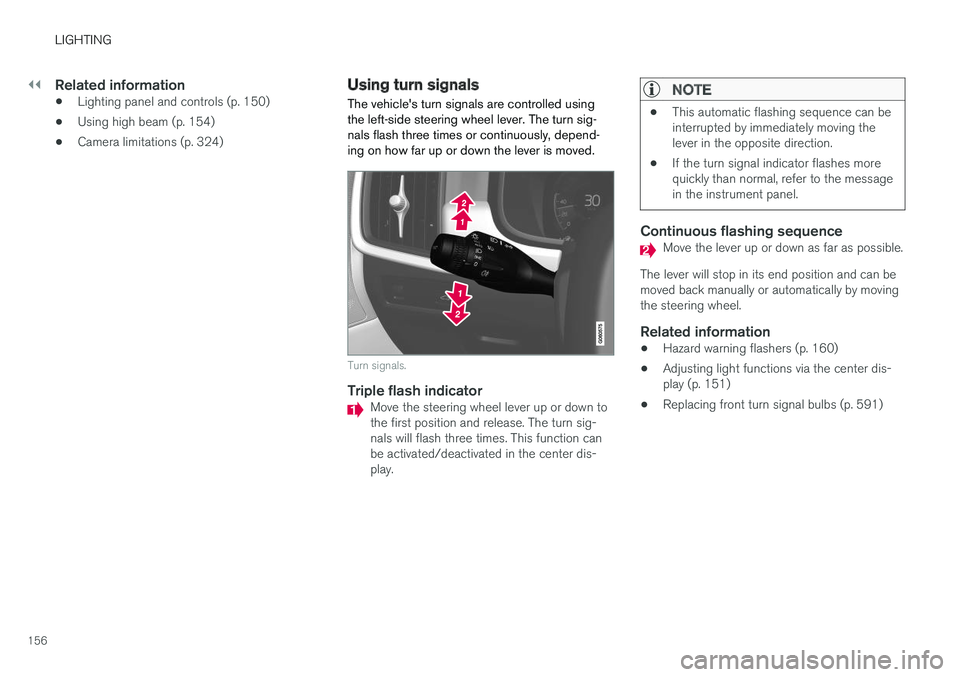
The vehicle's turn signals are controlled using the left-side steering wheel lever. The turn sig-nals flash three times or continuously, depend-ing on how far up or down the lever is moved.
Turn signals.
Triple flash indicatorMove the steering wheel lever up or down to the first position and release. The turn sig-nals will flash three times. This function canbe activated/deactivated in the center dis-play.
NOTE
• This automatic flashing sequence can be interrupted by immediately moving thelever in the opposite direction.
• If the turn signal indicator flashes morequickly than normal, refer to the messagein the instrument panel.
Continuous flashing sequenceMove the lever up or down as far as possible.
The lever will stop in its end position and can be moved back manually or automatically by movingthe steering wheel.
Related information
• Hazard warning flashers (p. 160)
• Adjusting light functions via the center dis-play (p. 151)
• Replacing front turn signal bulbs (p. 591)
Page 160 of 660
||
LIGHTING
* Option/accessory.
158 ignition or when the lighting ring is turned to the
position.
NOTE
Regulations concerning fog light use vary from country to country.
Cornering illumination
*The front fog lamps can include the cornering lights function, which temporarily illuminates thearea diagonally in front of the car in the directionthe steering wheel is turned on a sharp bend, orin the direction shown by the direction indicators. The function is activated in weak daylight or dark conditions when the lighting ring is in
or
mode and the vehicle speed is less than
about 30 km/h (about 20 mph). Both cornering illumination are also illuminated as a complement to the taillights when reversing. The function is activated as the default factory setting and can be activated and deactivatedusing the center display.
Related information
• Lighting panel and controls (p. 150)
• Ignition modes (p. 401)
• Rear fog light (p. 158)
• Active Bending Lights
* (p. 157) •
Adjusting light functions via the center dis-play (p. 151)
Rear fog light
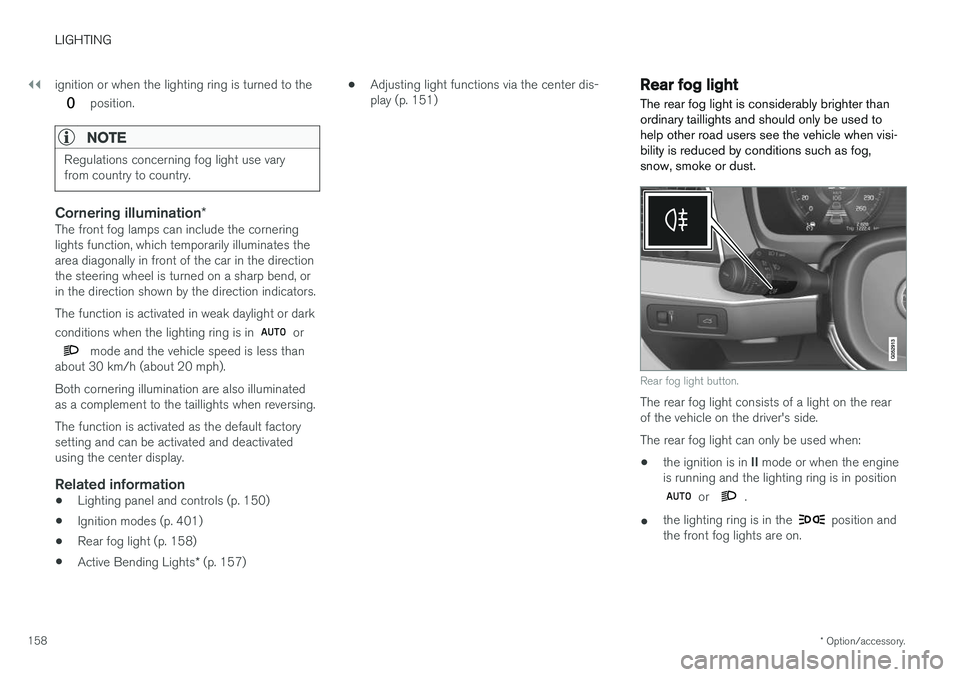
The rear fog light is considerably brighter than ordinary taillights and should only be used tohelp other road users see the vehicle when visi-bility is reduced by conditions such as fog,snow, smoke or dust.
Rear fog light button.
The rear fog light consists of a light on the rear of the vehicle on the driver's side. The rear fog light can only be used when:
• the ignition is in
II mode or when the engine
is running and the lighting ring is in position
or .
• the lighting ring is in the
position and
the front fog lights are on.