steering wheel controls VOLVO XC60 2018 Owner´s Manual
[x] Cancel search | Manufacturer: VOLVO, Model Year: 2018, Model line: XC60, Model: VOLVO XC60 2018Pages: 660, PDF Size: 11.77 MB
Page 220 of 660
CLIMATE CONTROL
* Option/accessory.
218
Activating and deactivating
automatic steering wheel heating *
The steering wheel can be heated for added comfort in cold weather.
Steering wheel heating can be set to automati- cally activate when the engine is started. Whenset to automatically activate, heating will beturned on at low ambient temperatures. 1. Tap
Settings in the Top view in the center
display.
2. Tap
Climate.
3. Select
Auto Steering Wheel Heating
Level to activate/deactivate automatic start
of heated steering wheel.
4. Select
Low, Medium or High to select level
after the function has been activated.
Related information
• Activating and deactivating the heated steer- ing wheel
* (p. 217)
Activating auto climate control
If auto climate control is activated, several cli- mate system functions are controlled automati-cally.
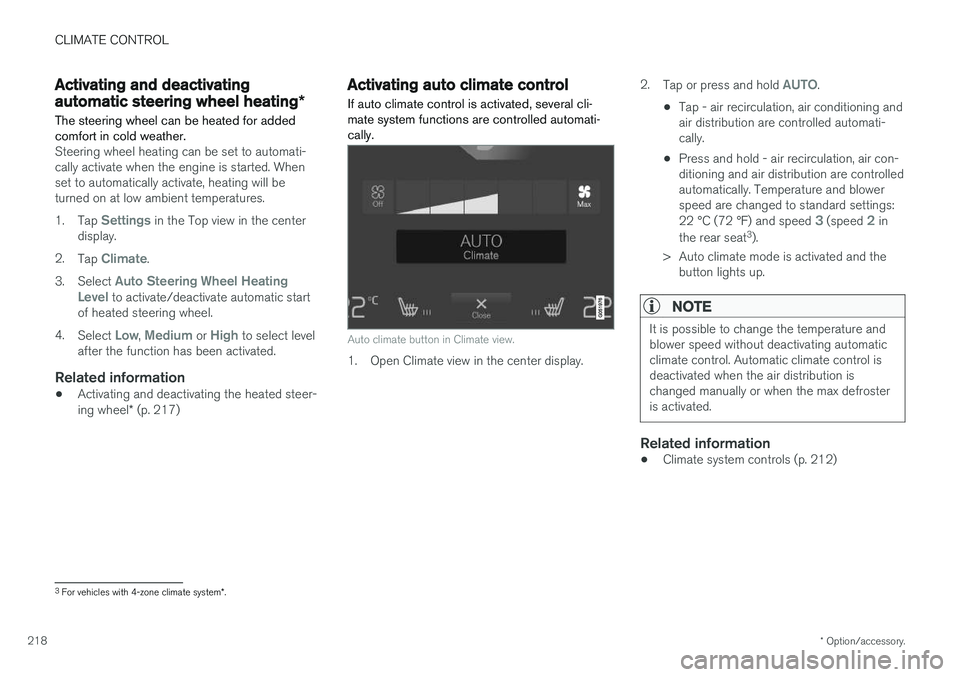
Auto climate button in Climate view.
1. Open Climate view in the center display. 2.
Tap or press and hold
AUTO.
• Tap - air recirculation, air conditioning and air distribution are controlled automati-cally.
• Press and hold - air recirculation, air con-ditioning and air distribution are controlledautomatically. Temperature and blowerspeed are changed to standard settings: 22 °C (72 °F) and speed
3 (speed 2 in
the rear seat 3
).
> Auto climate mode is activated and the button lights up.
NOTE
It is possible to change the temperature and blower speed without deactivating automaticclimate control. Automatic climate control isdeactivated when the air distribution ischanged manually or when the max defrosteris activated.
Related information
• Climate system controls (p. 212)
3
For vehicles with 4-zone climate system *.
Page 294 of 660
DRIVER SUPPORT
* Option/accessory.
292
Managing Adaptive Cruise Controlspeed
Adaptive Cruise Control (ACC 45
) can be set to
various speeds.
Setting/changing set speed
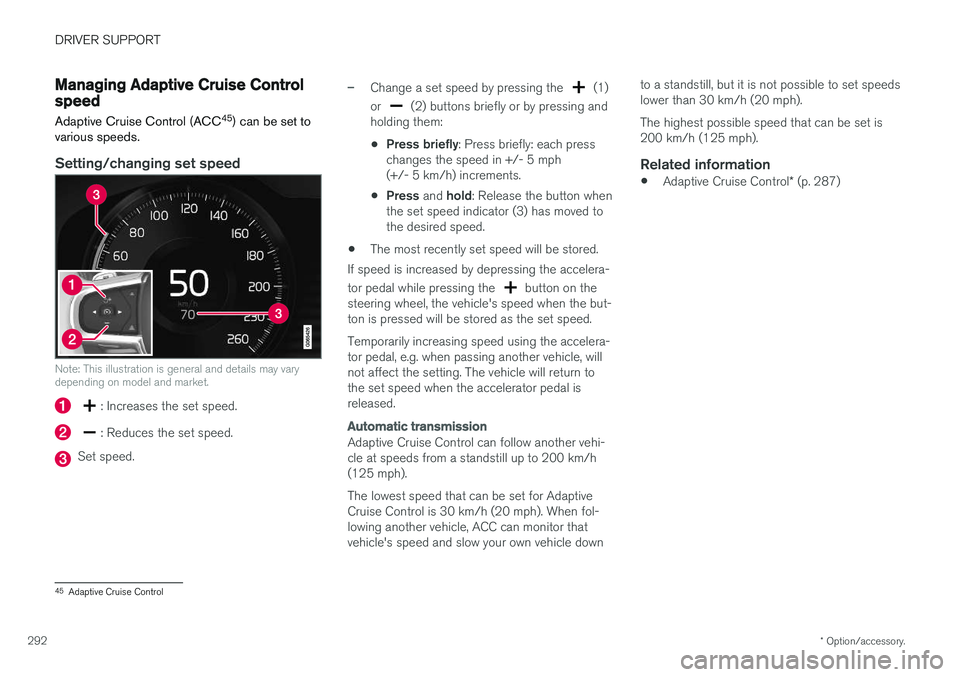
Note: This illustration is general and details may vary depending on model and market.
: Increases the set speed.
: Reduces the set speed.
Set speed.
–Change a set speed by pressing the (1)
or
(2) buttons briefly or by pressing and
holding them:
• Press briefly
: Press briefly: each press
changes the speed in +/- 5 mph (+/- 5 km/h) increments.
• Press
and hold: Release the button when
the set speed indicator (3) has moved tothe desired speed.
• The most recently set speed will be stored.
If speed is increased by depressing the accelera- tor pedal while pressing the
button on the
steering wheel, the vehicle's speed when the but- ton is pressed will be stored as the set speed. Temporarily increasing speed using the accelera- tor pedal, e.g. when passing another vehicle, willnot affect the setting. The vehicle will return tothe set speed when the accelerator pedal isreleased.
Automatic transmission
Adaptive Cruise Control can follow another vehi- cle at speeds from a standstill up to 200 km/h(125 mph). The lowest speed that can be set for Adaptive Cruise Control is 30 km/h (20 mph). When fol-lowing another vehicle, ACC can monitor thatvehicle's speed and slow your own vehicle down to a standstill, but it is not possible to set speedslower than 30 km/h (20 mph). The highest possible speed that can be set is 200 km/h (125 mph).
Related information
•
Adaptive Cruise Control
* (p. 287)
45
Adaptive Cruise Control
Page 307 of 660
DRIVER SUPPORT
}}
305
When the vehicle is approaching an off-ramp or a fork in the road, the driver should steer towardthe desired lane to indicate to Pilot Assist thedesired direction of travel.
Pilot Assist strives to keep the vehicle
in the center of the lane
When Pilot Assist provides steering assistance, itstrives to position the vehicle in the center of thelane between the lane markings. For the smooth-est driving experience possible, the driver shouldpermit the vehicle to find the optimal positioning.The driver should check that the vehicle is posi-tioned safely in the lane and can always adjustthe vehicle's position by applying more force tothe steering wheel. If Pilot Assist does not position the vehicle appro- priately in the lane, the driver should turn off PilotAssist or switch to Adaptive Cruise Control.
Overview
Controls
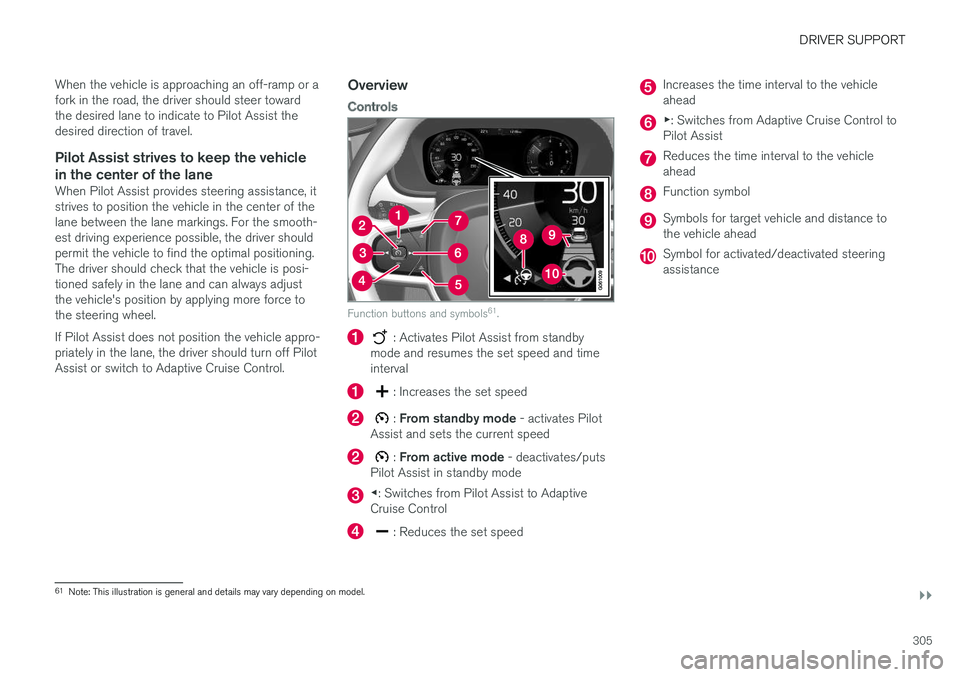
Function buttons and symbols 61
.
: Activates Pilot Assist from standby
mode and resumes the set speed and time interval
: Increases the set speed
: From standby mode - activates Pilot
Assist and sets the current speed
: From active mode - deactivates/puts
Pilot Assist in standby mode
◀ : Switches from Pilot Assist to Adaptive
Cruise Control
: Reduces the set speed
Increases the time interval to the vehicle ahead
▶ : Switches from Adaptive Cruise Control to
Pilot Assist
Reduces the time interval to the vehicle ahead
Function symbol
Symbols for target vehicle and distance to the vehicle ahead
Symbol for activated/deactivated steering assistance
61 Note: This illustration is general and details may vary depending on model.
Page 494 of 660
AUDIO, MEDIA AND INTERNET
* Option/accessory.
492
Tips for using Android Auto *
Here are some useful tips for when you use Android Auto.
• Ensure that your apps are updated.
• When starting the car, wait until the center display has started, connect the phone andthen open Android Auto from the app view.
• In the event of problems with Android Auto,disconnect your Android phone from theUSB port and then reconnect via USB. Oth-erwise, try closing the app on the phone andthen restarting the app.
• When a phone is connected to Android Autoit is still possible to playback media viaBluetooth to another media player. TheBluetooth function is on when Android Autois used.
Related information
•
Android Auto
* (p. 490)
Phone
A phone equipped with Bluetooth can be wire- lessly connected to the vehicle's integratedhands-free system.
The audio and media system offers hands-free functionality for remotely controlling a number ofthe phone's features. The phone's integratedcontrols can also be used, even when it is con-nected to the vehicle. When the phone has been paired and connected to the vehicle, it can be used as an Internet con-nection or to make or receive calls, send orreceive text messages or wirelessly play music.
The phone is controlled fromthe center display but the Appmenu (accessed using theright-side steering wheel key-pad) and voice commands canalso be used to control certainfunctions.
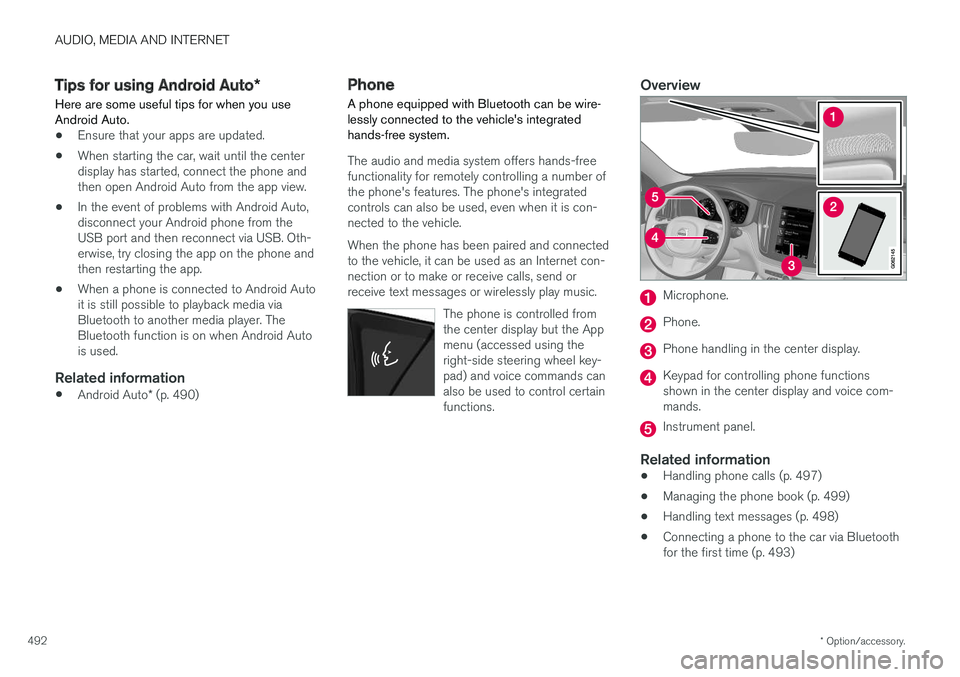
Overview
Microphone.
Phone.
Phone handling in the center display.
Keypad for controlling phone functions shown in the center display and voice com-mands.
Instrument panel.
Related information
•Handling phone calls (p. 497)
• Managing the phone book (p. 499)
• Handling text messages (p. 498)
• Connecting a phone to the car via Bluetooth for the first time (p. 493)
Page 605 of 660
MAINTENANCE AND SERVICE
}}
* Option/accessory.603
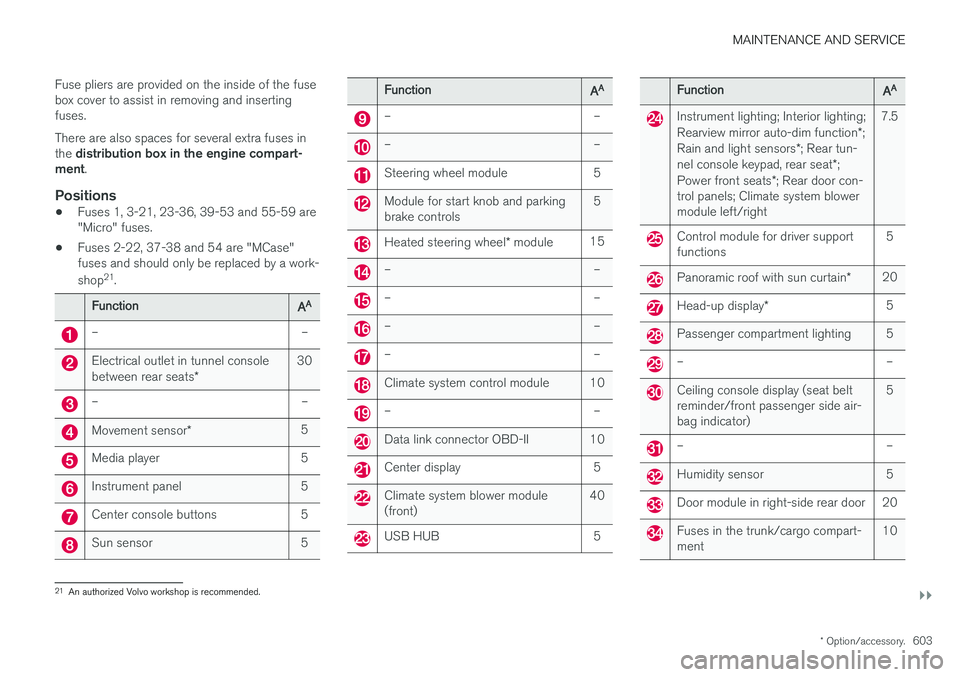
Fuse pliers are provided on the inside of the fuse box cover to assist in removing and insertingfuses. There are also spaces for several extra fuses in the
distribution box in the engine compart-
ment .
Positions
•Fuses 1, 3-21, 23-36, 39-53 and 55-59 are "Micro" fuses.
• Fuses 2-22, 37-38 and 54 are "MCase"fuses and should only be replaced by a work- shop 21
.
FunctionAA
– –
Electrical outlet in tunnel console between rear seats * 30
– –
Movement sensor
* 5
Media player 5
Instrument panel 5
Center console buttons 5
Sun sensor 5
FunctionAA
– –
– –
Steering wheel module 5
Module for start knob and parking brake controls 5
Heated steering wheel
* module 15
– –
– –
– –
– –
Climate system control module 10
– –
Data link connector OBD-II 10
Center display 5
Climate system blower module (front) 40
USB HUB 5
FunctionAA
Instrument lighting; Interior lighting; Rearview mirror auto-dim function
*;
Rain and light sensors *; Rear tun-
nel console keypad, rear seat *;
Power front seats *; Rear door con-
trol panels; Climate system blower module left/right 7.5
Control module for driver support functions
5
Panoramic roof with sun curtain
*20
Head-up display
* 5
Passenger compartment lighting 5
– –
Ceiling console display (seat belt reminder/front passenger side air-bag indicator) 5
– –
Humidity sensor 5
Door module in right-side rear door 20
Fuses in the trunk/cargo compart- ment
10
21
An authorized Volvo workshop is recommended.
Page 611 of 660
MAINTENANCE AND SERVICE
}}
609
Cleaning the interiorOnly use cleaning agents and car care products recommended by Volvo. Clean regularly andtreat stains immediately for best results. It isimportant to vacuum before using a cleaningagent.
CAUTION
• Some colored clothing (for example, dark jeans and suede garments) may stain theupholstery. If this occurs, it is important toclean and treat these parts of the uphols-tery as soon as possible.
• Never use strong solvents such aswasher fluid, gasoline, mineral spirit orconcentrated alcohol to clean the interioras this can damage the upholstery aswell as other interior materials.
• Never spray cleaning agent directly ontocomponents that have electrical buttonsand controls. Wipe instead with a dampcloth with cleaning agent.
• Sharp objects and Velcro can damagethe car's textile upholstery.
Related information
• Cleaning the center display (p. 609)
• Cleaning fabric upholstery and ceiling liner (p. 611)
• Cleaning the seat belt (p. 611) •
Cleaning floor mats and inlay mats (p. 611)
• Cleaning leather upholstery (p. 612)
• Cleaning the leather steering wheel(p. 613)
• Cleaning interior plastic, metal and wood sur-faces (p. 614)
Cleaning the center display
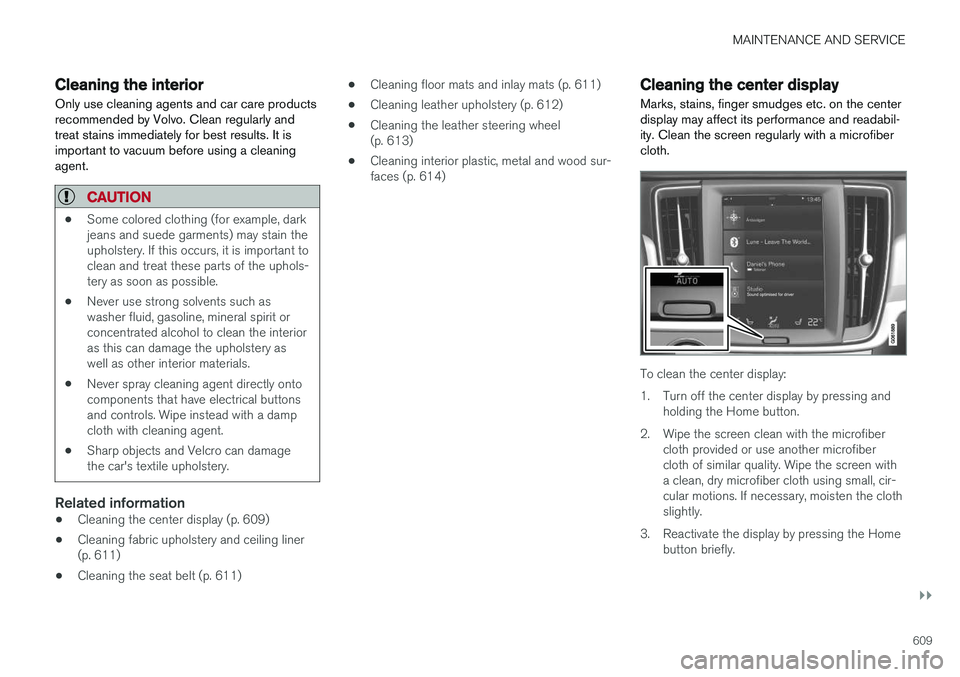
Marks, stains, finger smudges etc. on the center display may affect its performance and readabil-ity. Clean the screen regularly with a microfibercloth.
To clean the center display:
1. Turn off the center display by pressing and holding the Home button.
2. Wipe the screen clean with the microfiber cloth provided or use another microfiber cloth of similar quality. Wipe the screen witha clean, dry microfiber cloth using small, cir-cular motions. If necessary, moisten the clothslightly.
3. Reactivate the display by pressing the Home button briefly.
Page 650 of 660
INDEX
648
H
Handbrake 405, 406
Hand wash 615Hard diskspace 510
Hazard warning flashers 160
HDC 431
HD radio 466
Head restraint 195
Head-up display 140 activate and deactivate 142
cleaning 610
replacing windshield 582
settings 142
Heated washer nozzles 177 Heating Seats 214, 215
steering wheel 217, 218
windows 221, 222
Height adjustment 426, 429
high beams 154, 155
High engine temperature 440
Hill Descent Control 430, 431, 432 activate with function button 432
Hill Start Assist 410 Hill Start Assist (HSA) 410
Hoisting the vehicle 579 HomeLink ® 450
programming 451
use 452
HomeLink ® remote control
programmable 450
Home safe lighting 160
Honk 196
Hood, opening 581
Horn 196
I
IAQS (Interior Air Quality System) 204
IC (Inflatable Curtain) 60
ID, Volvo 26
Identification number 38
Ignition mode 401, 402
Immobilizer 244 Electronic immobilizer 244
Indicator symbols 91
Individual drive mode 417
Infant seats 67
Inflatable curtain 60
Inflatable Curtain 60
Inflating tires 549 Inflation pressure adjusting 530
Checking 529
recommended 531
Inflation pressure monitoring 531 action 535
Status 534
Inflation pressure table 641
Information display 80, 84
Infotainment (Audio and media) 458
Instrument cluster 80 settings 84
Instrument illumination 162
Instrument lighting 162 Instrument panel App menu 100, 101
messages 102
Instruments and controls 78 Instruments overview left-hand drive vehicle 78
IntelliSafe driver support 28
Interior Air Quality System 204
Intermittent wiping 176
Internet, see Internet-connected vehicle 501