VOLVO XC60 T8 2018 Owner´s Manual
Manufacturer: VOLVO, Model Year: 2018, Model line: XC60 T8, Model: VOLVO XC60 T8 2018Pages: 674, PDF Size: 11.93 MB
Page 581 of 674
LOADING, STORAGE AND PASSENGER COMPARTMENT
* Option/accessory.579
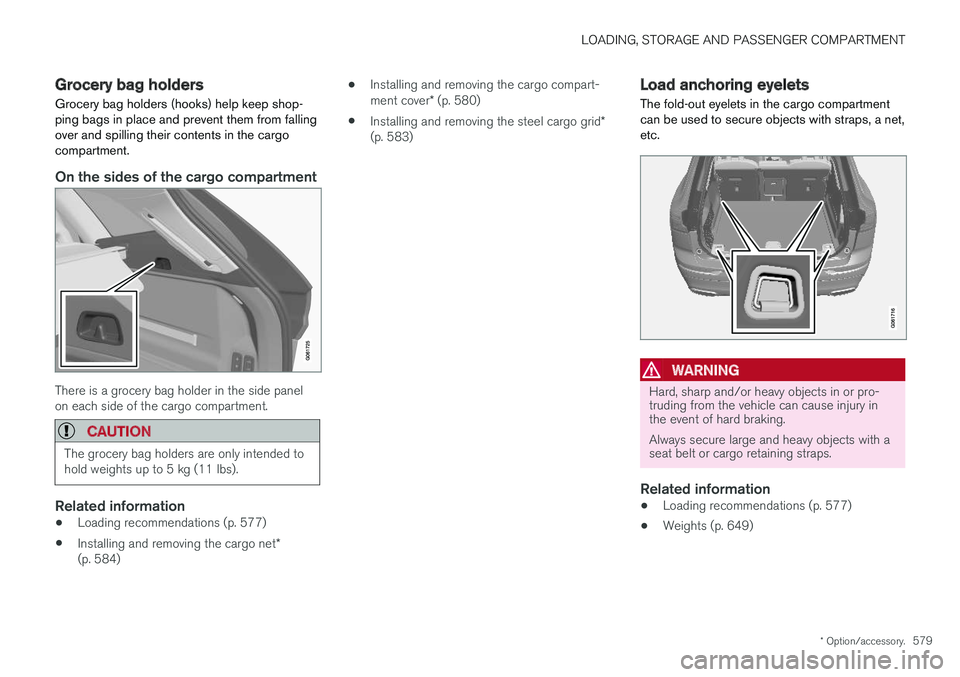
Grocery bag holders Grocery bag holders (hooks) help keep shop- ping bags in place and prevent them from fallingover and spilling their contents in the cargocompartment.
On the sides of the cargo compartment
There is a grocery bag holder in the side panel on each side of the cargo compartment.
CAUTION
The grocery bag holders are only intended to hold weights up to 5 kg (11 lbs).
Related information
•Loading recommendations (p. 577)
• Installing and removing the cargo net
*
(p. 584) •
Installing and removing the cargo compart- ment cover
* (p. 580)
• Installing and removing the steel cargo grid
*
(p. 583)
Load anchoring eyelets
The fold-out eyelets in the cargo compartment can be used to secure objects with straps, a net,etc.
WARNING
Hard, sharp and/or heavy objects in or pro- truding from the vehicle can cause injury inthe event of hard braking. Always secure large and heavy objects with a seat belt or cargo retaining straps.
Related information
• Loading recommendations (p. 577)
• Weights (p. 649)
Page 582 of 674
LOADING, STORAGE AND PASSENGER COMPARTMENT
* Option/accessory.
580
Rear seat ski hatch
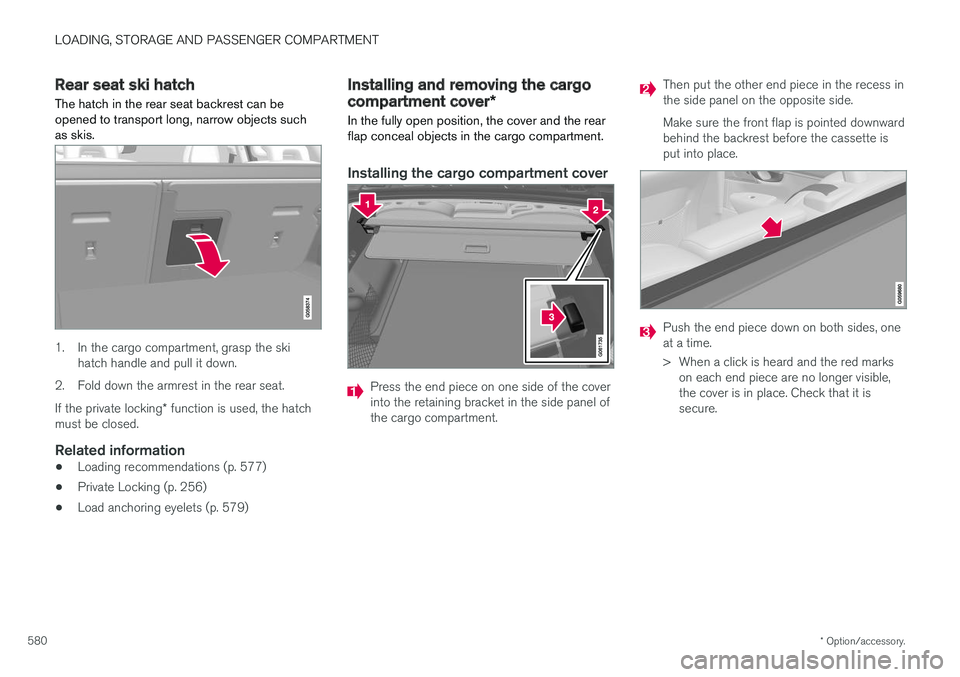
The hatch in the rear seat backrest can be opened to transport long, narrow objects suchas skis.
1. In the cargo compartment, grasp the ski hatch handle and pull it down.
2. Fold down the armrest in the rear seat. If the private locking * function is used, the hatch
must be closed.
Related information
• Loading recommendations (p. 577)
• Private Locking (p. 256)
• Load anchoring eyelets (p. 579)
Installing and removing the cargo
compartment cover
*
In the fully open position, the cover and the rear flap conceal objects in the cargo compartment.
Installing the cargo compartment cover
Press the end piece on one side of the cover into the retaining bracket in the side panel ofthe cargo compartment.
Then put the other end piece in the recess in the side panel on the opposite side. Make sure the front flap is pointed downward behind the backrest before the cassette isput into place.
Push the end piece down on both sides, one at a time.
> When a click is heard and the red marks on each end piece are no longer visible, the cover is in place. Check that it issecure.
Page 583 of 674
LOADING, STORAGE AND PASSENGER COMPARTMENT
* Option/accessory.581
Fitting the tailgate flap
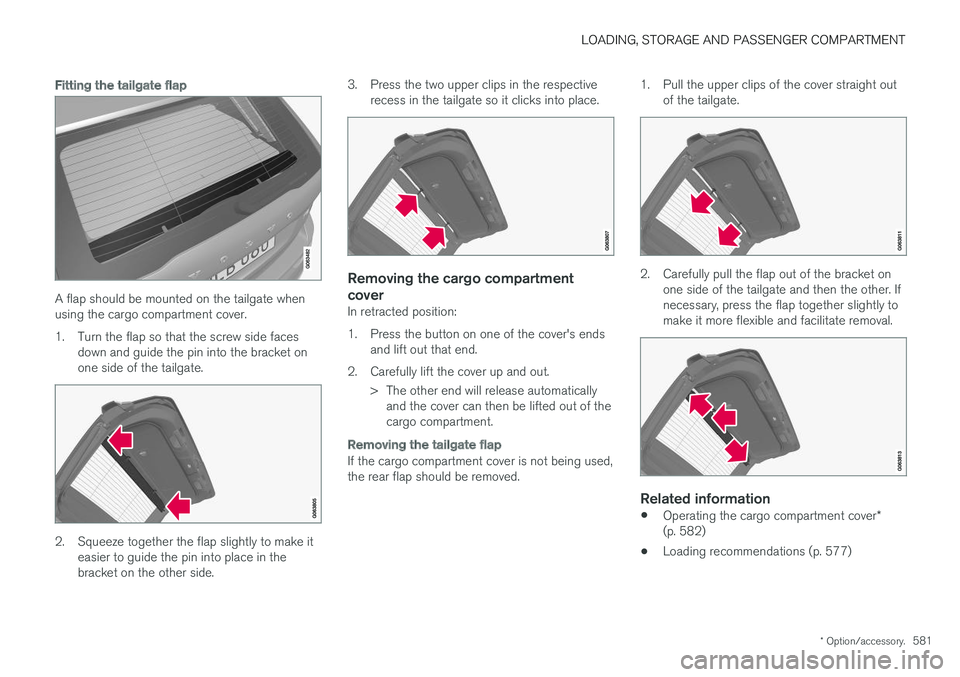
A flap should be mounted on the tailgate when using the cargo compartment cover.
1. Turn the flap so that the screw side faces
down and guide the pin into the bracket on one side of the tailgate.
2. Squeeze together the flap slightly to make iteasier to guide the pin into place in the bracket on the other side. 3. Press the two upper clips in the respective
recess in the tailgate so it clicks into place.
Removing the cargo compartment cover
In retracted position:
1. Press the button on one of the cover's endsand lift out that end.
2. Carefully lift the cover up and out. > The other end will release automaticallyand the cover can then be lifted out of the cargo compartment.
Removing the tailgate flap
If the cargo compartment cover is not being used, the rear flap should be removed. 1. Pull the upper clips of the cover straight out
of the tailgate.
2. Carefully pull the flap out of the bracket onone side of the tailgate and then the other. If necessary, press the flap together slightly tomake it more flexible and facilitate removal.
Related information
• Operating the cargo compartment cover
*
(p. 582)
• Loading recommendations (p. 577)
Page 584 of 674
LOADING, STORAGE AND PASSENGER COMPARTMENT
* Option/accessory.
582
Operating the cargo compartment
cover *
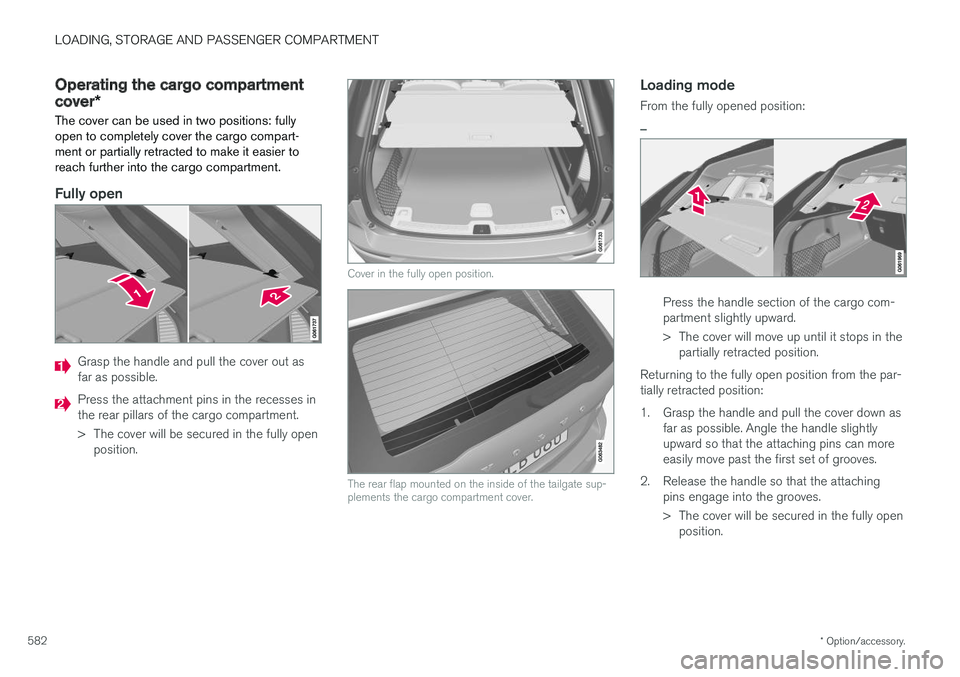
The cover can be used in two positions: fully open to completely cover the cargo compart-ment or partially retracted to make it easier toreach further into the cargo compartment.
Fully open
Grasp the handle and pull the cover out as far as possible.
Press the attachment pins in the recesses in the rear pillars of the cargo compartment.
> The cover will be secured in the fully open position.
Cover in the fully open position.
The rear flap mounted on the inside of the tailgate sup- plements the cargo compartment cover.
Loading mode
From the fully opened position:
–
Press the handle section of the cargo com- partment slightly upward.
> The cover will move up until it stops in the partially retracted position.
Returning to the fully open position from the par- tially retracted position:
1. Grasp the handle and pull the cover down as far as possible. Angle the handle slightly upward so that the attaching pins can moreeasily move past the first set of grooves.
2. Release the handle so that the attaching pins engage into the grooves.
> The cover will be secured in the fully openposition.
Page 585 of 674
LOADING, STORAGE AND PASSENGER COMPARTMENT
}}
* Option/accessory.583
CAUTION
When in the loading position, the cargo com- partment cover can obstruct visibility to therear. Make sure that the cargo compartmentcover is fully extended or fully retracted duringdriving.
Retracting the cover
1. From the fully opened position:
Lift the cover's handle and pull it rearward to release the cover's attaching pins from thegrooves. Let the cover retract. From the partially retracted position: Grasp the handle and pull the cover out of the groves to the fully open position. Lift thehandle and pull it rearward to release thecover's attaching pins from the grooves. Letthe cover retract.
2. Let the cover retract with its attaching pins above the side panels until it stops in thefully retracted position.
Related information
• Installing and removing the cargo compart- ment cover
* (p. 580)
Installing and removing the steel
cargo grid *
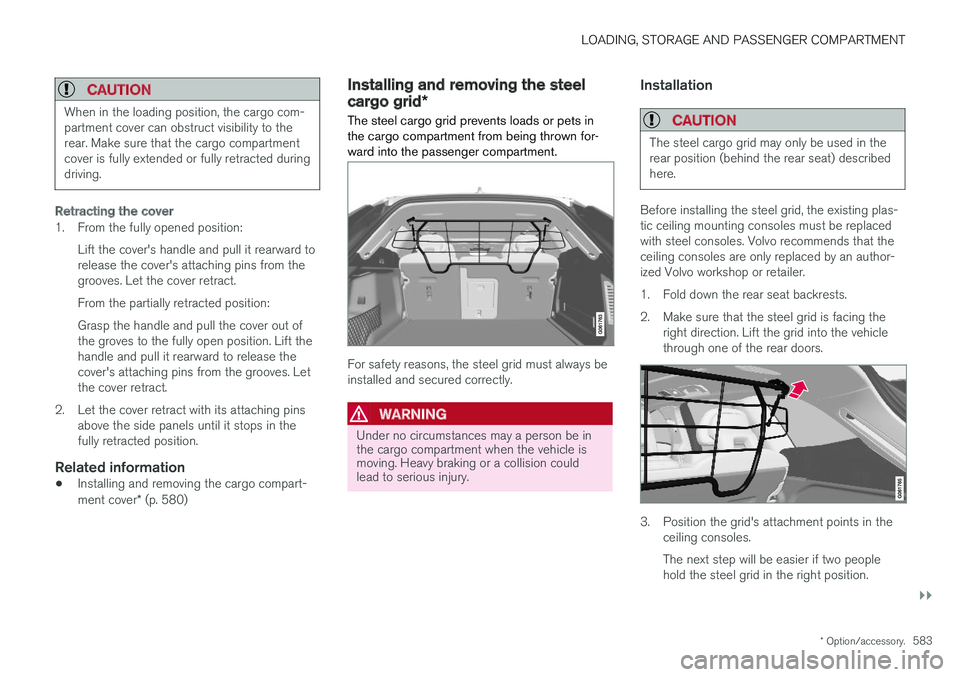
The steel cargo grid prevents loads or pets in the cargo compartment from being thrown for-ward into the passenger compartment.
For safety reasons, the steel grid must always be installed and secured correctly.
WARNING
Under no circumstances may a person be in the cargo compartment when the vehicle ismoving. Heavy braking or a collision couldlead to serious injury.
Installation
CAUTION
The steel cargo grid may only be used in the rear position (behind the rear seat) describedhere.
Before installing the steel grid, the existing plas- tic ceiling mounting consoles must be replacedwith steel consoles. Volvo recommends that theceiling consoles are only replaced by an author-ized Volvo workshop or retailer.
1. Fold down the rear seat backrests.
2. Make sure that the steel grid is facing the right direction. Lift the grid into the vehicle through one of the rear doors.
3. Position the grid's attachment points in theceiling consoles. The next step will be easier if two people hold the steel grid in the right position.
Page 586 of 674
||
LOADING, STORAGE AND PASSENGER COMPARTMENT
* Option/accessory.
584
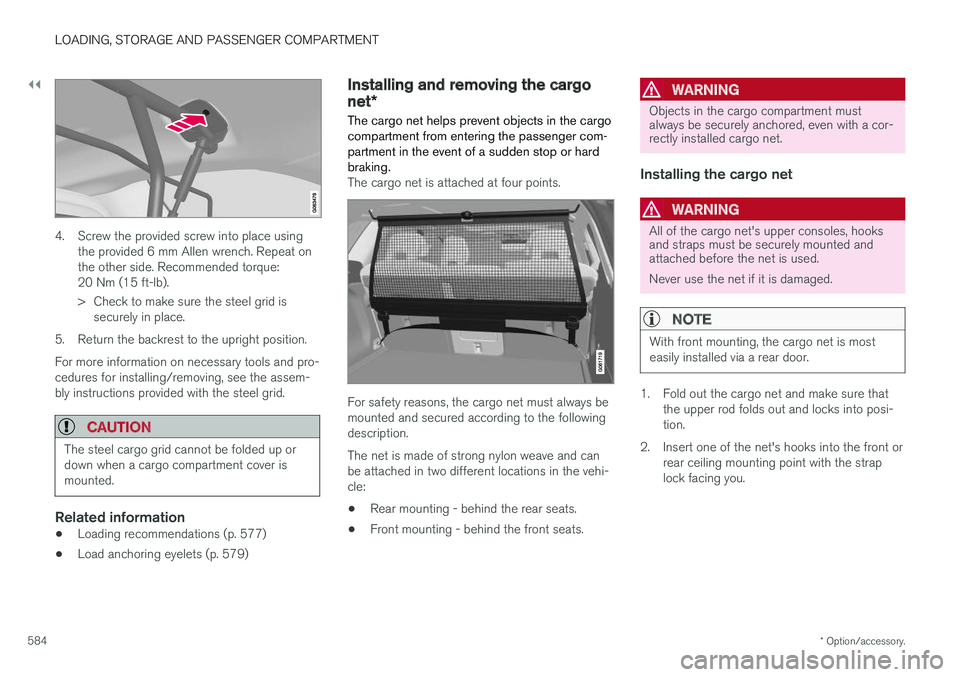
4. Screw the provided screw into place using
the provided 6 mm Allen wrench. Repeat on the other side. Recommended torque:20 Nm (15 ft-lb).
> Check to make sure the steel grid issecurely in place.
5. Return the backrest to the upright position. For more information on necessary tools and pro- cedures for installing/removing, see the assem-bly instructions provided with the steel grid.
CAUTION
The steel cargo grid cannot be folded up or down when a cargo compartment cover ismounted.
Related information
• Loading recommendations (p. 577)
• Load anchoring eyelets (p. 579)
Installing and removing the cargo
net
*
The cargo net helps prevent objects in the cargo compartment from entering the passenger com-partment in the event of a sudden stop or hardbraking.
The cargo net is attached at four points.
For safety reasons, the cargo net must always be mounted and secured according to the followingdescription. The net is made of strong nylon weave and can be attached in two different locations in the vehi-cle:
• Rear mounting - behind the rear seats.
• Front mounting - behind the front seats.
WARNING
Objects in the cargo compartment must always be securely anchored, even with a cor-rectly installed cargo net.
Installing the cargo net
WARNING
All of the cargo net's upper consoles, hooks and straps must be securely mounted andattached before the net is used. Never use the net if it is damaged.
NOTE
With front mounting, the cargo net is most easily installed via a rear door.
1. Fold out the cargo net and make sure that
the upper rod folds out and locks into posi- tion.
2. Insert one of the net's hooks into the front or rear ceiling mounting point with the straplock facing you.
Page 587 of 674
LOADING, STORAGE AND PASSENGER COMPARTMENT
}}
585
3. Insert the other upper hook into the ceiling
mounting point on the opposite side. The telescopic spring-loaded hooks make mount-ing easier. Make sure that the net's hooks are pushed forward as far as possible into their respec-tive mounting points. 4. Rear mounting: With the cargo net hooked
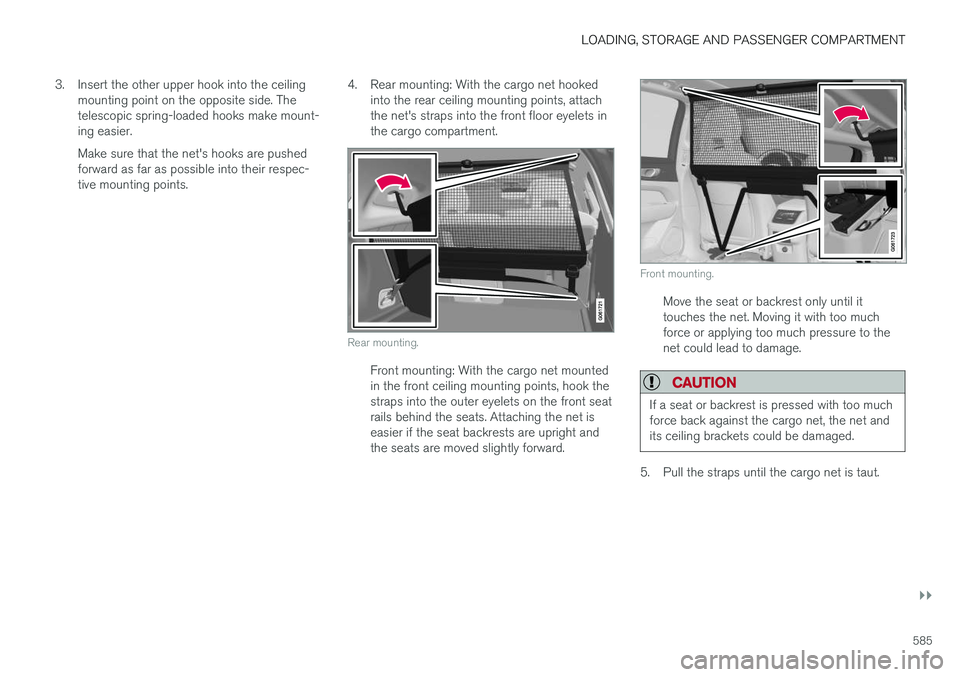
into the rear ceiling mounting points, attachthe net's straps into the front floor eyelets inthe cargo compartment.
Rear mounting.
Front mounting: With the cargo net mounted in the front ceiling mounting points, hook thestraps into the outer eyelets on the front seatrails behind the seats. Attaching the net iseasier if the seat backrests are upright andthe seats are moved slightly forward.
Front mounting.
Move the seat or backrest only until it touches the net. Moving it with too muchforce or applying too much pressure to thenet could lead to damage.
CAUTION
If a seat or backrest is pressed with too much force back against the cargo net, the net andits ceiling brackets could be damaged.
5. Pull the straps until the cargo net is taut.
Page 588 of 674
||
LOADING, STORAGE AND PASSENGER COMPARTMENT
586
Removing the cargo netThe cargo net can be easily removed and folded up.
1. Loosen the cargo net by pressing the buttonon the strap locks on each side and pulling to allow some slack.
2. Press in the catches and release both of the strap hooks.
3. Unhook the upper hooks and remove the net from the ceiling mounting points.
4. Press the red button on the rod so that it can be folded. Fold and roll up the net. Store thenet in its case.
Related information
• Loading recommendations (p. 577)
• Load anchoring eyelets (p. 579)
Page 589 of 674
M A I N T E N A N C E A N D S E R V I C E
Page 590 of 674
MAINTENANCE AND SERVICE
588
Volvo's service program
To keep the vehicle as safe and reliable as pos- sible, follow the Volvo service schedule speci-fied in the Warranty and Maintenance RecordsInformation booklet.
Volvo recommends having an authorized Volvo workshop perform service and maintenance.Volvo workshops have the staff, service literatureand special tools to guarantee the highest qualityof service.
CAUTION
To ensure the Volvo warranty is not invalida- ted, check and follow the Service and War-ranty Booklet.
Service and repairsService the vehicle regularly. Follow Volvo's rec- ommended service intervals. Detailed inspection and repairs may only be per- formed by an authorized workshop.
WARNING
Do not make any repairs on this vehicle your- self. Electrical cables and/or components thathave come loose may only be corrected by anauthorized workshop – an authorized Volvoworkshop is recommended.
IntroductionThe maintenance services contain several checks that require special instruments and tools andtherefore must be performed by a qualified tech-nician. To keep your Volvo in top condition, spec-ify time-tested and proven Genuine Volvo Partsand Accessories.
The Federal Clean Air Act - U.S.
The Federal Clean Air Act requires vehicle manu- facturers to furnish written instructions to the ulti-mate purchaser to assure the proper servicingand function of the components that controlemissions. These services, which are listed in the"Warranty and Service Records Information"booklet, are not covered by the warranty. You willbe required to pay for labor and material used.
Maintenance
Your Volvo passed several major inspections before it was delivered to you, in accordance withVolvo specifications. The maintenance proce-dures outlined in the Warranty and ServiceRecords Information booklet, many of which willpositively affect your vehicle's emissions, shouldbe performed as indicated. It is recommendedthat receipts for vehicle emission maintenance beretained in case questions arise concerningmaintenance. Inspection and maintenance shouldalso be performed anytime a malfunction isobserved or suspected.
Applicable warranties - U.S./Canada
In accordance with applicable U.S. and Canadian regulations, the following list of warranties is pro-vided.
• New Vehicle Limited Warranty
• Parts and Accessories Limited Warranty
• Corrosion Protection Limited Warranty
• Seat Belt and Supplemental Restraint Sys-tems Limited Warranty
• Emission Design and Defect Warranty
• Emission Performance Warranty
These are federal warranties. Other warrantiesare provided as required by state/provincial law.Refer to your separate Warranty and ServiceRecords Information booklet for detailed informa-tion concerning each of the warranties.