engine VOLVO XC70 2014 Owner´s Manual
[x] Cancel search | Manufacturer: VOLVO, Model Year: 2014, Model line: XC70, Model: VOLVO XC70 2014Pages: 394, PDF Size: 11.55 MB
Page 69 of 394

02 Locks and alarm
Keyless drive
02
67
Locking the vehicle
Models with keyless drive have a button on the outside door handlesThe doors and the tailgate can be locked by pressing the lock button in any of the outsidedoor handles.
NOTE
On keyless drive vehicles, the gear selec- tor must be in the Park ( P) position, all
doors and the tailgate must be closed andthe ignition must be switched off beforethe vehicle can be locked.
Keyless drive remote key and driver's seat/door mirror memory
• When you leave the vehicle with a PCC in your possession and lock any door, the position of the driver's seat and door mir-rors will be stored in the seat's memory.
• The next time a door is opened by a per-son with the
same PCC in his/her pos-
session, the driver's seat and door mir-rors will automatically move to the posi-tion that they were in when the door wasmost recently locked.
NOTE
If several people carrying PCCs approach the vehicle at the same time, the driver'sseat and door mirrors will assume thepositions they were in for the person whoopens the driver's door.
See also page 89 for information on adjust- ing and storing the seat's position in the seatmemory.
Keyless drive information messagesIf all of the PCCs are removed from the vehi-cle while the engine is running or if the igni-tion is in mode II (see page 86) and all of
the doors are closed, a message will appearin the instrument panel display and an audiblesignal will sound. When at least one PCC has been returned to the car, the message will be erased in the dis-play and the audible signal will stop when: •
A door has been opened and closed
• The PCC has been inserted in the ignition slot
• The
OK button (see page 197 for the
location of this button) has been pressed.
CAUTION
• Keyless drive remote keys should never be left in the vehicle. In the eventof a break-in, a remote found in thevehicle could make it possible to startthe engine.
• Electromagnetic fields or metalobstructions can interfere with thekeyless drive system. The remote keyshould never be placed closer thanapproximately 4-6 in. (10-15 cm) tocell phones, metallic objects or e.g.,stored in a metal briefcase.
USA – FCC ID:KR55WK48952, KR55WK48964 NOTEThis device complies with part 15 of the FCC Rules. Operation is subject to the followingtwo conditions: (1) This device may not causeharmful interference, and (2) this device mustaccept interference received, including inter-ference that may cause undesired operation.
Page 75 of 394

02 Locks and alarm
Alarm
02
73
Disarming the alarm
–Press the Unlock button on the remote key.
> Two short flashes from the car's direc-tion indicators confirm that the alarm has been deactivated and that alldoors are unlocked.
Turning off (stopping) the alarm
If the alarm is sounding, it can be stopped by pressing the Unlock button on the remote keyor by inserting the remote key in the ignitionslot. Two short flashes from the car's direc-tion indicators confirm that the alarm hasbeen turned off.
Other alarm-related functions
Automatic re-armingIf the doors are unlocked, the locks will auto- matically re-engage (re-lock) and the alarmwill re-arm after 2 minutes unless a door orthe tailgate has been opened.
Audible/visual alarm signal
• An audible alarm signal is given by a bat- tery powered siren. The alarm cycle lastsfor 30 seconds.
• The visual alarm signal is given by flash-ing all turn signals for approximately5 minutes or until the alarm is turned off.
Remote key not functioningIf the remote key is not functioning properly, the alarm can be turned off and the vehiclecan be started as follows:
1. Open the driver's door with the key blade
(see page 62 for information on detaching the key blade).
> This will trigger the alarm.
2. Insert the remote key into the ignition slot(also on vehicles with the optional keyless drive). This will turn off the alarm.
3. Start the engine (see page 120 for instructions).
Page 76 of 394
74* Option/accessory, for more information, see Introduction. Instruments and controls........................................................................ 76 Ignition modes........................................................................................ 86Seats....................................................................................................... 88Steering wheel........................................................................................ 95Lighting................................................................................................... 97
Wipers and washers.............................................................................. 105Windows............................................................................................... 108Mirrors................................................................................................... 110
Digial compass*.................................................................................... 113
Power moonroof* ................................................................................. 115 HomeLink
®
Wireless Control System*.................................................. 117
Starting the engine................................................................................ 120 Transmission......................................................................................... 125
Eco Guide* and Power Meter*.............................................................. 129Brakes................................................................................................... 131Parking brake........................................................................................ 134
Hill Descent Control (HDC)*.................................................................. 137
Page 79 of 394

03 Your driving environment
Instruments and controls
03
}}
* Option/accessory, for more information, see Introduction.77
FunctionPage
Controls for menus and messages, turn signals,high/low beams, tripcomputer199, 102,97, 215
Paddles for manually shifting gears*126
Cruise control146
Horn, airbag95, 22
Main instrument panel77
Infotainment system/ Bluetooth hands-freecontrols230, 259
START/STOP ENGINE button86
Ignition slot86
Display for infotainment system functions andmenus230, 197
Hazard warning flashers102
Door handle–
FunctionPage
In-door control panels (power windows, mirrors,central locking button,power child safety locks)108, 110,69,53
Controls for the infotain- ment system and menus199, 230, 208
Climate system controls208
Gear selector125
Controls for active chas- sis (Four-C)*222
Wipers and washers105, 106
Steering wheel adjust- ment95
Parking brake134
Hood opening control335
Power seat* adjustment controls88
Lighting panel, buttons for opening fuel fillerdoor and unlocking thetailgate97, 280, 70
Instrument panel information displays
Information displays: analog instrument panel
Information displays: digital instrument panel* These displays show information on some of the vehicle's functions, such as cruise con-
Page 80 of 394
03 Your driving environment
Instruments and controls
03
78* Option/accessory, for more information, see Introduction.
trol, the trip computer and messages. The information is shown with text and symbols. More detailed information can be found in the descriptions of the functions that use theinformation displays.
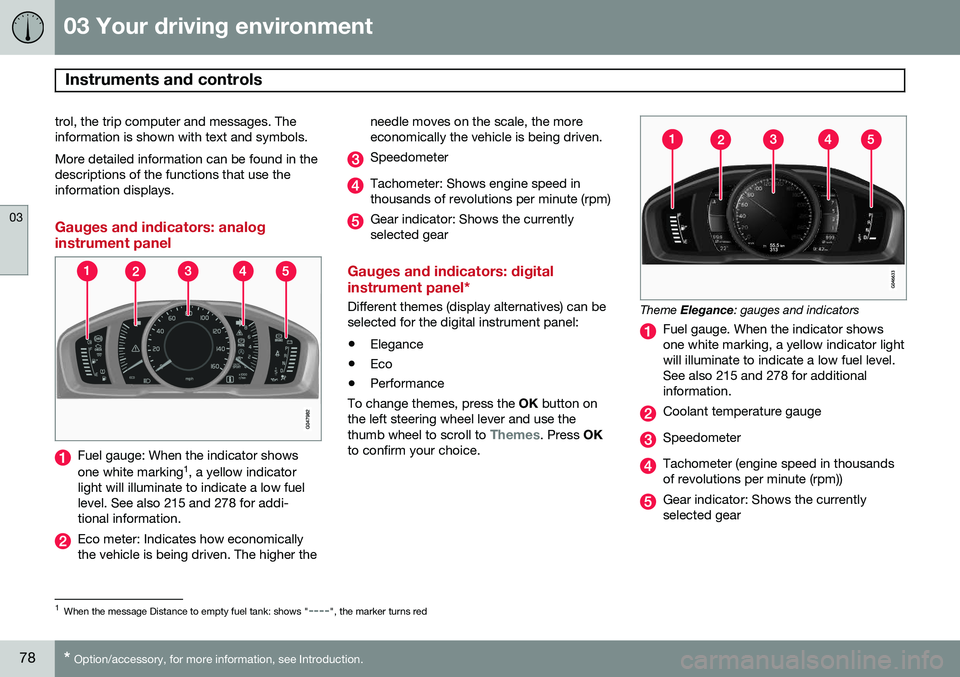
Gauges and indicators: analog instrument panel
Fuel gauge: When the indicator shows one white marking 1
, a yellow indicator
light will illuminate to indicate a low fuel level. See also 215 and 278 for addi-tional information.
Eco meter: Indicates how economically the vehicle is being driven. The higher the needle moves on the scale, the moreeconomically the vehicle is being driven.
Speedometer
Tachometer: Shows engine speed in thousands of revolutions per minute (rpm)
Gear indicator: Shows the currently selected gear
Gauges and indicators: digital instrument panel*
Different themes (display alternatives) can be selected for the digital instrument panel: •
Elegance
• Eco
• Performance
To change themes, press the OK button on
the left steering wheel lever and use the thumb wheel to scroll to
Themes. Press OK
to confirm your choice.
Theme Elegance : gauges and indicators
Fuel gauge. When the indicator shows one white marking, a yellow indicator lightwill illuminate to indicate a low fuel level.See also 215 and 278 for additionalinformation.
Coolant temperature gauge
Speedometer
Tachometer (engine speed in thousands of revolutions per minute (rpm))
Gear indicator: Shows the currently selected gear
1
When the message Distance to empty fuel tank: shows "----", the marker turns red
Page 81 of 394
03 Your driving environment
Instruments and controls
03
}}
79
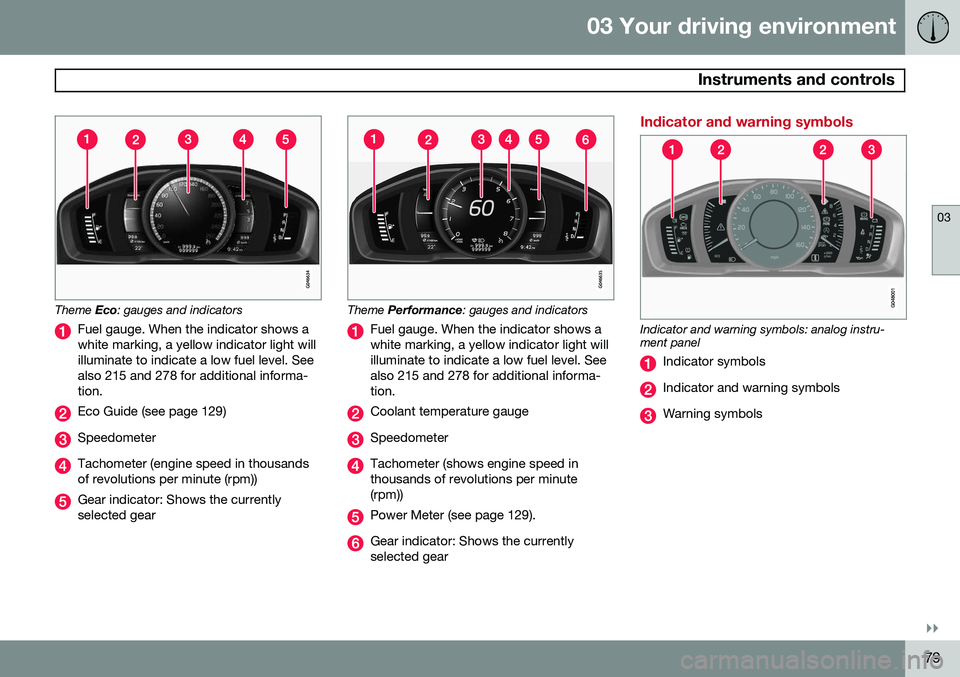
Theme Eco: gauges and indicators
Fuel gauge. When the indicator shows a white marking, a yellow indicator light willilluminate to indicate a low fuel level. Seealso 215 and 278 for additional informa-tion.
Eco Guide (see page 129)
Speedometer
Tachometer (engine speed in thousands of revolutions per minute (rpm))
Gear indicator: Shows the currently selected gear
Theme Performance : gauges and indicators
Fuel gauge. When the indicator shows a white marking, a yellow indicator light willilluminate to indicate a low fuel level. Seealso 215 and 278 for additional informa-tion.
Coolant temperature gauge
Speedometer
Tachometer (shows engine speed in thousands of revolutions per minute(rpm))
Power Meter (see page 129).
Gear indicator: Shows the currently selected gear
Indicator and warning symbols
Indicator and warning symbols: analog instru- ment panel
Indicator symbols
Indicator and warning symbols
Warning symbols
Page 82 of 394
03 Your driving environment
Instruments and controls
03
80* Option/accessory, for more information, see Introduction.
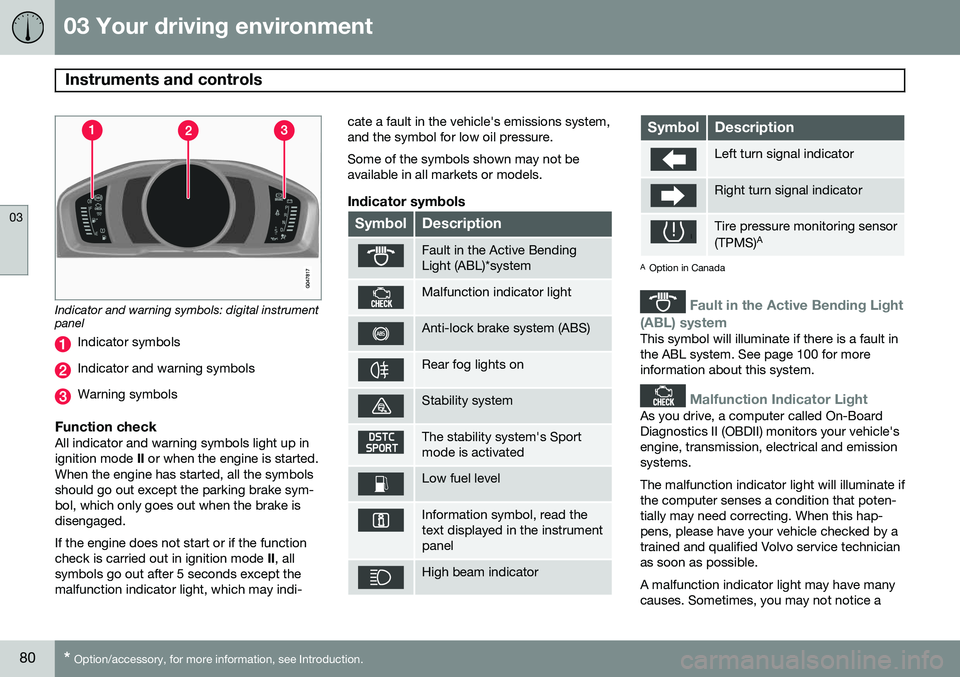
Indicator and warning symbols: digital instrument panel
Indicator symbols
Indicator and warning symbols
Warning symbols
Function checkAll indicator and warning symbols light up in ignition mode II or when the engine is started.
When the engine has started, all the symbolsshould go out except the parking brake sym-bol, which only goes out when the brake isdisengaged. If the engine does not start or if the function check is carried out in ignition mode II, all
symbols go out after 5 seconds except themalfunction indicator light, which may indi- cate a fault in the vehicle's emissions system,and the symbol for low oil pressure. Some of the symbols shown may not be available in all markets or models.
Indicator symbols
SymbolDescription
Fault in the Active Bending Light (ABL)*system
Malfunction indicator light
Anti-lock brake system (ABS)
Rear fog lights on
Stability system
The stability system's Sport mode is activated
Low fuel level
Information symbol, read the text displayed in the instrumentpanel
High beam indicator
SymbolDescription
Left turn signal indicator
Right turn signal indicator
Tire pressure monitoring sensor (TPMS)
A
A
Option in Canada
Fault in the Active Bending Light
(ABL) system
This symbol will illuminate if there is a fault in the ABL system. See page 100 for moreinformation about this system.
Malfunction Indicator Light
As you drive, a computer called On-Board Diagnostics II (OBDII) monitors your vehicle'sengine, transmission, electrical and emissionsystems. The malfunction indicator light will illuminate if the computer senses a condition that poten-tially may need correcting. When this hap-pens, please have your vehicle checked by atrained and qualified Volvo service technicianas soon as possible. A malfunction indicator light may have many causes. Sometimes, you may not notice a
Page 83 of 394
03 Your driving environment
Instruments and controls
03
* Option/accessory, for more information, see Introduction.81
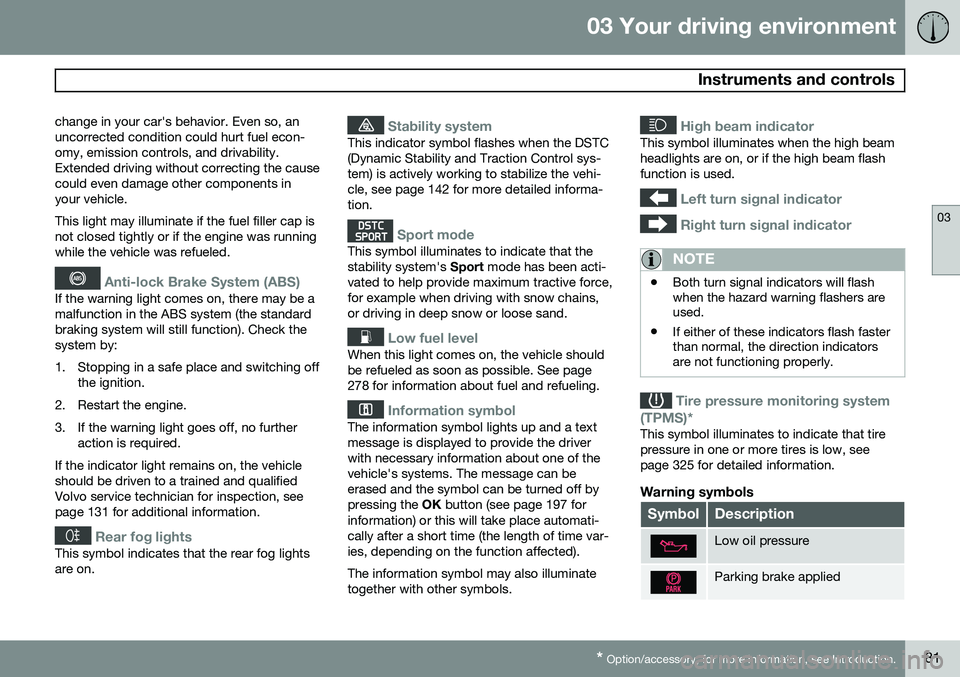
change in your car's behavior. Even so, an uncorrected condition could hurt fuel econ-omy, emission controls, and drivability.Extended driving without correcting the causecould even damage other components inyour vehicle. This light may illuminate if the fuel filler cap is not closed tightly or if the engine was runningwhile the vehicle was refueled.
Anti-lock Brake System (ABS)
If the warning light comes on, there may be a malfunction in the ABS system (the standardbraking system will still function). Check thesystem by:
1. Stopping in a safe place and switching off
the ignition.
2. Restart the engine.
3. If the warning light goes off, no further action is required.
If the indicator light remains on, the vehicle should be driven to a trained and qualifiedVolvo service technician for inspection, seepage 131 for additional information.
Rear fog lights
This symbol indicates that the rear fog lights are on.
Stability system
This indicator symbol flashes when the DSTC (Dynamic Stability and Traction Control sys-tem) is actively working to stabilize the vehi-cle, see page 142 for more detailed informa-tion.
Sport mode
This symbol illuminates to indicate that the stability system's Sport mode has been acti-
vated to help provide maximum tractive force,for example when driving with snow chains,or driving in deep snow or loose sand.
Low fuel level
When this light comes on, the vehicle should be refueled as soon as possible. See page278 for information about fuel and refueling.
Information symbol
The information symbol lights up and a text message is displayed to provide the driverwith necessary information about one of thevehicle's systems. The message can beerased and the symbol can be turned off bypressing the OK button (see page 197 for
information) or this will take place automati-cally after a short time (the length of time var-ies, depending on the function affected). The information symbol may also illuminate together with other symbols.
High beam indicator
This symbol illuminates when the high beam headlights are on, or if the high beam flashfunction is used.
Left turn signal indicator
Right turn signal indicator
NOTE
• Both turn signal indicators will flash when the hazard warning flashers areused.
• If either of these indicators flash fasterthan normal, the direction indicatorsare not functioning properly.
Tire pressure monitoring system
(TPMS)*
This symbol illuminates to indicate that tire pressure in one or more tires is low, seepage 325 for detailed information.
Warning symbols
SymbolDescription
Low oil pressure
Parking brake applied
Page 84 of 394

03 Your driving environment
Instruments and controls
03
82
SymbolDescription
SRS airbags
Seat belt reminder
Generator not charging
Fault in the brake system
Warning symbol, read the text displayed in the instrumentpanel
Low oil pressure
If the light comes on while driving, stop the vehicle, stop the engine immediately, andcheck the engine oil level. Add oil if neces-sary. If the oil level is normal and the lightstays on after restart, have the vehicle towedto the nearest trained and qualified Volvoservice technician.
Parking brake applied
This symbol flashes while the brake is being applied and then glows steadily when theparking brake has been set. See page 134 for more information about using the parking brake.
Airbags – SRS
If this light comes on while the vehicle is being driven, or remains on for longer thanapproximately 10 seconds after the vehiclehas been started, the SRS system's diagnos-tic functions have detected a fault in a seatbelt lock or pretensioner, a front airbag, sideimpact airbag, and/or an inflatable curtain.Have the system(s) inspected by a trainedand qualified Volvo service technician assoon as possible. See page 21 for more information about the airbag system.
Seat belt reminder
This symbol comes on for approximately 6 seconds if the driver has not fastened his orher seat belt.
Generator not charging
This symbol comes on during driving if a fault has occurred in the electrical system. Contactan authorized Volvo workshop.
Engine temperatureEngine overheating can result from low oil or coolant levels, towing or hard driving at highheat and altitude, or mechanical malfunction.Engine overheating will be signaled with textand a red warning triangle in the middle of theinstrument display. The exact text will dependon the degree of overheating. It may rangefrom
High engine temp Reduce speed toHigh engine temp Stop engine. If appropri-
ate, other messages, such as Coolant level
low, Stop safely will also be displayed. If
your engine does overheat so that you must stop the engine, always allow the engine tocool before attempting to check oil and cool-ant levels. See page 338 for more information.
Fault in brake system
If this symbol lights, the brake fluid level may be too low. Stop the vehicle in a safe placeand check the level in the brake fluid reser-voir, see page 338. If the level in the reservoiris below MIN, the vehicle should be transpor-
ted to an authorized Volvo workshop to havethe brake system checked. If the
and symbols come on
at the same time, there may be a fault in the brake force distribution system.
1. Stop the vehicle in a safe place and turn off the engine.
2. Restart the engine.
• If both symbols extinguish, continue driv- ing.
• If the symbols remain on, check the levelin the brake fluid reservoir, see page 338.If the brake fluid level is normal but the
Page 88 of 394
03 Your driving environment
Ignition modes
03
86* Option/accessory, for more information, see Introduction.
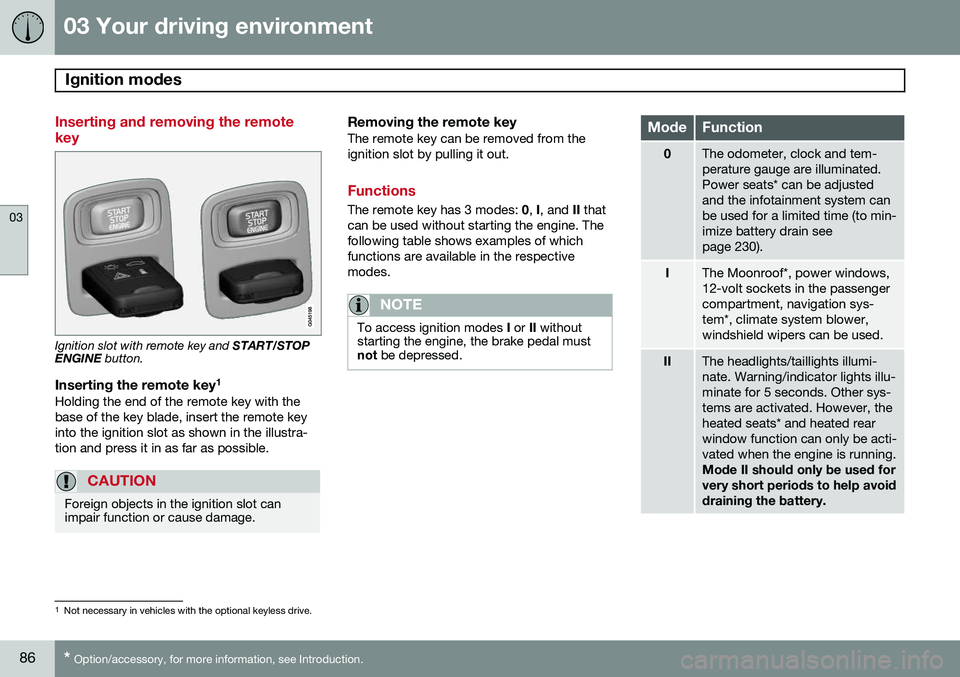
Inserting and removing the remote key
Ignition slot with remote key and START/STOP
ENGINE button.
Inserting the remote key 1Holding the end of the remote key with the base of the key blade, insert the remote keyinto the ignition slot as shown in the illustra-tion and press it in as far as possible.
CAUTION
Foreign objects in the ignition slot can impair function or cause damage.
Removing the remote keyThe remote key can be removed from the ignition slot by pulling it out.
Functions
The remote key has 3 modes:
0, I, and II that
can be used without starting the engine. The following table shows examples of whichfunctions are available in the respectivemodes.
NOTE
To access ignition modes I or II without
starting the engine, the brake pedal must not be depressed.
ModeFunction
0The odometer, clock and tem- perature gauge are illuminated.Power seats* can be adjustedand the infotainment system canbe used for a limited time (to min-imize battery drain seepage 230).
IThe Moonroof*, power windows, 12-volt sockets in the passengercompartment, navigation sys-tem*, climate system blower,windshield wipers can be used.
IIThe headlights/taillights illumi- nate. Warning/indicator lights illu-minate for 5 seconds. Other sys-tems are activated. However, theheated seats* and heated rearwindow function can only be acti-vated when the engine is running. Mode II should only be used for very short periods to help avoiddraining the battery.
1
Not necessary in vehicles with the optional keyless drive.