VOLVO XC90 2014 Owner´s Manual
Manufacturer: VOLVO, Model Year: 2014, Model line: XC90, Model: VOLVO XC90 2014Pages: 308, PDF Size: 13.31 MB
Page 201 of 308
07 Wheels and tires
Changing wheels
07
199
WARNING
When raising or lowering the spare wheel, please keep in mind that components inthe exhaust system may be very hot.
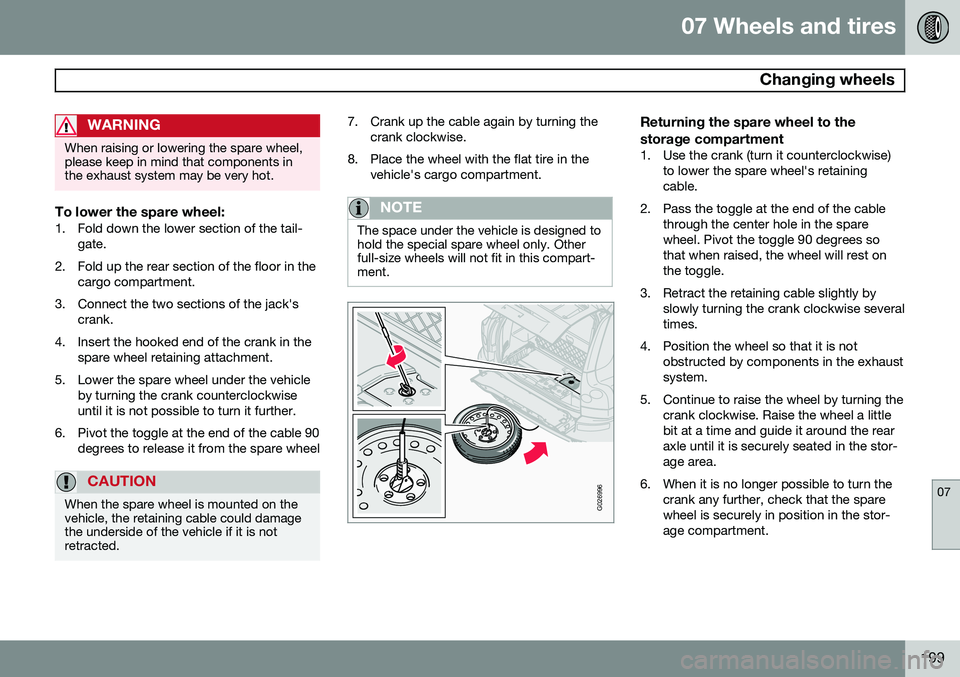
To lower the spare wheel:1. Fold down the lower section of the tail-gate.
2. Fold up the rear section of the floor in the cargo compartment.
3. Connect the two sections of the jack's crank.
4. Insert the hooked end of the crank in the spare wheel retaining attachment.
5. Lower the spare wheel under the vehicle by turning the crank counterclockwise until it is not possible to turn it further.
6. Pivot the toggle at the end of the cable 90 degrees to release it from the spare wheel
CAUTION
When the spare wheel is mounted on the vehicle, the retaining cable could damagethe underside of the vehicle if it is notretracted.
7. Crank up the cable again by turning thecrank clockwise.
8. Place the wheel with the flat tire in the vehicle's cargo compartment.
NOTE
The space under the vehicle is designed to hold the special spare wheel only. Otherfull-size wheels will not fit in this compart-ment.
G026996
Returning the spare wheel to the storage compartment
1. Use the crank (turn it counterclockwise) to lower the spare wheel's retaining cable.
2. Pass the toggle at the end of the cable through the center hole in the sparewheel. Pivot the toggle 90 degrees sothat when raised, the wheel will rest onthe toggle.
3. Retract the retaining cable slightly by slowly turning the crank clockwise severaltimes.
4. Position the wheel so that it is not obstructed by components in the exhaustsystem.
5. Continue to raise the wheel by turning the crank clockwise. Raise the wheel a littlebit at a time and guide it around the rearaxle until it is securely seated in the stor-age area.
6. When it is no longer possible to turn the crank any further, check that the sparewheel is securely in position in the stor-age compartment.
Page 202 of 308
07 Wheels and tires
Changing wheels
07
200
G026997
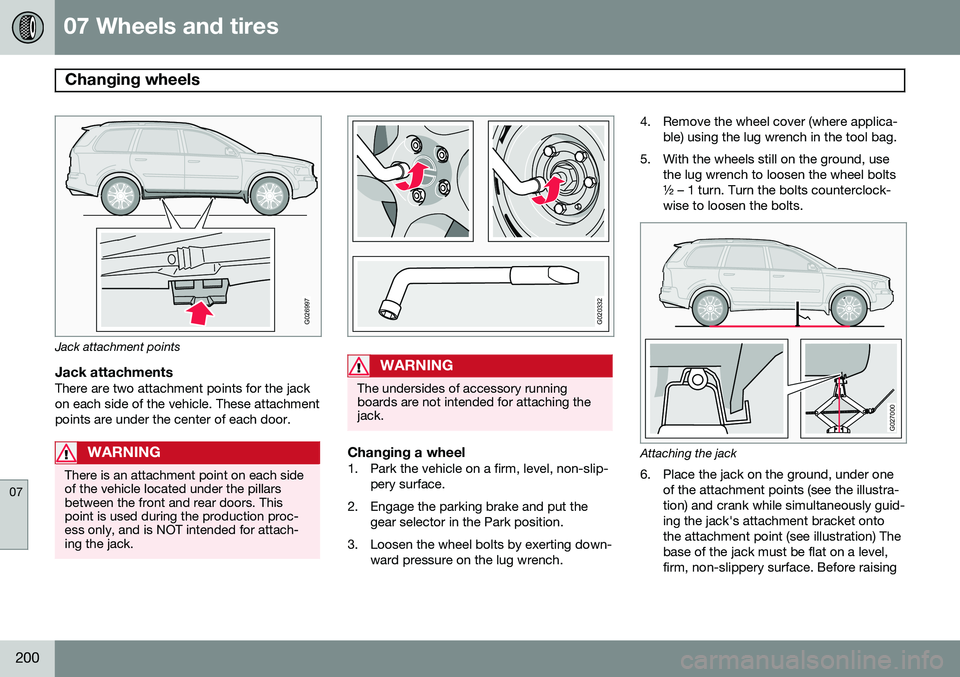
Jack attachment points
Jack attachmentsThere are two attachment points for the jack on each side of the vehicle. These attachmentpoints are under the center of each door.
WARNING
There is an attachment point on each side of the vehicle located under the pillarsbetween the front and rear doors. Thispoint is used during the production proc-ess only, and is NOT intended for attach-ing the jack.
G020332
WARNING
The undersides of accessory running boards are not intended for attaching thejack.
Changing a wheel1. Park the vehicle on a firm, level, non-slip-pery surface.
2. Engage the parking brake and put the gear selector in the Park position.
3. Loosen the wheel bolts by exerting down- ward pressure on the lug wrench. 4. Remove the wheel cover (where applica-
ble) using the lug wrench in the tool bag.
5. With the wheels still on the ground, use the lug wrench to loosen the wheel bolts ½ – 1 turn. Turn the bolts counterclock-wise to loosen the bolts.
G027000
Attaching the jack
6. Place the jack on the ground, under oneof the attachment points (see the illustra- tion) and crank while simultaneously guid-ing the jack's attachment bracket ontothe attachment point (see illustration) Thebase of the jack must be flat on a level,firm, non-slippery surface. Before raising
Page 203 of 308
07 Wheels and tires
Changing wheels
07
201
the vehicle, check that the jack is still cor- rectly positioned in the attachment.
7. Raise the vehicle until the wheel to be changed is lifted off the ground.
8. Unscrew the wheel bolts completely and carefully remove the wheel so as not todamage the threads on the studs.
NOTE
To avoid excessive wear and the necessity of rebalancing, mark and reinstall wheelsin the same location and position as beforeremoval. To lessen the chance of imbal-ance, each wheel hub is equipped with aguide stud to ensure that a removed wheelcan be reinstalled in its original position (aswhen changing over to winter tires/wheels).
CAUTION
•The vehicle must not be driven with wheels of different dimensions or witha spare tire other than the one thatcame with the vehicle. The use of dif-ferent size wheels can seriously dam-age your vehicle's transmission.
• Correct tightening torque on wheelbolts must be observed.
• The wheel bolts should never begreased or lubricated.
• Extended, chromed wheel bolts mustnot be used with steel rims, as theymake it impossible to fit the hub caps.
Installing the wheel1. Clean the contact surfaces on the wheel
and hub.
2. Lift the wheel and place it on the hub.
3. Install the wheel bolts and tighten hand- tight. Using the lug wrench, tighten cross- wise until all bolts are snug.
4. Lower the vehicle to the ground and alter- nately tighten the bolts crosswise to103 ft.lbs. (140 Nm).
5. Install the wheel cover (where applicable).
WARNING
• The jack must correctly engage the bar in the jack attachment. The vehicle'sweight must not rest on the jackattachment. See illustration "Attachingthe jack" on the previous page.
• Be sure the jack is on a firm, level,non-slippery surface.
• Never allow any part of your body tobe extended under a vehicle suppor-ted by a jack.
• Use the jack intended for the vehiclewhen replacing a wheel. For any otherjob, use stands to support the side ofthe vehicle being worked on.
• Apply the parking brake and put thegear selector in the (
P)ark position.
• Block the wheels standing on theground, use rigid wooden blocks orlarge stones.
• The jack should be kept well-greasedand clean, and should not be dam-aged.
• No objects should be placed betweenthe base of jack and the ground, orbetween the jack and the attachmentbar on the vehicle.
Page 204 of 308
07 Wheels and tires
Changing wheels
07
202
NOTE
The jack provided with your vehicle is intended to be used only in temporary sit-uations such as changing wheels in theevent of a flat tire. Only the jack that camewith your particular model should be usedto lift the vehicle. If the vehicle needs to belifted more frequently or for a prolongedperiod, using a garage jack or hoist is rec-ommended. Always follow this device’sinstructions for use.
The jack and tools should be returned to their storage spaces. The jack should be crankeddown fully so that it fits into the intendedspace.
Page 205 of 308
07 Wheels and tires
Tire Pressure Monitoring System (TPMS)
07
203
The tire pressure monitoring system
1
uses
sensors mounted in the tire valves to check inflation pressure levels. When the vehicle ismoving at a speed of approximately 20 mph(30 km/h) or faster, these sensors transmitinflation pressure data to a receiver located inthe vehicle.
USA – FCC ID: MRXG403MA4 A
This device complies with part 15 of the
FCC rules. Operation is subject to the fol- lowing conditions: (1) This device may notcause harmful interference, and (2) thisdevice must accept any interferencereceived, including interference that maycause undesired operation. When low inflation pressure is detected, TPMS will light up the tire pressure warn-ing light (also referred to as a telltale) in theinstrument panel (see page 61), and willdisplay a message in the text window. Thewording of this message is determined bythe degree of inflation pressure loss.
A On certain models, the FCC code is MRXTG315AM04
When low inflation pressure is detected, TPMS will light up the tire pressure warning light
(also referred to as a telltale) in the instrument panel and will display one of the following messages in the text window:
LOW
TIRE PRESS. CHECK TIRES or VERY LOW
TIRE PRESSURE.
NOTE
If a fault occurs in TPMS, the tire pressure warning light will flash for approximately 1 minute and
TIRE PRESS SYST
SERVICE REQUIRED will be displayed.
Each tire, including the spare (if provided), should be checked monthly when cold andinflated to the inflation pressure recom-mended by the vehicle manufacturer on thevehicle placard or tire inflation pressure label.(If your vehicle has tires of a different sizethan the size indicated on the vehicle placardor tire inflation pressure label, you shoulddetermine the proper tire inflation pressure forthose tires.) As an added safety feature, your vehicle has been equipped with a tire pressure monitor-ing system (TPMS) that illuminates a low tirepressure telltale when one or more of yourtires is significantly under-inflated. Accord-ingly, when the low tire pressure telltale illu-minates, you should stop and check yourtires as soon as possible, and inflate them to the proper pressure. Driving on a significantlyunder-inflated tire causes the tire to overheatand can lead to tire failure. Under-inflationalso reduces fuel efficiency and tire tread life,and may affect the vehicle's handling andstopping ability. Please note that the TPMS is not a substitute for proper tire maintenance, and it is the driv-er's responsibility to maintain correct tirepressure, even if under-inflation has notreached the level to trigger illumination of theTPMS low tire pressure telltale. Your vehicle has also been equipped with a TPMS malfunction indicator to indicate whenthe system is not operating properly. TheTPMS malfunction indicator is combined withthe low tire pressure telltale. When the sys-tem detects a malfunction, the telltale willflash for approximately one minute and thenremain continuously illuminated. Thissequence will continue upon subsequentvehicle start-ups as long as the malfunctionexists. When the malfunction indicator is illu-minated, the system may not be able todetect or signal low tire pressure as intended.TPMS malfunctions may occur for a variety ofreasons, including the installation of replace-ment or alternate tires or wheels on the vehi-cle that prevent the TPMS from functioning
1
This system is standard on U.S. models and optional on Canadian models
Page 206 of 308
07 Wheels and tires
Tire Pressure Monitoring System (TPMS)
07
204
properly. Always check the TPMS malfunc- tion telltale after replacing one or more tiresor wheels on your vehicle to ensure that thereplacement or alternate tires and wheelsallow the TPMS to continue to function prop-erly.
NOTE
TPMS indicates low tire pressure but does not replace normal tire maintenance. Forinformation on correct tire pressure, pleaserefer to the tire inflation pressure table inthis chapter or consult your Volvo retailer.
Erasing warning messagesWhen a low tire pressure warning message has been displayed, and the tire pressurewarning light has come on:
1. Use a tire pressure gauge to check theinflation pressure of all four tires.
2. Re-inflate the tire(s) to the correct pres- sure (consult the tire pressure placard or the table see page 183).
3. Drive the vehicle for several minutes at a speed of 20 mph (30 km/h) or faster.
> This will erase the warning text and thewarning light will go out.
WARNING
Incorrect inflation pressure could lead to tire failure, resulting in a loss of control ofthe vehicle.
Changing wheels with TPMSPlease note the following when changing or replacing the factory installed TPMS wheels/tires on the vehicle:
• Only the factory-mounted wheels are equipped with TPMS sensors in thevalves.
• If the vehicle is equipped with a tempo-rary spare tire, this tire does not have aTPMS sensor.
• If wheels without TPMS sensors are mounted on the vehicle,
TIRE PRESS
SYST. SERVICE REQUIRED will be dis-
played each time the vehicle is driven above 25 mph (40 km/h) for 10 minutes ormore.
• Once TPMS sensors are properly instal-led, the warning message should notreappear.
• Volvo recommends that TPMS sensorsbe fitted on all wheels used on the vehi-cle. Volvo does not recommend movingsensors back and forth between sets ofwheels.
NOTE
If a tire is changed or if the TPMS sensor is moved to another wheel, the sensor’svalve and valve core should be replaced.
CAUTION
When inflating tires with TPMS valves, press the pump's mouthpiece straightonto the valve to help avoid bending orotherwise damaging the valve.
Recalibrating TPMS (Canadian models only)
In certain cases, it may be necessary to reca- librate TPMS to conform to Volvo's recom-mended tire inflation pressures (see the infla-tion pressure table on page 183), for exam-ple, if higher inflation pressure is necessarywhen transporting heavy loads, etc. To recalibrate:
1. Switch off the engine.
2. Inflate the tires to the desired pressure
and turn the ignition key to position I or II
(see page 145 for additional information).
3. Turn the thumb wheel on the left-side steering wheel lever until
Tire pressure
Calibration appears in the display.
Page 207 of 308
07 Wheels and tires
Tire Pressure Monitoring System (TPMS)
07
* Option/accessory, for more information, see Introduction.205
4. Press and hold the
Reset button on the
left-side steering wheel lever until
TIRE
PRESSURE CALIBRATED is displayed.
Activating/deactivating TPMS (Canadian models only)
1. Switch off the engine.
2. Turn the ignition key to position I or II.
3. Press and hold the Reset button on the
left-side steering wheel lever until
TIRE
PRESS SYST OFF is displayed.
Repeat steps 1-3 to turn TPMS on again.
Self-supporting run flat tires (SST)*
Self-supporting run flat tires are available as optional equipment. The vehicle must beequipped with the Tire Pressure MonitoringSystem (TPMS) if tires of this type are instal-led. Tires of this type have specially reinforced sidewalls that make it possible to continuedriving to a limited extent even though the tirehas lost some or all of its inflation pressure.These tires are mounted on special rims (nor-mal tires can also be mounted on these rims). If an SST tire loses inflation pressure, the yel- low TPMS symbol illuminates in the instru-ment panel and a text message is also dis-played. If this happens, reduce speed to not more than 50 mph (80 km/h). The tire shouldbe replaced as soon as possible. Drive carefully; it may be difficult to determine which tire is damaged. To find the damagedtire, check the inflation pressure in all fourtires.
WARNING
•
SST tires should only be mounted by service technicians who are familiarwith tires of this type.
• SST tires may only be mounted onvehicles equipped with TPMS.
• Do not drive faster than 50 mph(80 km/h) if TPMS indicates that a tirehas lost inflation pressure.
• Do not drive farther than 50 miles(80 km) before replacing a damagedSST tire.
• Drive carefully and avoid e.g., hardbraking or fast turns.
• SST tires must be replaced if they aredamaged. A tire of this type cannot berepaired.
Page 208 of 308
206
Washing and cleaning the vehicle........................................................ 208 Paint touch up....................................................................................... 213
Page 209 of 308
C A R C A R E
Page 210 of 308
08 Car care
Washing and cleaning the vehicle
08
208
Washing
•The vehicle should be washed at regular intervals since dirt, dust, insects and tarspots adhere to the paint and may causedamage. It is particularly important towash the vehicle frequently in the winter-time to prevent corrosion, when salt hasbeen used on the roads.
• When washing the vehicle, do not exposeit to direct sunlight. Use lukewarm waterto soften the dirt before you wash with asponge, and plenty of water, to avoidscratching.
• Bird droppings: Remove from paintworkas soon as possible. Otherwise the finishmay be permanently damaged.
• A detergent can be used to facilitate thesoftening of dirt and oil.
CAUTION
Chromed wheels
: Clean chrome-plated
wheels using the same detergents used for the body of the vehicle. Aggressive wheelcleaning agents can permanently stainchrome-plated wheels.
• Dry the vehicle with a clean chamois and remember to clean the drain holes in thedoors and rocker panels.
• Tar spots can be removed with tarremover after the vehicle has beenwashed.
• A stiff-bristle brush and lukewarm soapywater can be used to clean the wiperblades. Frequent cleaning of the wind-shield and wiper blades improves visibilityconsiderably and also helps prolong theservice life of the wiper blades.
• Wash off the dirt from the underside(wheel housings, fenders, etc.).
• In areas of high industrial fallout, morefrequent washing is recommended.
Suitable detergentsSpecial vehicle washing detergents should be used. A suitable mixture is about 2.5 fl. oz.(8.5 cl) of detergent to 2.6 US gal. (10 liters) ofwarm water. After washing with a detergentthe vehicle should be well rinsed with cleanwater.
CAUTION
•Avoid waxing or polishing plastic or rubber components
• Polishing chromed strips can wearaway or damage the surface
• Polishes containing abrasive sub-stances should not be used
CAUTION
•Dirt, snow, etc., on the headlights can reduce lighting capacity considerably.Clean the headlights regularly, forexample when refueling.
• During high pressure washing, thespray mouthpiece must never becloser to the vehicle than 13 " (30 cm).Do not spray into the locks.
Special moonroof cautions:
• Always close the moonroof and sunshade before washing your vehicle.
• Never use abrasive cleaning agents onthe moonroof.
• Never use wax on the rubber sealsaround the moonroof.