VOLVO XC90 2015 Owners Manual
Manufacturer: VOLVO, Model Year: 2015, Model line: XC90, Model: VOLVO XC90 2015Pages: 570, PDF Size: 12.44 MB
Page 171 of 570
INSTRUMENTS AND CONTROLS
169
Adjusting the second row backrest tiltBackrest tilt can be adjusted separately for each of the second row seats.
Center seat
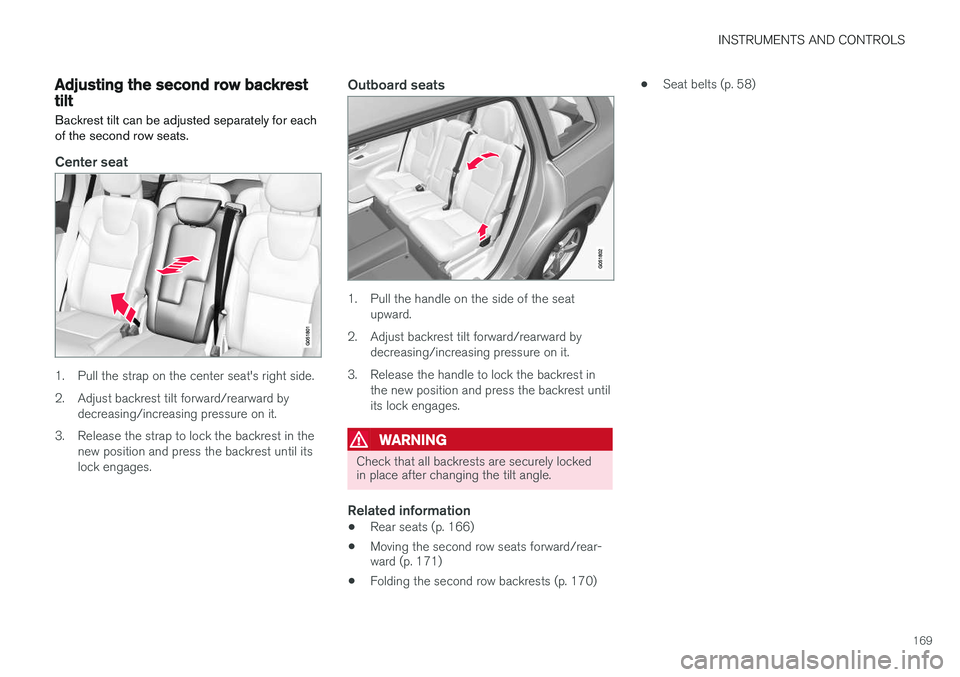
1. Pull the strap on the center seat's right side.
2. Adjust backrest tilt forward/rearward by decreasing/increasing pressure on it.
3. Release the strap to lock the backrest in the new position and press the backrest until its lock engages.
Outboard seats
1. Pull the handle on the side of the seatupward.
2. Adjust backrest tilt forward/rearward by decreasing/increasing pressure on it.
3. Release the handle to lock the backrest in the new position and press the backrest until its lock engages.
WARNING
Check that all backrests are securely locked in place after changing the tilt angle.
Related information
• Rear seats (p. 166)
• Moving the second row seats forward/rear- ward (p. 171)
• Folding the second row backrests (p. 170) •
Seat belts (p. 58)
Page 172 of 570
INSTRUMENTS AND CONTROLS
* Option/accessory, for more information, see Introduction.
170
Folding the second row backrests
The second row of seats has three individual seating positions whose backrests can befolded down separately.
CAUTION
• To help avoid damage to the seat uphols- tery, before a rear seat backrest is foldeddown, remove any objects from the seatand ensure that the seat belts are notbuckled.
• The integrated booster cushion
* in the
center position must be stowed (foldeddown) before the backrest is foldeddown.
• The center seating position armrest mustbe folded up before the backrest isfolded down.
NOTE
•It may be necessary to adjust the front seat backrests and/or move these seatsforward in order to fold down the rearseat backrests completely.
• It may also be necessary to move thesecond row of seats rearward.
WARNING
Adjust the seat and be sure it is locked in the new position before driving.
Center seat
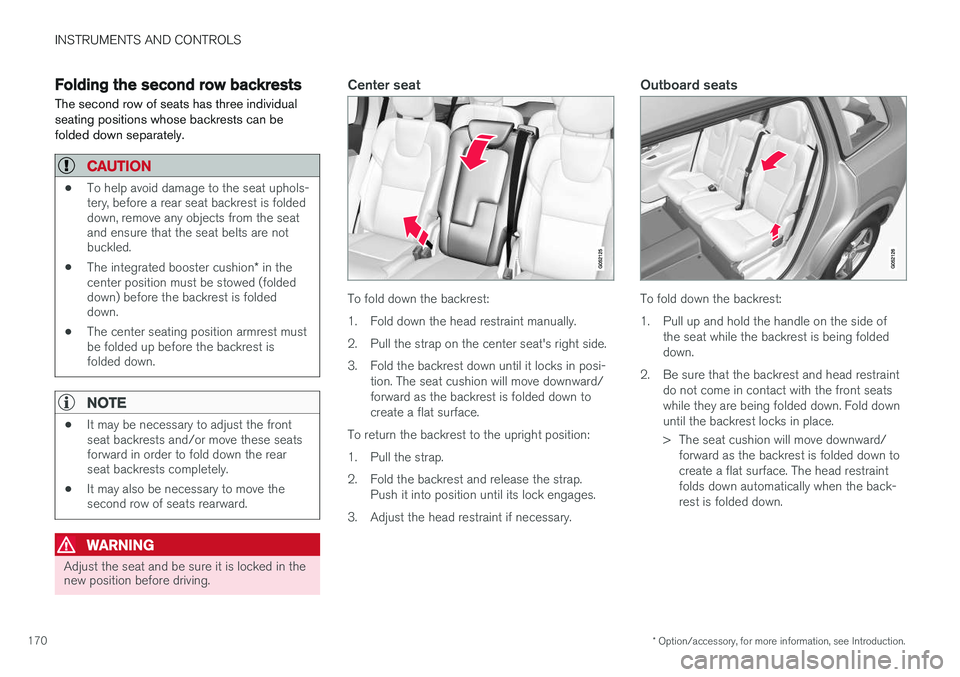
To fold down the backrest:
1. Fold down the head restraint manually.
2. Pull the strap on the center seat's right side.
3. Fold the backrest down until it locks in posi-
tion. The seat cushion will move downward/ forward as the backrest is folded down tocreate a flat surface.
To return the backrest to the upright position:
1. Pull the strap.
2. Fold the backrest and release the strap. Push it into position until its lock engages.
3. Adjust the head restraint if necessary.
Outboard seats
To fold down the backrest:
1. Pull up and hold the handle on the side of the seat while the backrest is being folded down.
2. Be sure that the backrest and head restraint do not come in contact with the front seatswhile they are being folded down. Fold downuntil the backrest locks in place.
> The seat cushion will move downward/forward as the backrest is folded down to create a flat surface. The head restraintfolds down automatically when the back-rest is folded down.
Page 173 of 570
INSTRUMENTS AND CONTROLS
* Option/accessory, for more information, see Introduction.171
WARNING
After being folded down, be sure the back- rests are securely locked in place.
To return the backrest to the upright position:
1. Pull up and hold the handle on the side of the seat while the backrest is being folded up.
2. Be sure that the backrest and head restraint do not come in contact with the front seatswhile they are being folded up. Fold up thebackrest and release the handle.
3. Press the backrest until its lock engages.
4. Fold up the head restraint manually.
WARNING
Be sure the backrest and head restraint are securely locked in position after they havebeen folded up.
Related information
• Rear seats (p. 166)
• Adjusting the second row backrest tilt (p. 169)
• Folding the third row
* backrests (p. 172)
• Adjusting the second row head restraints(p. 167)
Moving the second row seats forward/rearward
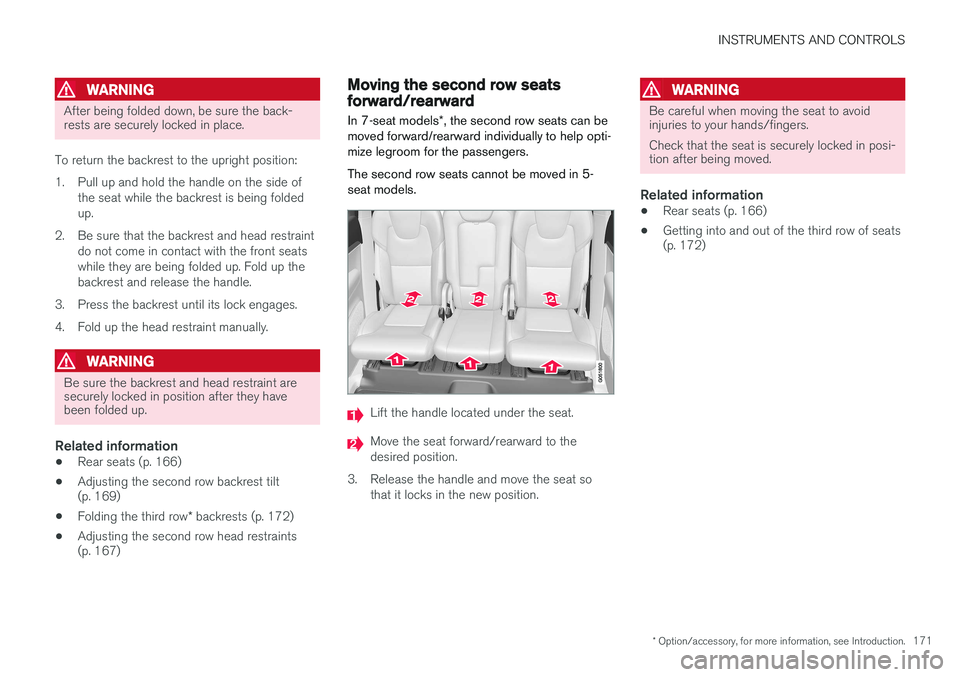
In 7-seat models *, the second row seats can be
moved forward/rearward individually to help opti- mize legroom for the passengers. The second row seats cannot be moved in 5- seat models.
Lift the handle located under the seat.
Move the seat forward/rearward to the desired position.
3. Release the handle and move the seat so that it locks in the new position.
WARNING
Be careful when moving the seat to avoid injuries to your hands/fingers. Check that the seat is securely locked in posi- tion after being moved.
Related information
• Rear seats (p. 166)
• Getting into and out of the third row of seats (p. 172)
Page 174 of 570
INSTRUMENTS AND CONTROLS
* Option/accessory, for more information, see Introduction.
172
Getting into and out of the third row of seats
The second row seats can be moved for easier access to the third row of seats *.
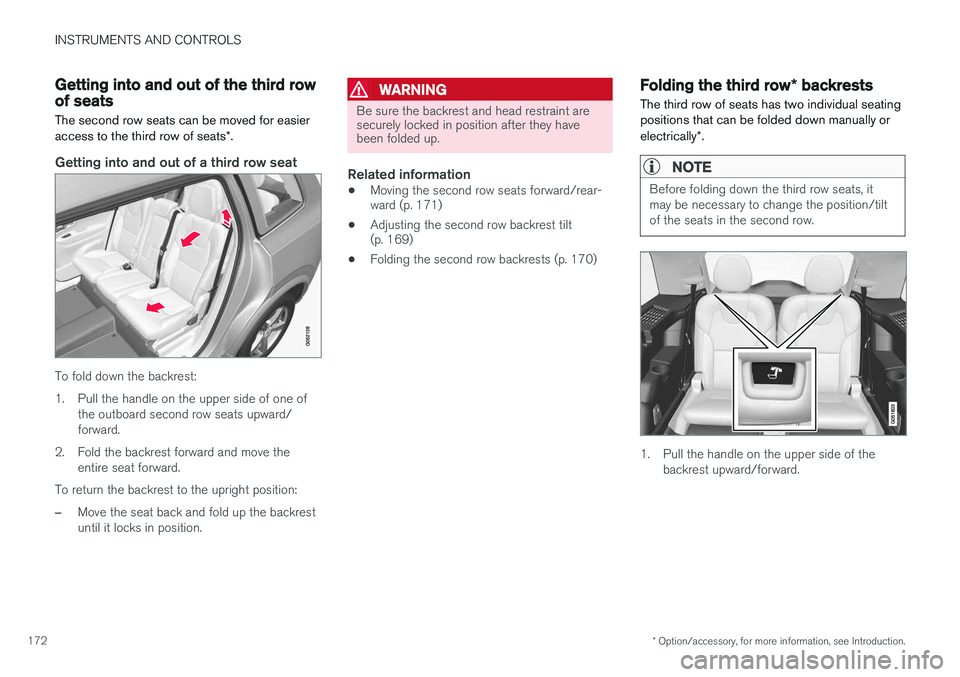
Getting into and out of a third row seat
To fold down the backrest:
1. Pull the handle on the upper side of one of
the outboard second row seats upward/ forward.
2. Fold the backrest forward and move the entire seat forward.
To return the backrest to the upright position:
–Move the seat back and fold up the backrest until it locks in position.
WARNING
Be sure the backrest and head restraint are securely locked in position after they havebeen folded up.
Related information
• Moving the second row seats forward/rear- ward (p. 171)
• Adjusting the second row backrest tilt(p. 169)
• Folding the second row backrests (p. 170)
Folding the third row
* backrests
The third row of seats has two individual seating positions that can be folded down manually or electrically *.
NOTE
Before folding down the third row seats, it may be necessary to change the position/tiltof the seats in the second row.
1. Pull the handle on the upper side of the
backrest upward/forward.
Page 175 of 570
INSTRUMENTS AND CONTROLS
173
2. Be sure that the backrest and head restraint
do not come in contact with the seat ahead while they are being folded down. Fold thebackrest down.
> The seat cushion will move downward/forward as the backrest is folded down to create a flat surface. The head restraintfolds down automatically when the back-rest is folded down.
To return the backrest to the upright position,fold the backrest up until it locks in position. Thehead restraint has to be folded up manually.
WARNING
Be sure the backrest and head restraint are securely locked in position after they havebeen folded up.
Related information
• Rear seats (p. 166)
• Adjusting the second row head restraints (p. 167)
• Adjusting the second row backrest tilt(p. 169)
• Moving the second row seats forward/rear-ward (p. 171)
Page 176 of 570

Page 177 of 570

C L I M A T E
Page 178 of 570

CLIMATE
* Option/accessory, for more information, see Introduction.
176
Climate control system
The vehicle is equipped with Electronic Climate Control (ECC) that cools, heats, dehumidifiesand filters the air in the passenger compartment.
2-zone climate system
2-zone system climate zones
The 2-zone climate system makes it possible to set the left- and right-side temperatures sepa-rately. All climate system settings are made from the center display and the buttons in the center con-sole.
4-zone climate system *
4-zone system climate zones
The 4-zone climate system makes it possible to set the left- and right-side temperatures sepa-rately for the front and rears seats. All climate system settings are made from the center display and the buttons in the center con-sole. Settings for the rear seats can also bemade from the climate system panel on the rearside of the tunnel console.
Related information
•Climate system sensors (p. 177)
• Perceived temperature (p. 176)
• Climate system controls (p. 180)
• Air quality (p. 177)
• Air distribution (p. 194)
• Air conditioning refrigerant (p. 541)
Perceived temperature
The climate system regulates passenger com- partment temperature based on the perceivedtemperature, not on the actual one.
The selected passenger compartment tempera- ture is based on a physical perception relating tothe current ambient temperature, air flow, humid-ity, sunlight in the passenger compartment, etc. The system's sunlight sensor monitors the side of the car where sunlight is entering the passengercompartment. This means that the actual tem-perature may differ between the right and leftsides of the compartment, even if the tempera-ture setting is the same for both sides.
Related information
• Climate system sensors (p. 177)
• Climate control system (p. 176)
Page 179 of 570

CLIMATE
* Option/accessory, for more information, see Introduction.177
Climate system sensors The climate system's sensors help regulate the passenger compartment temperature, humiditylevel, etc.
Location of the sensors
Humidity sensor: in the rearview mirror con- sole.
Ambient temperature sensor: in the pas- senger's side door mirror.
Passenger compartment temperature sen- sor: near the center console buttons.
Sunlight sensor: on the upper side of the dashboard.
NOTE
Do not cover or block the sensors with cloth- ing or other objects.
Related information
•Climate control system (p. 176)
• Perceived temperature (p. 176)
Air quality
The materials used in the passenger compart- ment have been selected and designed to bepleasant and comfortable, even for people withasthma or other types of allergies.
Materials in the passenger compartmentThe materials used have been developed to help minimize the amount of dust and make the cabineasier to keep clean. All floor mats can be easily removed for cleaning. Use car cleaning products recommended byVolvo. Only use cleaning agents and car care products recommended by Volvo. Clean regularly and fol-low the instructions included with the car careproduct.
Air filtering systemsIn addition to the passenger compartment filter, the Clean Zone Interior Package * and the Interior
Air Quality System * contribute to a cleaner pas-
senger compartment environment.
Related information
• Passenger compartment air filter (p. 179)
• Interior Air Quality System (IAQS)
* (p. 178)
• Clean Zone Interior Package (CZIP)
*
(p. 178)
• Cleaning the interior (p. 527)
Page 180 of 570

CLIMATE
* Option/accessory, for more information, see Introduction.
178
Clean Zone Interior Package (CZIP) *
The Clean Zone Interior Package includes a number of features that help further reduce aller-genic substances in the passenger compart-ment.
CZIP includes the following:
• An enhanced blower function that starts the blower when the vehicle is unlocked with theremote key to fill the passenger compart-ment with fresh air. This function starts auto-matically when required and shuts off auto-matically after a short period or if one thedoors is opened. The time for which theblower operates decreases gradually due toreduced need until the vehicle is four yearsold.
• The Interior Air Quality System (IAQS).
NOTE
In order to retain the CZIP standard, the IAQS filter must be replaced at the specified inter-vals. Consult your Volvo retailer.
See also the CZIP brochure for additional infor- mation.
Interior Air Quality System (IAQS)
*
The Interior Air Quality System uses a multifilter and an air quality sensor to remove gases, parti-cles and other contaminants from the air enter-ing the passenger compartment.
The IAQS sensor monitors increased levels of contaminants in the outside air and if contami-nants are detected, the air intake closes and theair inside the passenger compartment is recircu-lated, i.e., no outside air enters the vehicle. The fil-ter also cleans recirculated passenger compart-ment air.
NOTE
• The air quality sensor should always be engaged in order to obtain the best air inthe passenger compartment.
• Recirculation is limited in cold weather toavoid fogging.
• If the insides of the windows start fog-ging, disengage the air quality sensor.Use the defroster function to increaseairflow to the front, side, and rear win-dows.
NOTE
In order to retain the CZIP standard, the IAQS filter must be replaced at the specified inter-vals. Consult your Volvo retailer.
Activating/deactivating IAQSTo change the setting for IAQS activation/deacti- vation:
1. In the center display's Settings view, go to
Climate.
2. Activate/deactivate IAQS by selecting/dese- lecting the
Air Quality Sensor box.
Related information
• Air quality (p. 177)
• Passenger compartment air filter (p. 179)
• Clean Zone Interior Package (CZIP)
*
(p. 178)