light VOLVO XC90 2015 Workshop Manual
[x] Cancel search | Manufacturer: VOLVO, Model Year: 2015, Model line: XC90, Model: VOLVO XC90 2015Pages: 570, PDF Size: 12.44 MB
Page 158 of 570
INSTRUMENTS AND CONTROLS
* Option/accessory, for more information, see Introduction.
156
Windshield and headlight washers
Use the windshield/headlight washers to help improve visibility.
Starting the windshield and headlight washers
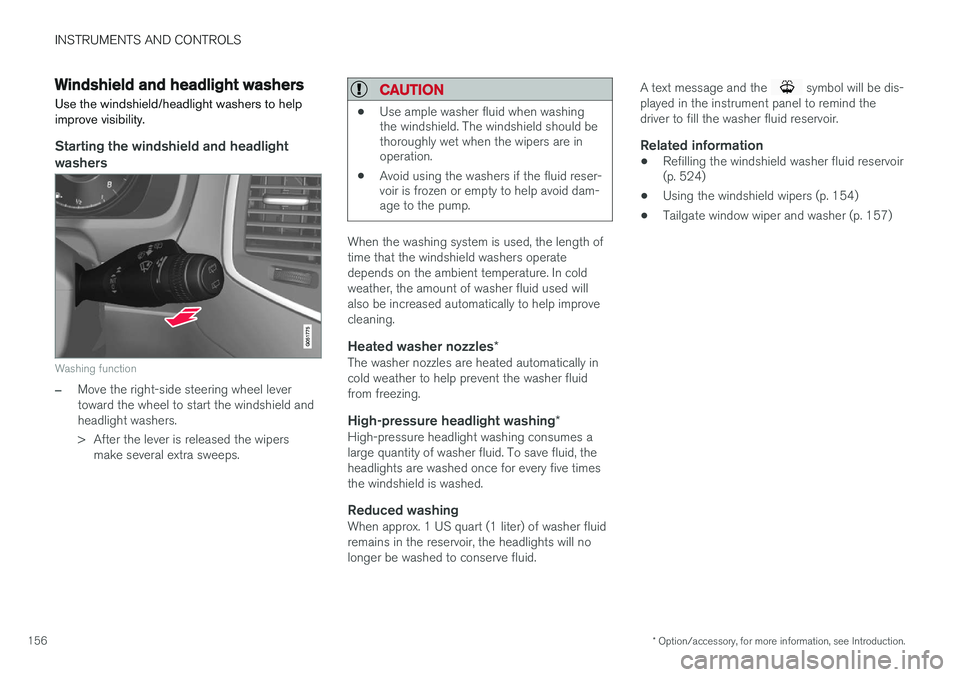
Washing function
–Move the right-side steering wheel lever toward the wheel to start the windshield andheadlight washers.
> After the lever is released the wipers make several extra sweeps.
CAUTION
• Use ample washer fluid when washing the windshield. The windshield should bethoroughly wet when the wipers are inoperation.
• Avoid using the washers if the fluid reser-voir is frozen or empty to help avoid dam-age to the pump.
When the washing system is used, the length of time that the windshield washers operatedepends on the ambient temperature. In coldweather, the amount of washer fluid used willalso be increased automatically to help improvecleaning.
Heated washer nozzles
*The washer nozzles are heated automatically incold weather to help prevent the washer fluidfrom freezing.
High-pressure headlight washing *High-pressure headlight washing consumes alarge quantity of washer fluid. To save fluid, theheadlights are washed once for every five timesthe windshield is washed.
Reduced washingWhen approx. 1 US quart (1 liter) of washer fluidremains in the reservoir, the headlights will nolonger be washed to conserve fluid. A text message and the
symbol will be dis-
played in the instrument panel to remind the driver to fill the washer fluid reservoir.
Related information
• Refilling the windshield washer fluid reservoir (p. 524)
• Using the windshield wipers (p. 154)
• Tailgate window wiper and washer (p. 157)
Page 159 of 570

INSTRUMENTS AND CONTROLS
* Option/accessory, for more information, see Introduction.157
Tailgate window wiper and washer
Start the tailgate window wiper/washer with con- trols on the right-side steering wheel lever.
NOTE
The rear wiper is equipped with a cut-off function, which means that it will not operateif its electric motor overheats. The wiper willfunction again after a cool-down period(30 seconds or longer, depending on the heatof the motor and ambient temperature condi-tions).
Using the tailgate wiper/washer
Press for tailgate interval wiper
Press for tailgate continuous wiper
–Move the lever forward to wash/wipe the tail- gate window.
Tailgate wiper and reverse gear1. In the center display, select SettingsMy
Car
Wipers.
2. Activate/deactivate by selecting/deselecting the
Auto Rear Wiper box.
If the windshield wipers are on and the transmis- sion is put into reverse gear, the tailgate wiperwill start. This function is deactivated when a dif-ferent gear is selected.
NOTE
On vehicles with the optional rain sensor, the tailgate wiper will be activated when reverseis selected, if the rain sensor is activated andit is raining.
Related information
• Using the windshield wipers (p. 154)
• Windshield and headlight washers (p. 156)
• Refilling the windshield washer fluid reservoir (p. 524)
• Activating/deactivating the rain sensor(p. 155)
Steering wheel The steering wheel has controls for the horn, certain optional driver support systems, menus/messages and paddles for manually shifting gears
*.
Page 161 of 570
INSTRUMENTS AND CONTROLS
* Option/accessory, for more information, see Introduction.159
Adjusting the steering wheel
The steering wheel can be adjusted to various positions.
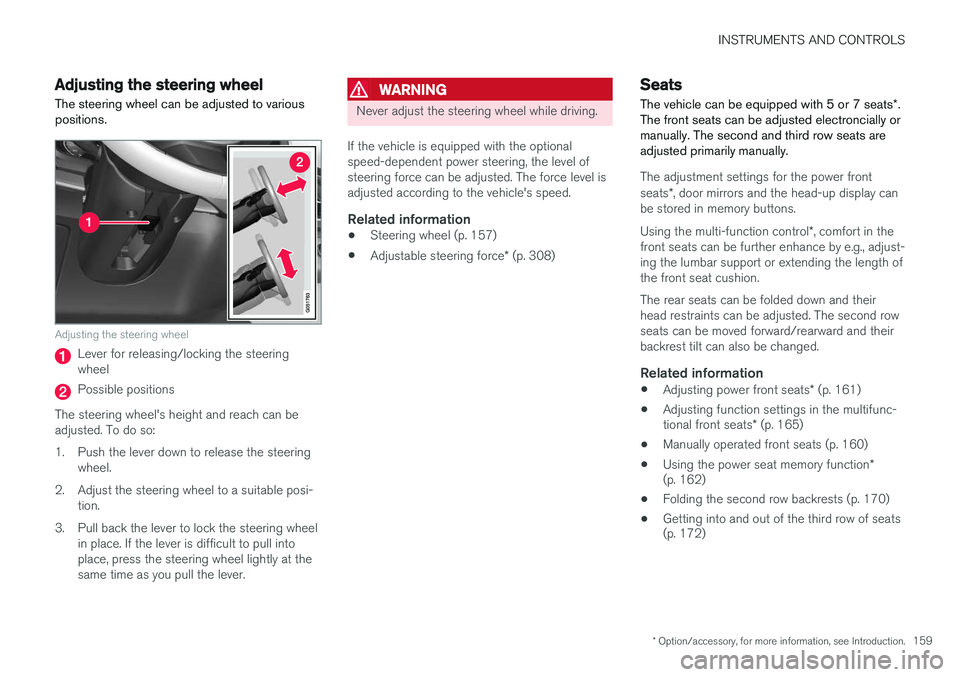
Adjusting the steering wheel
Lever for releasing/locking the steering wheel
Possible positions
The steering wheel's height and reach can be adjusted. To do so:
1. Push the lever down to release the steering wheel.
2. Adjust the steering wheel to a suitable posi- tion.
3. Pull back the lever to lock the steering wheel in place. If the lever is difficult to pull into place, press the steering wheel lightly at thesame time as you pull the lever.
WARNING
Never adjust the steering wheel while driving.
If the vehicle is equipped with the optional speed-dependent power steering, the level ofsteering force can be adjusted. The force level isadjusted according to the vehicle's speed.
Related information
• Steering wheel (p. 157)
• Adjustable steering force
* (p. 308)
Seats
The vehicle can be equipped with 5 or 7 seats *.
The front seats can be adjusted electroncially or manually. The second and third row seats areadjusted primarily manually.
The adjustment settings for the power front seats *, door mirrors and the head-up display can
be stored in memory buttons. Using the multi-function control *, comfort in the
front seats can be further enhance by e.g., adjust- ing the lumbar support or extending the length ofthe front seat cushion. The rear seats can be folded down and their head restraints can be adjusted. The second rowseats can be moved forward/rearward and theirbackrest tilt can also be changed.
Related information
• Adjusting power front seats
* (p. 161)
• Adjusting function settings in the multifunc- tional front seats
* (p. 165)
• Manually operated front seats (p. 160)
• Using the power seat memory function
*
(p. 162)
• Folding the second row backrests (p. 170)
• Getting into and out of the third row of seats (p. 172)
Page 165 of 570
INSTRUMENTS AND CONTROLS
* Option/accessory, for more information, see Introduction.163
2.
Press and release the M button. The indica-
tor light in the button will illuminate.
3. Press button 1, 2 or 3 within 3 seconds to
store the current position of the seat/ mirrors/head-up display in the selected but-ton.
> When the position has been stored in the selected button, an audible signal will sound and the indicator light in the M but-
ton will go out.
If none of the buttons (1, 2 or 3) is pressedwithin 3 seconds, the indicator light in the M but-
ton will go out and the position will not be stored.
The seat/mirrors/head-up display must be moved before a new position can be stored.
Using a stored positionA stored position can be used when one of thefront doors is opened or closed:
Front door open
–Press one of the bottons ( 1–3 ) briefly. The
seat, door mirrors and head-up display will move to the positions stored in that button.
Front door closed
–Press and hold one of the buttons ( 1–3 ) until
the seat, door mirrors and head-up display have moved to the positions stored in thatbutton. The seat, door mirrors and head-up display willstop automatically if the button is released beforethe they have reached the stored positions.
WARNING
•
Because the driver's seat can be adjusted with the ignition off, children should neverbe left unattended in the vehicle.
• Movement of the seat can be STOPPEDat any time by pressing any button on thepower seat control panel.
• Do not adjust the seat while driving. Theseat should be adjusted so that the brakepedal can be depressed fully. In addition,position the seat as far rearward as com-fort and control allow.
• The seat rails on the floor must not beobstructed in any way when the seat is inmotion.
Related information
•
Adjusting power front seats
* (p. 161)
• Power front seats
* (p. 161)
Multifunctional front seats *
In addition to the adjustment settings offered by the power seat controls, the multifunction controlprovides additional possibilities for convenienceand comfort.
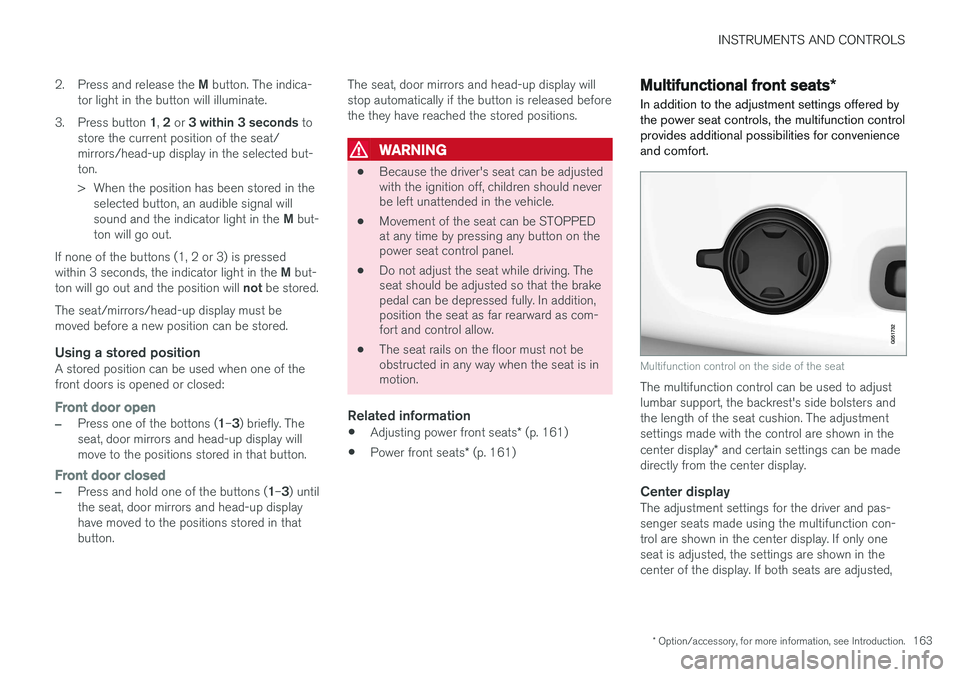
Multifunction control on the side of the seat
The multifunction control can be used to adjust lumbar support, the backrest's side bolsters andthe length of the seat cushion. The adjustmentsettings made with the control are shown in the center display * and certain settings can be made
directly from the center display.
Center displayThe adjustment settings for the driver and pas- senger seats made using the multifunction con-trol are shown in the center display. If only oneseat is adjusted, the settings are shown in thecenter of the display. If both seats are adjusted,
Page 178 of 570

CLIMATE
* Option/accessory, for more information, see Introduction.
176
Climate control system
The vehicle is equipped with Electronic Climate Control (ECC) that cools, heats, dehumidifiesand filters the air in the passenger compartment.
2-zone climate system
2-zone system climate zones
The 2-zone climate system makes it possible to set the left- and right-side temperatures sepa-rately. All climate system settings are made from the center display and the buttons in the center con-sole.
4-zone climate system *
4-zone system climate zones
The 4-zone climate system makes it possible to set the left- and right-side temperatures sepa-rately for the front and rears seats. All climate system settings are made from the center display and the buttons in the center con-sole. Settings for the rear seats can also bemade from the climate system panel on the rearside of the tunnel console.
Related information
•Climate system sensors (p. 177)
• Perceived temperature (p. 176)
• Climate system controls (p. 180)
• Air quality (p. 177)
• Air distribution (p. 194)
• Air conditioning refrigerant (p. 541)
Perceived temperature
The climate system regulates passenger com- partment temperature based on the perceivedtemperature, not on the actual one.
The selected passenger compartment tempera- ture is based on a physical perception relating tothe current ambient temperature, air flow, humid-ity, sunlight in the passenger compartment, etc. The system's sunlight sensor monitors the side of the car where sunlight is entering the passengercompartment. This means that the actual tem-perature may differ between the right and leftsides of the compartment, even if the tempera-ture setting is the same for both sides.
Related information
• Climate system sensors (p. 177)
• Climate control system (p. 176)
Page 179 of 570

CLIMATE
* Option/accessory, for more information, see Introduction.177
Climate system sensors The climate system's sensors help regulate the passenger compartment temperature, humiditylevel, etc.
Location of the sensors
Humidity sensor: in the rearview mirror con- sole.
Ambient temperature sensor: in the pas- senger's side door mirror.
Passenger compartment temperature sen- sor: near the center console buttons.
Sunlight sensor: on the upper side of the dashboard.
NOTE
Do not cover or block the sensors with cloth- ing or other objects.
Related information
•Climate control system (p. 176)
• Perceived temperature (p. 176)
Air quality
The materials used in the passenger compart- ment have been selected and designed to bepleasant and comfortable, even for people withasthma or other types of allergies.
Materials in the passenger compartmentThe materials used have been developed to help minimize the amount of dust and make the cabineasier to keep clean. All floor mats can be easily removed for cleaning. Use car cleaning products recommended byVolvo. Only use cleaning agents and car care products recommended by Volvo. Clean regularly and fol-low the instructions included with the car careproduct.
Air filtering systemsIn addition to the passenger compartment filter, the Clean Zone Interior Package * and the Interior
Air Quality System * contribute to a cleaner pas-
senger compartment environment.
Related information
• Passenger compartment air filter (p. 179)
• Interior Air Quality System (IAQS)
* (p. 178)
• Clean Zone Interior Package (CZIP)
*
(p. 178)
• Cleaning the interior (p. 527)
Page 181 of 570
CLIMATE
* Option/accessory, for more information, see Introduction.179
Passenger compartment air filter
All air entering the passenger compartment through the climate system air intake is filtered.
Filter replacementThe filter must be replaced according to the serv- ice schedule for your vehicle. When driving in e.g.,dusty or industrial areas, the filer may need to bereplaced more often. Consult your Volvo retailer.
Related information
• Air quality (p. 177)
• Clean Zone Interior Package (CZIP)
*
(p. 178)
• Interior Air Quality System (IAQS)
* (p. 178)
• Volvo's service program (p. 488)
Automatic climate control The Auto feature automatically controls a num- ber of climate system functions.
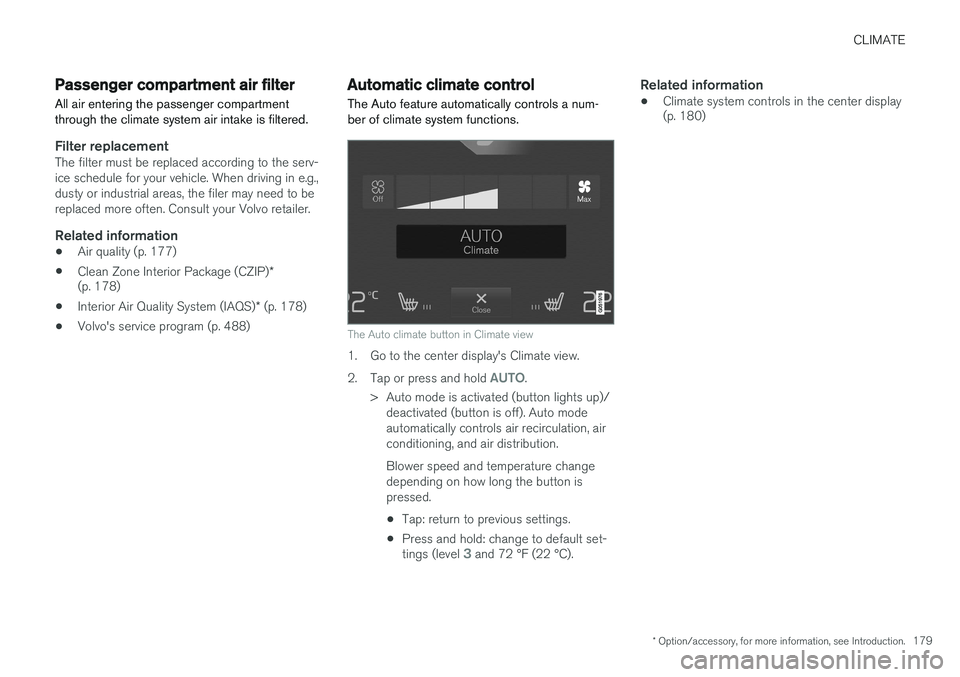
The Auto climate button in Climate view
1. Go to the center display's Climate view. 2.
Tap or press and hold
AUTO.
> Auto mode is activated (button lights up)/ deactivated (button is off). Auto mode automatically controls air recirculation, airconditioning, and air distribution. Blower speed and temperature change depending on how long the button ispressed.
• Tap: return to previous settings.
• Press and hold: change to default set- tings (level
3 and 72 °F (22 °C).
Related information
• Climate system controls in the center display (p. 180)
Page 185 of 570
CLIMATE
* Option/accessory, for more information, see Introduction.183
Setting the blower speed The blower can be set to seven different speeds. In models with the 4-zone climate system*,
blower speed can be set separately for the front and rear seats.
Setting blower speed for the front seats 3
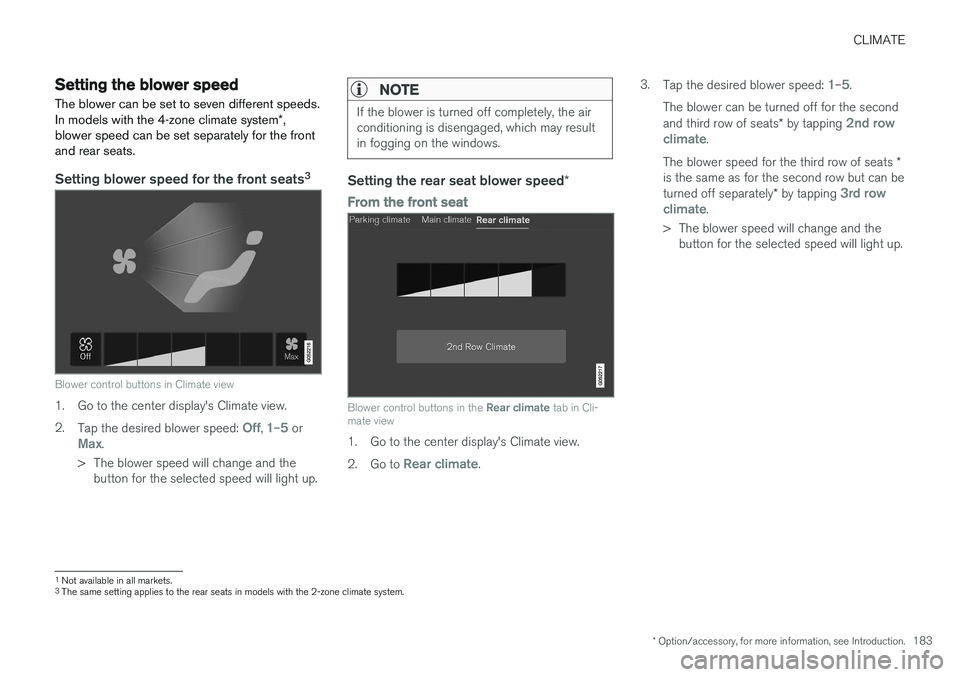
Blower control buttons in Climate view
1. Go to the center display's Climate view. 2.
Tap the desired blower speed:
Off, 1–5 orMax.
> The blower speed will change and the button for the selected speed will light up.
NOTE
If the blower is turned off completely, the air conditioning is disengaged, which may resultin fogging on the windows.
Setting the rear seat blower speed *
From the front seat
Blower control buttons in the Rear climate tab in Cli-
mate view
1. Go to the center display's Climate view. 2. Go to
Rear climate. 3.
Tap the desired blower speed:
1–5.
The blower can be turned off for the second and third row of seats * by tapping
2nd row
climate.
The blower speed for the third row of seats *
is the same as for the second row but can be turned off separately * by tapping
3rd row
climate.
> The blower speed will change and the button for the selected speed will light up.
1Not available in all markets.
3 The same setting applies to the rear seats in models with the 2-zone climate system.
Page 186 of 570
CLIMATE
* Option/accessory, for more information, see Introduction.
184
From the rear seat
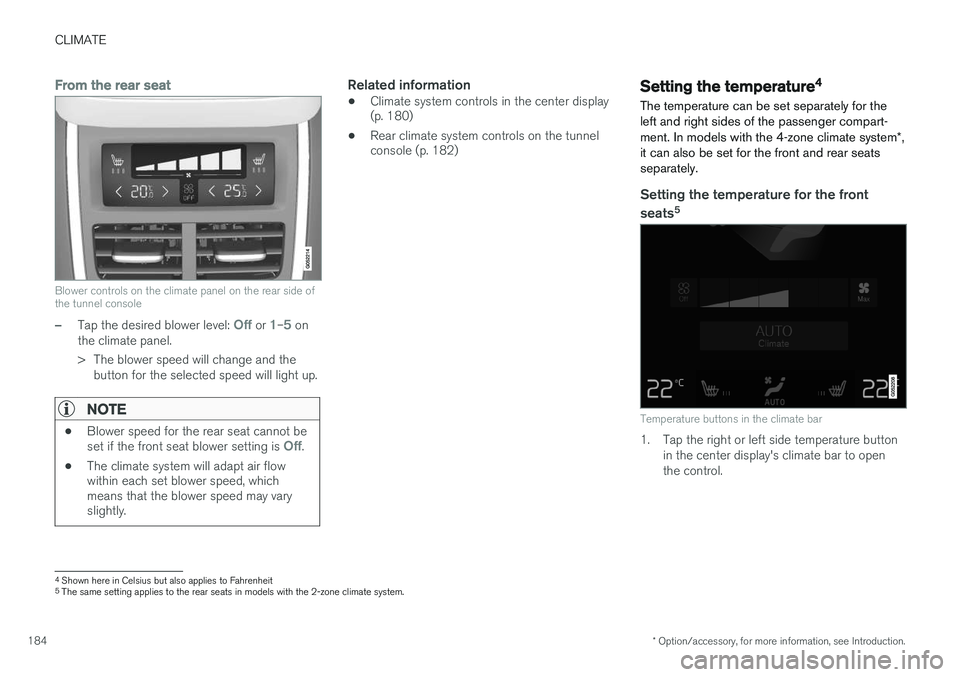
Blower controls on the climate panel on the rear side of the tunnel console
–Tap the desired blower level: Off or 1–5 on
the climate panel.
> The blower speed will change and the button for the selected speed will light up.
NOTE
• Blower speed for the rear seat cannot be set if the front seat blower setting is Off.
• The climate system will adapt air flow within each set blower speed, whichmeans that the blower speed may varyslightly.
Related information
• Climate system controls in the center display (p. 180)
• Rear climate system controls on the tunnelconsole (p. 182)Setting the temperature 4
The temperature can be set separately for the left and right sides of the passenger compart- ment. In models with the 4-zone climate system *,
it can also be set for the front and rear seats separately.
Setting the temperature for the front
seats 5
Temperature buttons in the climate bar
1. Tap the right or left side temperature button
in the center display's climate bar to open the control.
4Shown here in Celsius but also applies to Fahrenheit5
The same setting applies to the rear seats in models with the 2-zone climate system.
Page 188 of 570
CLIMATE
186
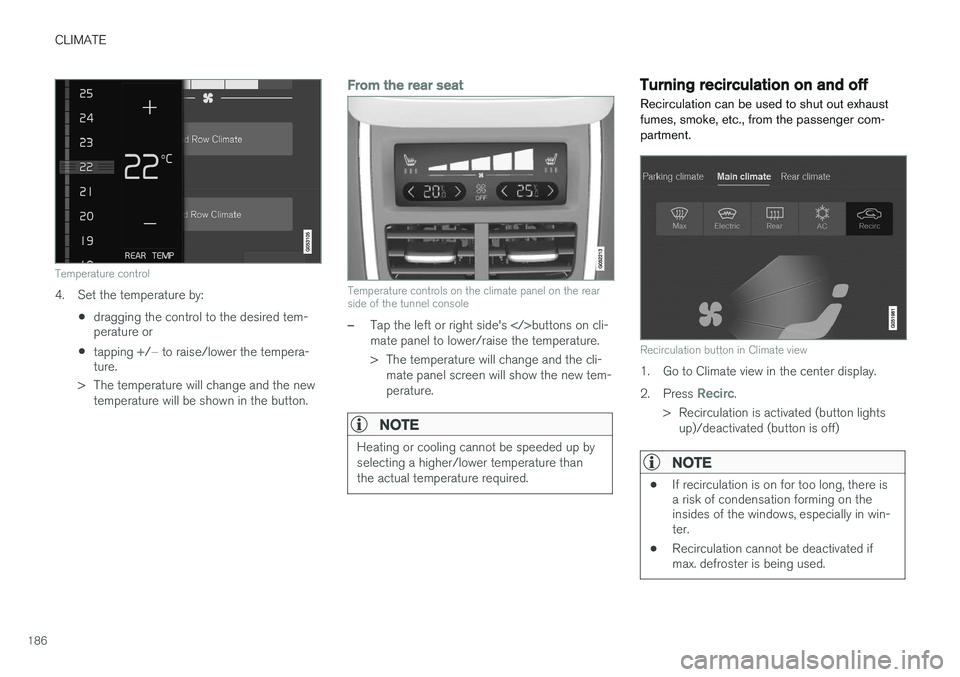
Temperature control
4. Set the temperature by:•dragging the control to the desired tem- perature or
• tapping
+/− to raise/lower the tempera-
ture.
> The temperature will change and the new temperature will be shown in the button.
From the rear seat
Temperature controls on the climate panel on the rear side of the tunnel console
–Tap the left or right side's buttons on cli-
mate panel to lower/raise the temperature.
> The temperature will change and the cli- mate panel screen will show the new tem- perature.
NOTE
Heating or cooling cannot be speeded up by selecting a higher/lower temperature thanthe actual temperature required.
Turning recirculation on and off
Recirculation can be used to shut out exhaust fumes, smoke, etc., from the passenger com-partment.
Recirculation button in Climate view
1. Go to Climate view in the center display. 2. Press
Recirc.
> Recirculation is activated (button lights up)/deactivated (button is off)
NOTE
• If recirculation is on for too long, there is a risk of condensation forming on theinsides of the windows, especially in win-ter.
• Recirculation cannot be deactivated ifmax. defroster is being used.