roof VOLVO XC90 2015 Owners Manual
[x] Cancel search | Manufacturer: VOLVO, Model Year: 2015, Model line: XC90, Model: VOLVO XC90 2015Pages: 570, PDF Size: 12.44 MB
Page 5 of 570

3
Starting or moving a vehicle in safety mode82
Safety systems 83
Airbag system 83
Driver/passenger side airbags 84
Inflatable curtains 87
Side impact airbags 88
Rollover protection system 89
Whiplash protection system 89
INSTRUMENTS AND CONTROLS
Trip computer92
Displaying trip computer information 92
Displaying trip statistics 94
HomeLink ®
Wireless Control System *94
Programming the HomeLink ®
Wire-
less Control System * 95
Instruments and controls 98
Adjusting the power door mirrors 100
Laminated panoramic roof *
101
Operating the laminated panoramic roof *
102
Power windows 104
Operating the power windows 104
Rearview mirror 105
Using sun shades 106
Settings view 106
Categories in Settings view 107
Changing system settings in Set- tings view 109
Linking a remote key to a driver profile 110
Changing settings in apps 111
Resetting the settings view 111
Resetting user data when the vehiclechanges owners 112
Driver profiles 112
Editing a driver profile 114
Importing/exporting a driver profile from/to a USB flash drive115
Ambient temperature sensor 116
Clock 116
Head-up display (HUD) *
117
Voice control 120
Using voice commands 121
Voice control for cell phones 121
Voice control for radio and media 122
Climate system voice commands 122
Navigation system voice commands 124
Voice control settings 125
Indicator symbols in the instrument panel 126
Instrument panel 128
Instrument panel App menu 129
Instrument panel licenses 130
Warning symbols in the instrument panel 134
Compass 136
Calibrating the compass 137
Lighting panel and controls 138
Low beam headlights 139
Daytime Running Lights (DRL) 140
High and low beam headlights 140
Active Bending Lights *
142
Page 56 of 570

INTRODUCTION
* Option/accessory, for more information, see Introduction.
54
Saving/deleting favoritesSave an article as a favorite by tapping the star (
) at the upper right when an article is open.
The star symbol will be filled in (
) when its arti-
cle has been saved as a favorite. To delete a favorite, tap its star again.
Using the search function1. Tap the magnifying glass icon () in the
owner's manual's upper menu. A keyboard will appear at the bottom of the screen.
2. Enter a word, e.g., "seat belt." > Suggested articles will be displayed asmore characters are entered.
3. Confirm by tapping the article. To leave search mode tap the up-arrow next to thesearch box.
Related information
• On-board digital owner's manual (p. 52)
• Using the center display keyboard (p. 32)
Glass
Laminated glass
The windshield and panoramic roof
* are made of
laminated glass, which is reinforced to help pre- vent break-ins and to provide additional sound-proofing. Laminated glass is optional for theother side windows.
Laminated glass symbol 6
Related information
•
Laminated panoramic roof
* (p. 101)
• Power windows (p. 104)
• Defrosting windows and mirrors (p. 187)
• Using sun shades (p. 106)
• Rearview mirror (p. 105)
• Power windows (p. 104)
• Head-up display (HUD)
* (p. 117)
• Activating/deactivating the rain sensor (p. 155)
• Windshield and headlight washers (p. 156)
• Tailgate window wiper and washer (p. 157)
Technician certification
In addition to Volvo factory training, Volvo sup- ports certification by the National Institute forAutomotive Service Excellence (A.S.E.).
Certified technicians have demonstrated a high degree of competence in specific areas. Besidespassing exams, each technician must also haveworked in the field for two or more years before acertificate is issued. These professional techni-cians are best able to analyze vehicle problemsand perform the necessary maintenance proce-dures to keep your Volvo at peak operating con-dition.
6 This symbol is not shown on the windshield or panoramic roof.
Page 89 of 570
SAFETY
87
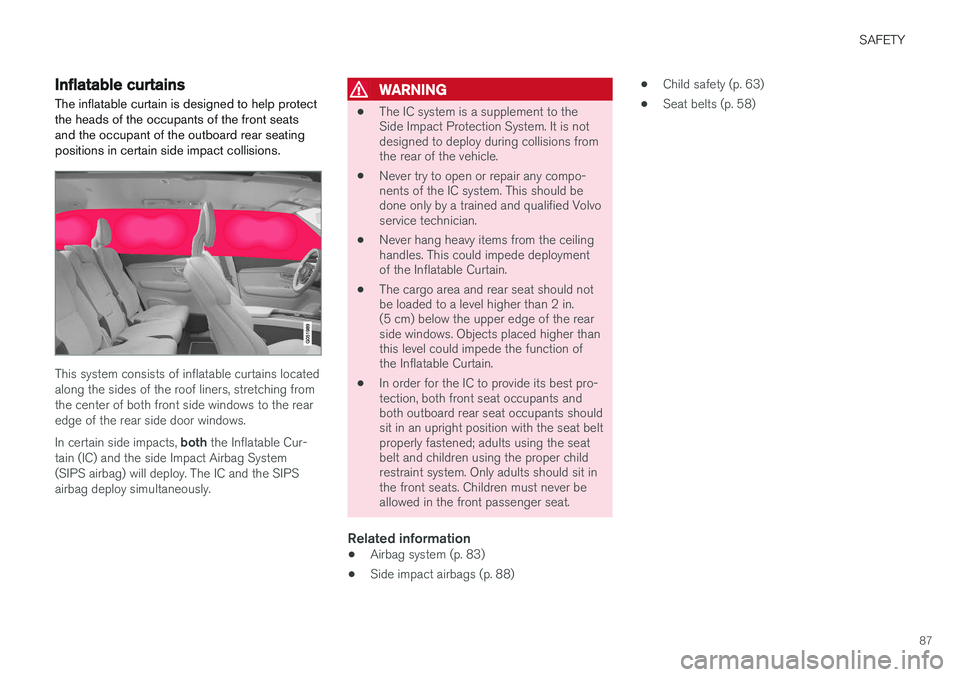
Inflatable curtainsThe inflatable curtain is designed to help protect the heads of the occupants of the front seatsand the occupant of the outboard rear seatingpositions in certain side impact collisions.
This system consists of inflatable curtains located along the sides of the roof liners, stretching fromthe center of both front side windows to the rearedge of the rear side door windows. In certain side impacts, both the Inflatable Cur-
tain (IC) and the side Impact Airbag System (SIPS airbag) will deploy. The IC and the SIPSairbag deploy simultaneously.
WARNING
• The IC system is a supplement to the Side Impact Protection System. It is notdesigned to deploy during collisions fromthe rear of the vehicle.
• Never try to open or repair any compo-nents of the IC system. This should bedone only by a trained and qualified Volvoservice technician.
• Never hang heavy items from the ceilinghandles. This could impede deploymentof the Inflatable Curtain.
• The cargo area and rear seat should notbe loaded to a level higher than 2 in.(5 cm) below the upper edge of the rearside windows. Objects placed higher thanthis level could impede the function ofthe Inflatable Curtain.
• In order for the IC to provide its best pro-tection, both front seat occupants andboth outboard rear seat occupants shouldsit in an upright position with the seat beltproperly fastened; adults using the seatbelt and children using the proper childrestraint system. Only adults should sit inthe front seats. Children must never beallowed in the front passenger seat.
Related information
• Airbag system (p. 83)
• Side impact airbags (p. 88) •
Child safety (p. 63)
• Seat belts (p. 58)
Page 101 of 570
INSTRUMENTS AND CONTROLS
* Option/accessory, for more information, see Introduction.99
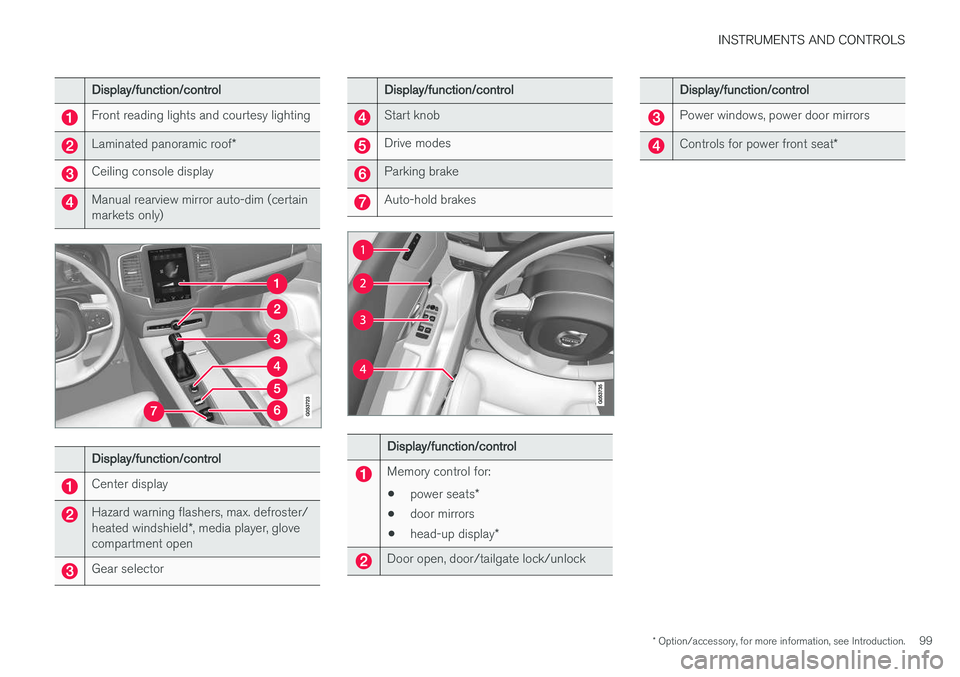
Display/function/control
Front reading lights and courtesy lighting
Laminated panoramic roof*
Ceiling console display
Manual rearview mirror auto-dim (certain markets only)
Display/function/control
Center display
Hazard warning flashers, max. defroster/ heated windshield*, media player, glove
compartment open
Gear selector
Display/function/control
Start knob
Drive modes
Parking brake
Auto-hold brakes
Display/function/control
Memory control for:
• power seats
*
• door mirrors
• head-up display
*
Door open, door/tailgate lock/unlock
Display/function/control
Power windows, power door mirrors
Controls for power front seat *
Page 103 of 570
INSTRUMENTS AND CONTROLS
* Option/accessory, for more information, see Introduction.101
1.
Tap
Settings in Top view.
2. Tap
My CarMirrors.
3. Select
Fold Mirrors When Locking to acti-
vate/deactivate.
Resetting the mirrors' positionA mirror that has been moved manually (e.g., bumped into in a parking lot, etc.) has to bereturned to its normal position electrically beforeautomatic folding will function correctly. 1. Fold in the mirrors with the L and R buttons.
2. Fold out the mirrors with the L and R buttons.
The mirrors have now been reset to their original positions.
Auto-dim *Settings can be made for the auto-dim functionin the rearview mirror. 1.
Tap
Settings in Top view.
2. Tap
My CarMirrors.
3. Under
Auto Dim Mirrors, select Normal,Dark or Light.
Related information
• Using the power seat memory function
*
(p. 162)
Laminated panoramic roof *
The laminated panoramic roof is divided into two sections and only the front section can beopened; it can be slid horizontally to the open orclosed positions or its rear edge can be raisedand lowered to allow ventilation.
The laminated panoramic roof also has a sun shade made of perforated fabric that is locatedbelow the sections of glass. This shade can beopened or closed, for example when driving inbright sunlight.
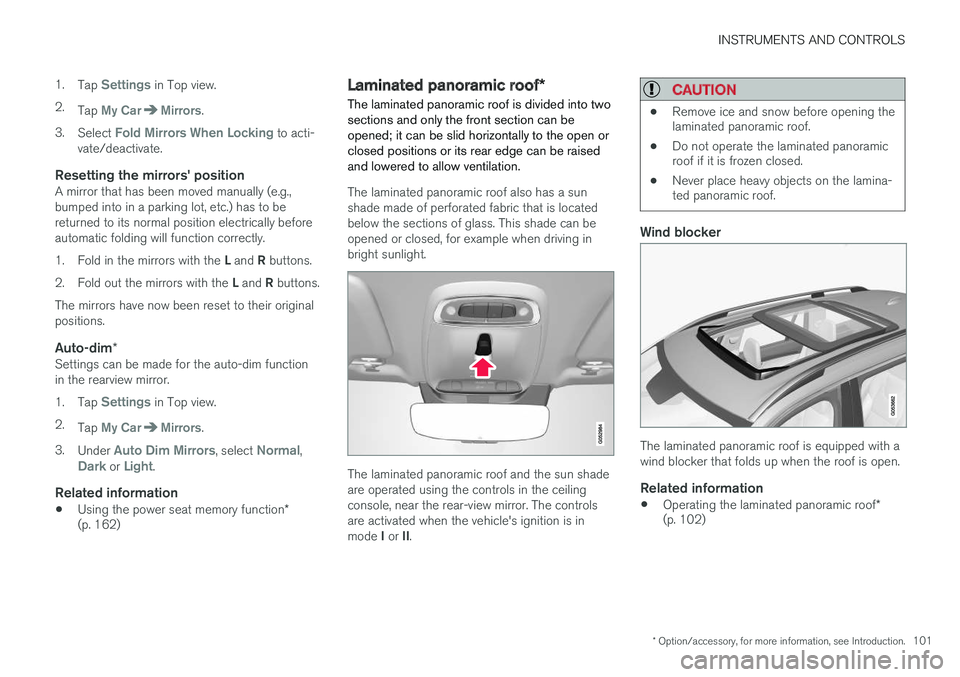
The laminated panoramic roof and the sun shade are operated using the controls in the ceilingconsole, near the rear-view mirror. The controlsare activated when the vehicle's ignition is in mode I or II.
CAUTION
• Remove ice and snow before opening the laminated panoramic roof.
• Do not operate the laminated panoramicroof if it is frozen closed.
• Never place heavy objects on the lamina-ted panoramic roof.
Wind blocker
The laminated panoramic roof is equipped with a wind blocker that folds up when the roof is open.
Related information
•
Operating the laminated panoramic roof
*
(p. 102)
Page 104 of 570
INSTRUMENTS AND CONTROLS
* Option/accessory, for more information, see Introduction.
102
Operating the laminated panoramic roof *
When opened automatically, the sun shade and roof open completely. In the ventilation position, the rear edge of the front section of the roof is raised.
Operation
WARNING
• During manual closing, if the laminated panoramic roof is obstructed, immediatelyopen it again.
• Never open or close the laminated panor-amic roof if it is obstructed in any way.
• Never allow a child to operate the lamina-ted panoramic roof.
• Never leave a child alone in a vehicle.
• When leaving the vehicle, ensure that the ignition is in mode
0. Never leave a
remote key in the vehicle.
• Never extend any object or body part though the open laminated panoramicroof, even if the vehicle's ignition is com-pletely switched off.
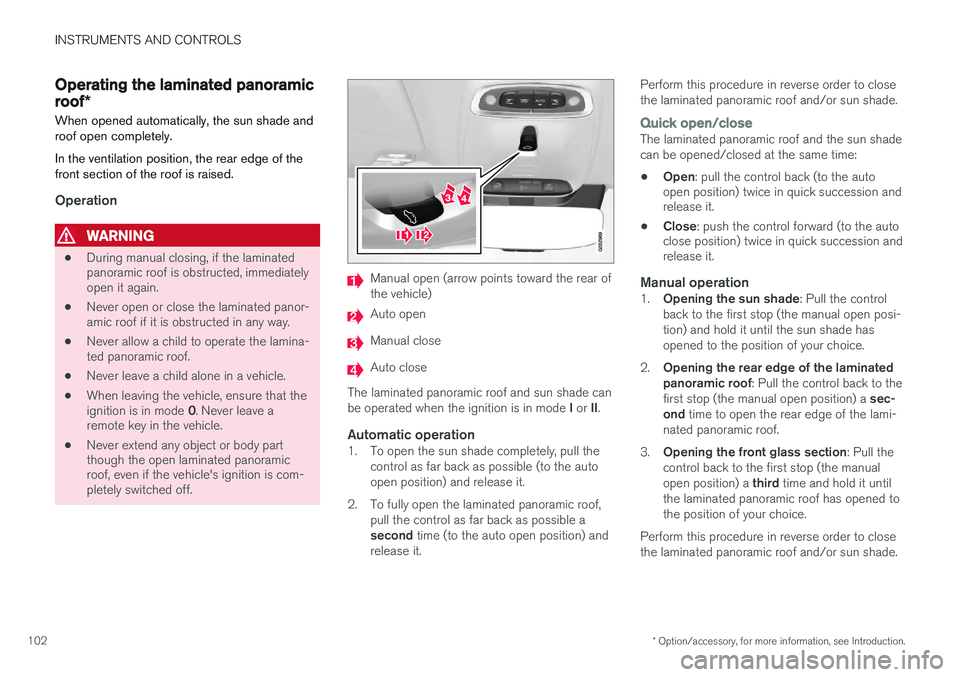
Manual open (arrow points toward the rear of the vehicle)
Auto open
Manual close
Auto close
The laminated panoramic roof and sun shade can be operated when the ignition is in mode I or II.
Automatic operation1. To open the sun shade completely, pull the
control as far back as possible (to the auto open position) and release it.
2. To fully open the laminated panoramic roof, pull the control as far back as possible a second time (to the auto open position) and
release it. Perform this procedure in reverse order to close the laminated panoramic roof and/or sun shade.
Quick open/closeThe laminated panoramic roof and the sun shade can be opened/closed at the same time: •
Open
: pull the control back (to the auto
open position) twice in quick succession and release it.
• Close
: push the control forward (to the auto
close position) twice in quick succession andrelease it.
Manual operation1. Opening the sun shade : Pull the control
back to the first stop (the manual open posi- tion) and hold it until the sun shade hasopened to the position of your choice.
2. Opening the rear edge of the laminatedpanoramic roof : Pull the control back to the
first stop (the manual open position) a sec-
ond time to open the rear edge of the lami-
nated panoramic roof.
3. Opening the front glass section : Pull the
control back to the first stop (the manual open position) a third time and hold it until
the laminated panoramic roof has opened to the position of your choice.
Perform this procedure in reverse order to closethe laminated panoramic roof and/or sun shade.
Page 105 of 570
INSTRUMENTS AND CONTROLS
103
NOTE
For manual opening, the sun shade must first be fully open before it will be possible to openthe laminated panoramic roof. When closing,the laminated panoramic roof must be fullyclosed before the sun shade can be closed.
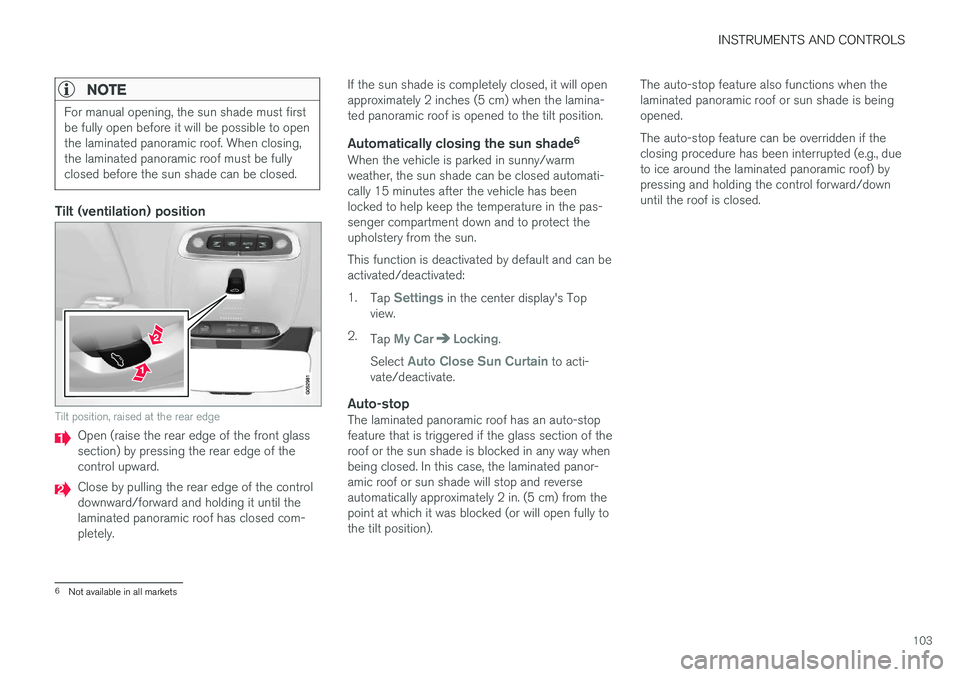
Tilt (ventilation) position
Tilt position, raised at the rear edge
Open (raise the rear edge of the front glass section) by pressing the rear edge of thecontrol upward.
Close by pulling the rear edge of the control downward/forward and holding it until thelaminated panoramic roof has closed com-pletely.If the sun shade is completely closed, it will openapproximately 2 inches (5 cm) when the lamina-ted panoramic roof is opened to the tilt position.
Automatically closing the sun shade
6When the vehicle is parked in sunny/warmweather, the sun shade can be closed automati-cally 15 minutes after the vehicle has beenlocked to help keep the temperature in the pas-senger compartment down and to protect theupholstery from the sun. This function is deactivated by default and can be activated/deactivated: 1.
Tap
Settings in the center display's Top
view.
2. Tap
My CarLocking.
Select
Auto Close Sun Curtain to acti-
vate/deactivate.
Auto-stopThe laminated panoramic roof has an auto-stop feature that is triggered if the glass section of theroof or the sun shade is blocked in any way whenbeing closed. In this case, the laminated panor-amic roof or sun shade will stop and reverseautomatically approximately 2 in. (5 cm) from thepoint at which it was blocked (or will open fully tothe tilt position). The auto-stop feature also functions when thelaminated panoramic roof or sun shade is beingopened. The auto-stop feature can be overridden if the closing procedure has been interrupted (e.g., dueto ice around the laminated panoramic roof) bypressing and holding the control forward/downuntil the roof is closed.
6
Not available in all markets
Page 123 of 570
INSTRUMENTS AND CONTROLS
121
Using voice commands
The following is an introduction for using voice commands.
Press the button on the right- side steering wheel keypad toactivate the system and initiatea voice command dialog.
Keep the following points in mind when using voice commands:
• When giving a command, speak at your usual speed and in a normal tone of voice
after
the tone .
• Avoid speaking while the system is respond- ing. Commands cannot be processed duringa response.
• Avoid background noises in the cabin whenusing the system by closing the vehicle's doors, windows and panoramic roof
* when
giving voice commands..
Voice command dialogs can be cancelled by:
• Saying "
Cancel".
• By pressing and holding the
button on
the right-side steering wheel keypad.
To speed up a command dialog or to skip system responses, press the
button on the right-
side steering wheel keypad when the system is responding.
Voice command examples
Press , say " Call"-"[First-name] "-"[Last-
name] "-"[number category] " to call a contact
in your phonebook if the person has more than one phone number listed (i.e., home, mobile, work,etc.). For example, press
and say
" Call "-"Robin "-"Smith "-"mobile ".
Commands/phrasesThe following commands can always be used: •
Repeat: the system will repeat the most
recent voice instruction.
•
Cancel: cancel the dialog.
•
Help: Initiates a help dialog. The system will
provide several alternative commands that can be used in a given situation.
The commands for specific situations are descri- bed in the respective articles such as "Cell phonecommands", etc.
NumbersNumbers can be spoken individually, in groups or the entire phone number can be given at onetime.
Related information
• Voice control (p. 120)
Voice control for cell phones Voice commands can be used to control many of the most common functions in a Bluetooth ®
-
connected cell phone.
Cell phone voice commands:
• "
Phone ": initiates a phone dialog and dis-
plays possible commands.
• "
Call "-"[First-name] "-"[Last-name] ": calls
the selected contact from the phonebook.
• "
Call "-"[First-name] "-"[Last-
name] "-"[number category] ": calls a con-
tact in your phonebook if the person has more than one phone number listed (i.e.,home, mobile, work, etc.).
• "
Call "-"[phone number] ": calls the phone
number.
• "
Call list ": displays a list of calls.
Command for having a text message read aloud:
• "
Read message ": the message will be read
aloud.
Related information
• Using voice commands (p. 121)
Page 150 of 570
INSTRUMENTS AND CONTROLS
* Option/accessory, for more information, see Introduction.
148
Cargo area lightingThe cargo area lighting comes on or goes off when the tailgate is opened or closed.
Ambience lighting1. In the center display's Top view, select
SettingsMy CarLightsAmbient
Lighting
2. Choose among the following settings:
•
Ambient Light Intensity: Off, Low orHigh.
•
Ambient Light Level: Reduced or Full.
Mood lighting *When the overhead courtesy lighting has gone out and the engine is running, several LEDslocated near the roof console illuminate to pro-vide faint lighting to help e.g., see objects in stor-age compartments. This lighting goes out justafter the overhead courtesy lighting when thevehicle is locked. The following settings can be made for the mood lighting in the center display:
Brightness1. In the center display's Top view, select
SettingsMy CarLightsInterior
Mood Lighting.
2. Press
Interior Mood Light Intensity and
choose Off, Low or High.
Change the color of the light1. In the center display's Top view, select
SettingsMy CarLightsInterior
Mood Lighting.
2. Choose
By Temperature, By Theme orTheme Colors.
Related information
• Lighting panel and controls (p. 138)
Using turn signals
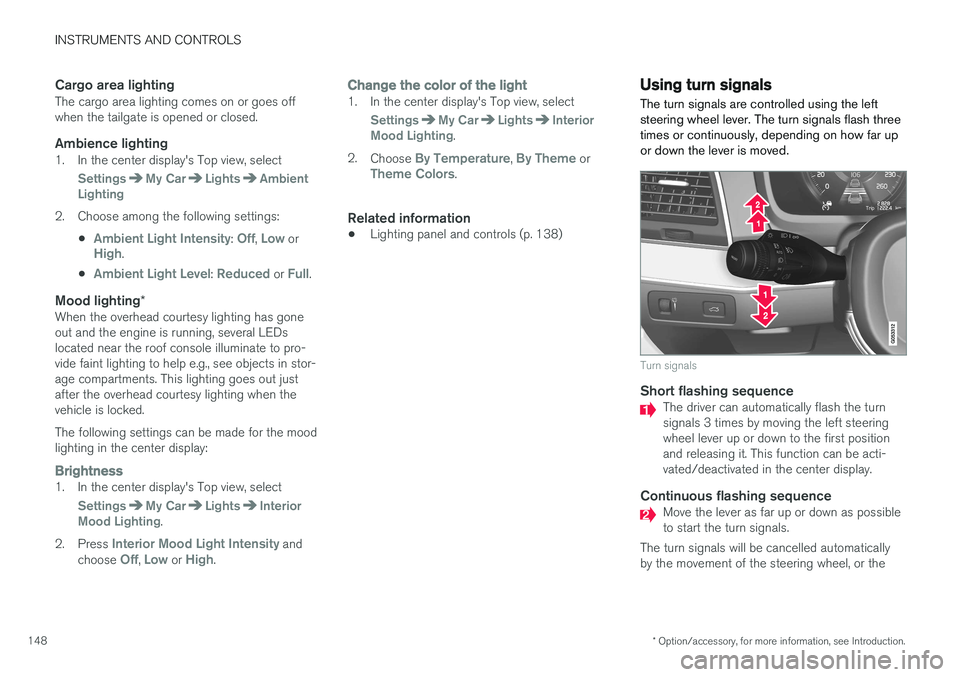
The turn signals are controlled using the left steering wheel lever. The turn signals flash threetimes or continuously, depending on how far upor down the lever is moved.
Turn signals
Short flashing sequenceThe driver can automatically flash the turn signals 3 times by moving the left steeringwheel lever up or down to the first positionand releasing it. This function can be acti-vated/deactivated in the center display.
Continuous flashing sequenceMove the lever as far up or down as possible to start the turn signals.
The turn signals will be cancelled automaticallyby the movement of the steering wheel, or the
Page 192 of 570
CLIMATE
* Option/accessory, for more information, see Introduction.
190 2. Tap the steering wheel heating button
repeatedly to select one of four levels:
Off,High, Middle or Low.
> The level changes and is displayed in the button.
Automatic steering wheel heatingThe automatic function starts heating the steer- ing wheel when the temperature is sufficientlycold and turns it off automatically when the wheelis sufficiently warm. 1. Tap
Settings in the center display's Top
view.
2. Tap
Climate.
3. Under
Auto Steering Wheel Heating
Level, select Off, Low, Middle or High to
activate/deactivate the automatic function.
Related information
• Climate system controls (p. 180)
• Climate system controls in the center display (p. 180)
• Steering wheel (p. 157)
Air conditioning
The air conditioning cools and dehumidifies the air in the passenger compartment.
Activating/deactivating the main air conditioning unit
1. For the air conditioning to function optimally, close the side windows and laminated panor- amic roof *.
Air conditioning button in Climate view
2. Go to Climate view in the center display. 3.
Tap
AC.
> The air conditioning is activated (button lights up)/deactivated (button is off).
NOTE
• For the air conditioning to function opti- mally, close the side windows and lamina- ted panoramic roof
*
• The air conditioning cannot be activated if the blower is set to
Off.
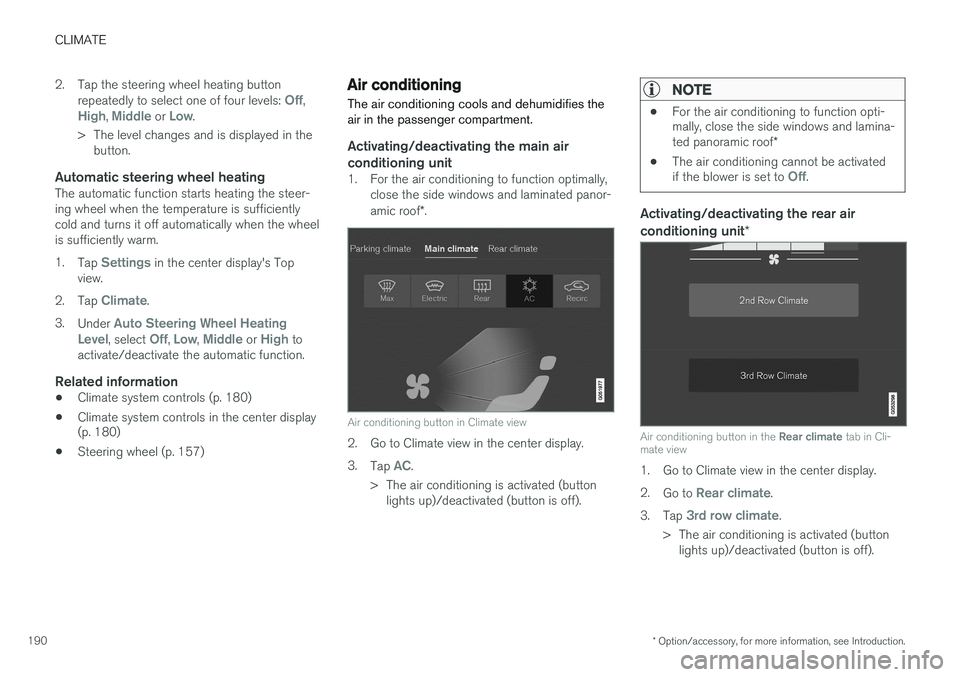
Activating/deactivating the rear air conditioning unit
*
Air conditioning button in the Rear climate tab in Cli-
mate view
1. Go to Climate view in the center display. 2. Go to
Rear climate.
3. Tap
3rd row climate.
> The air conditioning is activated (button lights up)/deactivated (button is off).