SIM VOLVO XC90 2017 Owner´s Manual
[x] Cancel search | Manufacturer: VOLVO, Model Year: 2017, Model line: XC90, Model: VOLVO XC90 2017Pages: 560, PDF Size: 9.97 MB
Page 409 of 560
INFOTAINMENT
* Option/accessory.407
The IBOC system is referred to as a "hybrid" since it is both analogue and digital. Duringhybrid operation, receivers still continue toreceive the analogue (non-digital) signal. HDRadio receivers incorporate both modes ofreception, where the receiver will automaticallyswitch to the analogue signal if the digital signalcannot be decoded or is lost by the receiver. When you have tuned to an HD Radio station, the
symbol will appear in the infotainment sys-
tem display. The symbol will be displayed in dif- ferent colors:
• Grayed-out symbol
: NoHD Radio broadcast
reception
• White symbol
: the radio is actively receiving
an HD broadcast
• Orange symbol
: the radio is receiving an
HD broadcast with digital sound
More information about HD Radio and IBOC canbe found on Ibiquity's website, www.hdradio.comand www.ibiquity.com.
Artist Experience ™A radio station's logo and album art can be dis-played. If a station opts to provide this informa-tion, it is broadcast once every 12 minutes, whichmeans that there may be a delay before thelogo/album art appear on the screen. The radiocan store 100 station logos so the next time theradio is tuned to the same station, the logo will be displayed immediately. Album art is synchedwith the artist that you are currently listening to.
iTunes taggingThis feature is common to both HD Radio and SiriusXM
®
Satellite radio *. See the section
"iTunes tagging" in the article "SiriusXM satellite radio settings" for more detailed information.
Ball game modeThis feature means that a main FM station (HD1)will broadcast live events, where the content ofthe programming is more important than soundquality, in analog mode only to help prevent thedelay between analog and digital broadcasting.The HD Radio symbol will be white during livebroadcasts and "Live" will be displayed next tothe symbol.
Benefits of digital broadcasting
• Better sound (FM sounds near CD qualityand AM as analogue FM).
• Some FM frequencies offer a greater num-ber of listening choices through “multicast-ing” (consisting of a frequency's main chan-nel and any sub-channels that may also beavailable on that particular frequency.)
• When receiving a digital signal there is nomultipath disturbance or hisses/pops/crack-ling due to outside influences.
How HD Radio
™ Technology
broadcasting works
HD Radio works similarly to conventional radioand broadcasts of this type are available in manyareas of the United States. However, there are afew key differences:
• Instead of transmitting one analogue signal,stations send out a bundled signal – bothanalogue and digital.
• An HD Radio receiver can receive both digi-tal and analogue broadcasts. Depending onthe terrain and location of the vehicle (whichwill influence the signal strength), thereceiver will determine which signal toreceive.
Related information
•
Switching HD Radio on and off (p. 408)
• HD Radio sub-channels (p. 408)
• HD Radio limitations (p. 409)
• Radio (p. 404)
• Changing and searching for radio stations(p. 405)
Page 435 of 560
INFOTAINMENT
}}
433
CD
1. Insert a CD. 2.Open the
CD app in the center display's App
view.
3. Select a track. > Playback will begin.
USB flash drive
1. Insert the flash drive in the USB socket. 2. Open the
USB app in the center display's
App view.
3. Select a track. > Playback will begin.
Mp3 player and iPod®
NOTE
Use the iPod app ( not the USB app) to start playback. When an iPod is the media source, the info- tainment system will use a menu structuresimilar to the iPod's own menu structure.
1. Connect the device.
2. Start playback in the connected device.3.
Open the
iPod, USB, AUX) app in the cen-
ter display's App view.
> Playback will begin.
Bluetooth-connected device
1. Connect the device.
2. Activate Bluetooth in the device.
3. Start playback from the connected device.4. Open the
Bluetooth app in the center dis-
play's App view.
> Playback will begin.
Internet media
1. Connect the vehicle to the Internet.
2. Open the app in the center display's App view.
> Playback will begin.
Video
1. Connect the device. 2.Open the
USB app in the center display's
App view.
3. Tap the title of the video content to be played.
> Playback will begin.
Apple CarPlay
Apple CarPlay is described in a separate article.
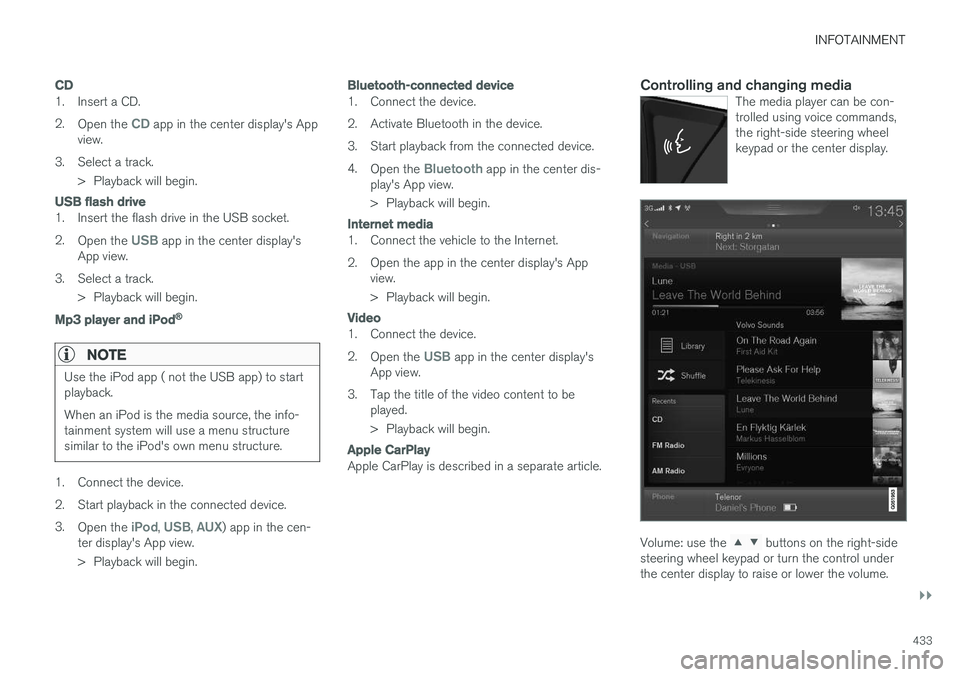
Controlling and changing mediaThe media player can be con- trolled using voice commands,the right-side steering wheelkeypad or the center display.
Volume: use the buttons on the right-side
steering wheel keypad or turn the control under the center display to raise or lower the volume.
Page 436 of 560
||
INFOTAINMENT
* Option/accessory.
434 Play/pause: tap the track's image, press the
symbol on the keypad or press the button under the center display. Change tracks: tap the desired track on the cen- ter display, press the
buttons under the
center display or on the right-side steering wheel keypad. Fast forward/reverse, move within a track: press the time axis on the center display and drag from side to side, press and hold the
buttons
under the center display or on the right-side steering wheel keypad. Change media source: Tap a media source under
Recents, tap the desired app in the center dis-
play's App view or use the
button on the
right-side steering wheel keypad.
Library: tap to play a track from the library.
Shuffle: tap to play tracks in random order.
Similar: tap to use Gracenote to search for simi-
lar music on the USB device and create a playlist based on the results. The playlist can contain upto 50 tracks.
Change device: tap to toggle between USB
devices if more than one is connected.
Video settings
The following can be adjusted with the video player in full screen or by opening the center dis- play's Top view and tapping
SettingsVideo:Audio Language, Off and Subtitle Language.
Play
DivX®
This DivX device must be registered in order to play purchased DivX Video-on-Demand (VOD)movies.
1. Open the center display's Top view and tap
SettingsVideoDivX
® VOD to get a
registration code.
2. Go to vod.divx.com for additional information and to complete the registration process.
Related information
• CD (media) player
* (p. 432)
• Media player (p. 427)
• Voice control for radio and media (p. 121)
• Apps (applications) (p. 402)
• Connecting a Bluetooth ®
device (p. 426)
• Connecting a device via the AUX/USB socket (p. 426)
• Gracenote (p. 436)
• Connecting to the Internet (p. 439)
• Media searches (p. 434)
• Video (p. 437)
• Apple CarPlay (p. 428)
Media searches
Searches can be made for information such as artists, composers, song titles, albums, video,audio books, playlists and podcasts (digitalmedia on the Internet).
1. Tap .
> The center display's Search view opens and the keyboard will be displayed.
2. Enter a search word/phrase.
Page 437 of 560
INFOTAINMENT
435
3.
Tap
Search.
> The infotainment system will search through all connected devices and any results will be displayed by category.
Swipe the screen horizontally to display each cat-egory separately.
Related information
• Media player (p. 427)
• Playing media (p. 432)
• Using the center display keyboard (p. 31)
Playing media through the AUX/USB sockets
An external media device, such as an iPod or an mp-3 player can be connected to the infotain-ment system.
A device with rechargeable batteries can be recharged when it is connected to the USBsocket (if the ignition is on or the engine is run-ning). To simplify the use of a USB flash drive, it is advisable to only store files with compatible fileformats on it. It will take considerably longer forthe system to index the files on the drive if it con-tains anything other than compatible files. In addition to audio, the vehicle's media player also supports video playback when the externaldevice is connected to the USB socket. Certain mp-3 players have proprietary file formats that are not supported by the infotainment sys-tem.
Related information
• Connecting a device via the AUX/USBsocket (p. 426)
Streaming media through a Bluetooth connection The media player is equipped with Bluetooth ®
for streaming audio files from external Bluetooth ®
-enabled devices.
Related information
• Connecting a Bluetooth ®
device (p. 426)
• Playing media (p. 432)
• Voice control for radio and media (p. 121)
• Media player (p. 427)
• Ignition modes (p. 380)
• Media player technical data (p. 437)
Page 442 of 560
||
INFOTAINMENT
4401. Activate tethering/personal hotspot in the
cell phone.
2. Tap
Settings in the center display's Top
view.
3. Tap
CommunicationWi-Fi.
4. Tap Wi-Fi to activate/deactivate.
5. Tap the name of the network to be used.
6. Enter the network password.
7. If a different connection was used previously, confirm the connection change.
> The vehicle will connect to the network.
Please be aware that certain cell phones disable tethering when the connection to the vehicle hasbeen broken, e.g., when the phone has beenremoved from the vehicle. In such cases, thephone's tethering function will have to be reacti-vated the next time the phone is used to connectto the Internet. When a phone is connected to the vehicle, it is saved for future use. When a max. number of 50have been saved, the first one connected will bedeleted. To show the list of saved networks or to manually delete a network, tap
SettingsWi-Fi
Saved networks.
See the article "Wi-Fi technology and security" for network connection requirements.
Connect using the vehicle's integrated modem
When the vehicle is connected using the modem, Volvo On Call services will use the connection.
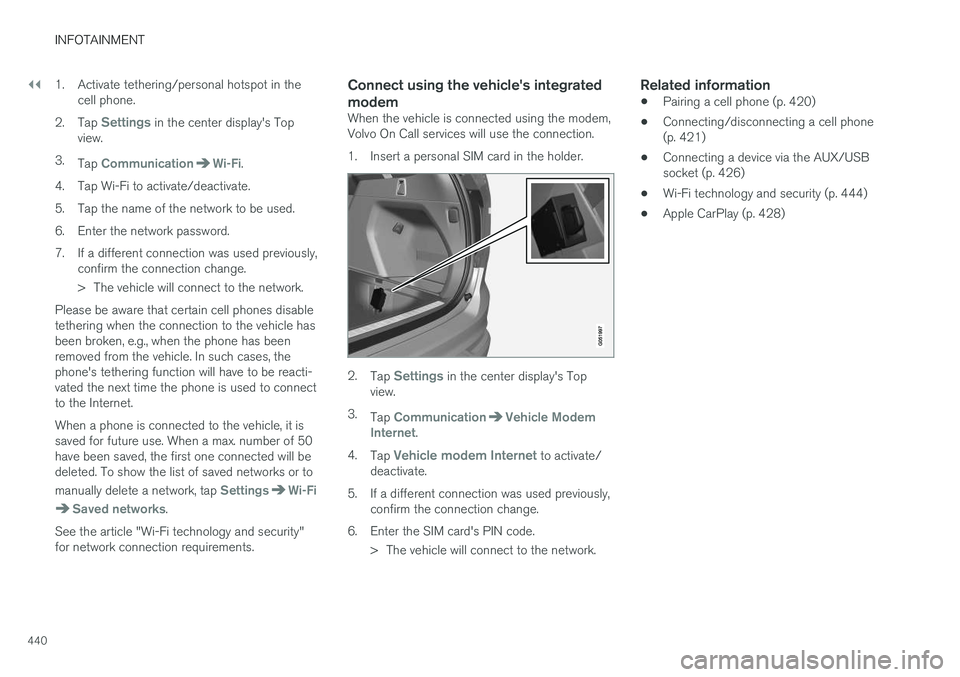
1. Insert a personal SIM card in the holder.
2. Tap Settings in the center display's Top
view.
3. Tap
CommunicationVehicle Modem
Internet.
4. Tap
Vehicle modem Internet to activate/
deactivate.
5. If a different connection was used previously, confirm the connection change.
6. Enter the SIM card's PIN code. > The vehicle will connect to the network.
Related information
• Pairing a cell phone (p. 420)
• Connecting/disconnecting a cell phone (p. 421)
• Connecting a device via the AUX/USBsocket (p. 426)
• Wi-Fi technology and security (p. 444)
• Apple CarPlay (p. 428)
Page 445 of 560
INFOTAINMENT
443
Related information
•Internet connected vehicle (p. 439)
• Connecting to the Internet (p. 439)
Tethering (Wi-Fi sharing)
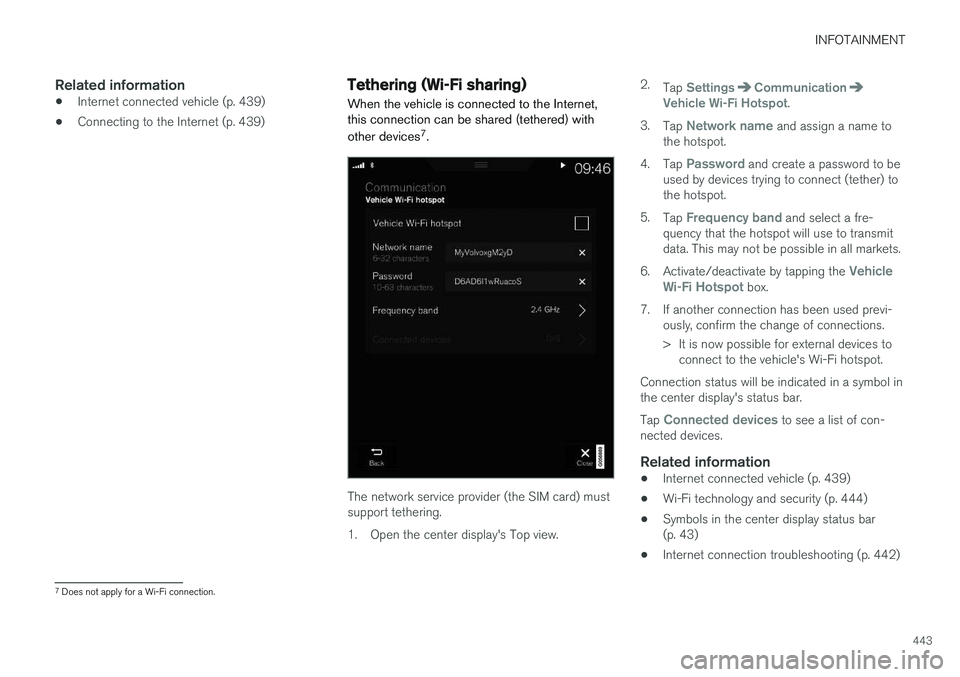
When the vehicle is connected to the Internet, this connection can be shared (tethered) with other devices 7
.
The network service provider (the SIM card) must support tethering.
1. Open the center display's Top view. 2.
Tap
SettingsCommunicationVehicle Wi-Fi Hotspot.
3. Tap
Network name and assign a name to
the hotspot.
4. Tap
Password and create a password to be
used by devices trying to connect (tether) to the hotspot.
5. Tap
Frequency band and select a fre-
quency that the hotspot will use to transmit data. This may not be possible in all markets.
6. Activate/deactivate by tapping the
Vehicle
Wi-Fi Hotspot box.
7. If another connection has been used previ- ously, confirm the change of connections.
> It is now possible for external devices toconnect to the vehicle's Wi-Fi hotspot.
Connection status will be indicated in a symbol in the center display's status bar. Tap
Connected devices to see a list of con-
nected devices.
Related information
• Internet connected vehicle (p. 439)
• Wi-Fi technology and security (p. 444)
• Symbols in the center display status bar (p. 43)
• Internet connection troubleshooting (p. 442)
7
Does not apply for a Wi-Fi connection.
Page 446 of 560
INFOTAINMENT
444
Deleting Wi-Fi networks
Networks that are not used can be deleted.
1. Tap Settings in the center display's Top
view.
2. Tap
Wi-FiSaved networks.
3. Tap
Forget to remove the network.
4. Confirm the selection. > The vehicle will no longer connect to thedeleted network.
Deleting all networksAll networks can be deleted at the same time by returning (resetting) to factory settings. If this is done, all user data and settings will be reset to their default settings.
Related information
• Internet connected vehicle (p. 439)
• Connecting to the Internet (p. 439)
Wi-Fi technology and security
The following are types of networks can be con- nect to.
It is possible to connect to the following types of networks:
• Frequency: 2.4 or 5 GHz 8
.
• Standards: 802.11 a/b/g/n.
• Security type: WPA2-AES-CCMP.
The vehicle's Wi-Fi system is designed to man-age Wi-Fi devices in the vehicle. If several devices are using a frequency at the same time, this may result in poorer performance.
Related information
• Internet connected vehicle (p. 439)
• Connecting to the Internet (p. 439)
• Tethering (Wi-Fi sharing) (p. 443)
• Internet connection troubleshooting (p. 442)
Vehicle modem settings
The vehicle is equipped with a modem that can be used to connect the vehicle to the Internet. Itis also possible to share (tether) this connectionvia Wi-Fi.
1. Tap Settings in the center display's Top
view.
2. Tap
CommunicationVehicle Modem
Internet and choose among the following
settings:
•
Vehicle modem Internet: select to use the
vehicle's modem to connect to the Internet.
•
Data usage: %s: Tap Reset to restart
(reset) the counter for the amount of data sent/received.
•
Network Select carrier
: select a service provider
automatically or manually.
Data roaming: select to allow the vehicle to
connect to another network if the standard network is not available (e.g., if you are driv-ing in another country). This could entailadditional charges, consult your service pro-vider.
•
SIM card PIN
8 Selecting a frequency is not possible in all markets.
Page 447 of 560
INFOTAINMENT
}}
445
Change PIN: enter max. 4 digits.
Disable PIN: Allow access to the SIM card
without requiring a PIN code.
•
Send request code: this is used to down-
load the balance remaining on a SIM card. This is specific to your service provider.
Related information
• Internet connected vehicle (p. 439)
• Connecting to the Internet (p. 439)
Infotainment system license information
The following license information pertains to Vol- vo's agreements with certain manufacturers/developers.
Bowers & Wilkins
Bowers & Wilkins and B&W are trademarks of the B&W Group Ltd. Nautilus is a trademark ofB&W Group Ltd. Kevlar is a registered trademarkof DuPont.
Dirac Live
Dirac Live technology has been used in the development and tuning of the sound in order toensure a world-class sound experience. DiracLive and the D-symbol are registered trademarksof Dirac Research AB.
DivX ®
DivX
®
, DivX Certified ®
and associated logos are
trademarks of DivX, LLC and are used under license. About DIVX VIDEO:This DivX Certified ®
device
can play DivX ®
Home Theater video files up to
576p (including .avi, .divx). Download free soft- ware at www.divx.com to create, play and streamdigital video. About DIVX VIDEO-ON-DEMAND: This DivX Certified ®
device must be registered in order to
play purchased DivX Video-on-Demand (VOD) movies. To obtain your registration code, locatethe DivX VOD section in your device setup menu.
Page 487 of 560
MAINTENANCE AND SERVICING
}}
485
Sending an appointment request
1.Open the Car status app in the center dis-
play's App view.
2. Tap
Appointments.
3. Under
Appointments, tap Request
appoint..
4. Check that your
Volvo ID is correct.
5. Check that the correct preferred retailer is listed. If you prefer, simply tap the button to initiate a call to the retailer.
6. Tap
Send appointment request. Your
request and vehicle data will be sent to your retailer through the vehicle's Internet con-nection.
> Volvo will send a booking invitation to your email address with a link to your preferred workshop's On-Line Service Scheduler.
7. Open the email and click the link to book your workshop appointment at a convenienttime with your preferred service advisor. Addany additional preferences and free text toyour booking. 8. When you have submitted your workshop
booking, your appointment will be confirmedonline directly by email. The booking informa- tion will also appear in the
Car status app in
the center display after a period of time as well as in your My Volvo personal website,where you can make changes to yourappointment at any time.
9. Several days prior to your appointment, you will receive a reminder via email from yourretailer. A notification will also appear on thecenter display one day prior to the appoint-ment. You can set the interval for otherreminders (e.g., two days, three days) at yourMy Volvo personal website.
10. On the day of your appointment, a reminder will appear again on the center display andthe retailer's address can be set in your navi-gation system if you require directions to theworkshop.
Sending vehicle-related information
Information about the vehicle can be sent at any time using its Internet connection. Using this function does not send a workshop
appointment request to your retailer ; only
vehicle data will be transmitted to Volvo. This vehicle data can be accessed by any retailer ifyou call the retailer and provide your VehicleIdentification Number (VIN).
1. Open the Car status app in the center dis-
play's App view.
2. Tap
Appointments.
3. Under
Appointments, tap Send vehicle
data.
> A message confirming that vehicle infor- mation has been sent via the Internet connection will appear on the center dis-play. Transmission of the vehicle informa-tion can be cancelled at any time by tap-ping the X in the activity indicator.
Page 507 of 560
MAINTENANCE AND SERVICING
}}
505
Replacing bulbs
The halogen headlight bulbs 3
can be replaced
by the owner.
Before the halogen headlight bulbs can be replaced, that plastic covering over the headlighthousing has to be removed and the housing hasto be lifted out of the vehicle.
NOTE
Halogen headlights are not available on all models or in all markets. Consult your Volvo retailer if you are uncertain about the type of headlights in your vehicle.To do so:
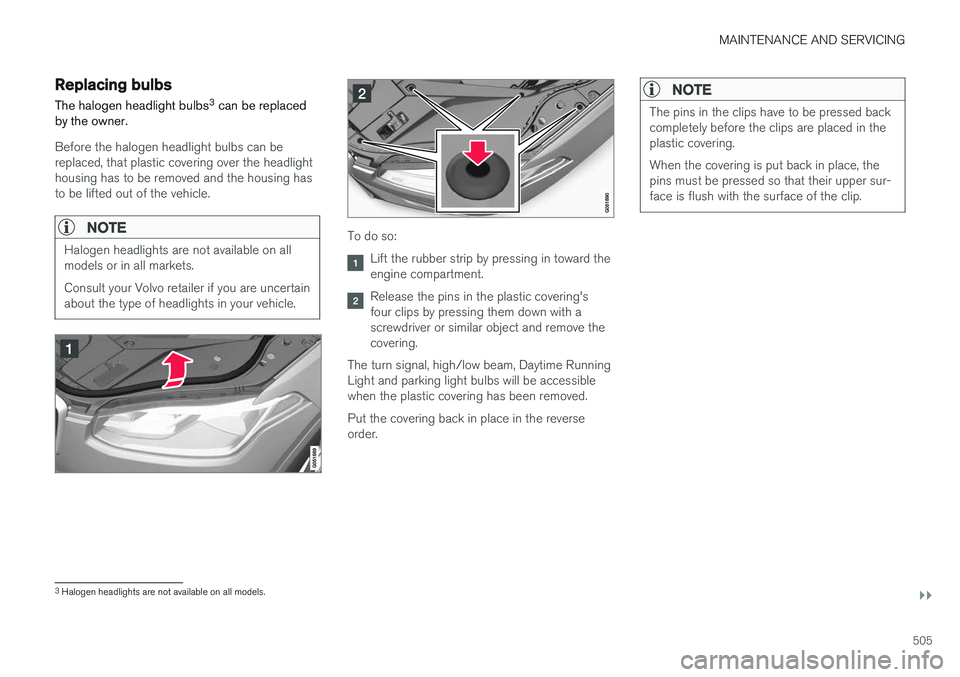
Lift the rubber strip by pressing in toward the engine compartment.
Release the pins in the plastic covering's four clips by pressing them down with ascrewdriver or similar object and remove thecovering.
The turn signal, high/low beam, Daytime RunningLight and parking light bulbs will be accessiblewhen the plastic covering has been removed. Put the covering back in place in the reverse order.
NOTE
The pins in the clips have to be pressed back completely before the clips are placed in theplastic covering. When the covering is put back in place, the pins must be pressed so that their upper sur-face is flush with the surface of the clip.
3 Halogen headlights are not available on all models.