change time VOLVO XC90 T8 2016 Owner´s Manual
[x] Cancel search | Manufacturer: VOLVO, Model Year: 2016, Model line: XC90 T8, Model: VOLVO XC90 T8 2016Pages: 546, PDF Size: 10.26 MB
Page 104 of 546
 after severalseconds of transmission – whic")
||
INSTRUMENTS AND CONTROLS
102
Gate Operator/Canadian Programming
Canadian radio-frequency laws require transmit- ter signals to “time-out” (or quit) after severalseconds of transmission – which may not be longenough for HomeLink to pick up the signal dur-ing programming. Similar to this Canadian law,some U.S. gate operators are designed to “time-out” in the same manner. If you live in Canada or you are having difficulties programming a gate operator or garage dooropener by using the “Programming” procedures, replace “Programming HomeLink” step 3 with the following:
• Continue to press and hold the HomeLink button while you
press and release - every
two seconds (“cycle”) your hand-held trans-
mitter until the HomeLink indicator light changes from a slow to a rapidly blinkinglight. Now you may release both the Home-Link and hand-held transmitter buttons.
Proceed with “Programming” step 4 to complete.
Using HomeLink ®When programming has been completed, HomeLink
®
can be used instead of the original
remote controls. To operate, press and hold the programmed HomeLink ®
button until the trained device begins
to operate 3
(this may take several seconds). The indicator light will glow steadily or flash when the button has been pressed. Activation will nowoccur for the trained device (i.e., garage dooropener, gate operator, security system, entry doorlock, home/office lighting, etc.).
NOTE
If the ignition is switched off, HomeLink will function for 30 minutes after the driver's doorhas been opened.
For convenience, the hand-held transmitter of the device may also be used at any time. In the event that there are still programming diffi- culties or questions, contact HomeLink at:www.HomeLink.com, www.youtube.com/HomeLinkGentex or by phoning the hotline at 1–800–355–3515.
Resetting HomeLink
®
buttonsUse the following procedure to reset (erase pro- gramming) from the three HomeLink ®
buttons
(individual buttons cannot be reset but can be “reprogrammed” as outlined in the following sec-tion): 1. Press and hold HomeLink ®
buttons 1 and 3
for approx. 10 seconds until the indicator light begins to flash green. 2. Release both buttons.
>HomeLink ®
is now in the training (or
learning) mode and can be programmedat any time beginning with “To program HomeLink ®
" above.
Reprogramming a single HomeLink ®
button
To reprogram an individual HomeLink ®
button:
1. Press and hold the desired HomeLink ®
but-
ton. DO NOT release the button.
2. The yellow indicator light will begin to flash after 20 seconds. Without releasing the HomeLink button, proceed with “To program HomeLink ®
" step 1 above.
For questions or comments, contact HomeLink at: www.HomeLink.com, www.youtube.com/HomeLinkGentex or by phoning the hotline at 1–800–355–3515.
FCC (USA) and IC (Canada)This device complies with FCC rules part 15 andIndustry Canada RSS-210. Operation is subjectto the following two conditions: (1) This devicemay not cause harmful interference, and (2) Thisdevice must accept any interference that may bereceived including interference that may causeundesired operation. WARNING: The transmitterhas been tested and complies with FCC and IC
3 Do not hold the button for more than 20 seconds as this will clear the programming of the button.
Page 108 of 546

||
INSTRUMENTS AND CONTROLS
* Option/accessory, for more information, see Introduction.
106 1.
Tap
Settings in Top view.
2. Tap
My CarMirrors.
3. Select
Fold Mirrors When Locking to acti-
vate/deactivate.
Resetting the mirrors' positionA mirror that has been moved manually (e.g., bumped into in a parking lot, etc.) has to bereturned to its normal position electrically beforeautomatic folding will function correctly. 1. Fold in the mirrors with the L and R buttons.
2. Fold out the mirrors with the L and R buttons.
The mirrors have now been reset to their original positions.
Auto-dim *Settings can be made for the auto-dim functionin the rearview and door mirrors. The auto-dim function is always active while the vehicle is being driven except when the reversegear has been selected. The level of sensitivityfor this function can be set to three levels, whichaffect the rearview mirror and door mirrors.
NOTE
When the level of sensitivity is changed, this change will not be noticeable immediately butwill take effect after a short period of time.
The level of sensitivity is set from the center dis- play: 1.
Tap
Settings in Top view.
2. Tap
My CarMirrors.
3. Under
Auto Dim Mirrors, select Normal,Dark or Light.
Related information
• Using the power seat memory function
*
(p. 164)
• Rearview mirror (p. 110)
Laminated panoramic roof
*
The laminated panoramic roof is divided into two sections and only the front section can beopened; it can be slid horizontally to the open orclosed positions or its rear edge can be raisedand lowered to allow ventilation.
The laminated panoramic roof also has a sun shade made of perforated fabric that is locatedbelow the sections of glass. This shade can beopened or closed, for example when driving inbright sunlight.
The laminated panoramic roof and the sun shade are operated using the controls in the ceilingconsole, near the rear-view mirror. The controlsare activated when the vehicle's ignition is in mode I or II.
Page 113 of 546

INSTRUMENTS AND CONTROLS
}}
111
NOTE
When the level of sensitivity is changed, this change will not be noticeable immediately butwill take effect after a short period of time.
The level of sensitivity is set from the center dis- play: 1.Tap
Settings in Top view.
2. Tap
My CarMirrors.
3. Under
Auto Dim Mirrors, select Normal,Dark or Light.
Related information
• Adjusting the power door mirrors (p. 105)
Using sun shades
Both rear doors have integrated sun shades.
Rear doors
Hook and locking mechanism
1. Pull up the sun shade and hook it to the upper section of the door frame.
2. Lock the sun shade by moving the locking mechanism upward.
The window can be opened/closed when the sun shade is being used.
Settings view
The center display's Settings view is used to make many of the vehicle's function settings andto display vehicle-related information.
Opening Settings view
Top view with the Settings button
1. Pull down the tab on the upper edge of the
center display to open Top view.
2. Tap
Settings.
3. Tap one of the categories displayed and nav- igate to sub-categories and settings by tap- ping again.
4. Tap
Back to go back in Settings view.
Tap
Close to close Settings view.
Page 116 of 546

INSTRUMENTS AND CONTROLS
* Option/accessory, for more information, see Introduction.
114
Changing system settings in Settings view
Settings view's main category
System contains
general settings and information, such as lan- guage, units of measure, etc.
The system settings under Driver Profile, Date
& Time, Keyboard Layouts, Voice Control,Software Updates, Factory reset andServices are described in their respective arti-
cles in the owner's manual.
Changing system languages1. Pull down the center display's Top view and
tap Settings.
2. Tap
SystemLanguage.
3. Select a new system language. Languages that can be used for voice commands are indicated by a voice control symbol.
> This change affects the language used inthe instrument panel, center display and the head-up display *.
Changing units of measure
Changing length and volume units
1. Pull down the center display's Top view and
tap Settings.
2. Tap
SystemUnitsUnits. 3. Select one of the following measurement
standards:
•
Metric: kilometers, liters and degrees Cel-
sius.
•
Imperial: miles, gallons and degrees Cel-
sius.
•
US: miles, gallons and degrees Fahren-
heit.
> This change affects the units of measure used in the instrument panel, center dis- play and the head-up display *
Changing tire inflation pressure units
1. Pull down the center display's Top view and
tap Settings.
2. Tap
SystemUnitsTire Pressure.
3. Select a unit of measure for tire pressure. > This changes the tire inflation pressureunits used in the
Car status app in the
center display.
Viewing storage information1. Pull down the center display's Top view and
tap Settings.
2. Tap
SystemStorage.
> Storage information for the vehicle's hard drive will be displayed, including total capacity, available capacity and theamount of storage space used by theapps that have been installed.
Viewing the VIN (Vehicle Identification Number)
1. Pull down the center display's Top view and
tap Settings.
2. Tap
SystemVehicle Identification
Number.
> The vehicle's VIN will be displayed.
Page 117 of 546

INSTRUMENTS AND CONTROLS
115
Changing settings in apps
App view, which is one of the center display's basic views, contains all of the apps installed inthe vehicle. From Home view, navigate to Appview by swiping the screen from right to left.
Apps for integrated (basic) functionsCertain apps in your vehicle are factory-installed, such as FM, USB and CD and are part of Sen-
sus. Settings in these apps can be changed in the center display's Top view.
Changing settings for a basic app
1. Tap one of the basic apps, for example FM
radio.
2. Pull down Top view. 3. Tap
FM Radio Settings.
4. Change the desired settings and confirm.
5. Press the Home button below the center dis- play or tap the screen outside of Top view or pull up Top view to return to your originalview. See also the article "Categories in Set-tings view."
Third party appsThird party apps have to be downloaded e.g.,Volvo ID. Settings for these apps are made in
the apps themselves, not in Top view.
Related information
• Settings view (p. 111)
• Navigating in the center display's views (p. 42)
• Categories in Settings view (p. 112)
Resetting the settings view
All of the changes made under Settings view can be reset to their default values at the sametime.
Resetting1. Tap Settings in the center display's Top
view.
2. Tap
SystemFactory reset.
3. Tap
OK to confirm your choice.
Related information
• Settings view (p. 111)
• Resetting user data when the vehicle changes owners (p. 116)
Page 119 of 546

INSTRUMENTS AND CONTROLS
}}
* Option/accessory, for more information, see Introduction.117
Clock The clock is displayed in the instrument panel and in the center display.
Location of the clock in the instrument panel in 12" (upper) and 8" (lower) instrument panels
Certain messages and other information in the instrument panel may temporarily obscure theclock. In the center display, the clock is located at the upper right of the status bar.
Settings for date and time
Select SettingsSystemDate & Time in
the center display's Top view to change the for- mat for displaying date or time. Set the date and time by tapping the up or down arrows on the center display.
Automatic time
The function Automatic Time is also available,
which adjusts the time zone automatically, depending on the vehicle's location. If
Automatic
Time has not been selected, set the date and
time manually by tapping the up or down arrows on the center display.
Daylight savings time
In certain countries, an automatic change to day- light savings time can be selected by activating
Auto. If the automatic change is not available,
change to daylight savings time by selecting Onor Off.
Related information
• Instrument panel (p. 127)
• Center display overview (p. 32)
• Using the center display (p. 49)
Head-up display (HUD)
*
The head-up display provides information such as speed, cruise control functions, navigation,traffic sign information, incoming phone calls,etc. at the base of the windshield in the driver'sfield of vision.
Incoming phone call
The HUD supplements the instrument panel and projects information on the lower section of thewindshield. The projected information can only beseen from the driver's seat.
CAUTION
The HUD's projection unit is located in the dashboard. Avoid scratching or placingobjects on the unit's glass surface.
Page 163 of 546

INSTRUMENTS AND CONTROLS
}}
* Option/accessory, for more information, see Introduction.161
Adjusting the steering wheel
The steering wheel can be adjusted to various positions.
Adjusting the steering wheel
Lever for releasing/locking the steering wheel
Possible positions
The steering wheel's height and reach can be adjusted. To do so:
1. Push the lever down to release the steering wheel.
2. Adjust the steering wheel to a suitable posi- tion.
3. Pull back the lever to lock the steering wheel in place. If the lever is difficult to pull into place, press the steering wheel lightly at thesame time as you pull the lever.
WARNING
Never adjust the steering wheel while driving.
If the vehicle is equipped with the optional speed-dependent power steering, the level ofsteering force can be adjusted. The force level isadjusted according to the vehicle's speed.
Related information
• Steering wheel (p. 160)
• Adjustable steering force
* (p. 323)
Seats
The vehicle is equipped with 7 seats. The front seats can be adjusted electroncially or manually.The second and third row seats are adjusted pri-marily manually.
The adjustment settings for the power front seats *, door mirrors and the head-up display can
be stored in memory buttons. Using the multi-function control *, comfort in the
front seats can be further enhance by e.g., adjust- ing the lumbar support or extending the length ofthe front seat cushion. The rear seats can be folded down and their head restraints can be adjusted. The second rowseats can be moved forward/rearward and theirbackrest tilt can also be changed.
Related information
• Adjusting power front seats
* (p. 163)
• Adjusting function settings in the multifunc- tional front seats
* (p. 166)
• Manually operated front seats (p. 162)
• Using the power seat memory function
*
(p. 164)
• Folding the second row backrests (p. 172)
• Getting into and out of the third row of seats (p. 174)
Page 165 of 546

INSTRUMENTS AND CONTROLS
* Option/accessory, for more information, see Introduction.163
Power front seats*
The power front seats offer a number of adjust- ment possibilities to help maximize comfort andergonomics.
The power seats have an overload protector that
activates if a seat is blocked by any object. If this occurs, put the ignition in mode I or 0 and wait
for a short period before operating the seat again. The power seat(s) can be adjusted for a short period after unlocking the door with the remotekey without switching the ignition on. Seat adjust-ment can always be made when the engine isrunning.
Related information
• Multifunctional front seats
* (p. 165)
• Adjusting power front seats
* (p. 163)
• Using the power seat memory function
*
(p. 164)
• Manually operated front seats (p. 162)
• Turning seat heating
* on and off (p. 199)
• Turning front seat ventilation
* on and off
(p. 200)
• Easy access to and from the driver seat (p. 169)
Adjusting power front seats
*
The power front seat(s) can be adjusted to many positions to help improve comfort and ergonom-ics.
Adjust lumbar support by pressing the con- trol up/down/forward/rearward
Raise/lower the front edge of the seat cush- ion by moving the control up/down
Raise/lower the seat by moving the control up/down
Move the seat forward/rearward by moving the control forward/rearward
Change backrest tilt by moving the control forward/rearward
Only one of the power seat's controls can beused at the same time. The front seat backrests can be folded down completely.
Related information
• Power front seats
* (p. 163)
• Using the power seat memory function
*
(p. 164)
• Multifunctional front seats
* (p. 165)
• Seat belts (p. 64)
Page 166 of 546
INSTRUMENTS AND CONTROLS
* Option/accessory, for more information, see Introduction.
164
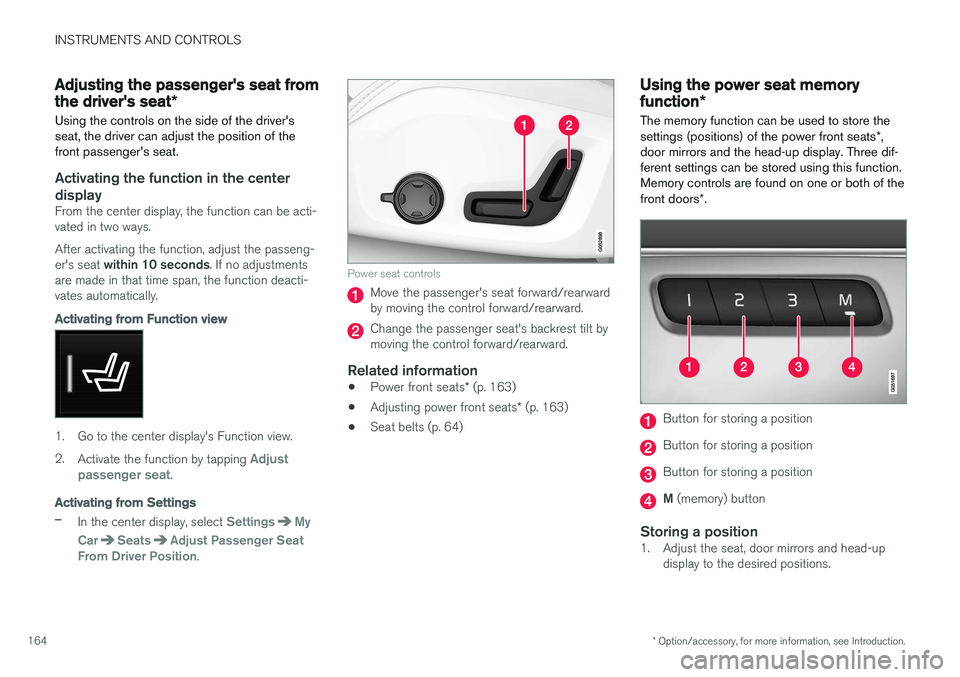
Adjusting the passenger's seat from the driver's seat *
Using the controls on the side of the driver's seat, the driver can adjust the position of thefront passenger's seat.
Activating the function in the center
display
From the center display, the function can be acti- vated in two ways. After activating the function, adjust the passeng- er's seat within 10 seconds . If no adjustments
are made in that time span, the function deacti- vates automatically.
Activating from Function view
1. Go to the center display's Function view. 2. Activate the function by tapping
Adjust
passenger seat.
Activating from Settings
–In the center display, select SettingsMy
Car
SeatsAdjust Passenger Seat
From Driver Position.
Power seat controls
Move the passenger's seat forward/rearward by moving the control forward/rearward.
Change the passenger seat's backrest tilt by moving the control forward/rearward.
Related information
• Power front seats
* (p. 163)
• Adjusting power front seats
* (p. 163)
• Seat belts (p. 64)
Using the power seat memory function
*
The memory function can be used to store the settings (positions) of the power front seats *,
door mirrors and the head-up display. Three dif- ferent settings can be stored using this function.Memory controls are found on one or both of the front doors *.
Button for storing a position
Button for storing a position
Button for storing a position
M (memory) button
Storing a position1. Adjust the seat, door mirrors and head-up
display to the desired positions.
Page 185 of 546

CLIMATE
183
3.
Tap
Add timer.
> A pop-up window will open.
NOTE
A new timer setting cannot be made if there are already 8 timers set. Delete one of theexisting timer settings in order to add a newone.
4. Tap Date to set a specific date for the timer
setting. Tap
Days to set a timer for one or more days
of the week. For
Days: activate/deactivate the repeat
function by selecting/deselecting the
Repeat weekly box.
5. For
Date: Select a date for preconditioning
by scrolling in the date list using the arrow keys. For
Days: Select days of the week for pre-
conditioning by tapping the days' buttons.
6. Set the time at which preconditioning should be completed by scrolling with the arrows in the clock.
7. Tap
Confirm to add the timer setting.
> The timer settings will be added to the list and activated.
Editing a timer setting1. Open Climate view in the center display. 2. Tap the
Parking climate tab.
3. Tap the timer setting to be changed. > A pop-up window will open.
4. Change the setting as described in the sec- tion "Adding a timer setting" above.
Deleting a timer setting
The button for editing a list/deleting a timer setting in the Climate setting's Parking climate tab
1. Open Climate view in the center display. 2.
Tap the
Parking climate tab.
3. Tap
Edit list.
4. Tap the delete icon at the right in the list. >The icon will change to the text
Delete. 5.
Tap
Delete to confirm.
> The timer setting will be deleted from the list.