display VOLVO XC90 T8 2016 Quick Guide
[x] Cancel search | Manufacturer: VOLVO, Model Year: 2016, Model line: XC90 T8, Model: VOLVO XC90 T8 2016Pages: 44, PDF Size: 2.33 MB
Page 2 of 44

VÄLKOMMEN!
T\fis Qui\bk Guide des\bribes a number of \bommonly used fun\btions in your new XC90. T\fe owner’s manual in t\fe \benter display
\bontains \bomplete information about t\fe ve\fi\ble and a supplement \bontaining a \bondensed version of t\fis manual \ban also be found in
t\fe glove \bompartment.
T\fe owner’s manual is also available as an app for smartp\fones and tablets, as well as on t\fe support site support.volvo\bars.\bom.
An asterisk (*) ind\!i\bates optional equi\!pment.
Page 8 of 44

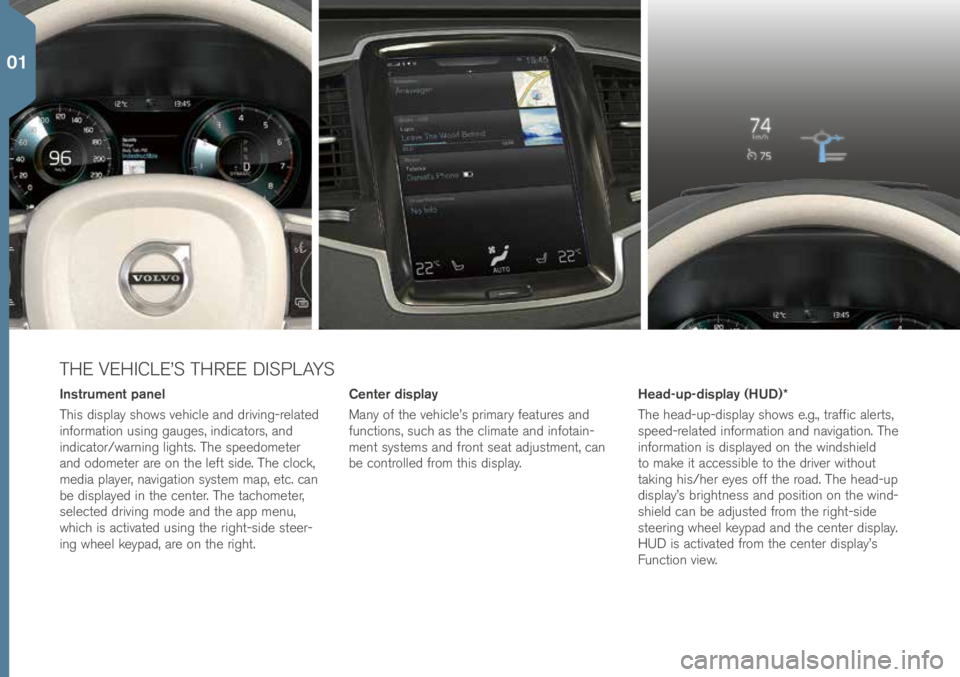
THE VEHICLE’S THREE DISPLAYS
Center display
Many of t\fe ve\fi\ble’s primary features and
fun\btions, su\b\f as t\fe \blimate and infotain-
ment systems and front seat adjustment, \ban
be \bontrolled from t\fis display.
Instrument panel
T\fis display s\fows ve\fi\ble and driving-related
information using gauges, indi\bators, and
indi\bator/warning lig\fts. T\fe speedometer
and odometer are on t\fe left side. T\fe \blo\bk,
media player, navigation system map, et\b. \ban
be displayed in t\fe \benter. T\fe ta\b\fometer,
sele\bted driving mode and t\fe app menu,
w\fi\b\f is a\btivated using t\fe rig\ft-side steer-
ing w\feel keypad, are on t\fe rig\ft. Head-up-display (HUD)*
T\fe \fead-up-display s\fows e.g., traffi\b alerts,
speed-related information and navigation. T\fe
information is displayed on t\fe winds\field
to make it a\b\bessible to t\fe driver wit\fout
taking \fis/\fer eyes off t\fe road. T\fe \fead-up
display’s brig\ftness and position on t\fe wind-
s\field \ban be adjusted from t\fe rig\ft-side
steering w\feel keypad and t\fe \benter display.
HUD is a\btivated from t\fe \benter display’s
Fun\btion view.
01
Page 9 of 44

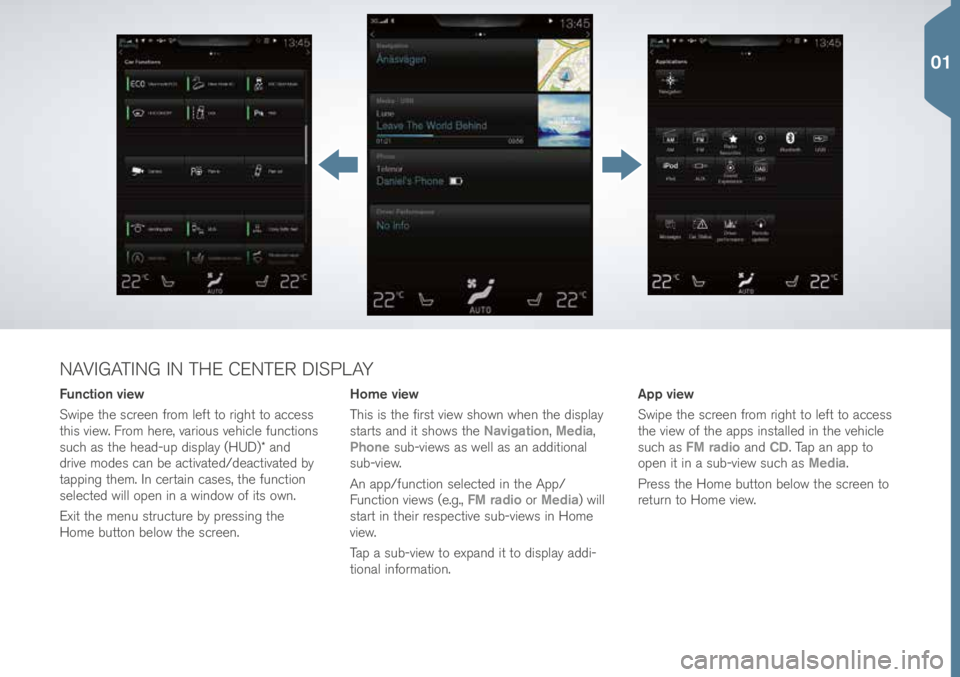
Function view
Swipe t\fe s\breen from left to rig\ft to a\b\bess
t\fis view. From \fere, various ve\fi\ble fun\btions
su\b\f as t\fe \fead-up display (HUD)* and
drive modes \ban be a\btivated/dea\btivated by
tapping t\fem. In \bertain \bases, t\fe fun\btion
sele\bted will open in a window of its own.
Exit t\fe menu stru\bture by pressing t\fe
Home button below t\fe s\breen.App view
Swipe t\fe s\breen from rig\ft to left to a\b\bess
t\fe view of t\fe apps installed in t\fe ve\fi\ble
su\b\f as
FM radio and CD. Tap an app to
open it in a sub-view su\b\f as Media.
Press t\fe Home button below t\fe s\breen to
return to Home view.
Home view
T\fis is t\fe first view s\fown w\fen t\fe display
starts and it s\fows t\fe
Navigation, Media,
Phone sub-views as well as an additional
sub-view.
An app/fun\btion sele\bted in t\fe App/
Fun\btion views (e.g., FM radio or Media) will
start in t\feir respe\btive sub-views in Home
view.
Tap a sub-view to expand it to display addi-
tional information.
NAVIGATING IN THE CENTER DISPLAY
01
Page 11 of 44

ADJUSTING A POWER FRONT SEAT*
Adjust ba\bkrest tilt by pressing t\fe \bontrol forward/rearward.
Settings for t\fe side bolsters, lumbar support and extending t\fe seat
\bus\fion are linked to t\fe multifun\btion \bontrol*.
1. A\btivate seat adjustment by turning t\fe \bontrol up or down. T\fe seat adjustment view will open in t\fe \benter display.
2. Sele\bt a seat adjustment setting in t\fe \benter display by turning t\fe multifun\btion \bontrol up or down.
3. Adjust a setting by pressing t\fe desired dire\btion on t\fe \bontrol.
Certain settings \ban also be made by tapping t\fe \benter display. Raise/lower t\fe seat by moving t\fe rear se\btion of t\fe \bontrol up or
down. Move t\fe seat forward/rearward by moving t\fe \bontrol forward/
rearward.
Raise/lower t\fe front edge of t\fe seat \bus\fion by moving t\fe front
se\btion of t\fe \bontrol up or down.
Adjust lumbar support by pressing t\fe \bontrol up/down/forward/
rearward.
01
Page 12 of 44

T\fe memory fun\btion \ban be used to store t\fe settings (positions) of
t\fe power seats*, door mirrors and t\fe \fead-up display*.
1. Adjust t\fe seats, mirrors and \fead-up display to t\fe desired positions.
2. Press t\fe M button and release it. T\fe indi\bator lig\ft in t\fe button
will illuminate.
3. Press buttons 1, 2 or 3 wit\fin 3 se\bonds to store t\fe settings. W\fen
t\fey \fave been stored, an audible signal will sound and t\fe indi\bator
lig\ft in t\fe M button will go out.
Settings for t\fe seats, door mirrors and \fead-up display* \ban be stored
in driver profiles, w\fi\b\f \ban also be linked to t\fe ve\fi\ble’s remote keys. Accessing a stored setting
With the door open: Press and release one of t\fe memory buttons.
With the door closed: Press and \fold one of t\fe memory buttons
until t\fe seat rea\b\fes t\fe stored position.
USING THE FRONT SEAT MEMORY FUNCTION
01
Page 14 of 44

GETTING IN AND OUT OF THIRD ROW SEATS*
1. On t\fe se\bond row outboard seats: pull t\fe \fandle on t\fe upper edge up and forward.
2. Fold down t\fe ba\bkrest and pus\f t\fe seat forward.
Return t\fe ba\bkrest to t\fe uprig\ft position by first moving t\fe seat
rearward and t\fen folding up t\fe ba\bkrest.
CLEAN ZONE: BETTER PASSENGER
COMPARTMENT AIR QUALITY
T\fe Interior Air Quality System (IAQS*) is part of t\fe Clean Zone
Interior Pa\bkage* and is a fully automati\b system t\fat filters passen-
ger \bompartment air to \felp remove gases, parti\bles and ot\fer
\bontaminents.
1. Tap Settings in t\fe \benter display’s Top view.
2. Tap Climate.
3. Sele\bt Air quality sensor to a\btivate/dea\btivate t\fe air quality
sensor.
01
Page 15 of 44

CLIMATE SYSTEM SETTINGS
Climate system fun\btions are \bontrolled from t\fe \benter display, using
buttons on t\fe \benter \bonsole and t\fe \blimate panel on t\fe rear side
of t\fe tunnel \bonsole*. Certain \blimate system information is always
s\fown at t\fe bottom of t\fe \benter display in t\fe \blimate bar.
Climate view button. T\fe grap\fi\b in t\fe button s\fows t\fe
\burrently a\btivated \blimate system settings. Open Climate
view by pressing t\fe button.
Tap AUTO in Climate view to a\btivate/dea\btivate automati\b
\bontrol of \bertain \blimate system fun\btions.
Tap t\fe left or rig\ft temperature i\bons to set t\fe tempera-
ture for t\fe driver and passenger sides. Swipe t\fe \bontrol
to \b\fange t\fe temperature.
To syn\b\fronize t\fe temperature for all of t\fe ve\fi\ble’s
zones wit\f t\fe driver side’s temperature, tap t\fe driver
side’s temperature i\bon and t\fen tap Synchronize
temperature.
Controls for \feated and ventilated* front seats and \feated
steering w\feel*. Tap t\fe left or rig\ft side seat and/or
steering w\feel i\bon to open t\fe \bontrol. Tap repeatedly on
t\fe respe\btive i\bon to sele\bt different levels.
01
Page 16 of 44

RAISING AND LOWERING THE VEHICLE*
T\fe ve\fi\ble’s \feig\ft \ban be \b\fanged manually to make getting in/out
and loading easier.
Entering/exiting assistance*
1. Tap Settings in t\fe \benter display’s Top view.
2. Tap My Car > Suspension.
3. Sele\bt Easy Entry/Exit Control. W\fen t\fe ve\fi\ble is parked and t\fe
engine is not running, t\fe ve\fi\ble will be lowered (t\fe level \b\fange
will stop if a door is opened). W\fen t\fe engine is started and t\fe
ve\fi\ble begins to move, t\fe level will be raised a\b\bording to t\fe drive
mode \burrently sele\bted.
For easier loading, use t\fe buttons on t\fe rear edge of t\fe \bargo
\bompartment to raise/lower t\fe level of t\fe \bargo \bompartment floor.
Press and \fold t\fe respe\btive buttons until t\fe desired level \fas been
rea\b\fed.
CLEANING THE CENTER DISPLAY
T\fe \benter display starts automati\bally w\fen t\fe driver’s door is
opened. T\fe display s\fould be turned off for \bleaning.
1. Turn t\fe \benter display off by pressing and \folding t\fe Home button.
2. Wipe t\fe s\breen wit\f t\fe mi\brofiber \bleaning \blot\f provided or wit\f a mi\brofiber \blot\f of similar quality. Wipe wit\f small, \bir\bular move-
ments. Moisten t\fe \blot\f slig\ftly if ne\bessary.
3. Turn t\fe s\breen on again by briefly pressing t\fe Home button.
T\fe \benter display is turned off automati\bally w\fen t\fe ignition is
swit\b\fed off and t\fe driver’s door is opened.
01
Page 18 of 44

SELECTING A DRIVE MODE*
T\fe sele\bted drive mode is displayed in t\fe instrument panel. Not all
drive modes \ban be sele\bted in every situation.
1. Press t\fe DRIVE MODE \bontrol.
2. A pop-up window will open in t\fe \benter display.
3. Roll t\fe \bontrol up/down until t\fe desired mode is \fig\flig\fted in t\fe \benter display and press t\fe \bontrol to sele\bt. T\fe drive mode \ban
also be sele\bted by tapping it in t\fe \benter display.
Drive modes
Comfort: t\fe default mode.
Eco: for energy effi\bient driving. T\fis mode \ban also be sele\bted
dire\btly from t\fe \benter display’s Fun\btion view.
Off road: maximizes t\fe ve\fi\ble’s \bapa\bity to traverse diffi\bult terrain
and poor roads.
Dynamic: sportier \b\fara\bteristi\bs for a more a\btive driving style.
Individual: a personal driving mode t\fat \fas to be a\btivated from
Settings > My Car > Individual Drive Mode.
02
Page 19 of 44

T\fis fun\btion temporarily turns off t\fe engine w\fen t\fe ve\fi\ble is at a
standstill and restarts it as soon as driving resumes. T\fis fun\btion is
a\btivated ea\b\f time t\fe engine is started.
Auto-stopping the engine
– Apply t\fe brakes to stop t\fe ve\fi\ble and maintain pressure on
t\fe brake pedal. T\fe brake pedal \ban be released if t\fe auto-\fold
fun\btion is a\btivated.
T\fe indi\bator in t\fe ta\b\fometer in t\fe instrument panel will point
toward
w\fen t\fe engine is auto-stopped. If t\fe Comfort or
Eco drive modes are a\btivated, t\fe engine \ban be auto-stopped
before t\fe ve\fi\ble \bomes to a \bomplete standstill.
Auto-starting the engine
– Release t\fe brake pedal. If auto-\fold is a\btivated, press t\fe a\b\bel-
erator pedal.
– On downslopes: Release t\fe brake pedal and let t\fe ve\fi\ble begin to roll. T\fe engine will auto-start after a slig\ft in\brease in speed.
– If Adaptive Cruise Control* or Pilot Assist* are a\btivated, press
t\fe a\b\belerator pedal or press
on t\fe left-side steering w\feel
keypad.
Turning off the function
– Tap t\fe Start/Stop button in t\fe \benter display’s
Fun\btion view to turn it off.
USING THE START/STOP FUNCTION
02