VOLVO XC90 T8 2017 Owner´s Manual
Manufacturer: VOLVO, Model Year: 2017, Model line: XC90 T8, Model: VOLVO XC90 T8 2017Pages: 580, PDF Size: 10.37 MB
Page 251 of 580
LOCKS AND ALARM
}}
* Option/accessory.249
–Press the button14
on the lower edge of
the tailgate.
> The tailgate will close automatically but will not be locked .
–Press the button14
on the lower edge of
the tailgate.
> The tailgate will close automatically. The tailgate and doors will also be locked and
the alarm will be armed.
If the remote key is not close enough to the tail- gate, automatic locking/unlocking/opening/clos-ing will not be possible. Three short audible sig-nals will sound.
Interrupting opening/closing
–This can be done in five ways: • Press the button on the lighting panel
• Press the button on the remote key
• Press either of the buttons on the lower edge of the tailgate
• Press lightly on the rubber-covered buttonunder the tailgate's outside handle
• Move your foot under a sensor beneath the rear bumper
*
> The tailgate will stop moving
Programming the tailgate's maximum opening angle
The tailgate's maximum opening angle can be programmed, for example, if the tailgate has to beopened in a garage with a low ceiling. Programming the opening angle:
–Open the tailgate manually to the desired angle and press and hold the closing buttonon the tailgate's lower edge for at least 3seconds. Release the tailgate.
> Two audible signals will sound to indicate that the selected opening angle has been stored.
Erasing tailgate programming
–Open the tailgate manually to its highest position and press and hold the closing but-ton on the tailgate's lower edge for at least 3seconds. Release the tailgate.
> Two audible signals will sound to indicate that the programmed opening angle has been erased.
NOTE
If the tailgate has been opened and closed continuously too long, the automatic functionwill be deactivated to avoid overloading theelectrical system. The automatic function canbe used again after approximately 2 minutes. If the vehicle's battery has been discharged or disconnected, or if the tailgate has been openfor more than 24 hours, the tailgate must beopened and closed once manually to resetthe system.
Pinch protectionIf the tailgate is obstructed when being opened/ closed, a pinch protection mechanism is acti-vated.
• While opening: the tailgate will stop movingand an audible signal will sound.
• While closing: the tailgate will stop andreturn to the currently programmed maximumopening position. An audible signal willsound.
WARNING
Pay attention to the risk of injury when open- ing/ closing the tailgate. Before opening/closing: Make sure that no one is in the pathof the tailgate as an injury could occur.
14
Models equipped with the optional Passive Entry system have a button to close the tailgate and a button to close and lock the tailgate.
Page 252 of 580
||
LOCKS AND ALARM
* Option/accessory.
250
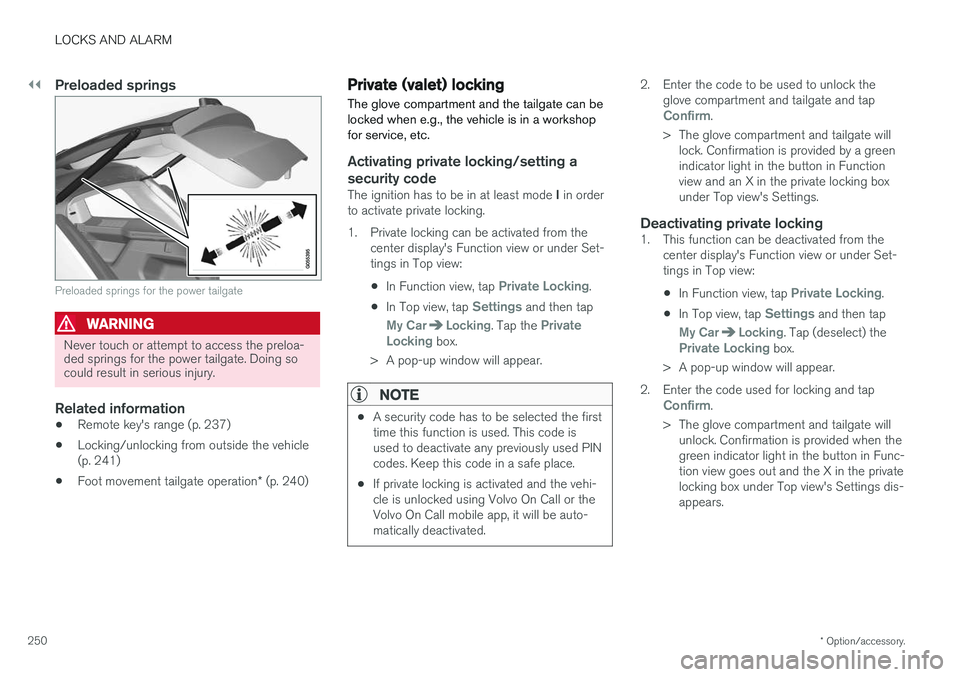
Preloaded springs
Preloaded springs for the power tailgate
WARNING
Never touch or attempt to access the preloa- ded springs for the power tailgate. Doing socould result in serious injury.
Related information
• Remote key's range (p. 237)
• Locking/unlocking from outside the vehicle (p. 241)
• Foot movement tailgate operation
* (p. 240)
Private (valet) locking
The glove compartment and the tailgate can be locked when e.g., the vehicle is in a workshopfor service, etc.
Activating private locking/setting a
security code
The ignition has to be in at least mode I in order
to activate private locking.
1. Private locking can be activated from the center display's Function view or under Set- tings in Top view:
• In Function view, tap
Private Locking.
• In Top view, tap
Settings and then tap
My CarLocking. Tap the Private
Locking box.
> A pop-up window will appear.
NOTE
• A security code has to be selected the first time this function is used. This code isused to deactivate any previously used PINcodes. Keep this code in a safe place.
• If private locking is activated and the vehi-cle is unlocked using Volvo On Call or theVolvo On Call mobile app, it will be auto-matically deactivated.
2. Enter the code to be used to unlock the
glove compartment and tailgate and tap
Confirm.
> The glove compartment and tailgate will lock. Confirmation is provided by a green indicator light in the button in Functionview and an X in the private locking boxunder Top view's Settings.
Deactivating private locking1. This function can be deactivated from the center display's Function view or under Set-tings in Top view:
• In Function view, tap
Private Locking.
• In Top view, tap
Settings and then tap
My CarLocking. Tap (deselect) thePrivate Locking box.
> A pop-up window will appear.
2. Enter the code used for locking and tap
Confirm.
> The glove compartment and tailgate will unlock. Confirmation is provided when the green indicator light in the button in Func-tion view goes out and the X in the privatelocking box under Top view's Settings dis-appears.
Page 253 of 580
LOCKS AND ALARM
}}
251
Related information
•Locking/unlocking the tailgate (p. 246)
• Using the glove compartment (p. 219)
• Navigating in the center display's views (p. 43)
Locking/unlocking with the detachable key blade
The detachable key blade can be used to e.g., unlock the driver's door from the outside if, forexample, the remote key's battery is weak.
Unlocking
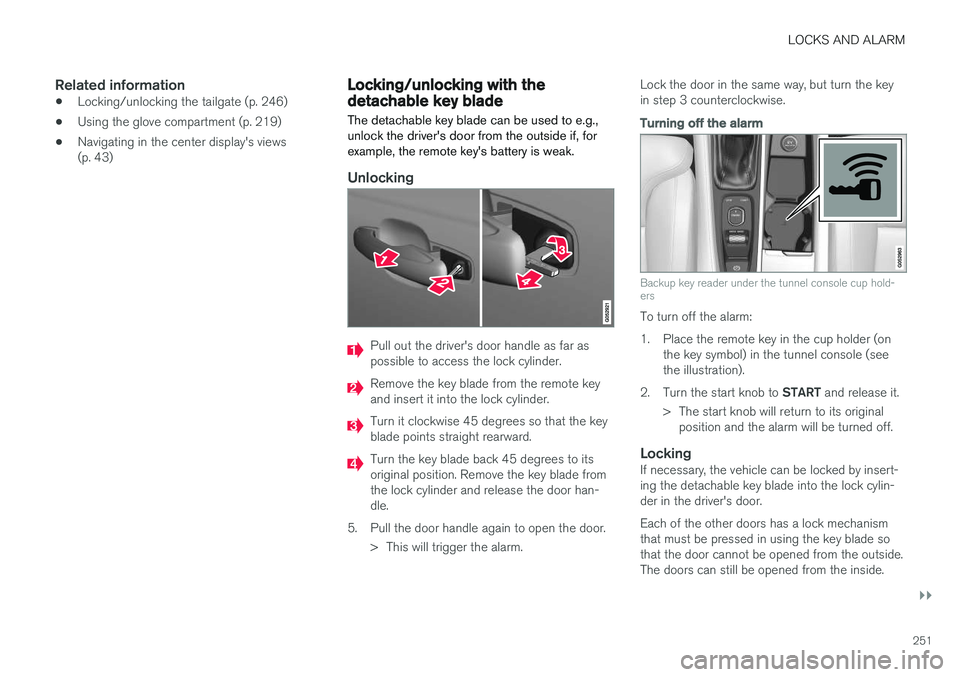
Pull out the driver's door handle as far as possible to access the lock cylinder.
Remove the key blade from the remote key and insert it into the lock cylinder.
Turn it clockwise 45 degrees so that the key blade points straight rearward.
Turn the key blade back 45 degrees to its original position. Remove the key blade fromthe lock cylinder and release the door han-dle.
5. Pull the door handle again to open the door. > This will trigger the alarm. Lock the door in the same way, but turn the keyin step 3 counterclockwise.
Turning off the alarm
Backup key reader under the tunnel console cup hold- ers
To turn off the alarm:
1. Place the remote key in the cup holder (on
the key symbol) in the tunnel console (see the illustration).
2. Turn the start knob to START and release it.
> The start knob will return to its original position and the alarm will be turned off.
LockingIf necessary, the vehicle can be locked by insert-ing the detachable key blade into the lock cylin-der in the driver's door. Each of the other doors has a lock mechanism that must be pressed in using the key blade sothat the door cannot be opened from the outside.The doors can still be opened from the inside.
Page 254 of 580
||
LOCKS AND ALARM
252
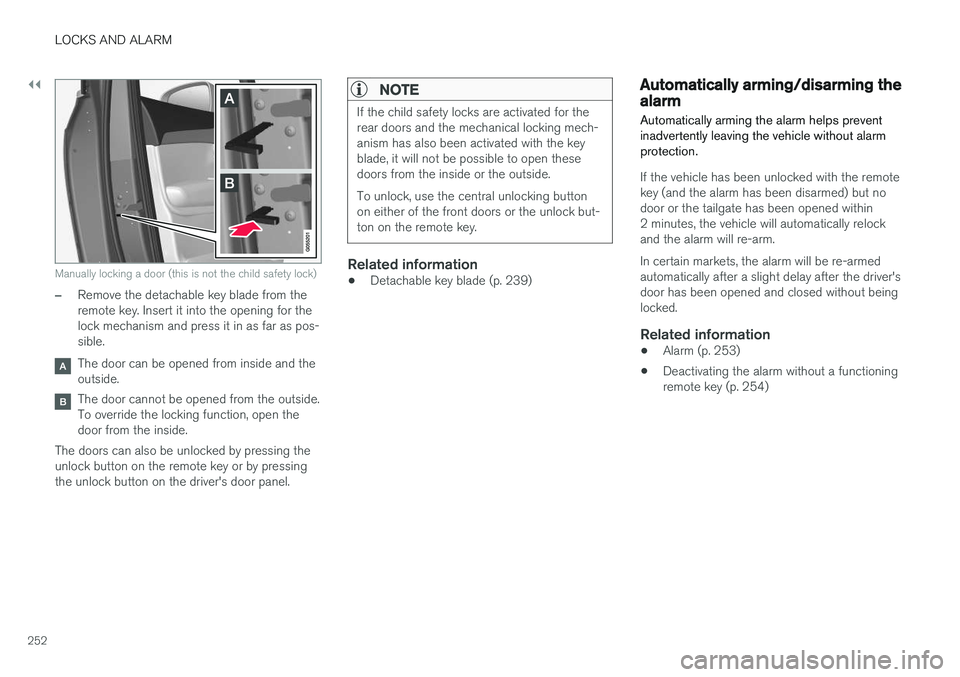
Manually locking a door (this is not the child safety lock)
–Remove the detachable key blade from the remote key. Insert it into the opening for thelock mechanism and press it in as far as pos-sible.
The door can be opened from inside and the outside.
The door cannot be opened from the outside. To override the locking function, open thedoor from the inside.
The doors can also be unlocked by pressing theunlock button on the remote key or by pressingthe unlock button on the driver's door panel.
NOTE
If the child safety locks are activated for the rear doors and the mechanical locking mech-anism has also been activated with the keyblade, it will not be possible to open thesedoors from the inside or the outside. To unlock, use the central unlocking button on either of the front doors or the unlock but-ton on the remote key.
Related information
• Detachable key blade (p. 239)
Automatically arming/disarming the alarm
Automatically arming the alarm helps prevent inadvertently leaving the vehicle without alarmprotection.
If the vehicle has been unlocked with the remote key (and the alarm has been disarmed) but nodoor or the tailgate has been opened within2 minutes, the vehicle will automatically relockand the alarm will re-arm. In certain markets, the alarm will be re-armed automatically after a slight delay after the driver'sdoor has been opened and closed without beinglocked.
Related information
• Alarm (p. 253)
• Deactivating the alarm without a functioningremote key (p. 254)
Page 255 of 580
LOCKS AND ALARM
}}
* Option/accessory.253
Alarm
The alarm system provides a warning if an attempt is made to break into the vehicle.
The following conditions will trigger the alarm:
• a door/hood/tailgate are opened
• the battery is disconnected
• the alarm siren is disconnected
If a problem is detected in the alarm system, this symbol and
Alarm
system failure Service required will
be displayed in the instrument panel.
Do not attempt to repair any of the components in the alarm system yourself; this could affect theinsurance policy on the vehicle. Contact a trainedand qualified Volvo service technician.
NOTE
One of the alarm sensors, which is sensitive to metallic objects, is located under the tunnelconsole cup holders. Avoid leaving coins,keys, etc., in the cup holders because theymay inadvertently trigger the alarm.
Arming the alarm
–Lock the vehicle by pressing the remote key's lock button. On models with theoptional Passive Entry system, the vehiclecan also be locked by pressing the outerindentation for locking on one of the doorhandles or by pressing the tailgate's rubber-ized pressure plate. If the vehicle is equipped with a power tail- gate *, the button on the lower edge of the
tailgate can also be used to lock the vehicle and arm the alarm.
Disarming the alarmThe alarm can be disarmed by: • Unlock the vehicle by pressing the remote key's unlock button
• Pressing the pressure-sensitive area on theinside of one of the door handles on modelswith the optional Passive Entry system.
• Pressing the tailgate's rubberized pressureplate on models with the optional PassiveEntry system.
Turning off a triggered (sounding)
alarm
–Press the remote key's unlock button or put the ignition in mode I by turning the start
knob to START and releasing it.
Alarm signalsThe following occurs if the alarm has been trig- gered:
• A siren will sound for 30 seconds or until thealarm is turned off
• All turn signals flash for 5 minutes or untilthe alarm is turned off
If the door that triggered the alarm is left open,
the alarm cycle will be repeated 10 times.
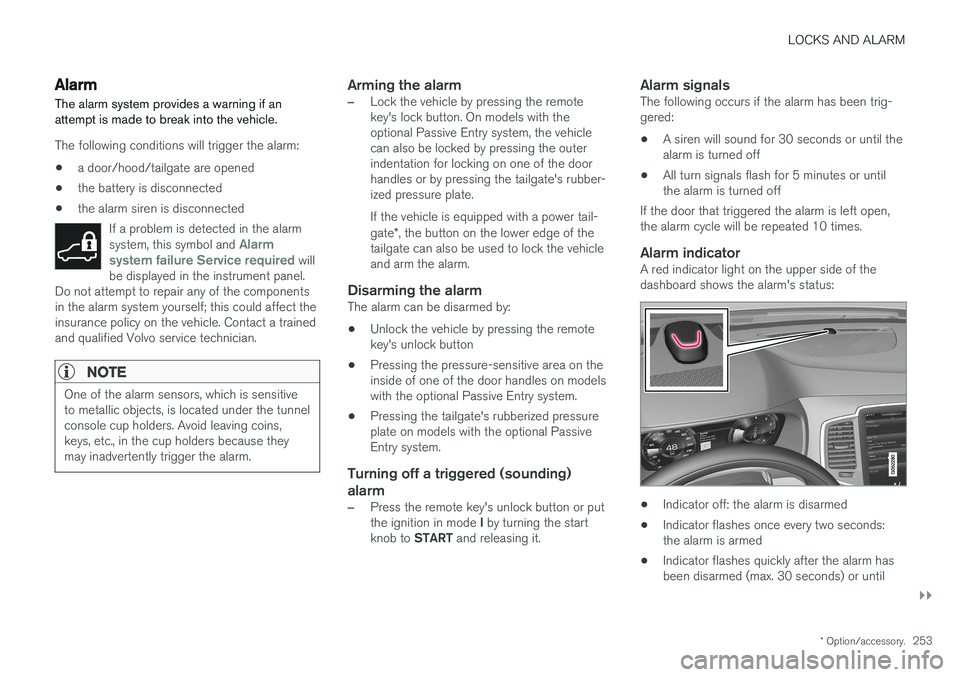
Alarm indicatorA red indicator light on the upper side of thedashboard shows the alarm's status:
• Indicator off: the alarm is disarmed
• Indicator flashes once every two seconds: the alarm is armed
• Indicator flashes quickly after the alarm hasbeen disarmed (max. 30 seconds) or until
Page 256 of 580
||
LOCKS AND ALARM
* Option/accessory.
254 the ignition has been put in mode
I (turn the
start knob to START and release it): the
alarm has been triggered
Related information
• Automatically arming/disarming the alarm (p. 252)
• Deactivating the alarm without a functioningremote key (p. 254)
Deactivating the alarm without a functioning remote key
If the remote key is not functioning properly, the alarm can be turned off and the vehicle can bestarted as follows:
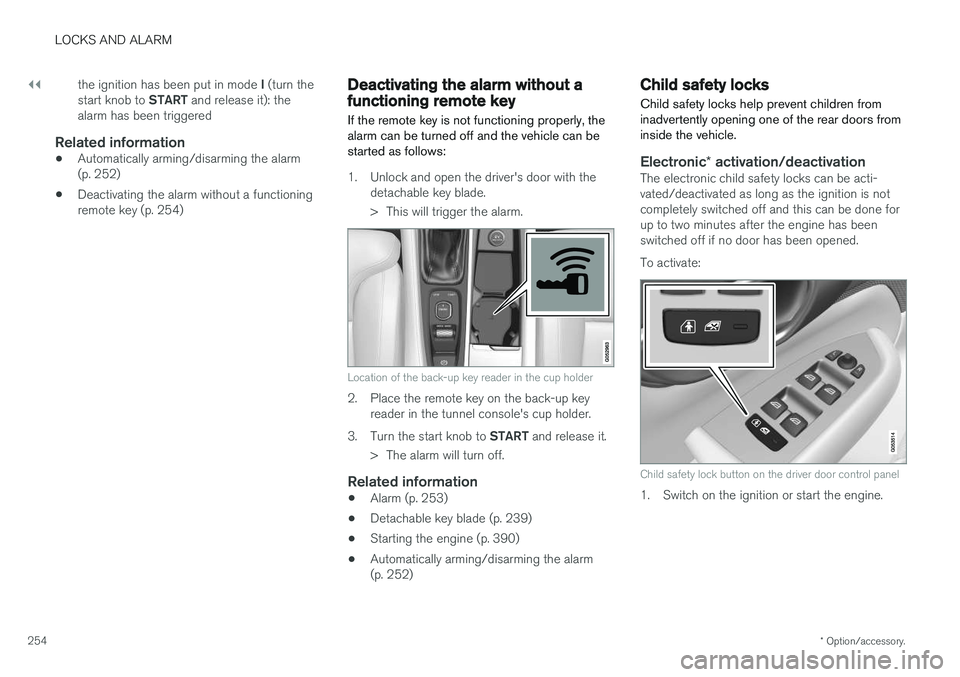
1. Unlock and open the driver's door with the detachable key blade.
> This will trigger the alarm.
Location of the back-up key reader in the cup holder
2. Place the remote key on the back-up keyreader in the tunnel console's cup holder.
3. Turn the start knob to START and release it.
> The alarm will turn off.
Related information
• Alarm (p. 253)
• Detachable key blade (p. 239)
• Starting the engine (p. 390)
• Automatically arming/disarming the alarm (p. 252)
Child safety locks
Child safety locks help prevent children from inadvertently opening one of the rear doors frominside the vehicle.
Electronic * activation/deactivationThe electronic child safety locks can be acti- vated/deactivated as long as the ignition is notcompletely switched off and this can be done forup to two minutes after the engine has beenswitched off if no door has been opened. To activate:
Child safety lock button on the driver door control panel
1. Switch on the ignition or start the engine.
Page 257 of 580
LOCKS AND ALARM
255
2. Press the button on the driver's door control
panel. >
Rear child lock Activated will be dis-
played in the instrument panel and the indicator light in the button will illuminateto show that the child safety locking func-tion is activated.
While the child safety locks are activated:
• the rear door windows can only be openedfrom the driver door control panel
• the rear doors cannot be opened from theinside
To deactivate:
–Press the button in the driver door control panel. >
Rear child lock Deactivated will be dis-
played in the instrument panel and the indicator light in the button will go out toshow that the child safety locking functionis deactivated.
When the ignition is switched off, the current set-ting for the child safety locks will be stored. If thelocks were activated at that time, they will con-tinue to be activated when the ignition isswitched on again.
Symbol Message Explanation
Rear child lockActivatedThe rear-door child safetylocks are acti-vated.
Rear child lockDeacti-vatedThe rear-door child safetylocks are deacti-vated.
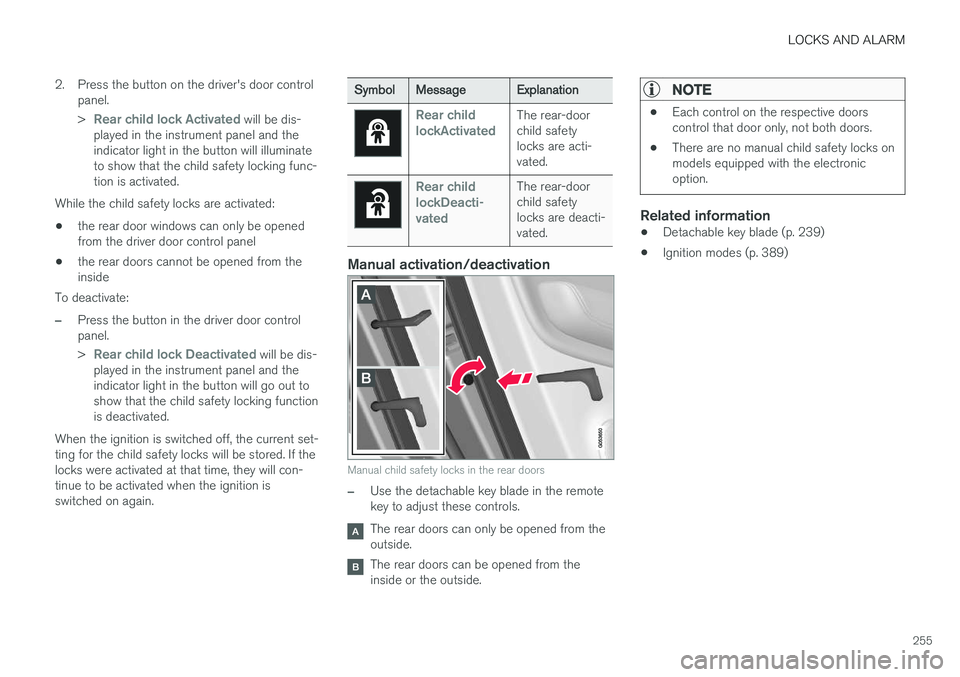
Manual activation/deactivation
Manual child safety locks in the rear doors
–Use the detachable key blade in the remote key to adjust these controls.
The rear doors can only be opened from the outside.
The rear doors can be opened from the inside or the outside.
NOTE
•Each control on the respective doors control that door only, not both doors.
• There are no manual child safety locks onmodels equipped with the electronicoption.
Related information
• Detachable key blade (p. 239)
• Ignition modes (p. 389)
Page 258 of 580
LOCKS AND ALARM
* Option/accessory.
256
Start and lock system type designations
The following information contains type designa- tions for the start and lock system.
Alarm systemUSA FCC ID: MAYDA 5823(3) This device complies with part 15 of the FCC rules. Operation is subject to the following condi-tions: (1) This device may not cause harmfulinterference, and (2) this device must accept anyinterference received, including interference thatmay cause undesired operation. Canada IC: 4405A-DA 5823(3)This device is subject to the following conditions: (1) this device may not cause interference, and(2) this device must accept any interference,including interference that may cause undesiredoperation of the device.
Remote keys (Passive entry/Passive start *)
USA Volvo Standard Key FCC ID: YGOHUF8423 Volvo Tag ID FCC ID: YGOHUF8432This device complies with Part 15 of the FCC Rules. Operation is subject to the following twoconditions: (1) This device may not cause harmful interfer- ence, and (2) this device must accept any interferencereceived, including interference that may causeundesired operation. Any changes or modification not expressly approved by the party responsible for compliancecould void the user
Page 259 of 580

D R I V E R S U P P O R T
Page 260 of 580
DRIVER SUPPORT
* Option/accessory.
258
Driver support systems
The vehicle is equipped with a number of driver support systems that help provide the driver withactive/passive support.
Some of these systems are standard while others are optional and they are designed to e.g., helpthe driver maintain a set speed or a set distanceto a vehicle ahead, or warn the driver of a poten-tial collision situation and in certain cases applythe brakes if necessary. Certain optional systemscan also assist in various parking situations.
Related information
• Adjustable steering force
* (p. 258)
• Electronic Stability Control (ESC) (p. 259)
• Roll stability control (RSC) (p. 263)
• Speed limiter (SL)
* (p. 263)
• Distance Alert
* (p. 275)
• Cruise Control (CC) (p. 270)
• Adaptive Cruise Control (ACC)
* (p. 277)
• Pilot Assist
* (p. 291)
• Driver support system radar sensor (p. 304)
• Driver support system camera (p. 308)
• City Safety
™ (p. 312)
• Blind Spot Information (BLIS)
* (p. 325)
• Cross Traffic Alert (CTA)
* (p. 327)
• Road Sign Information (RSI)
* (p. 332) •
Driver Alert Control (DAC) (p. 334)
• Driving lane assistance (p. 336)
• Run-off Mitigation (p. 341)
• Park Assist
* (p. 344)
• Park Assist Camera (PAC)
* (p. 348)
• Park Assist Pilot (PAP)
* (p. 354)
Adjustable steering force *
Steering force increases with the speed of the vehicle to give the driver an enhanced sense ofcontrol and stability. At low speed the vehicle iseasier to steer in order to facilitate parking, etc.
Changing the steering force levelTo change the level of steering force, see theinformation under the heading "individual" in arti-cle "Drive modes" for additional information. On models not equipped with the drive mode control in the center console, the selection ismade in the center display's Top view under:
SettingsMy CarDrive ModesSteering force
NOTE
•This steering force level menu function cannot be accessed when the vehicle isin motion.
• In certain situations, the power steeringfunction may become too hot and mustbe temporarily cooled. During cooling,power steering effect will be reduced andmore force may be necessary to turn thesteering wheel and a message will bedisplayed in the instrument panel.