dashboard VOLVO XC90 TWIN ENGINE 2018 User Guide
[x] Cancel search | Manufacturer: VOLVO, Model Year: 2018, Model line: XC90 TWIN ENGINE, Model: VOLVO XC90 TWIN ENGINE 2018Pages: 686, PDF Size: 17 MB
Page 210 of 686
||CLIMATE CONTROL
208
one on each side of the pillars between the
front and rear doors.
Seven seats - one additional vent on each of
the pillars behind the rear doors.
Related information
•
Climate (p. 202)
• Adjusting air distribution (p. 208)
• Opening, closing and directing air vents
(p. 209)
• Air distribution options (p. 210) Adjusting air distribution
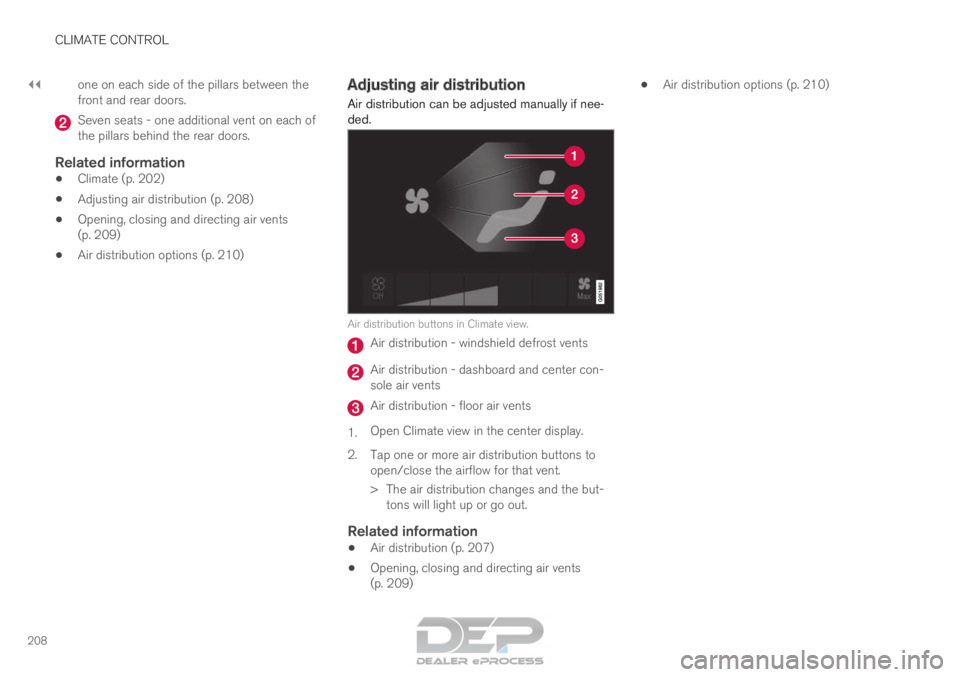
Air distribution can be adjusted manually if nee-
ded. Air distribution buttons in Climate view.
Air distribution - windshield defrost vents
Air distribution - dashboard and center con-
sole air vents
Air distribution - floor air vents
1. Open Climate view in the center display.
2.
Tap one or more air distribution buttons to
open/close the airflow for that vent.
> The air distribution changes and the but- tons will light up or go out.
Related information
• Air distribution (p. 207)
• Opening, closing and directing air vents
(p. 209) •
Air distribution options (p. 210)
Page 212 of 686
CLIMATE CONTROL
210Air distribution options
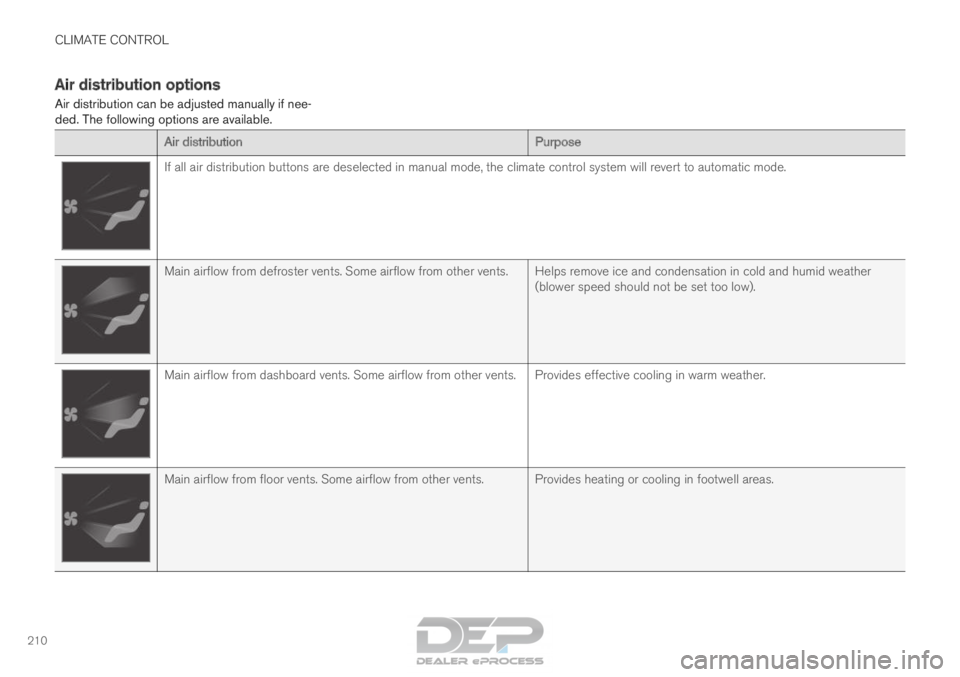
Air distribution can be adjusted manually if nee-
ded. The following options are available.
Air distribution
PurposeIf all air distribution buttons are deselected in manual mode, the clima\
te control system will revert to automatic mode.
Main airflow from defroster vents. Some airflow from other vents. Helps remove ice and condensation in cold and humid weather
(blower speed should not be set too low).Main airflow from dashboard vents. Some airflow from other vents. Provides effective cooling in warm weather.
Main airflow from floor vents. Some airflow from other vents. Provides heating or cooling in footwell areas.
Page 213 of 686

CLIMATE CONTROL
}}
211 Air distribution
PurposeMain airflow from defroster and dashboard vents. Some airflow
from other vents.
Provides a comfortable climate in warm and dry weather.Main airflow from defroster and floor vents. Some airflow from
other vents.
Provides a comfortable climate and effective defogging in cold and
humid weather.Main airflow from dashboard and floor vents. Some airflow from
other vents.
Provides a comfortable climate in sunny, cool weather.Main airflow from defroster, dashboard and floor vents.
Provides balanced comfort in the passenger compartment.
Page 240 of 686
KEY, LOCKS AND ALARM
* Option/accessory.
238 Lock indication
When the vehicle is locked or unlocked, the turn
signals will flash to indicate that the vehicle has
been locked or unlocked correctly.
Exterior confirmationLocking
• The turn signals will flash once and the door
mirrors will fold in 1
to confirm the vehicle is
locked.
Unlocking
• The turn signals will flash twice and the door
mirrors will fold out 1
to confirm the vehicle is
unlocked.
All doors, tailgate and hood must be closed for
confirmation to be given. If only the driver's door
is closed when the vehicle is locked 2
, the vehicle
will be locked but the turn signals will only flash
to indicate locking when all doors and the hood
and tailgate have been closed.
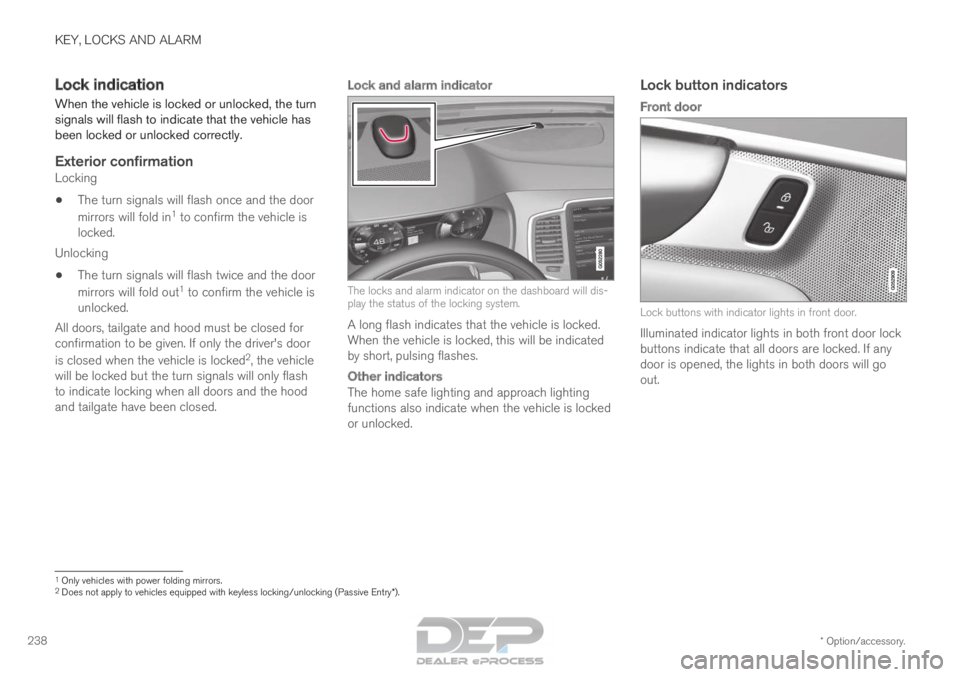
Lock and alarm indicator The locks and alarm indicator on the dashboard will dis-
play the status of the locking system.
A long flash indicates that the vehicle is locked.
When the vehicle is locked, this will be indicated
by short, pulsing flashes.
Other indicators
The home safe lighting and approach lighting
functions also indicate when the vehicle is locked
or unlocked.
Lock button indicators
Front door Lock buttons with indicator lights in front door.
Illuminated indicator lights in both front door lock
buttons indicate that all doors are locked. If any
door is opened, the lights in both doors will go
out. 1
Only vehicles with power folding mirrors.
2 Does not apply to vehicles equipped with keyless locking/unlocking (Pas\
sive Entry*).
Page 261 of 686
KEY, LOCKS AND ALARM
}}
* Option/accessory. 259
Unlocking the tailgate from inside
the vehicle
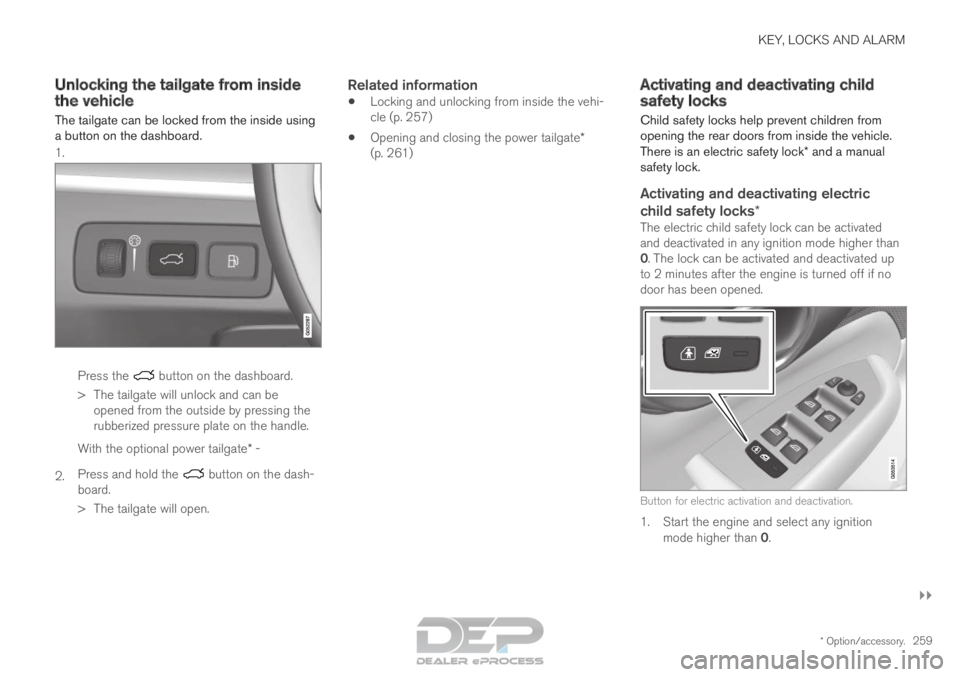
The tailgate can be locked from the inside using
a button on the dashboard. 1. Press the button on the dashboard.
>
The tailgate will unlock and can be
opened from the outside by pressing the
rubberized pressure plate on the handle.
2. With the optional power tailgate* -
Press and hold the button on the dash-
board.
>
The tailgate will open.
Related information
• Locking and unlocking from inside the vehi-
cle (p. 257)
• Opening and closing the power tailgate*
(p. 261) Activating and deactivating child
safety locks
Child safety locks help prevent children from
opening the rear doors from inside the vehicle.
There is an electric safety lock* and a manual
safety lock.
Activating and deactivating electric
child safety locks*
The electric child safety lock can be activated
and deactivated in any ignition mode higher than
0. The lock can be activated and deactivated up
to 2 minutes after the engine is turned off if no
door has been opened. Button for electric activation and deactivation.
1. Start the engine and select any ignition
mode higher than 0.
Page 265 of 686
KEY, LOCKS AND ALARM
}}
* Option/accessory. 263
Closing and locking 17
the power
tailgate
– Press the button on the lower edge of
the tailgate to close and simultaneously lock
the tailgate and doors (all doors must be
closed in order to lock).
>
The tailgate closes automatically - the tail-
gate and doors lock, and the alarm* is
activated.
NOTE •
One of the vehicle's remote keys must be
within range for locking and unlocking to
be possible.
• When the keyless locking or closing* func-
tions are used, three audible signals will
sound if the key is not detected close
enough to the tailgate.
CAUTION When operating the tailgate manually, open
and close it slowly. If you encounter resis-
tance, do not use force. This could lead to
damage and loss of function.
Interrupting opening or closingInterrupt opening or closing by doing one of the
following:
• Press the button on the dashboard.
• Press the button on the remote key.
• Press the close button on the underside of
the tailgate.
• Press the rubberized pressure plate on the
underside of the tailgate's outer handle.
• Using a foot movement*.
Tailgate movement is interrupted and stops. The
trunk lid can then be opened or closed manually.
Pinch protectionIf anything obstructs the tailgate with enough
force to prevent it from opening or closing, pinch
protection will be activated.
• When opening - the tailgate will stop moving
and an audible signal will sound.
• When closing - the tailgate will stop, a long
audible signal will sound and the tailgate will
return to the programmed maximum opening
position.
WARNING Be aware of the risk of serious injury when
operating the tailgate. Before opening/clos-
ing, make sure that no one is in the path of
the tailgate who could be injured by its move-
ment.
Always operate the tailgate with caution.
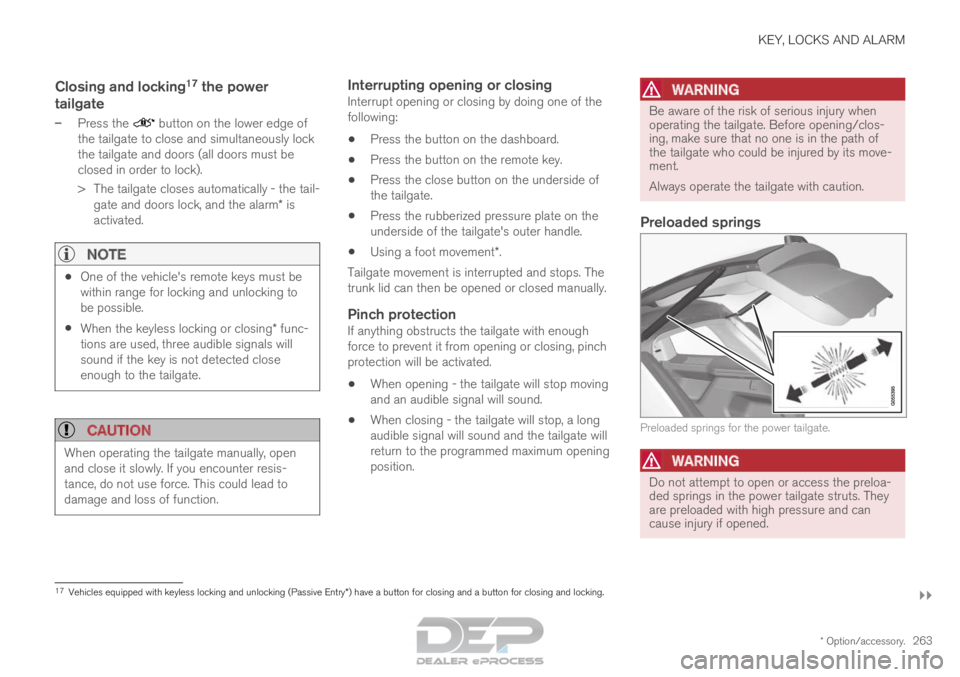
Preloaded springs
Preloaded springs for the power tailgate.
WARNING
Do not attempt to open or access the preloa-
ded springs in the power tailgate struts. They
are preloaded with high pressure and can
cause injury if opened.
17
Vehicles equipped with keyless locking and unlocking (Passive Entry*) have a button for closing and a button for closing and locking.
Page 270 of 686
||KEY, LOCKS AND ALARM
268
Related information
•
Private Locking (p. 266) Alarm
The alarm emits sound and light signals if any-
one without a valid remote key attempts to break
into the vehicle or interferes with the start battery
or alarm siren.
When armed, the alarm will be triggered if:
• the hood, tailgate or any door is opened.
• a battery cable is disconnected
• the alarm siren is disconnected.
Alarm signalsThe following occurs if the alarm is triggered:
• A siren will sound for 30 seconds or until the
alarm is turned off.
• All turn signals will flash for 5 minutes or
until the alarm is turned off.
If the reason the alarm was triggered is not recti-
fied, the alarm cycle will repeat up to 10 times 20
.
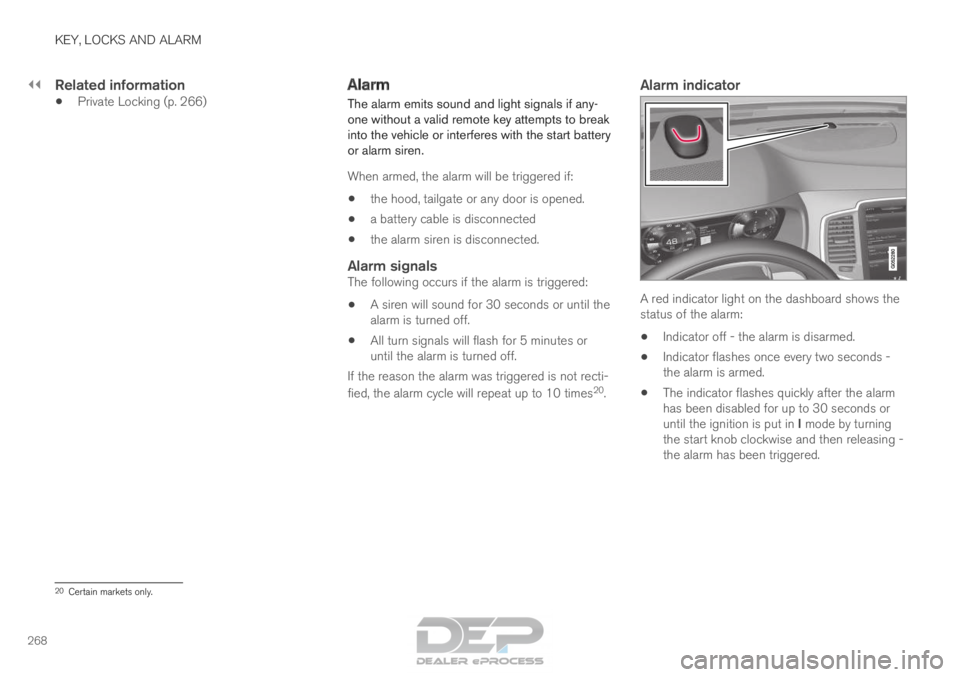
Alarm indicator A red indicator light on the dashboard shows the
status of the alarm:
• Indicator off - the alarm is disarmed.
• Indicator flashes once every two seconds -
the alarm is armed.
• The indicator flashes quickly after the alarm
has been disabled for up to 30 seconds or
until the ignition is put in I mode by turning
the start knob clockwise and then releasing -
the alarm has been triggered. 20
Certain markets only.
Page 271 of 686
KEY, LOCKS AND ALARM
}}
* Option/accessory. 269
In the event of alarm system failureIf a problem is detected in the alarm
system, a symbol and the message
Alarm system failure Service
required will appear in the instrument
panel. Contact a workshop - an authorized Volvo
workshop is recommended.
NOTE Do not attempt to repair or alter any of the
components in the alarm system yourself. Any
such attempt could affect the terms and con-
ditions of your insurance policy.
Related information
•
Arming and disarming the alarm (p. 269) Arming and disarming the alarm
The alarm is armed when the vehicle is locked.
Arming the alarmLock and arm the vehicle by:
• pressing the lock button on the remote key •
touch the marked surface on the outside of
the door handle or the rubberized pressure
plate on the tailgate 21
.
If the vehicle is equipped with both keyless lock-
ing/unlocking * and power tailgate*, the button on the lower edge of the tailgate can also
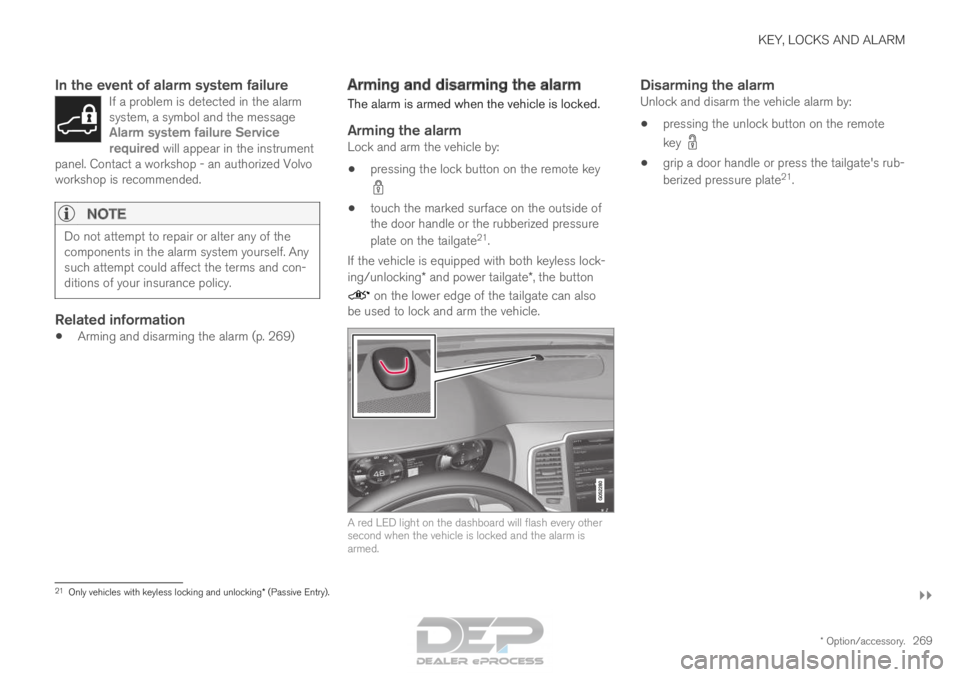
be used to lock and arm the vehicle. A red LED light on the dashboard will flash every other
second when the vehicle is locked and the alarm is
armed.
Disarming the alarmUnlock and disarm the vehicle alarm by:
• pressing the unlock button on the remote
key •
grip a door handle or press the tailgate's rub-
berized pressure plate 21
. 21
Only vehicles with keyless locking and unlocking* (Passive Entry).
Page 465 of 686

STARTING AND DRIVING
}}
463 1. Press the button on the dashboard.
>
Pressure equalization in the fuel tank cau-
ses a slight delay before the fuel filler
door opens. Fuel tank Fuel lid is
opening will be displayed in the instru- ment panel, followed by Fuel tank Ready for refueling.
NOTE Refueling must be done within approximately
10 minutes of opening the fuel filler door.
After this time, the valve opened by pushing
the button will close and it will no longer be
possible to refuel without the pump's nozzle
switching off.
If the valve is closed before refueling is com-
plete - press the button again and wait until
the driver display shows the message
Fuel
tank Ready for refueling. 2. After refueling, press the fuel filler door
lightly to close it.
Related information
• Refueling (p. 463) Refueling
The fuel tank is equipped with a fuel filling sys-
tem without a cover.Refueling the vehicle at a service
station
Page 657 of 686

SPECIFICATIONS
}}
655 Vehicle Emission Control Information. US
models. Your Volvo is designed to meet all appli-
cable emission standards, as evidenced by the
certification label on the underside of the hood.
For further information regarding these regula-
tions, please consult your Volvo retailer. Vehicle Emission Control Information.
Canadian models. Your Volvo is designed to
meet all applicable emission standards, as evi-
denced by the certification label on the underside
of the hood. For further information regarding
these regulations, please consult your Volvo
retailer. Vehicle Identification Number (VIN). The
VIN plate is located on the top left surface of the
dashboard. The Vehicle Identification Number
(VIN) should always be quoted in all correspond-
ence concerning your vehicle with the retailer and
when ordering parts. Tire inflation pressures. This label indicates
the correct inflation pressures for the tires that
were on the vehicle when it left the factory. Federal Motor Vehicle Safety Standards
(FMVSS) specifications (USA) and Ministry of
Transport (CMVSS) standards (Canada). Your
Volvo is designed to meet all applicable safety
standards, as evidenced by the certification label
on the driver's side B-pillar (the structural mem-
ber at the side of the vehicle, at the rear of the
driver's door opening). This label also includes
codes for paint color, etc. For further information
regarding these regulations, please consult your
Volvo retailer. U.S. models have the upper decal;
Canadian models have the lower one.