stop start VOLVO XC90 TWIN ENGINE 2018 Service Manual
[x] Cancel search | Manufacturer: VOLVO, Model Year: 2018, Model line: XC90 TWIN ENGINE, Model: VOLVO XC90 TWIN ENGINE 2018Pages: 686, PDF Size: 17 MB
Page 482 of 686

||STARTING AND DRIVING
* Option/accessory.
480 www.HomeLink.com, www.youtube.com/
HomeLinkGentex or call 1-800-355-3515.
Programming individual buttons
To program an individual HomeLink
®
button:
1. Press and hold the desired button for about 20 seconds.
2. When the indicator light on HomeLink ®
starts flashing slowly, it is possible to pro-
gram as usual.
Note: If the button you are reprogramming
does not program with a new device, it will
return to the previously saved programming.
Resetting the HomeLink ®
buttons
It is only possible to reset all HomeLink ®
buttons
at once. It is not possible to reset individual but-
tons. Individual buttons can only be reprogram-
med.
– Press and hold the outer buttons (1 and 3)
on HomeLink ®
for about 10 seconds.
>
When the indicator light goes from a
steady glow to flashing, the buttons have
been reset and are ready for reprogram-
ming.
Related information
• Using HomeLink (p. 480)
• HomeLink ®
* (p. 478)
• Type approval for HomeLink ®
* (p. 481) Using HomeLink
Once HomeLink ®
is programmed, it can be
used instead of the separate remote controls.
Press and hold the programming button. The
garage door, gate, alarm system, etc. will be acti-
vated (this may take several seconds). If the but-
ton is held down for more than 20 seconds,
reprogramming will begin. The indicator light will
glow steadily or flash when the button has been
pressed. The original remote controls may be
used concurrently with HomeLink ®
if desired.
NOTE If the ignition is off, HomeLink
®
works for
30 minutes after the driver's door has been
opened.
WARNING •
If you use HomeLink ®
to open a garage
door or gate, be sure no one is near the
gate or door while it is in motion.
• Do not use HomeLink ®
with any garage
door opener that lacks safety stop and
reverse features as required by US fed-
eral safety standards (this includes any
garage door opener model manufactured
before April 1, 1982). A garage door that
cannot detect an object - signaling the
door to stop and reverse - does not meet
current U.S. federal safety standards. For
more information, contact HomeLink at:
www.homelink.com.
Related information
• HomeLink ®
* (p. 478)
• Programming HomeLink ®
* (p. 479)
• Type approval for HomeLink ®
* (p. 481)
Page 484 of 686

STARTING AND DRIVING
* Option/accessory.
482 Activating and deactivating the
compass
An integrated compass in the upper right corner
of the rearview mirror shows the direction the
vehicle is traveling.
Activating and deactivating the
compass
The compass is automatically activated when the
vehicle is started.
To deactivate/activate the compass manually:
– Use a paper clip or similar object to press the
button on the bottom of the mirror.
Related information
• Compass (p. 481)
• Calibrating the compass (p. 482) Calibrating the compass
The globe is divided into 15 magnetic zones.
The compass should be calibrated if the vehicle
is driven from one zone to another.
To calibrate the compass:
1.
Stop the vehicle in a large, open area away
from steel constructions and high-voltage
power lines.
2. Start the engine and switch off all electrical equipment (climate system, wipers, etc.) and
make sure all doors are closed.
NOTE Calibration may fail or not even be initiated if
electrical equipment is not turned off.
3. Hold the button on the bottom of the rear-
view mirror pressed for about 3 seconds
(using e.g. a paper clip). The number of the
current magnetic zone is shown. 15
14
13
12
11
9
8
7
6
5
4
3
2
1
10 Magnetic zones.
4. Press the button on the underside of the
mirror repeatedly until the desired magnetic
zone ( 1–15) appears (see the map of mag-
netic zones).
5. Wait until the display again shows C, or
press and hold the button on the underside
of the rearview mirror for approx. 6 seconds
until
C is displayed.
6.
Drive slowly in a circle at a speed of no more
than 10 km/h (6 mph) until a compass direc-
tion is shown in the display. This indicates
that calibration is complete. Drive in a circle
two more times to fine-tune the calibration.
7. Vehicles with heated windshields*: If C is
shown in the display when the windshield
heating function is activated, perform step 6
above with the heating function on.
Page 495 of 686

AUDIO, MEDIA AND INTERNET
}}
* Option/accessory. 493
Storing radio favorites
It is possible to add a radio a radio station in the Radio favorites app and in the list of favorites
for the waveband (e.g. FM). Instructions for add-
ing and removing favorites are provided below.
Radio favoritesRadio favorites shows saved
favorites from all wavebands. 1.
Open the Radio favorites app from App
view.
2.
Tap the desired station in the list to listen.
Adding and deleting radio favorites
– Tap to add/remove a radio channel from
the waveband's list of favorites or Radio
favorites.
If a favorite station is deleted here, it will also be
deleted from that waveband's list of favorites.
Related information
• Radio (p. 490)
• Starting the radio (p. 491)
• Searching for a radio station (p. 492)
• Changing waveband and radio station
(p. 491) •
Voice control for radio and media (p. 148)
• Radio settings (p. 493)
• App menu in instrument panel (p. 103) Radio settings
There are a number of different radio functions
that can be activated and deactivated.
Canceling a traffic messageA current broadcast (e.g. a traffic message) can
be temporarily interrupted by pressing in the
right-side steering wheel keypad or tapping
Cancel in the center display.
Activating and deactivating radio
functions
Pull down Top view and select Settings Media and the desired waveband to see available
functions.
FM radio
• HD Radio FM: HD Radio
™
Technology:
makes it possible to achieve a sound quality
comparable with a CD.
• Show Broadcast Information: shows
information on program content, artists, etc.
• Freeze Program Name: select to stop the
program service name from scrolling continu-
ously. Instead it freezes after 20 seconds.
SiriusXM ®
Satellite radio*
Pull down Top view and select Settings Media SiriusXM
to show a list of available
options.
Page 564 of 686

||WHEELS AND TIRES
* Option/accessory.
562
NOTE Always remember to calibrate the Tire Pres-
sure Monitoring System when the wheels
have been changed or the tire inflation pres-
sure has been corrected according to the tire
pressure decal or tire inflation pressure table.
If correct reference values have not been set,
the system cannot issue low tire pressure
alerts correctly.
The vehicle must be stationary with the
engine running to access the calibration but-
ton and to start the calibration process.
WARNING
The exhaust gases contain carbon monoxide,
which is invisible and odorless but very poi-
sonous. For this reason, always perform the
calibration procedure outdoors or in a work-
shop with exhaust gas evacuation equipment.
Related information
•
Recommended tire pressure (p. 559)
• Adjusting tire pressure (p. 558)
• Viewing tire pressure status in the center
display* (p. 562)
• Action when warned of low tire pressure
(p. 563)
• Tire pressure monitoring system* (p. 559) Viewing tire pressure status in the
center display*
With the system for tire pressure monitoring,
Tyre Pressure Monitoring System (TPMS), tire
pressure status can be viewed in the center dis-
play.
Checking status1. Open the Car status app in App view. 2.
Tap TPMS to display the status of the tires.
Status indicator light
The graphic in the center display shows the sta-
tus of each tire 8
. Green tire:
• Inflation pressure is above the warning
threshold.
Yellow tire:
• The tire's inflation pressure is too low. Stop
and check/inflate the tire as soon as possi-
ble. Recalibrate the system after adjusting
the tire pressure.
All tires yellow:
• The inflation pressure is too low in one or
more tires. Stop and check/inflate the tires
as soon as possible. Recalibrate the system
after adjusting tire pressure.
All tires gray:
• Calibration in progress.
• Status unknown. 8
The illustration is generic. Layout may vary depending on vehicle model \
or software version.
Page 586 of 686

LOADING, STORAGE AND PASSENGER COMPARTMENT
* Option/accessory.
584 Using the electrical outlets
The 12 V outlet can be used for devices
intended for this such as MP3 players, coolers
and cellular phones.
The high-voltage outlet* can be used for devices
intended for this, such as chargers, laptops, etc. The ignition must be in at least mode I for the
outlets to supply current. The outlets will then be
active as long as there is sufficient charge in the
start battery.
If the engine is turned off and the vehicle is
locked, the outlets will be deactivated. If the
engine is turned off and the vehicle remains
unlocked, the sockets will remain active for up to
7 minutes.
NOTE Bear in mind that using the electrical outlets
when the engine is off could cause the starter
battery to have too low of a charge level,
which could limit other functionality.
Accessories connected to the electrical out-
lets can be activated even when the vehicle
electrical system is off or if preconditioning is
used. For this reason, disconnect plugs when
they are not in use to prevent the starter bat-
tery from becoming discharged.
WARNING •
Do not use accessories with large or
heavy plugs – they could damage the out-
let or come loose while you are driving.
• Do not use accessories that could cause
disruptions to e.g. the vehicle's radio
receiver or electrical system.
• Position the accessory so that there is no
risk of it injuring the driver or passengers
in the event of heavy braking or a colli-
sion.
• Pay attention to connected accessories
as they can generate heat that could burn
passengers or the interior.
Using 12 V outlets1. Remove the stopper (tunnel console) or fold
down the cover (trunk/cargo compartment)
over the socket and plug in the device.
2. Unplug the device and put the stopper back in (tunnel console) or fold up the cover
(trunk/cargo compartment) when the socket
is not in use or left unattended.
CAUTION The maximum power is 120 W (10 A) per
outlet.
Using high-voltage outletsThe ignition must be in at least mode I for outlets
to supply current. The outlets will then be active
as long as there is sufficient charge in the start
battery.
1. Slide down the cover over the outlet and plug
in the device.
>
The LED 2
light on the outlet will indicate
its status.
2. The outlet is supplying electrical current when the light is glowing steadily green.
3. Disconnect the device by pulling out the plug (do not pull on the cord).
Pull up the cover when the outlet is not in
use or is left unattended.
CAUTION The maximum power is 150 W.
WARNING
Do not attempt to alter or repair the high-volt-
age outlet on your own. Volvo recommends
contacting an authorized Volvo workshop.
2
LED (Light Emitting Diode)
Page 617 of 686

MAINTENANCE AND SERVICE
}}
615
Start battery
The vehicle has a single-pole electrical system
that uses the chassis and engine mount as con-
ductors.
The start battery is used to start the electrical
system and power electrical equipment in the
vehicle. The hybrid battery is used to start the
combustion engine.
The start battery should only be replaced by a
workshop 15
.
The start battery is a 12 V AGM (Absorbed Glass
Mat) battery, dimensioned for regenerative charg-
ing and to support the function of the vehicle's
various systems.
The service life and performance of the start bat-
tery are affected by factors such as driving style,
driving conditions, climate, battery discharges,
number of starts, etc.
• Never disconnect the start battery while the
engine is running.
• Make sure the cables to the start battery are
correctly connected and the clamps are
securely tightened.
WARNING •
Batteries generate hydrogen gas, which
is flammable and explosive.
• Do not connect the jumper cable to any
part of the fuel system or to any moving
parts. Avoid touching hot manifolds.
• Battery fluid contains sulfuric acid. Do not
allow battery fluid to contact eyes, skin,
fabrics or painted surfaces.
• If contact occurs, flush the affected area
immediately with water. Obtain medical
help immediately if eyes are affected.
• Never expose the battery to open flame
or electric spark. Do not smoke near the
battery. Failure to follow the instructions
for jump starting can lead to injury.
Connection points
WARNING PROPOSITION 65 WARNING
Battery posts, terminals, and related accesso-
ries contain lead and lead compounds, chemi-
cals known to the state of California to cause
cancer and reproductive harm. Wash hands
after handling.Use the vehicle's connection points in the engine
compartment to connect an external start battery
or battery charger.
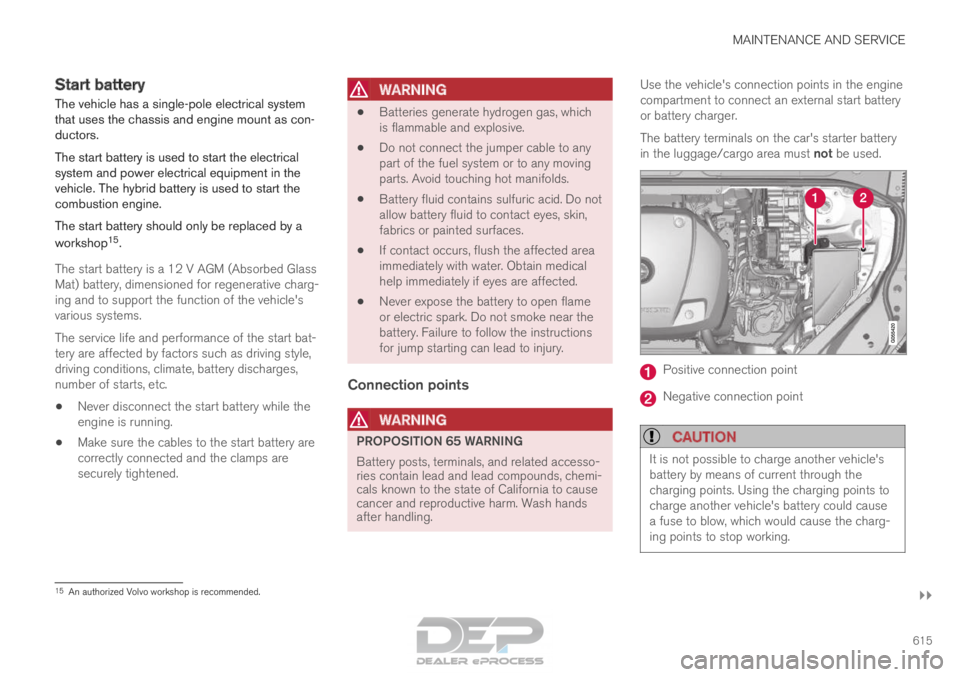
The battery terminals on the car's starter battery
in the luggage/cargo area must not be used.
Positive connection point
Negative connection point
CAUTION
It is not possible to charge another vehicle's
battery by means of current through the
charging points. Using the charging points to
charge another vehicle's battery could cause
a fuse to blow, which would cause the charg-
ing points to stop working.
15
An authorized Volvo workshop is recommended.
Page 618 of 686

||MAINTENANCE AND SERVICE
616
CAUTION
Only a modern battery charger with controlled
charge voltage should be used to charge the
starter battery. The rapid charging function
should not be used as this could damage the
battery.
NOTE
If both the starter battery and the hybrid bat-
tery are discharged, both batteries must be
charged. In such cases, it is not possible to
charge only the hybrid battery first.
The starter battery must have a certain level
of charge for it to be possible to charge the
hybrid battery.
CAUTION Failure to observe the following could cause
the infotainment energy save mode to tempo-
rarily stop working and/or a message in the
driver's display regarding the state of charge
of the starter battery may be temporarily
incorrect after an external starter battery or
battery charger has been connected:
• The negative battery terminal of the vehi-
cle's starter battery must never be used
to connect an external starter battery or
battery charger – only the vehicle's neg-
ative charging point should be used as
a grounding point.NOTE If the starter battery becomes discharged too
many times, it will shorten its service life.
The service life of the starter battery is affec-
ted by several factors, such as driving condi-
tions and climate. The starting capacity of the
battery reduces gradually over time. The bat-
tery must therefore be recharged if the vehi-
cle is not used or a long period of time or if it
is only driven short distances. Severe cold fur-
ther limits the starting capacity.
To keep the starter battery in a good condi-
tion, the vehicle should be driven at least
15 minutes per week or the battery should be
connected to a battery charger with automatic
trickle charging.
A starter battery that is always kept fully
charged has the maximum service life.
Page 671 of 686

INDEX
669
Charge level
vehicle function 459
Charging hybrid battery 407
opening and closing the charging
door 411
start charging 412
Status 414, 415, 416
stop charging 418
Charging cable 409
Charging current 408
Checking engine oil level 611
Child restraints 63, 65 booster cushions 71
convertible seats 69
infant seats 67
integrated booster cushion 76
ISOFIX/LATCH anchors 74
lower attachment points 74
recalls and registration 65
top tether anchors 72
Child safety 63
Child safety locks 259
Circuit breaker 410
City Safety 335, 336, 338, 339, 344, 346
City Safety in crossing traffic 341, 342 City Safety when evasive maneuver preven-
ted
343
Cleaning
635, 637, 638
automatic car wash 641
car wash 638, 639, 641, 642, 643, 644
center display 633
Seat belts 635
textile upholstery 633, 635, 636
upholstery 633, 635, 636, 637, 638
wheels 644
Cleaning wheels 644
Cleaning wiper blades 642
Clean Zone 205
Clean Zone Interior Package 206
Climate 202
auto-regulation 219
blower control 224, 225
parking 230
perceived temperature 203
Sensors 202
temperature control 226, 227, 228
voice control 203
zones 202
Climate controls 213
center display 213
rear seat 213 Climate system
202, 213
Refrigerant 664
repairs 608
Clock, setting 93
Collision 42, 47, 52, 61
Collision warner detection of pedestrians 339
radar sensor 326
Collision warning 335, 347
Color code, paintwork 646
Color codes 646
Compass 481, 482 calibration 482
Condensation in headlights 639, 641, 642, 643
Connecting vehicle to Internet No connection or poor connection 534
via a mobile device (WiFi) 531
via mobile device (Bluetooth) 531
via vehicle's modem 532
Connect phone 521
Contact information 26
Convertible seats 69
coolant 663
Coolant, filling 612
Page 673 of 686

INDEX
671
Electronic immobilizer 252
emergency brake lights 160
Emission inspection readiness 598
Engine
automatic start and stop of combustion
engine 444
overheating 468
start 424
turn off 426
Engine braking, automatic 454
Engine compartment coolant 612
engine oil 610
overview 609
Engine drag control 274
Engine oil 610 filling 611
filter 610
grade and volume 662
Engine shutdown 426
Engine specifications 661
Engine temperature high 468
Environment 27
Error messages Adaptive Cruise Control 309
see Messages and symbols 309, 324 Error messages in BLIS
352
Ethanol content max. 10% by volume
464
Exterior dimensions 657
F Federal Clean Air Act
598
Ferry transport
450
Flat tire 572
Flooded road 462
Fluids, volumes 650, 664
Fluids and oils 663, 664
Fog lights rear 159
Four-C 450
Front seat blower 224
climate 213
heating 215, 216
temperature 226
ventilation 217
Front seat manual 184
Front seats, power 185 adjusting passenger seat from driver's
seat 191 adjusting seat
185
Lumbar support
190
massage 188, 189
memory function 186, 187
multifunction control 188, 189, 190
Side bolsters 190
FSC, environmental labeling 23
Fuel 464 Travel Link service 505
Fuel filling 463
Fuel gauge 86
Fuel requirements 464, 465
Fuel tank volume 664
Fuse box 621
Fuses below the glove compartment 626
general 620
in engine compartment 622
in the cargo compartment 629
replacing 621
G Gasoline grade
464
Gauge fuel gauge
86
Page 676 of 686

INDEX
674high beams 156, 157
home safe lighting 161
in passenger compartment 162, 164
instrument illumination 164
instrument lighting 164
light bulbs, specifications 614
low beams 155
position lights 154
rear fog light 159
settings 153
Turn signals 158
Lighting, replacing bulbs 613
Limp home 438
Load anchoring eyelets cargo compartment 589
Load anchoring hooks 588
Load carriers 588
Load index 554
Loading general 586
load anchoring eyelets 589
long load 587
Lock indication 238 setting 239
Locking/unlocking Tailgate 243, 256
Locking wheel bolts 565 Locks
Locking
241
unlocking 241
Long-term storage 421
Low battery charge level start battery 469
Low beams 155
Lower the rear end 587
Low oil level 611
Low-speed driving 453 activate with function button 454
M Maintained climate comfort
234
start/stop
234
Maintenance 598
corrosion protection 644
Max. axle weight 659
Max. roof load 659
Media player 507, 508, 509
compatible file formats 536, 537
voice control 148
Messages and symbols Adaptive Cruise Control 309
Collision warner with auto-brake 346 Messages in BLIS
352
Messages in display
105, 140
handling 106, 141
saved 107, 142
Mileage 89
electric motor 458
Misting condensation in headlights 638, 641
Mood lighting 163, 164
N Net
cargo compartment
593
O Occupant safety
43
Occupant weight sensor
56
Octane rating 465
Oil, see also Engine oil 662
On-board diagnostics 598
On-board Diagnostic socket 36
Option/accessory 21
Outside temperature gauge 94