remote start VOLVO XC90 TWIN ENGINE 2018 Owners Manual
[x] Cancel search | Manufacturer: VOLVO, Model Year: 2018, Model line: XC90 TWIN ENGINE, Model: VOLVO XC90 TWIN ENGINE 2018Pages: 686, PDF Size: 17 MB
Page 8 of 686
6
Activating and deactivating climatecontrol for the third-row seats*229
Parking climate230
Preconditioning230
Starting and stopping preconditioning231
Preconditioning timer settings232
Adding and editing timer setting forpreconditioning233
Activating and deactivating precondi-tioning timer settings233
Deleting preconditioning timer settings234
Climate comfort retaining function234
Switching on and off the climateretaining function when parking234
Parking climate symbols and messages236
KEY, LOCKS AND ALARM
Lock indication238
Lock confirmation settings239
Remote key239
Locking and unlocking using theremote key241
Settings for remote and inside doorunlock242
Unlocking the tailgate using theremote key243
Remote key range243
Replacing the remote key's battery244
Ordering additional remote keys248
Red Key - restricted remote key*248
Red Key* settings249
Detachable key blade250
Locking and unlocking with detacha-ble key blade251
Electronic immobilizer252
Start and lock system type designations252
Keyless and touch-sensitive surfaces*253
Keyless locking and unlocking*254
Keyless unlock settings*256
Keyless tailgate unlock*256
Antenna locations for the start andlock system257
Locking and unlocking from insidethe vehicle257
Unlocking the tailgate from insidethe vehicle259
Activating and deactivating childsafety locks259
Automatic locking when driving261
Opening and closing the power tailgate*261
Setting a maximum height for thepower tailgate*264
Foot movement tailgate operation*265
Private Locking266
Activating and deactivating privatelocking267
Alarm268
Arming and disarming the alarm269
Foreign Component Detection*270
Page 140 of 686
||DISPLAYS AND VOICE CONTROL
138
Global settings
Global settings and parameters do not change
when driver profiles are changed. They remain
the same regardless of which driver profile is cur-
rently active.
Keyboard layout is an example of a global setting.
If driver profile X is used to add additional key-
board languages, these languages will also be
available for driver profile Y. The settings for key-
board layout are not saved to a specific driver
profile - the settings are global.
Personal settings
If driver profile X has been used to e.g., set the
brightness for the center display, driver profile Y
will not be affected by this setting. It will only be
saved to driver profile X because brightness set-
ting is a personal setting.
Related information
•
Selecting a driver profile (p. 138)
• Changing a driver profile's name (p. 139)
• Resetting driver profile settings (p. 139)
• Linking a remote key to a driver profile
(p. 139)
• Table of settings in the center display
(p. 136) Selecting a driver profile
When the center display starts up, the selected
driver profile will be shown at the top of the
screen. The most recently used driver profile will
be active the next time the vehicle is unlocked. A
different driver profile can be selected once the
vehicle has been unlocked. However, if the
remote key has been linked to a driver profile,
this profile will be used instead.
There are two options for switching between
driver profiles.
Option 1:
1.
Tap the name of the driver profile shown at
the top of the center display when the dis-
play starts up.
> A list will appear, showing driver profiles that can be selected.
2. Select desired driver profile.
3. Tap Confirm.
>
The driver profile has now been selected
and the system will load the settings
stored in that profile.
Option 2:
1. Pull down Top view in the center display.
2. Tap Profile.
>
The same list as in option 1 will be dis-
played.
3. Select desired driver profile. 4.
Tap Confirm.
>
The driver profile has now been selected
and the system will load the settings
stored in that profile.
Related information
• Driver profiles (p. 137)
• Navigating in the center display's views
(p. 115)
• Changing a driver profile's name (p. 139)
• Linking a remote key to a driver profile
(p. 139)
Page 208 of 686

CLIMATE CONTROL
* Option/accessory.
206 Clean Zone Interior Package*
Clean Zone Interior Package (CZIP) is a series
of modifications that filters even more allergy and
asthma-inducing substances from the passenger
compartment.
CZIP includes the following:
• An enhanced function that starts the blower
when the vehicle is unlocked using the
remote key. The blower will then fill the pas-
senger compartment with fresh air. The func-
tion starts when required and switches off
automatically after a period of time or when
one of the passenger compartment doors is
opened. The amount of time the blower runs
gradually decreases due to reduced need up
until the vehicle is 4 years old.
• The fully automatic Interior Air Quality
System (IAQS).
Related information
•Air quality (p. 204)
• Clean Zone* (p. 205)
• Interior Air Quality System* (p. 206)
• Passenger compartment air filter (p. 207) Interior Air Quality System*
Interior Air Quality System (IAQS) is a fully auto-
matic air quality system that removes gases and
particles to reduce odors and contaminants in
the passenger compartment. IAQS is part of the Clean Zone Interior Package
(CZIP) and removes air contaminants such as
particles, hydrocarbons, nitric oxides and ground-
level ozone.
If the system's air quality sensors detect contami-
nants in the outside air, the air intake closes and
air recirculation is activated.
NOTE To ensure optimal air quality in the passenger
compartment, the air quality sensor should
always be engaged.
Recirculation is limited in cold weather to pre-
vent fogging.
In the event of fogging, use the defroster
functions for the windshield, side windows
and rear window.
Related information
•
Activating and deactivating the air quality
sensor* (p. 207)
• Air quality (p. 204)
• Clean Zone* (p. 205)
• Clean Zone Interior Package* (p. 206) •
Passenger compartment air filter (p. 207)
Page 234 of 686
||CLIMATE CONTROL
* Option/accessory.
232
NOTE Preconditioning is only available when the car
is connected to an electrical outlet. A charg-
ing post that is not always active, for example
because of a timer, can cause loss of function
for preconditioning.
If the car is not connected to an electrical
socket it is still possible in a warm climate to
achieve brief cooling of the passenger com-
partment by direct starting preconditioning.
NOTE
The vehicle doors and windows should be
closed during preconditioning of the passen-
ger compartment.
Starting from app*
A device with the Volvo On Call* app can be used
to start preconditioning or check settings. Pre-
conditioning heats or cools the passenger com-
partment (using the vehicle's air conditioning) to
a comfortable temperature.
The passenger compartment can also be precon-
ditioned using the Engine Remote Start (ERS) 3
function using the Volvo On Call* app.
Related information
• Parking climate (p. 230)
• Preconditioning (p. 230)
• Preconditioning timer settings (p. 232) Preconditioning timer settings
The timer can be set to finish preconditioning at
a predetermined time.
The timer can store up to 8 preset times for:
• A time on a particular date
• A time on one or more days of the week, with
or without the repeat function.
NOTE Preconditioning is only available when the car
is connected to an electrical outlet. A charg-
ing post that is not always active, for example
because of a timer, can cause loss of function
for preconditioning.
If the car is not connected to an electrical
socket it is still possible in a warm climate to
achieve brief cooling of the passenger com-
partment by direct starting preconditioning.
Related information
•
Preconditioning (p. 230)
• Adding and editing timer setting for precon-
ditioning (p. 233)
• Activating and deactivating preconditioning
timer settings (p. 233)
• Deleting preconditioning timer settings
(p. 234) 3
Certain markets only.
Page 241 of 686
KEY, LOCKS AND ALARM
}}
* Option/accessory. 239
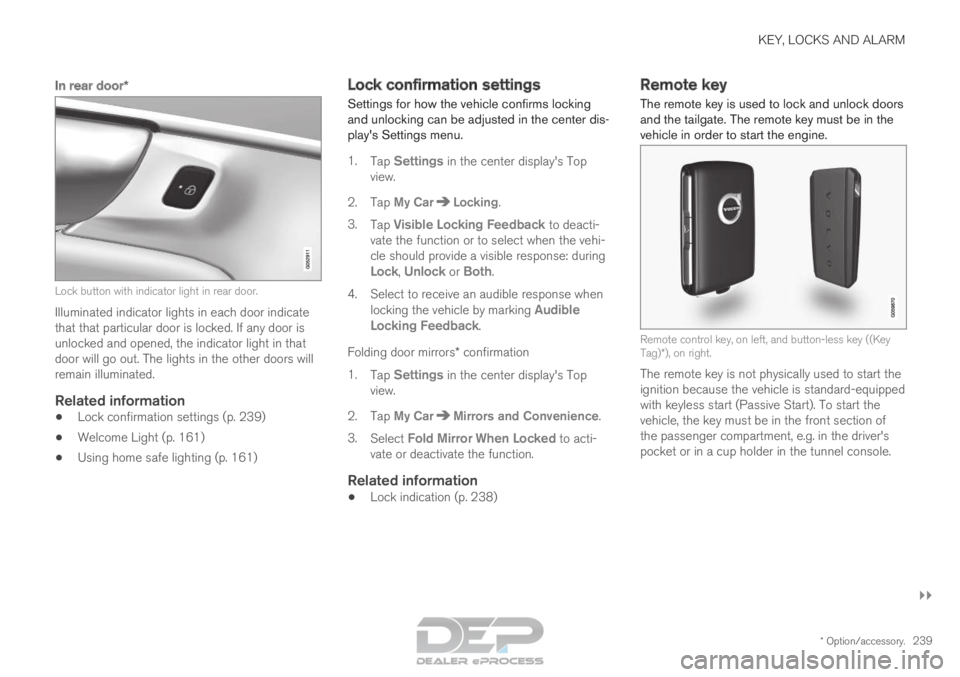
In rear door*Lock button with indicator light in rear door.
Illuminated indicator lights in each door indicate
that that particular door is locked. If any door is
unlocked and opened, the indicator light in that
door will go out. The lights in the other doors will
remain illuminated.
Related information
•
Lock confirmation settings (p. 239)
• Welcome Light (p. 161)
• Using home safe lighting (p. 161) Lock confirmation settings
Settings for how the vehicle confirms locking
and unlocking can be adjusted in the center dis-
play's Settings menu.
1.
Tap Settings in the center display's Top
view.
2.
Tap My Car Locking
.
3. Tap Visible Locking Feedback to deacti-
vate the function or to select when the vehi-
cle should provide a visible response: during
Lock, Unlock or Both.
4.
Select to receive an audible response when
locking the vehicle by marking Audible
Locking Feedback.
Folding door mirrors* confirmation
1. Tap Settings in the center display's Top
view.
2.
Tap My Car Mirrors and Convenience
.
3. Select Fold Mirror When Locked to acti-
vate or deactivate the function.
Related information
• Lock indication (p. 238) Remote key
The remote key is used to lock and unlock doors
and the tailgate. The remote key must be in the
vehicle in order to start the engine. Remote control key, on left, and button-less key ((Key
Tag)*), on right.
The remote key is not physically used to start the
ignition because the vehicle is standard-equipped
with keyless start (Passive Start). To start the
vehicle, the key must be in the front section of
the passenger compartment, e.g. in the driver's
pocket or in a cup holder in the tunnel console.
Page 242 of 686
||KEY, LOCKS AND ALARM
* Option/accessory.
240 The keyless system for locking/unlocking the
doors and tailgate (Passive Entry*) is available as
an option. This system has a range in a semicircle
with a radius of approximately 1.5 meter (5 feet)
out from the driver's door and approx. 1 meter
(3 feet) out from the tailgate.
With keyless start in combination with keyless
locking and unlocking, the remote key can be
located anywhere in the passenger compartment
or cargo compartment in order to start the
engine.
Each remote key supplied with the vehicle can be
linked to a driver profile with unique settings for
the vehicle. When a key with a specific profile is
used, the vehicle settings are adjusted according
to that profile.
Buttonless key, Key TagFor vehicles equipped with keyless locking and
unlocking*, a smaller, lighter and button-less key
(Key Tag 3
) is also provided. It works the same
way as the regular remote key as regard keyless
start and keyless locking and unlocking 4
. It does
not have a detachable key blade and its battery
cannot be replaced.
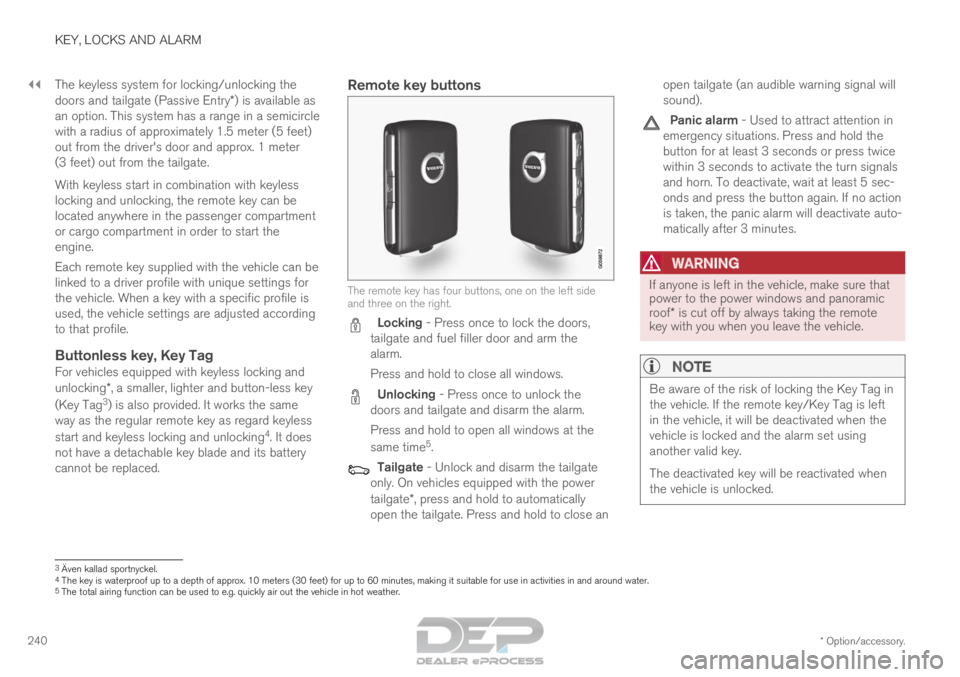
Remote key buttons The remote key has four buttons, one on the left side
and three on the right.
Locking - Press once to lock the doors,
tailgate and fuel filler door and arm the
alarm.
Press and hold to close all windows. Unlocking - Press once to unlock the
doors and tailgate and disarm the alarm.
Press and hold to open all windows at the
same time 5
. Tailgate - Unlock and disarm the tailgate
only. On vehicles equipped with the power
tailgate*, press and hold to automatically
open the tailgate. Press and hold to close an open tailgate (an audible warning signal will
sound). Panic alarm - Used to attract attention in
emergency situations. Press and hold the
button for at least 3 seconds or press twice
within 3 seconds to activate the turn signals
and horn. To deactivate, wait at least 5 sec-
onds and press the button again. If no action
is taken, the panic alarm will deactivate auto-
matically after 3 minutes.
WARNING If anyone is left in the vehicle, make sure that
power to the power windows and panoramic
roof* is cut off by always taking the remote
key with you when you leave the vehicle.
NOTE Be aware of the risk of locking the Key Tag in
the vehicle. If the remote key/Key Tag is left
in the vehicle, it will be deactivated when the
vehicle is locked and the alarm set using
another valid key.
The deactivated key will be reactivated when
the vehicle is unlocked.
3
Även kallad sportnyckel.
4 The key is waterproof up to a depth of approx. 10 meters (30 feet) for\
up to 60 minutes, making it suitable for use in activities in and aroun\
d water.
5 The total airing function can be used to e.g. quickly air out the vehicl\
e in hot weather.
Page 243 of 686
KEY, LOCKS AND ALARM
}}
* Option/accessory. 241
InterferenceElectromagnetic fields or obstructing objects may
interfere with the remote key's functions for key-
less start and keyless locking and unlocking*.
NOTEAvoid storing the remote control key near
metal objects or electronic devices, e.g. cell
phones, tablets, laptops or chargers – pref-
erably no closer than 10-15 cm (4-6 in.).
If you experience interference, use the remote
key's detachable blade to unlock the vehicle and
place the remote key in the backup key reader in
the tunnel console cup holder to disarm the
alarm.
NOTE
When the remote control key is placed in the
cup holder, make sure that no other vehicle
keys, metal objects or electronic devices (e.g.
cell phones, tablets, laptops or chargers) are
found in the cup holder. Multiple vehicle keys
close to each other in the cup holder can dis-
rupt their functionality.
Related information
•
Locking and unlocking using the remote key
(p. 241)
• Remote key range (p. 243) •
Replacing the remote key's battery (p. 244)
• Detachable key blade (p. 250)
• Red Key - restricted remote key* (p. 248)
• Electronic immobilizer (p. 252) Locking and unlocking using the
remote key
All doors and tailgate can be locked and
unlocked simultaneously using the buttons on
the remote key.
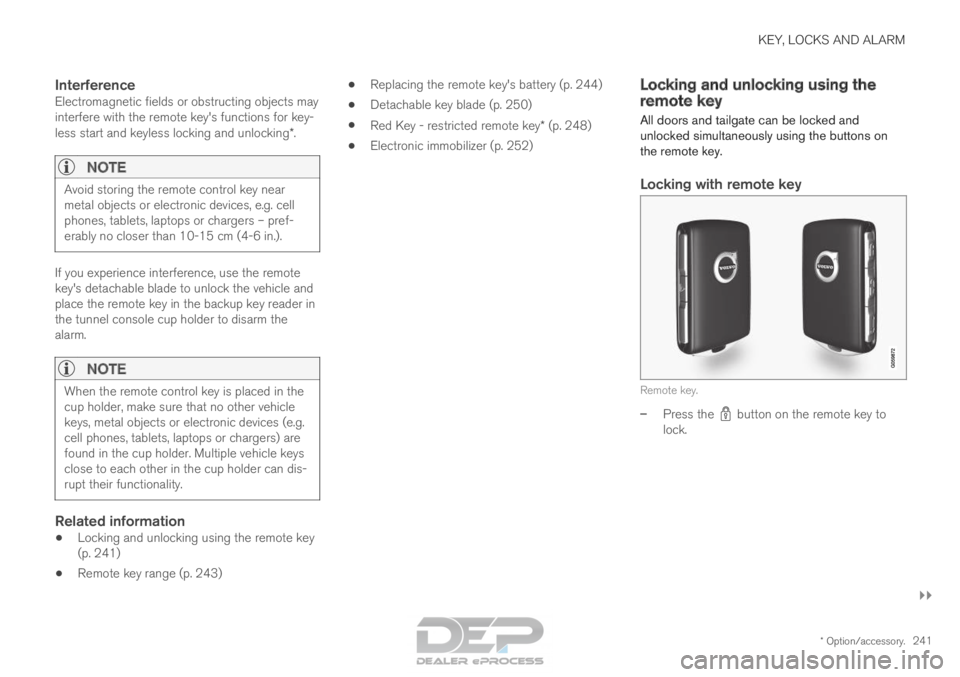
Locking with remote key Remote key.
–
Press the button on the remote key to
lock.
Page 246 of 686
||KEY, LOCKS AND ALARM
* Option/accessory.
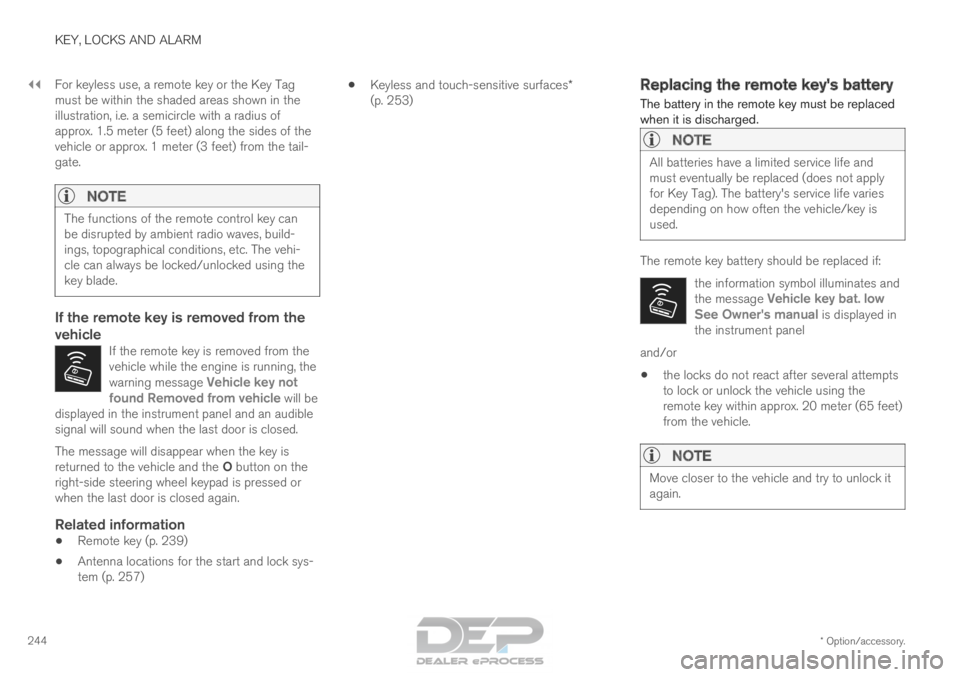
244 For keyless use, a remote key or the Key Tag
must be within the shaded areas shown in the
illustration, i.e. a semicircle with a radius of
approx. 1.5 meter (5 feet) along the sides of the
vehicle or approx. 1 meter (3 feet) from the tail-
gate.
NOTE
The functions of the remote control key can
be disrupted by ambient radio waves, build-
ings, topographical conditions, etc. The vehi-
cle can always be locked/unlocked using the
key blade.
If the remote key is removed from the
vehicle
If the remote key is removed from the
vehicle while the engine is running, the
warning message
Vehicle key not
found Removed from vehicle will be
displayed in the instrument panel and an audible
signal will sound when the last door is closed. The message will disappear when the key is
returned to the vehicle and the O button on the
right-side steering wheel keypad is pressed or
when the last door is closed again.
Related information
• Remote key (p. 239)
• Antenna locations for the start and lock sys-
tem (p. 257) •
Keyless and touch-sensitive surfaces*
(p. 253) Replacing the remote key's battery
The battery in the remote key must be replaced
when it is discharged.
NOTE All batteries have a limited service life and
must eventually be replaced (does not apply
for Key Tag). The battery's service life varies
depending on how often the vehicle/key is
used.
The remote key battery should be replaced if:
the information symbol illuminates and
the message Vehicle key bat. low
See Owner's manual is displayed in
the instrument panel and/or
• the locks do not react after several attempts
to lock or unlock the vehicle using the
remote key within approx. 20 meter (65 feet)
from the vehicle.
NOTE Move closer to the vehicle and try to unlock it
again.
Page 247 of 686
KEY, LOCKS AND ALARM
}}
* Option/accessory. 245
The battery in the smaller key without buttons
9
(the Key Tag) cannot be replaced. A new key can
be ordered from an authorized Volvo workshop.
CAUTION An end-of-life Key Tag must be turned in to
an authorized Volvo workshop. The key must
be deleted from the vehicle because it can
still be used to start the vehicle via backup
start.
Opening the key and replacing the
battery
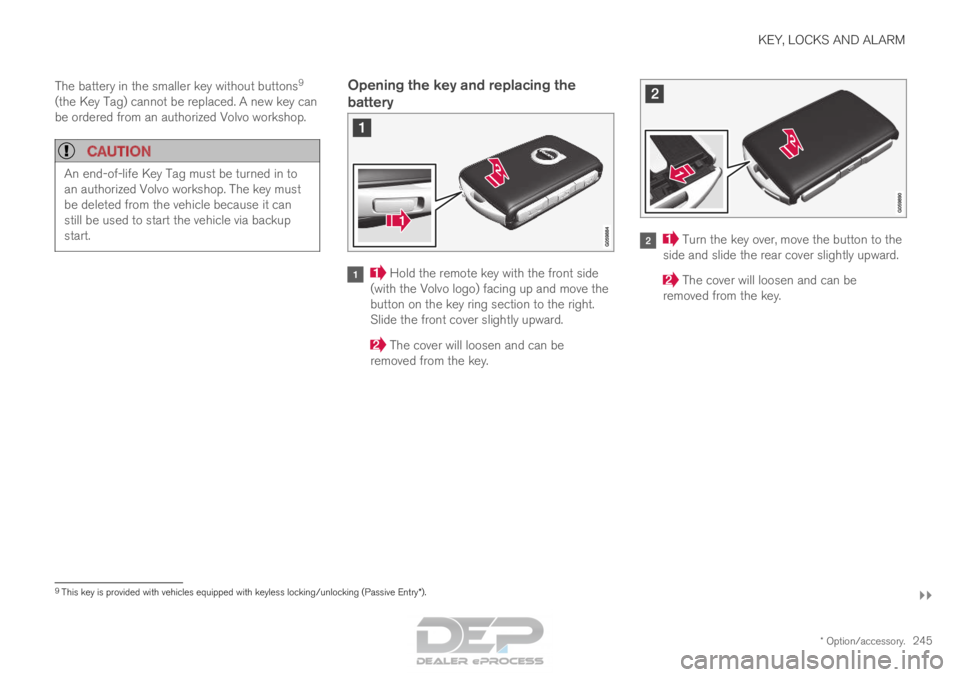
Hold the remote key with the front side
(with the Volvo logo) facing up and move the
button on the key ring section to the right.
Slide the front cover slightly upward. The cover will loosen and can be
removed from the key. Turn the key over, move the button to the
side and slide the rear cover slightly upward. The cover will loosen and can be
removed from the key. 9
This key is provided with vehicles equipped with keyless locking/unlocki\
ng (Passive Entry*).
Page 253 of 686
KEY, LOCKS AND ALARM
}}
251
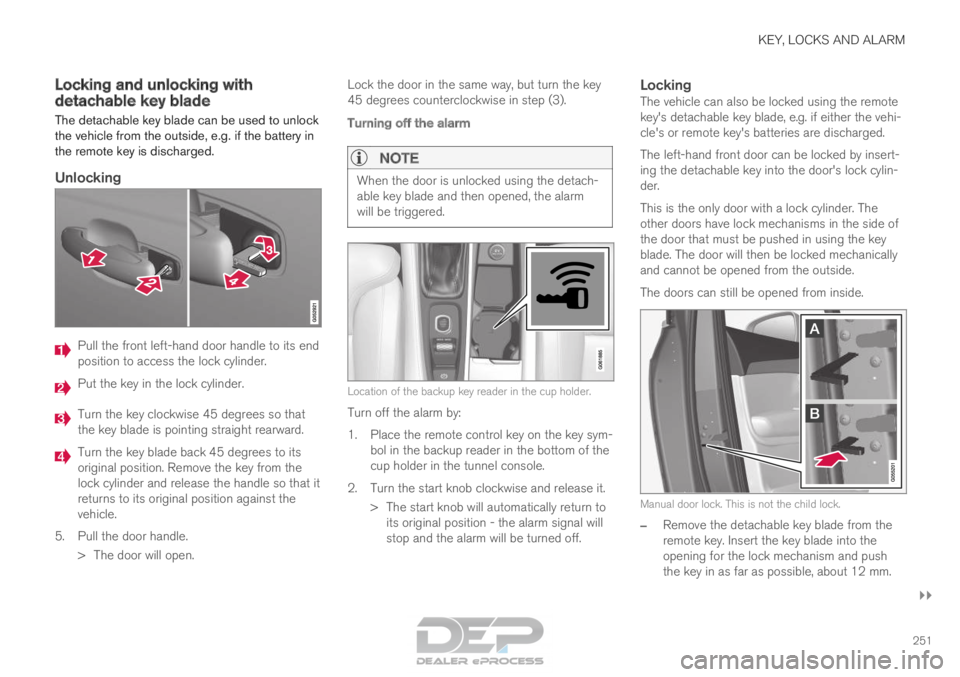
Locking and unlocking with
detachable key blade
The detachable key blade can be used to unlock
the vehicle from the outside, e.g. if the battery in
the remote key is discharged.
Unlocking Pull the front left-hand door handle to its end
position to access the lock cylinder.
Put the key in the lock cylinder.
Turn the key clockwise 45 degrees so that
the key blade is pointing straight rearward.
Turn the key blade back 45 degrees to its
original position. Remove the key from the
lock cylinder and release the handle so that it
returns to its original position against the
vehicle.
5.
Pull the door handle.
> The door will open. Lock the door in the same way, but turn the key
45 degrees counterclockwise in step (3).
Turning off the alarm
NOTE When the door is unlocked using the detach-
able key blade and then opened, the alarm
will be triggered.
Location of the backup key reader in the cup holder.
Turn off the alarm by:
1.
Place the remote control key on the key sym-
bol in the backup reader in the bottom of the
cup holder in the tunnel console.
2. Turn the start knob clockwise and release it. > The start knob will automatically return toits original position - the alarm signal will
stop and the alarm will be turned off.
LockingThe vehicle can also be locked using the remote
key's detachable key blade, e.g. if either the vehi-
cle's or remote key's batteries are discharged.
The left-hand front door can be locked by insert-
ing the detachable key into the door's lock cylin-
der.
This is the only door with a lock cylinder. The
other doors have lock mechanisms in the side of
the door that must be pushed in using the key
blade. The door will then be locked mechanically
and cannot be opened from the outside.
The doors can still be opened from inside. Manual door lock. This is not the child lock.
–
Remove the detachable key blade from the
remote key. Insert the key blade into the
opening for the lock mechanism and push
the key in as far as possible, about 12 mm.