VOLVO XC90 TWIN ENGINE 2019 Owners Manual
Manufacturer: VOLVO, Model Year: 2019, Model line: XC90 TWIN ENGINE, Model: VOLVO XC90 TWIN ENGINE 2019Pages: 697, PDF Size: 10.33 MB
Page 661 of 697

MAINTENANCE AND SERVICE
659
Changing rear window wipers
The wiper blades help remove water from the
windshield and rear window. Along with the
washer fluid, they clean the glass and help
improve visibility while driving. The windshield
and rear window wiper blades can be replaced.
Changing rear window wipers Lift the wiper arm from the window and pull the lower
section of the blade to the right.
Grasp the center of the wiper blade and lift it
from the window to the stop position.
NOTE
When the wiper arm is halfway folded out, it
will stop in a locking position that helps pre-
vent the arm from falling back onto the rear
window. The wiper arm must be pulled past
the locking position stop in order to change
the wiper blade.
Grip the lower part of the blade and pull to
the right until the blade loosens from the
arm.3.
Press the new wiper blade until it clicks into
place. Check to make sure the blade is
securely in place.
4. Fold the wiper arm back toward the window.
CAUTION Check the blades regularly. Neglected main-
tenance shortens the life of the blades.
Related information
Using the rain sensor (p. 177)
Using the windshield and headlight washers
(p. 179)
Using automatic rear window wiping when
backing up (p. 181)
Using the rain sensor's memory function
(p. 178)
Using the rear window wiper/washer
(p. 180)
Filling washer fluid (p. 662)
Windshield wipers in the service position
(p. 661)
Replacing windshield wiper blades (p. 660)
Using the windshield wipers (p. 176)
Wiper blades and washer fluid (p. 176)
Page 662 of 697

MAINTENANCE AND SERVICE
660Replacing windshield wiper blades
The wiper blades help remove water from the
windshield and rear window. Along with the
washer fluid, they clean the glass and help
improve visibility while driving. The windshield
and rear window wiper blades can be replaced.
Replacing wiper blades Raise the wiper arms to the service position.
Service position is activated/deactivated via
the function view in the center display when
the car is stationary and the windshield wip-
ers are not on. Press the button on the wiper
blade attachment and pull the wiper blade
straight out, parallel with the wiper arm.
Slide in a new wiper blade until it clicks into
place.
3.
Check to make sure the blade is securely in
place.
4. Press the wiper blade back against the wind- shield.
Wiper blades come in varying lengths
NOTE When changing wiper blades, make sure that
the blades are of different lengths. The blade
on the driver's side is longer than the one on
the passenger side.
Related information
Using the rain sensor (p. 177)
Using the windshield and headlight washers
(p. 179)
Using automatic rear window wiping when
backing up (p. 181)
Using the rain sensor's memory function
(p. 178)
Using the rear window wiper/washer
(p. 180)
Filling washer fluid (p. 662)
Windshield wipers in the service position
(p. 661)
Changing rear window wipers (p. 659)
Using the windshield wipers (p. 176)
Wiper blades and washer fluid (p. 176)
Page 663 of 697

MAINTENANCE AND SERVICE
661
Windshield wipers in the service
position
The windshield wiper blades must be in the serv-
ice (vertical) position for certain operations, e.g.
replacing the blades. Windshield wipers in the service position.
The windshield wipers must be in the service
position when replacing, washing or lifting the
blades (e.g. to scrape ice or snow from the wind-
shield).
CAUTION Before placing the wipers in service position,
ensure that they have not frozen to the wind-
shield.
Activating/deactivating service positionThe service position can be activated/deactivated
when the vehicle is stationary and the windshield
wipers are switched off. Service position is acti-
vated/deactivated via Function view in the center
display:
Tap the Wiper ServicePosition button. The indicator
light in the button will illuminate
when service position is acti-
vated. The windshield wipers
will move to the vertical posi-
tion when service position is
activated. To deactivate the service position, tap
Wiper Service Position once. The indicator light
in the button will go out when service position is
deactivated. The wiper blades will also move out of service
position if:
The windshield wipers are turned on.
The windshield washers are turned on.
The rain sensor is activated.
The vehicle begins moving.CAUTION If the wiper arms in service position are raised
from the windshield, they must be folded back
against the windscreen before activating wip-
ing, washing or rain sensor as well as before
departure. This is to prevent scratching the
paint on the hood.
Related information
Using the rain sensor (p. 177)
Using the windshield and headlight washers
(p. 179)
Using automatic rear window wiping when
backing up (p. 181)
Using the rain sensor's memory function
(p. 178)
Using the rear window wiper/washer
(p. 180)
Filling washer fluid (p. 662)
Replacing windshield wiper blades (p. 660)
Changing rear window wipers (p. 659)
Using the windshield wipers (p. 176)
Wiper blades and washer fluid (p. 176)
Page 664 of 697

MAINTENANCE AND SERVICE
* Option/accessory.
662 Filling washer fluid
Washer fluid is used to keep the headlights,
windshield and rear window clean. Washer fluid
containing anti-freeze should be used in very
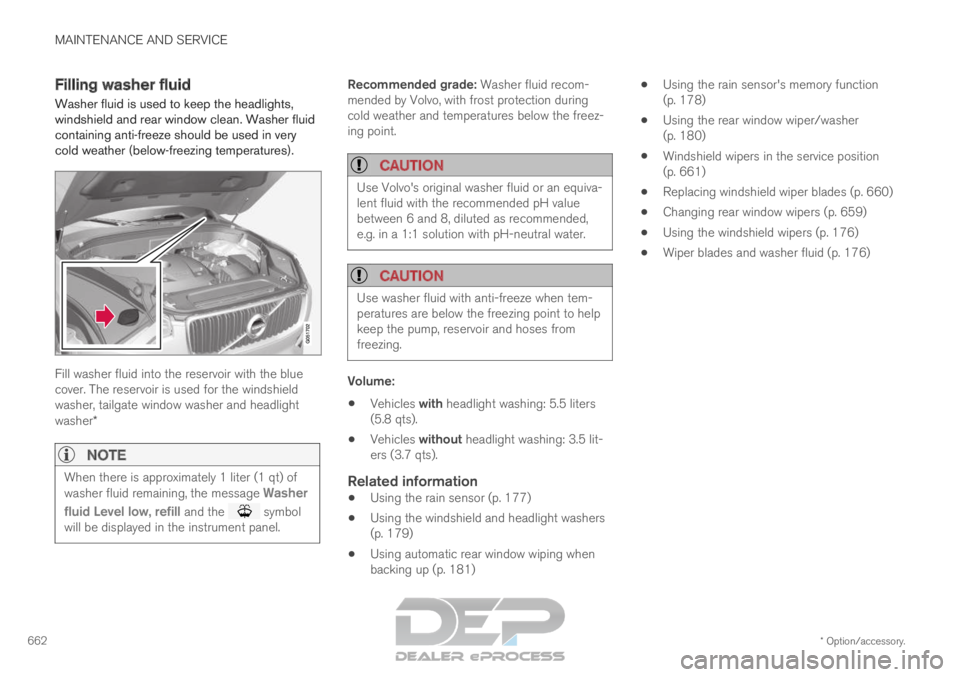
cold weather (below-freezing temperatures). Fill washer fluid into the reservoir with the blue
cover. The reservoir is used for the windshield
washer, tailgate window washer and headlight
washer*
NOTE
When there is approximately 1 liter (1 qt) of
washer fluid remaining, the message
Washer
fluid
Level low, refill and the symbol
will be displayed in the instrument panel. Recommended grade: Washer fluid recom-
mended by Volvo, with frost protection during
cold weather and temperatures below the freez-
ing point.
CAUTION
Use Volvo's original washer fluid or an equiva-
lent fluid with the recommended pH value
between 6 and 8, diluted as recommended,
e.g. in a 1:1 solution with pH-neutral water.
CAUTION
Use washer fluid with anti-freeze when tem-
peratures are below the freezing point to help
keep the pump, reservoir and hoses from
freezing.
Volume:
Vehicles with headlight washing: 5.5 liters
(5.8 qts).
Vehicles without headlight washing: 3.5 lit-
ers (3.7 qts).
Related information
Using the rain sensor (p. 177)
Using the windshield and headlight washers
(p. 179)
Using automatic rear window wiping when
backing up (p. 181)
Using the rain sensor's memory function
(p. 178)
Using the rear window wiper/washer
(p. 180)
Windshield wipers in the service position
(p. 661)
Replacing windshield wiper blades (p. 660)
Changing rear window wipers (p. 659)
Using the windshield wipers (p. 176)
Wiper blades and washer fluid (p. 176)
Page 665 of 697

S P E C I F I C A T I O N S
Page 666 of 697

SPECIFICATIONS
664Type designations
The decals in the vehicle contain information
such as chassis number, type designation, color
code, etc.
Location of decals The illustration is general and details may vary depending on market and\
model.
Page 667 of 697

SPECIFICATIONS
}}
665 Vehicle Emission Control Information. US
models. Your Volvo is designed to meet all appli-
cable emission standards, as evidenced by the
certification label on the underside of the hood.
For further information regarding these regula-
tions, please consult your Volvo retailer. Vehicle Emission Control Information.
Canadian models. Your Volvo is designed to
meet all applicable emission standards, as evi-
denced by the certification label on the underside
of the hood. For further information regarding
these regulations, please consult your Volvo
retailer. Vehicle Identification Number (VIN). The
VIN plate is located on the top left surface of the
dashboard. The Vehicle Identification Number
(VIN) should always be quoted in all correspond-
ence concerning your vehicle with the retailer and
when ordering parts. Tire inflation pressures. This label indicates
the correct inflation pressures for the tires that
were on the vehicle when it left the factory. Federal Motor Vehicle Safety Standards
(FMVSS) specifications (USA) and Ministry of
Transport (CMVSS) standards (Canada). Your
Volvo is designed to meet all applicable safety
standards, as evidenced by the certification label
on the driver's side B-pillar (the structural mem-
ber at the side of the vehicle, at the rear of the
driver's door opening). This label also includes
codes for paint color, etc. For further information
regarding these regulations, please consult your
Volvo retailer. U.S. models have the upper decal;
Canadian models have the lower one.
Page 668 of 697

||SPECIFICATIONS
666
Engine oil. This label contains the recom-
mended engine oil specifications. Decal A/C. Refrigerant R134a.
NOTE
The decals shown in the Owner's Manual do
not claim to be exact reproductions of those
found in the vehicle. The purpose is to show
approximately how they look and about where
they are located on the vehicle. The informa-
tion that applies for your vehicle in particular
is found on the decal on the vehicle.
Related information
Air conditioning specifications (p. 674)
Page 669 of 697

SPECIFICATIONS
}}
* Option/accessory. 667
Dimensions
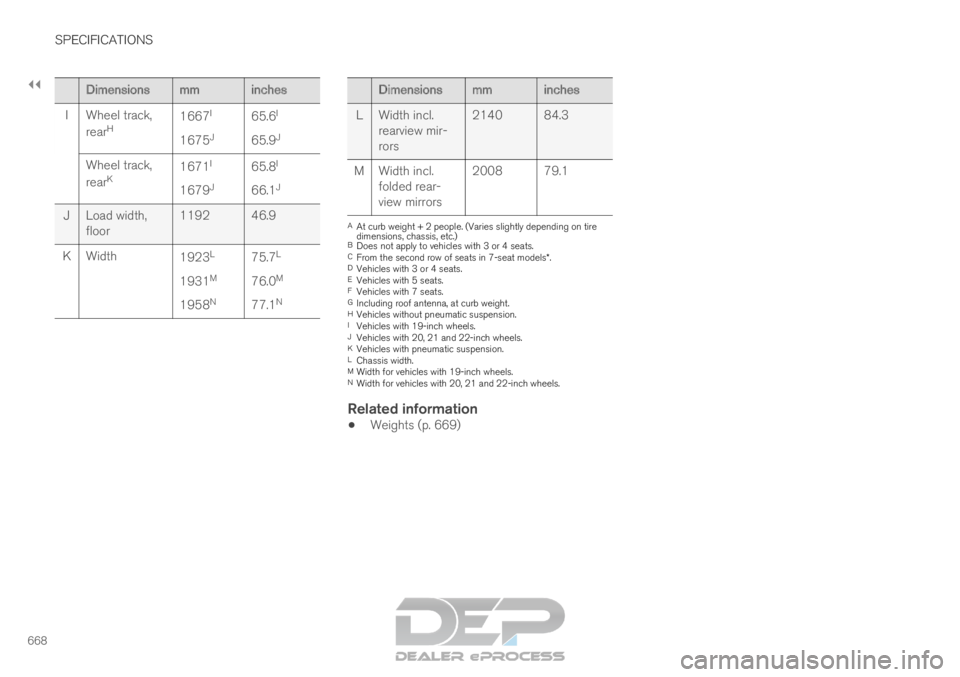
The vehicle's length, height, etc. are shown in
the table. Dimensions
mminches
A
Ground clear-
ance A 227 8.9
B Wheelbase 2984 117.5 C Length 4950 194.9
D Load length, floor, folded
backrest B 2040
1260
C 80.3
49.6
C Dimensions
mminches
E
Load length,
floor 761/898
D
1220 E
554 F 30.0/35.4
D
48.0 E
21.8 F
F Height G
1776 69.9
G Load height 816 32.1 Dimensions
mminches
H
Wheel track,
front H 1665
I
1673 J 65.6
I
65.9 J
Wheel track,
front K 1668
I
1676 J 65.7
I
66.0 J
Page 670 of 697

||SPECIFICATIONS
668
Dimensions
mminches
I
Wheel track,
rear H 1667
I
1675 J 65.6
I
65.9 J
Wheel track,
rear K 1671
I
1679 J 65.8
I
66.1 J
J Load width, floor 1192 46.9
K Width 1923L
1931 M
1958 N 75.7
L
76.0 M
77.1 N Dimensions
mminches
L
Width incl.
rearview mir-
rors 2140 84.3
M Width incl. folded rear-
view mirrors 2008 79.1 A
At curb weight + 2 people. (Varies slightly depending on tire
dimensions, chassis, etc.)
B Does not apply to vehicles with 3 or 4 seats.
C From the second row of seats in 7-seat models*.
D Vehicles with 3 or 4 seats.
E Vehicles with 5 seats.
F Vehicles with 7 seats.
G Including roof antenna, at curb weight.
H Vehicles without pneumatic suspension.
I Vehicles with 19-inch wheels.
J Vehicles with 20, 21 and 22-inch wheels.
K Vehicles with pneumatic suspension.
L Chassis width.
M Width for vehicles with 19-inch wheels.
N Width for vehicles with 20, 21 and 22-inch wheels.
Related information
Weights (p. 669)