display VOLVO XC90 TWIN ENGINE HYBRID 2017 Owners Manual
[x] Cancel search | Manufacturer: VOLVO, Model Year: 2017, Model line: XC90 TWIN ENGINE HYBRID, Model: VOLVO XC90 TWIN ENGINE HYBRID 2017Pages: 584, PDF Size: 14.2 MB
Page 493 of 584
WHEELS AND TIRES
}}
491
Installing a wheel
It is important to install wheels properly.
1. Clean the contact surfaces on the wheel andhub.
2.Lift the wheel and place it on the hub.
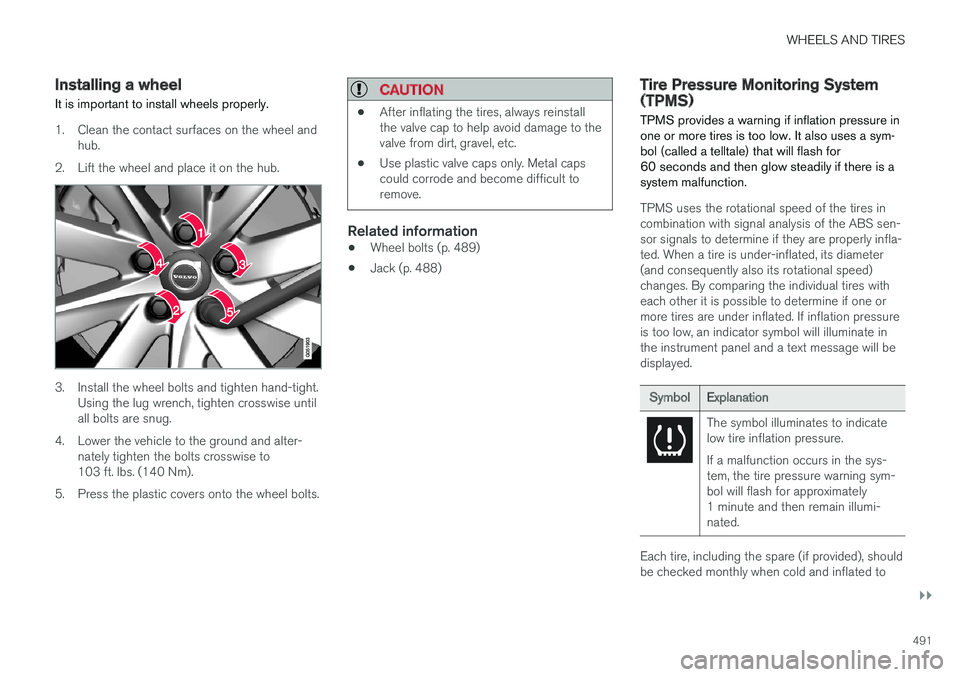
3. Install the wheel bolts and tighten hand-tight.Using the lug wrench, tighten crosswise untilall bolts are snug.
4.Lower the vehicle to the ground and alter-nately tighten the bolts crosswise to103 ft. lbs. (140 Nm).
5. Press the plastic covers onto the wheel bolts.
CAUTION
•After inflating the tires, always reinstallthe valve cap to help avoid damage to thevalve from dirt, gravel, etc.
•Use plastic valve caps only. Metal capscould corrode and become difficult toremove.
Related information
•Wheel bolts (p. 489)
•Jack (p. 488)
Tire Pressure Monitoring System(TPMS)
TPMS provides a warning if inflation pressure inone or more tires is too low. It also uses a sym-bol (called a telltale) that will flash for60 seconds and then glow steadily if there is asystem malfunction.
TPMS uses the rotational speed of the tires incombination with signal analysis of the ABS sen-sor signals to determine if they are properly infla-ted. When a tire is under-inflated, its diameter(and consequently also its rotational speed)changes. By comparing the individual tires witheach other it is possible to determine if one ormore tires are under inflated. If inflation pressureis too low, an indicator symbol will illuminate inthe instrument panel and a text message will bedisplayed.
SymbolExplanation
The symbol illuminates to indicatelow tire inflation pressure.
If a malfunction occurs in the sys-tem, the tire pressure warning sym-bol will flash for approximately1 minute and then remain illumi-nated.
Each tire, including the spare (if provided), shouldbe checked monthly when cold and inflated to
Page 494 of 584
||
WHEELS AND TIRES
492
the inflation pressure recommended by the vehi-cle manufacturer on the vehicle placard or tireinflation pressure label. (If your vehicle has tiresof a different size than the size indicated on thevehicle placard or tire inflation pressure label, youshould determine the proper tire inflation pres-sure for those tires.)
As an added safety feature, your vehicle hasbeen equipped with a tire pressure monitoringsystem (TPMS) that illuminates a low tire pres-sure telltale when one or more of your tires issignificantly under-inflated. Accordingly, when thelow tire pressure telltale illuminates, you shouldstop and check your tires as soon as possible,and inflate them to the proper pressure.
Driving on a significantly under-inflated tire cau-ses the tire to overheat and can lead to tire fail-ure. Under-inflation also reduces fuel efficiencyand tire tread life, and may affect the vehicle'shandling and stopping ability. Please note thatthe TPMS is not a substitute for proper tire main-tenance, and it is the driver's responsibility tomaintain correct tire pressure, even if under-infla-tion has not reached the level to trigger illumina-tion of the TPMS low tire pressure telltale.
Your vehicle has also been equipped with aTPMS malfunction indicator to indicate when thesystem is not operating properly. The TPMS mal-function indicator is combined with the low tirepressure telltale.
When the system detects a malfunction, the tell-tale will flash for approximately one minute andthen remain continuously illuminated. Thissequence will continue upon subsequent vehiclestart-ups as long as the malfunction exists. Whenthe malfunction indicator is illuminated, the sys-tem may not be able to detect or signal low tirepressure as intended.
TPMS malfunctions may occur for a variety ofreasons, including the installation of replacementor alternate tires or wheels on the vehicle thatprevent the TPMS from functioning properly.Always check the TPMS malfunction telltale afterreplacing one or more tires or wheels on yourvehicle to ensure that the replacement or alter-nate tires and wheels allow the TPMS to con-tinue to function properly.
Messages in the instrument panel
When the TPMS symbol illuminates, the followingtext messages may also be displayed:
•Tire pressure low
•Tire pressure system Temporarilyunavailable
•Tire pressure system Service required
If TPMS cannot determine which tire(s) have lowinflation pressure:
•All four tires will be shown as affected in thecenter display
After changing wheels, always calibrate the sys-tem to avoid false warnings.
TPMS does not replace the need for regular tireinspection and maintenance.
NOTE
If you change to tires with a different dimen-sion than the factory-installed ones, theTPMS system must be calibrated for thesetires.
TPMS cannot be turned off.
WARNING
Incorrect inflation pressure could lead to tirefailure, resulting in a loss of control of thevehicle.
Related information
•Checking tire inflation pressure (p. 493)
•Reinflating tires equipped with the TirePressure Monitoring System (TPMS)(p. 494)
•Ignition modes (p. 400)
Page 495 of 584
WHEELS AND TIRES
493
Checking tire inflation pressure
The Tire Pressure Monitoring System (TPMS)makes it possible to view the current inflationpressure status of all four tires.
Checking inflation pressure
Open the Car status app inthe center display's Applicationview. Tap Status to see thecurrent inflation pressure sta-tus of all four tires.
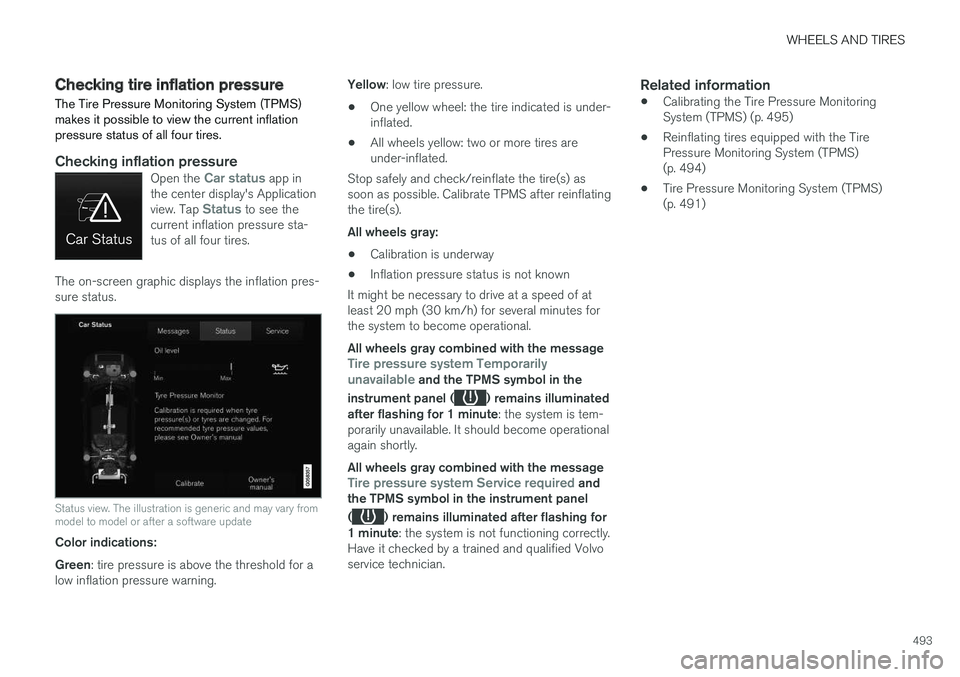
The on-screen graphic displays the inflation pres-sure status.
Status view. The illustration is generic and may vary frommodel to model or after a software update
Color indications:
Green: tire pressure is above the threshold for alow inflation pressure warning.
Yellow: low tire pressure.
•One yellow wheel: the tire indicated is under-inflated.
•All wheels yellow: two or more tires areunder-inflated.
Stop safely and check/reinflate the tire(s) assoon as possible. Calibrate TPMS after reinflatingthe tire(s).
All wheels gray:
•Calibration is underway
•Inflation pressure status is not known
It might be necessary to drive at a speed of atleast 20 mph (30 km/h) for several minutes forthe system to become operational.
All wheels gray combined with the messageTire pressure system Temporarilyunavailable and the TPMS symbol in the
instrument panel () remains illuminatedafter flashing for 1 minute: the system is tem-porarily unavailable. It should become operationalagain shortly.
All wheels gray combined with the messageTire pressure system Service required andthe TPMS symbol in the instrument panel
() remains illuminated after flashing for1 minute: the system is not functioning correctly.Have it checked by a trained and qualified Volvoservice technician.
Related information
•Calibrating the Tire Pressure MonitoringSystem (TPMS) (p. 495)
•Reinflating tires equipped with the TirePressure Monitoring System (TPMS)(p. 494)
•Tire Pressure Monitoring System (TPMS)(p. 491)
Page 496 of 584
WHEELS AND TIRES
494
Reinflating tires equipped with theTire Pressure Monitoring System(TPMS)
When low tire pressure has been detected, amessage will be displayed in the instrumentpanel and the Tire Pressure Monitoring Systemsymbol will illuminate.
SymbolExplanation
When the TPMS symbol illuminatesand a message is displayed, check,reinflate the tire(s) and calibrateTPMS.
1. Use a tire pressure gauge to check the infla-tion pressure of all four tires.
2.Re-inflate the tire(s) to the correct pressure.Consult the tire pressure decal located onthe driver's side B-pillar (the structural mem-ber at the side of the vehicle, at the rear ofthe driver's door opening) or the inflationpressure table in your printed owner's man-ual supplement.
3. Calibrate the Tire Pressure MonitoringSystem, see the article "Calibrating the TirePressure Monitoring System".
4. In some cases, it may be necessary to drivethe vehicle for several minutes at a speed ofat least 20 mph (30 km/h) to erase theTPMS telltale warning and the text message.Please be aware that the TPMS telltalewarning will not go out until the low tire pres-sure has been corrected and calibration hasbeen carried out.
NOTE
To help avoid incorrect tire inflation pressure,if possible only inflate the tires when they arecold. The tires are considered to be coldwhen they have the same temperature as thesurrounding (ambient) air. This temperature isnormally reached after the vehicle has beenparked for at least 3 hours. After driving a dis-tance of approximately 1 mile (1.6 km), thetires are considered to be warm.
CAUTION
When inflating tires, press the pump's mouth-piece straight onto the valve to help avoidbending or otherwise damaging the valve.
CAUTION
•After inflating the tires, always reinstallthe valve cap to help avoid damage to thevalve from dirt, gravel, etc.
•Use plastic valve caps only. Metal capscould corrode and become difficult toremove.
WARNING
•Incorrect inflation pressure could lead totire failure, resulting in a loss of control ofthe vehicle.
•Tire monitoring systems cannot indicatesudden tire damage caused by externalfactors (e.g., a blowout) in advance.
Related information
•Tire Pressure Monitoring System (TPMS)(p. 491)
•Checking tire inflation pressure (p. 493)
•Calibrating the Tire Pressure MonitoringSystem (TPMS) (p. 495)
Page 497 of 584
WHEELS AND TIRES
495
Calibrating the Tire PressureMonitoring System (TPMS)
In order for the Tire Pressure Monitoring Systemto work properly, tire pressure reference valuesmust be set correctly. This must be done eachtime wheels are changed or tire pressures aremodified.
Calibrating TPMS
To calibrate the system:
1. Switch off the engine.
2. Re-inflate the tire(s) to the correct pressure.Consult the tire pressure decal located onthe driver's side B-pillar (the structural mem-ber at the side of the vehicle, at the rear ofthe driver's door opening) or the inflationpressure table in your printed owner's man-ual supplement.
3. Start the engine.
4.Open the Car status app in the center dis-play's App view.
5.Tap Status to access Tire PressureMonitoring System.
6.Tap the calibration button.
7.Tap OK after the tire pressure in all four tireshas been checked and adjusted.
8.Drive the vehicle.
> The calibration process will be completedwhile driving and will be interrupted if thevehicle is parked and the engine isswitched off. Calibration continues auto-matically when driving resumes.
When enough data has been collected to detecta low tire pressure situation, the tires' color in thecenter display will change to green. The systemwill not give any text confirmation when calibra-tion is finished although it will state if calibrationfails. When driving with heavy loads or at sus-tained highway speeds, the tire pressure shouldbe adjusted to the recommended inflation pres-sures.
After adjusting inflation pressure, repeat steps1-8.
NOTE
Always remember to calibrate the Tire Pres-sure Monitoring System when the wheelshave been changed or the tire inflation pres-sure has been corrected according to the tirepressure decal or tire inflation pressure table.
If correct reference values have not been set,the system cannot issue low tire pressurealerts correctly.
The vehicle must be parked with the enginerunning to access the calibration button andto start the calibration process.
WARNING
The exhaust gases contain carbon monoxide,which is invisible and odorless but very poi-sonous. For this reason, always perform thecalibration procedure outdoors or in a work-shop with exhaust gas evacuation equipment.
Related information
•Tire Pressure Monitoring System (TPMS)(p. 491)
Page 507 of 584
MAINTENANCE AND SERVICING
}}
505
Emission inspection readiness
How do states use OBD II for emission
inspections?
Many states connect a computer directly to avehicle's OBD II system. The inspector can thenread "faults." In some states, this type of inspec-tion has replaced the tailpipe emission test.
How can my vehicle fail OBD II emission
inspection?
Your vehicle can fail OBD II emission inspectionfor any of the following reasons.
•If your Check Engine (MIL) light is lit, yourvehicle may fail inspection.
•If your vehicle's Check Engine light was lit,but went out without any action on your part,OBD II will still have a recorded fault. Yourvehicle may pass or fail, depending on theinspection practices in your area.
•If you had recent service that required dis-connecting the battery, OBD II diagnosticinformation may be incomplete and "notready" for inspection. A vehicle that is notready may fail inspection.
How can I prepare for my next OBD II
emission inspection?
•If your Check Engine (MIL) light is lit – or waslit but went out without service, have your
vehicle diagnosed and, if necessary, servicedby a qualified Volvo technician.
•If you recently had service for a lit CheckEngine light, or if you had service thatrequired disconnecting the battery, a periodof driving is necessary to bring the OBD IIsystem to "ready" for inspection. Two half-hour trips of mixed stop-and-go/highwaydriving are typically needed to allow OBD II toreach readiness. Your Volvo retailer can pro-vide you with more information on planning atrip.
•Maintain your vehicle in accordance with yourvehicle's maintenance schedule.
Owner maintenance
Periodic maintenance requirements and intervalsare described in your vehicle's Warranty andService Records Information booklet.
The following points can be carried out betweenthe normally scheduled maintenance services.
Each time the car is refueled:
•Check the engine oil level.
•Clean the windshield, windshield wipers,headlights, and taillights.
Monthly:
•Check cold tire pressure in all tires. Inspectthe tires for wear.
•Check that engine coolant and other fluidlevels are between the indicated "min" and"max" markings.
•Clean interior glass surfaces with a glasscleaner and soft paper towels.
•Wipe driver information displays with a softcloth.
•Visually inspect battery terminals for corro-sion. Corrosion may indicate a loose terminalconnector, or a battery near the end of itsuseful service life. Consult your Volvo retailerfor additional information.
As needed:
Wash the car, including the undercarriage, toreduce wear that can be caused by a buildup ofdirt, and corrosion that can be caused by salt res-idues.
Clean leaves and twigs from air intake vents atthe base of the windshield, and from other placeswhere they may collect.
NOTE
Complete service information for qualifiedtechnicians is available online for purchase orsubscription at www.volvotechinfo.com.
Page 508 of 584

||
MAINTENANCE AND SERVICING
506
Related information
•Climate system service (p. 511)System updates
Updates are available for infotainment-relatedservices and Internet connections. If system soft-ware updates are available, they can be to bedownloaded all at once or separately.
System (software) updates arehandled through theDownload Center app in thecenter display's App view. Taponce to start a download app inHome view's lower sub-view. Ifno search for updates hasbeen performed since the last time the infotain-ment system was started, a search will be initi-ated.
No search will begin if a software download isunderway.
An icon in the System updates button indicatesthe number of updates that are currently availa-ble. Tap the button to display a list of updatesthat can be installed in the vehicle.
For additional information and answers to com-monly asked questions pertaining to the functionand downloading system updates, go to sup-port.volvocars.com.
Background searches for software updatesis activated by default when the vehicle isdelivered from the factory.
NOTE
Downloading data may affect other systemfeatures that share the Internet connection. Adownload can be cancelled at any time or theother features can be temporarily turned offwhile the software download is underway.
NOTE
An update may be interrupted when the igni-tion is switched off.
However, an update does not have to becompleted when the ignition is switched off; itwill resume automatically when the ignition isswitched on again.
Updating all system software
–Select Install all at the bottom of the list.
To avoid displaying a list, select Install all by theSystem updates button.
Updating individual programs
–Select Install to choose the software to bedownloaded.
Cancelling a download
–Tap the activity indicator that replaced theInstall button on the screen when the down-load began.
Page 509 of 584
MAINTENANCE AND SERVICING
507
Keep in mind that a download can be cancelledbut an installation that has already begun cannotbe interrupted.
Allowing background searches or
software updates
This function can be deactivated from the centerdisplay:
1. Go to the Settings in the center display's Topview and select Download Center.
2.Tap SystemDownload Center.
3.Tap to deselect Auto Software Update.
If an update is available, New software updatesavailable will appear in the center display's sta-tus bar. Tap the message to start a download appin Home view's lower sub-view. As soon as thedownload app has started, an icon in the Systemupdates button will indicate the number ofdownloads available.
Related information
•Center display overview (p. 33)
•Navigating in the center display's views(p. 43)
Remote updates
With the vehicle connected to the Internet,updates for a number of the vehicle's systemscan be downloaded from the center display.
The Download Center app isstarted from the center dis-play's App view and makes itpossible to:
•search for and update system software
•update the Sensus Navigation maps
•download, update and uninstall apps
Related information
•Downloading, updating and uninstalling apps(p. 468)
•System updates (p. 506)
Vehicle status
The vehicle's general status can be displayed inthe center display along with the possibility to
book service1
The Car status app is startedin the center display's App viewand has three tabs:
•Messages: stored messages
•Status: tire pressure and engine oil level
•Appointments: booking service or repairs1
Related information
•Using the center display (p. 50)
•Booking service and repairs (p. 508)
•Checking tire inflation pressure (p. 493)
•Checking and refilling engine oil (p. 542)
1Certain markets only.
Page 510 of 584

MAINTENANCE AND SERVICING
508
Booking service and repairs
Connected Service Booking (CSB) makes itpossible to use the vehicle's Internet connectionto set up a time for service, maintenance and/orrepairs.
The information is handled through the Carstatus app, which can be opened from the cen-ter display's App view.
Information about your vehicle is sent to yourretailer and you can book your workshop appoint-ment directly in your retailer's workshop planningsystem using the Volvo On-Line Service Schedu-ler with your smart phone. The system will alsosend a reminder as the appointment approachesand the Sensus Navigation system will providedirections to the workshop if necessary.
This feature makes it convenient to book a work-shop appointment directly from your vehicle.Vehicle-related information is sent to yourretailer, who prepares your visit to the workshop.After you have requested a workshop appoint-ment, your retailer will send you an email includ-ing a link enabling you to connect directly to yourretailer's booking system, where you can bookthe appointment at a convenient time. Informationabout your retailer is also available in the vehicleso that you can contact the retailer/workshop atany time using the Call my retailer menu option.
NOTE
My Volvo can be found by going to www.vol-vocars.com and selecting the United States orCanada.
Before the service can be used
Volvo ID
•The owner (primary driver) must create orhave a Volvo ID (see the article "Volvo ID").
•You must enter your Volvo ID (your emailaddress) in the vehicle as explained in thearticle "Volvo ID". If you have already regis-tered a Volvo ID, use the same email addressthat you used to create the Volvo ID.
Changing a Volvo ID email address
If you would like to register a different emailaddress, open the Volvo ID app in the center dis-play's App view and tap Change Volvo ID. Fol-low the instructions provided. See also the article"Volvo ID" for additional information.
Selecting a Volvo retailer on the My Volvo
website
By default, the retailer where you purchased yourvehicle will be your preferred retailer/Volvoauthorized workshop who will perform serviceand repairs on your vehicle. To change the pre-ferred retailer, go to your personalized My Volvowebsite.
Prerequisites for booking service from the
vehicle
In order to request an appointment from the vehi-cle:
•The engine must be running
•The vehicle must be connected to the Inter-net (see the article "Internet connected vehi-cle")
Using the service
When it is time for service or in certain cases ifrepairs are necessary, a message will appear inthe instrument panel and in the center display.This message is triggered by:
•the amount of time that has elapsed sincethe last service
•the number of hours the engine has runsince the last service
•mileage since the last service.
•Specific alerts or fault codes in the vehicle
Booking service or repairs
Submit a booking request whenever you need aworkshop appointment or when a messageregarding the need for service or repairs hasbeen displayed in the instrument panel and in thecenter display. This can be done directly from thevehicle as follows or alternatively by using the MyVolvo personal website booking tab.
Page 511 of 584
MAINTENANCE AND SERVICING
}}
509
Sending an appointment request
1.Open the Car status app in the center dis-play's App view.
2.Tap Appointments.
3.Under Appointments, tap Requestappoint..
4.Check that your Volvo ID is correct.
5.Check that the correct preferred retailer islisted. If you prefer, simply tap the button toinitiate a call to the retailer.
6.Tap Send appointment request. Yourrequest and vehicle data will be sent to yourretailer through the vehicle's Internet con-nection.
>Volvo will send a booking invitation to youremail address with a link to your preferredworkshop's On-Line Service Scheduler.
7. Open the email and click the link to bookyour workshop appointment at a convenienttime with your preferred service advisor. Addany additional preferences and free text toyour booking.
8. When you have submitted your workshopbooking, your appointment will be confirmedonline directly by email. The booking informa-tion will also appear in the Car status app inthe center display after a period of time aswell as in your My Volvo personal website,where you can make changes to yourappointment at any time.
9.Several days prior to your appointment, youwill receive a reminder via email from yourretailer. A notification will also appear on thecenter display one day prior to the appoint-ment. You can set the interval for otherreminders (e.g., two days, three days) at yourMy Volvo personal website.
10. On the day of your appointment, a reminderwill appear again on the center display andthe retailer's address can be set in your navi-gation system if you require directions to theworkshop.
Sending vehicle-related information
Information about the vehicle can be sent at anytime using its Internet connection.
Using this function does not send a workshopappointment request to your retailer; onlyvehicle data will be transmitted to Volvo. Thisvehicle data can be accessed by any retailer ifyou call the retailer and provide your VehicleIdentification Number (VIN).
1.Open the Car status app in the center dis-play's App view.
2.Tap Appointments.
3.Under Appointments, tap Send vehicledata.
>A message confirming that vehicle infor-mation has been sent via the Internetconnection will appear on the center dis-play. Transmission of the vehicle informa-tion can be cancelled at any time by tap-ping the X in the activity indicator.