display VOLVO XC90 TWIN ENGINE HYBRID 2017 Owners Manual
[x] Cancel search | Manufacturer: VOLVO, Model Year: 2017, Model line: XC90 TWIN ENGINE HYBRID, Model: VOLVO XC90 TWIN ENGINE HYBRID 2017Pages: 584, PDF Size: 14.2 MB
Page 512 of 584

||
MAINTENANCE AND SERVICING
510
Viewing workshop information
1.Open the Car status app in the center dis-play's App view.
2.Tap Appointments.
3.Under Appointments, tap Workshopinformation.
>A window with retailer information willappear.
4. If you prefer, call the retailer, or select anaddress or GPS coordinates to activate thenavigation system.
Appointments and vehicle information
When you make an appointment or send vehicleinformation from your vehicle, this information will
be sent using the Internet connection2. Informa-tion about the vehicle includes:
•service requirements
•time since service was last performed
•function status
•fluid levels
•mileage (odometer reading)
•VIN (Vehicle Identification Number)
•The vehicle's software version
•Diagnostic information
Related information
•Internet connected vehicle (p. 466)
•Volvo ID (p. 32)
Wi-Fi connection to a workshop
The time a vehicle is in a workshop for service orrepairs can be reduced by transmitting trouble-shooting information as soon as the car reachesthe workshop.
This is done most conveniently by selectingAutomatically connect when I arrive in thecenter display's Settings menu.
Each time the vehicle slows down to a sufficientlylow speed, it begins searching for a Wi-Fi net-work. If an authorized Volvo network (at a retaileror workshop) is found, a message will be dis-played or a pop-up window will open in the cen-ter display (this applies to manual connections,see the section "Manually connecting to a work-shop" below).
2There will be a slight charge for sending this information via the vehicle's Internet connection, depending on your service plan.
Page 513 of 584

MAINTENANCE AND SERVICING
511
Automatically connecting to a
workshop
Without driver confirmation
This is the most convenient way to transmit trou-ble-shooting data. The driver does not need toconfirm that the vehicle will establish a connec-tion.
If the vehicle stops at a workshop and the engineis switched off using the start knob, a messagewill appear above the status bar in the center dis-play. The vehicle will be automatically connectedwhen the driver's door is opened if the driverdoes not tap the Cancel button in the message.
To help prevent the driver from being disturbedby unwanted requests to connect (e.g., if thevehicle is often parked near a workshop with anauthorized Volvo network), the vehicle will switchto manual connection if the driver cancels a con-nection request twice within 5 days.
With driver confirmation
With this alternative, the driver must confirm aconnection.
If the vehicle stops at a workshop and the engineis switched off using the start knob, a pop-upwindow will open in the center display. The vehi-cle will be automatically connected when the driv-er's door is opened if the driver taps Connect inthe pop-up window. If the driver does nothing ortaps the pop-up window's Abort button, noattempt will be made to establish a connection.
NOTE
To help prevent the driver from being distur-bed by unwanted requests to connect (e.g., ifthe vehicle is often parked near a workshopwith an authorized Volvo network), the vehiclewill switch to manual connection if the drivercancels a connection request twice within5 days.
Manually connecting to a workshop
Manual connections are handled by the servicetechnician.
Changing the way a connection is made
The type of connection (manual or automatic)can be changed in the center display's Settingsmenu.
1. Pull down the center display's Top view andtap Settings.
2.Tap CommunicationVolvo ServiceNetworks.
3.Select Automatically connect when Iarrive, Ask before connecting or Neverconnect and never ask (manual connec-tions).
Related information
•Internet connected vehicle (p. 466)
•Settings view (p. 115)
Climate system service
Service and repairs on the air conditioning sys-tem should only be done by a trained and quali-fied Volvo service technician.
Troubleshooting and repairs
The air conditioning system contains a floures-cent tracer substance. Ultraviolet light is used tosearch for leaks in the system.
Refrigerant R134a
WARNING
The air conditioning system contains therefrigerant R134a under pressure. Serviceand repairs on the system should only bedone by a trained and qualified Volvo servicetechnician.
Related information
•Climate control system (p. 188)
Page 515 of 584

MAINTENANCE AND SERVICING
}}
513
CAUTION
•The infotainment system's energy-savingfeature may not function correctly or atall, and/or a message may be displayed ifa battery charger or jumper cables arenot connected properly.
•The negative terminal on the battery mustnever be used to connect a jumper cableor a battery charger. Only the groundpoint on the chassis may be used.
NOTE
•The service life of the start battery isshortened if it becomes dischargedrepeatedly.
•The service life of the start battery isaffected by factors such as driving condi-tions and climate. Extreme cold may alsofurther decrease the battery's startcapacity.
•Because the battery
Page 525 of 584
MAINTENANCE AND SERVICING
}}
523
Fuses in the passengercompartment
The fuses in the passenger compartment(located under the glove compartment) help pro-
tect electrical components such as the 120-voltsocket, displays and door modules.There is a fuse removal tool on the inside of thefuse box covers. There are also positions in thefuse box for several extra fuses.
Page 527 of 584
MAINTENANCE AND SERVICING
}}
* Option/accessory, for more information, see Introduction.525
Positions
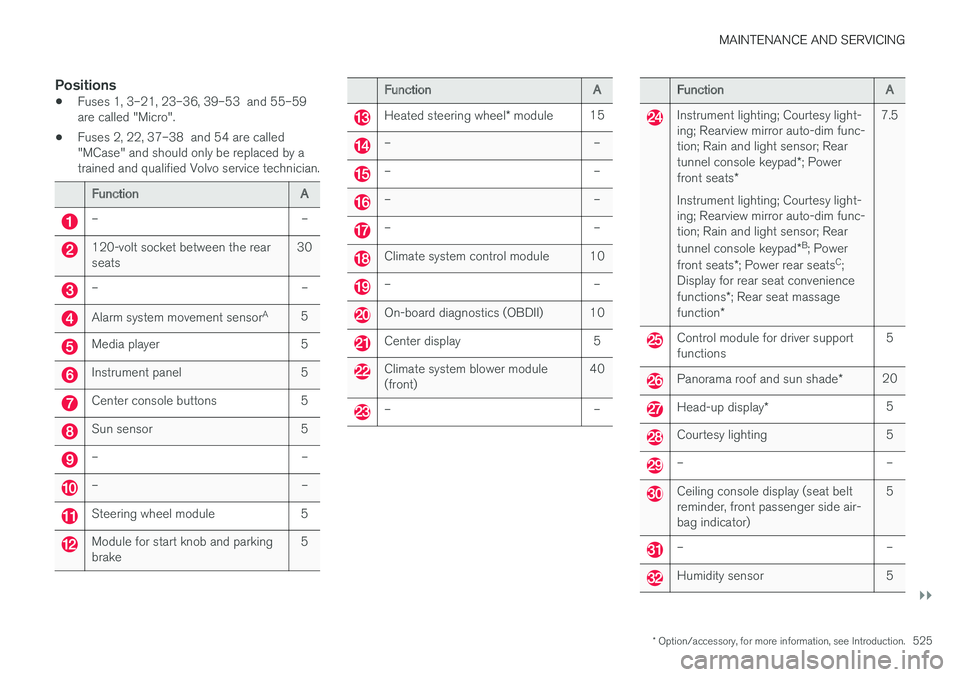
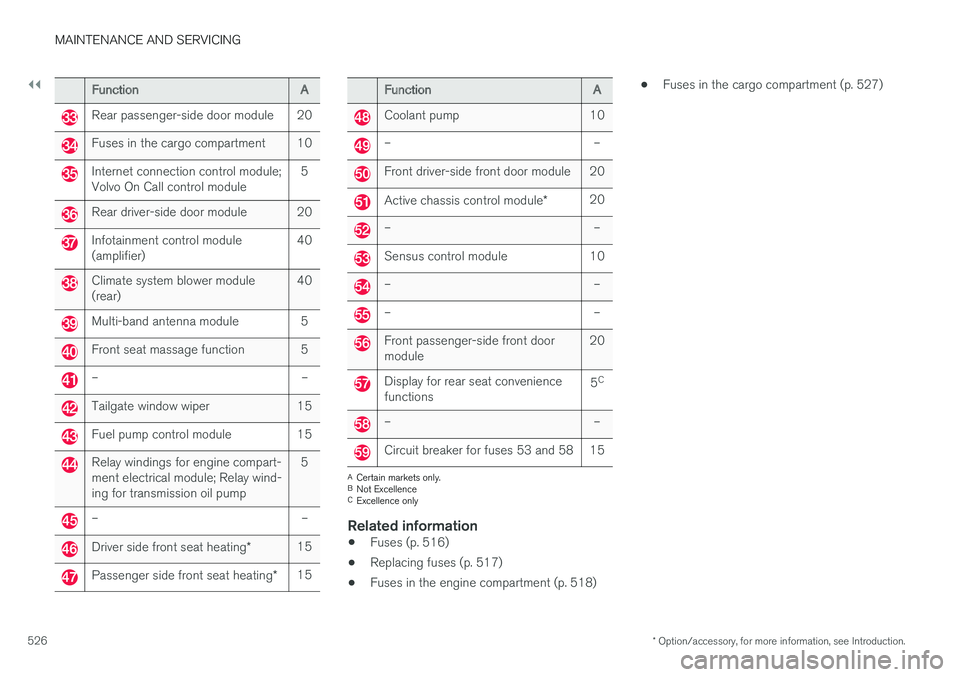
•Fuses 1, 3–21, 23–36, 39–53 and 55–59are called "Micro".
•Fuses 2, 22, 37–38 and 54 are called"MCase" and should only be replaced by atrained and qualified Volvo service technician.
FunctionA
––
120-volt socket between the rearseats30
––
Alarm system movement sensorA5
Media player5
Instrument panel5
Center console buttons5
Sun sensor5
––
––
Steering wheel module5
Module for start knob and parkingbrake5
FunctionA
Heated steering wheel* module15
––
––
––
––
Climate system control module10
––
On-board diagnostics (OBDII)10
Center display5
Climate system blower module(front)40
––
FunctionA
Instrument lighting; Courtesy light-ing; Rearview mirror auto-dim func-tion; Rain and light sensor; Reartunnel console keypad*; Powerfront seats*
Instrument lighting; Courtesy light-ing; Rearview mirror auto-dim func-tion; Rain and light sensor; Rear
tunnel console keypad*B; Power
front seats*; Power rear seatsC;Display for rear seat conveniencefunctions*; Rear seat massagefunction*
7.5
Control module for driver supportfunctions5
Panorama roof and sun shade*20
Head-up display*5
Courtesy lighting5
––
Ceiling console display (seat beltreminder, front passenger side air-bag indicator)
5
––
Humidity sensor5
Page 528 of 584
||
MAINTENANCE AND SERVICING
* Option/accessory, for more information, see Introduction.526
FunctionA
Rear passenger-side door module20
Fuses in the cargo compartment10
Internet connection control module;Volvo On Call control module5
Rear driver-side door module20
Infotainment control module(amplifier)40
Climate system blower module(rear)40
Multi-band antenna module5
Front seat massage function5
––
Tailgate window wiper15
Fuel pump control module15
Relay windings for engine compart-ment electrical module; Relay wind-ing for transmission oil pump
5
––
Driver side front seat heating*15
Passenger side front seat heating*15
FunctionA
Coolant pump10
––
Front driver-side front door module20
Active chassis control module*20
––
Sensus control module10
––
––
Front passenger-side front doormodule20
Display for rear seat conveniencefunctions5C
––
Circuit breaker for fuses 53 and 5815
ACertain markets only.BNot ExcellenceCExcellence only
Related information
•Fuses (p. 516)
•Replacing fuses (p. 517)
•Fuses in the engine compartment (p. 518)
•Fuses in the cargo compartment (p. 527)
Page 539 of 584

MAINTENANCE AND SERVICING
}}
* Option/accessory, for more information, see Introduction.537
Hoisting the vehicle
When the vehicle is hoisted, the jack or garagelift must be positioned correctly under the vehi-cle.
For vehicles equipped with leveling control*, if it isalso equipped with the optional pneumatic sus-pension, this must be deactivated before thevehicle is hoisted. This is done from the centerdisplay:
1.Tap Settings in Top view.
2.Tap My CarSuspension .
3.Select Deactivate Suspension & LevelingControl.
Page 544 of 584
||
MAINTENANCE AND SERVICING
542
CAUTION
•Not checking the oil level regularly canresult in serious engine damage if the oillevel becomes too low.
•Oil that is lower than the specified qualitycan damage the engine.
•Volvo does not recommend the use of oiladditives.
•Always add oil of the same type and vis-cosity as already used.
•Oil changes should be carried out by atrained and qualified Volvo service techni-cian.
•Using oil of higher than the specifiedquality is permitted and may be neces-sary for demanding driving.
Also, refer to the Warranty and Service Recordsinformation booklet for information on oil changeintervals and oil specifications.
Related information
•Checking and refilling engine oil (p. 542)
Checking and refilling engine oil
The oil level is checked electronically.
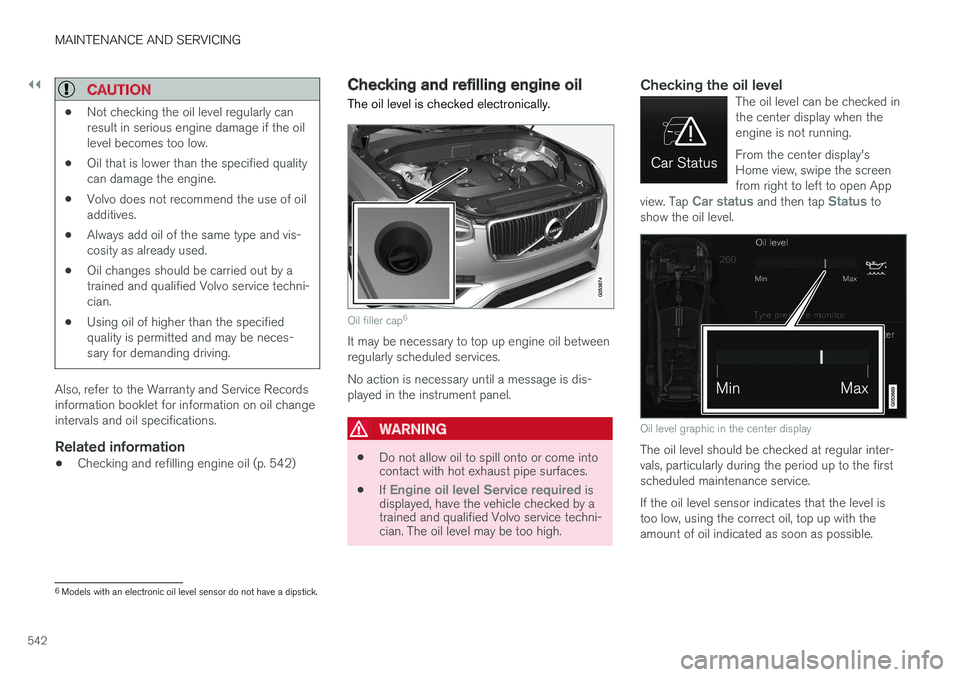
Oil filler cap6
It may be necessary to top up engine oil betweenregularly scheduled services.
No action is necessary until a message is dis-played in the instrument panel.
WARNING
•Do not allow oil to spill onto or come intocontact with hot exhaust pipe surfaces.
•If Engine oil level Service required isdisplayed, have the vehicle checked by atrained and qualified Volvo service techni-cian. The oil level may be too high.
Checking the oil level
The oil level can be checked inthe center display when theengine is not running.
From the center display'sHome view, swipe the screenfrom right to left to open Appview. Tap Car status and then tap Status toshow the oil level.
Oil level graphic in the center display
The oil level should be checked at regular inter-vals, particularly during the period up to the firstscheduled maintenance service.
If the oil level sensor indicates that the level istoo low, using the correct oil, top up with theamount of oil indicated as soon as possible.
6Models with an electronic oil level sensor do not have a dipstick.
Page 545 of 584
MAINTENANCE AND SERVICING
}}
543
NOTE
•The system cannot detect changes in theoil level immediately. The vehicle must bedriven approximately 20 miles (30 km) orhave been parked on level ground withthe engine off for 5 minutes before theoil level reading will be correct.
•If the necessary conditions are not metfor checking the oil level electronically(time interval after the engine wasswitched off, if the vehicle is parked onan incline, etc.), No values available willbe displayed. This does not indicate aproblem with the oil level sensor.
Related information
•Engine oil (p. 541)
•Ignition modes (p. 400)
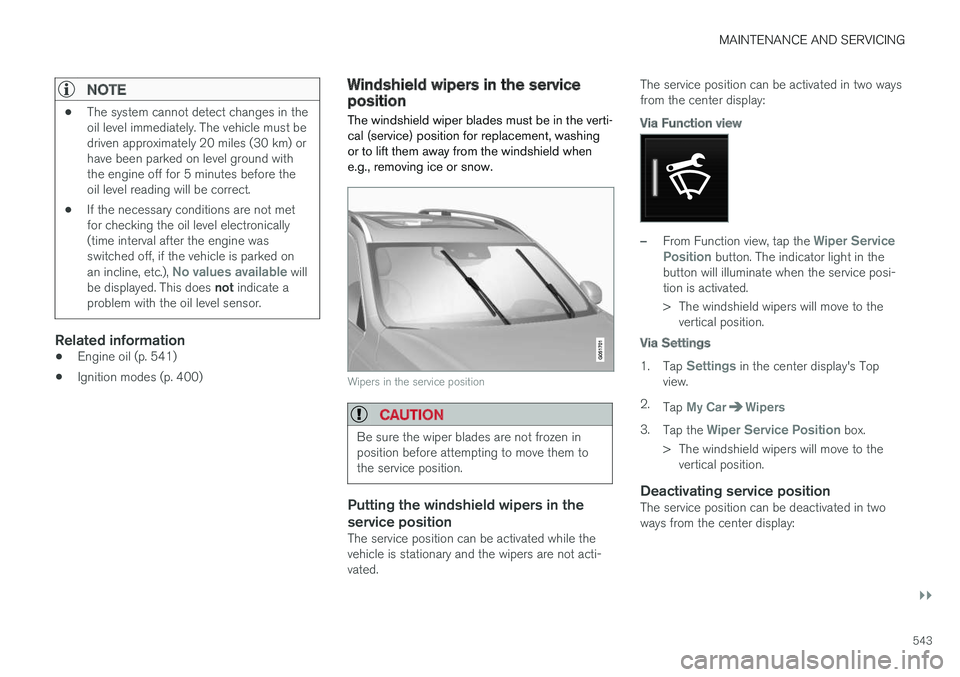
Windshield wipers in the serviceposition
The windshield wiper blades must be in the verti-cal (service) position for replacement, washingor to lift them away from the windshield whene.g., removing ice or snow.
Wipers in the service position
CAUTION
Be sure the wiper blades are not frozen inposition before attempting to move them tothe service position.
Putting the windshield wipers in the
service position
The service position can be activated while thevehicle is stationary and the wipers are not acti-vated.
The service position can be activated in two waysfrom the center display:
Via Function view
–From Function view, tap the Wiper ServicePosition button. The indicator light in thebutton will illuminate when the service posi-tion is activated.
>The windshield wipers will move to thevertical position.
Via Settings
1.Tap Settings in the center display's Topview.
2.Tap My CarWipers
3.Tap the Wiper Service Position box.
>The windshield wipers will move to thevertical position.
Deactivating service position
The service position can be deactivated in twoways from the center display:
Page 546 of 584

||
MAINTENANCE AND SERVICING
544
Via Function view
–From Function view, tap the Wiper ServicePosition button. The indicator light in thebutton will go out when the service positionis deactivated.
Via Settings
1.Tap Settings in the center display's Topview.
2.My CarWipers
3.Tap the Wiper Service Position to deselectthe box.
The wipers will also leave the service position if:
•The wipers are activated.
•The windshield washers are activated.
•The rain sensor is activated.
CAUTION
If the wiper arms have been folded out fromthe windshield while in the service position,fold them back against the windshield beforereturning the wipers to the normal position tohelp avoid scratching the paint on the hood.
Related information
•Replacing wiper blades (p. 544)
•Using the windshield wipers (p. 161)
Replacing wiper blades
The wiper blades should be replaced regularlyfor best effect.
The windshield wiper blades must be in the verti-cal (service) position for replacement, washingor to lift them away from the windshield whene.g., removing ice or snow.
Replacing the windshield wiper blades