cruise control VOLVO XC90 TWIN ENGINE HYBRID 2017 Owners Manual
[x] Cancel search | Manufacturer: VOLVO, Model Year: 2017, Model line: XC90 TWIN ENGINE HYBRID, Model: VOLVO XC90 TWIN ENGINE HYBRID 2017Pages: 584, PDF Size: 14.2 MB
Page 8 of 584
6
Start and lock system type designations259
DRIVER SUPPORT
Driver support systems262
Adjustable steering force262
Electronic Stability Control (ESC)263
Electronic Stability Control (ESC)sport mode264
Electronic Stability Control (ESC)symbols and messages265
Roll stability control (RSC)267
Speed limiter (SL)*267
Starting and activating the SpeedLimiter (SL)*268
Changing a Speed Limiter (SL)*maximum speed269
Automatic Speed Limiter (ASL)*269
Activating/deactivating theAutomatic Speed Limiter (ASL)*271
Changing tolerance for theAutomatic Speed Limiter271
Deactivating/reactivating the SpeedLimiter*272
Turning the Speed Limiter* off273
Cruise Control (CC)274
Starting and activating Cruise Control274
Changing Cruise Control speed275
Deactivating/resuming CruiseControl (CC)276
Turning Cruise Control off277
Switching between Cruise Controland Adaptive Cruise Control*278
Distance Alert*279
Using Distance Alert*280
Distance Alert* limitations281
Adaptive Cruise Control (ACC)*281
Starting and activating AdaptiveCruise Control (ACC)*284
Deactivating/resuming AdaptiveCruise Control (ACC)285
Changing Adaptive Cruise Control(ACC) speed287
Setting an Adaptive Cruise Controltime interval288
Passing Assistance with AdaptiveCruise Control or Pilot Assist-2289
Changing target vehicles and auto-matic braking with Adaptive CruiseControl (ACC)
289
Adaptive Cruise Control (ACC) -troubleshooting291
Adaptive Cruise Control (ACC) - limi-tations292
Adaptive Cruise Control (ACC) sym-bols and messages293
Pilot Assist*295
Pilot Assist-1*295
Starting and activating Pilot Assist-1*298
Page 23 of 584
INTRODUCTION
* Option/accessory, for more information, see Introduction.21
Owner's manual and theenvironment
The wood pulp in Volvo's printed owner's infor-
mation comes from FSC® (Forest Stewardship
Council®) certified forests and other responsiblesources.
FSC ®
The symbol above indicates that the wood pulp is
FSC® certified.
Related information
•Volvo and the environment (p. 20)
IntelliSafe—driver support
IntelliSafe is Volvo's philosophy regarding vehi-cle safety. It encompasses a number of systems,both standard and optional, that are designed tohelp make driving and traveling in a Volvo safer.
Support
Systems that help make driving safer are an inte-gral part of IntelliSafe. These include optionalfeatures such as Adaptive Cruise Control* thathelps maintain a set distance to a vehicle ahead,Park Assist Pilot*, which assists in parking thevehicle, Cross Traffic Alert*, Blind SpotInformation*, etc.
Accident prevention
Systems such as City Safety are designed toautomatically apply the brakes in situations inwhich the driver does not have time to react.Lane Keeping Aid* alerts the drive if the vehicleinadvertently crosses a lane's/road's side markerline.
Protection
The vehicle is equipped with e.g., seat belt pre-tensioners that pull the seat belts taut in criticalsituations when there is a collision risk andnumerous airbags designed to help provide cush-ioning if certain types of collisions should occur.
Related information
•Adaptive Cruise Control (ACC)* (p. 281)
•Park Assist Pilot (PAP)* (p. 368)
•High and low beam headlights (p. 148)
•Cross Traffic Alert (CTA)* (p. 341)
•Blind Spot Information (BLIS)* (p. 339)
•City Safety™ (p. 326)
•Driving lane assistance (p. 350)
•Airbag system (p. 71)
•Roll stability control (RSC) (p. 267)
•Seat belts (p. 66)
•General safety information (p. 62)
Page 124 of 584
INSTRUMENTS AND CONTROLS
* Option/accessory, for more information, see Introduction.122
Head-up display (HUD)*
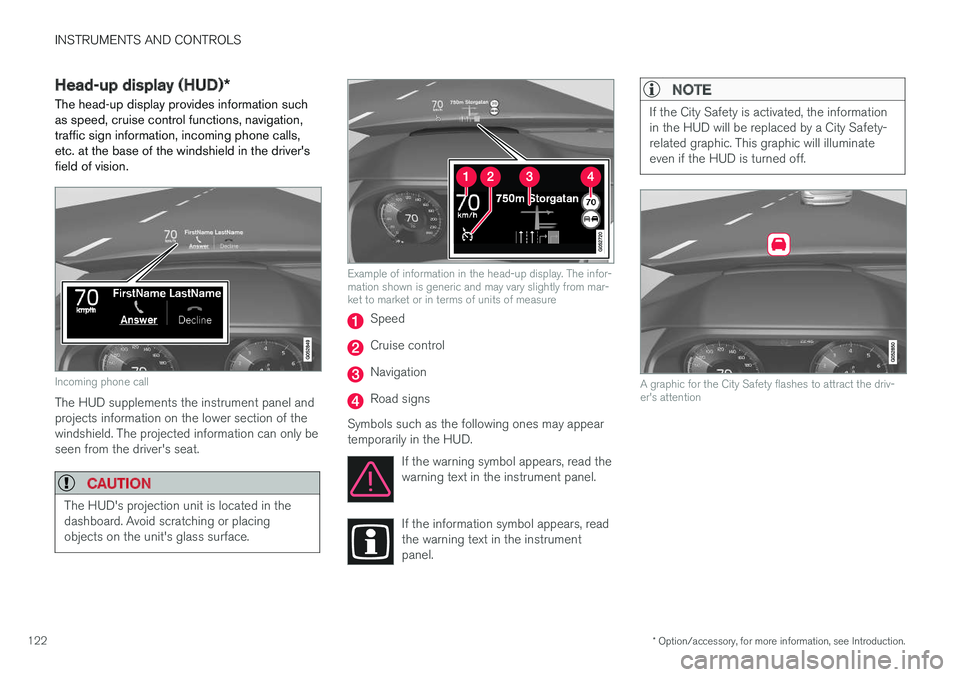
The head-up display provides information suchas speed, cruise control functions, navigation,traffic sign information, incoming phone calls,etc. at the base of the windshield in the driver'sfield of vision.
Incoming phone call
The HUD supplements the instrument panel andprojects information on the lower section of thewindshield. The projected information can only beseen from the driver's seat.
CAUTION
The HUD's projection unit is located in thedashboard. Avoid scratching or placingobjects on the unit's glass surface.
Example of information in the head-up display. The infor-mation shown is generic and may vary slightly from mar-ket to market or in terms of units of measure
Speed
Cruise control
Navigation
Road signs
Symbols such as the following ones may appeartemporarily in the HUD.
If the warning symbol appears, read thewarning text in the instrument panel.
If the information symbol appears, readthe warning text in the instrumentpanel.
NOTE
If the City Safety is activated, the informationin the HUD will be replaced by a City Safety-related graphic. This graphic will illuminateeven if the HUD is turned off.
A graphic for the City Safety flashes to attract the driv-er's attention
Page 135 of 584
INSTRUMENTS AND CONTROLS
}}
133
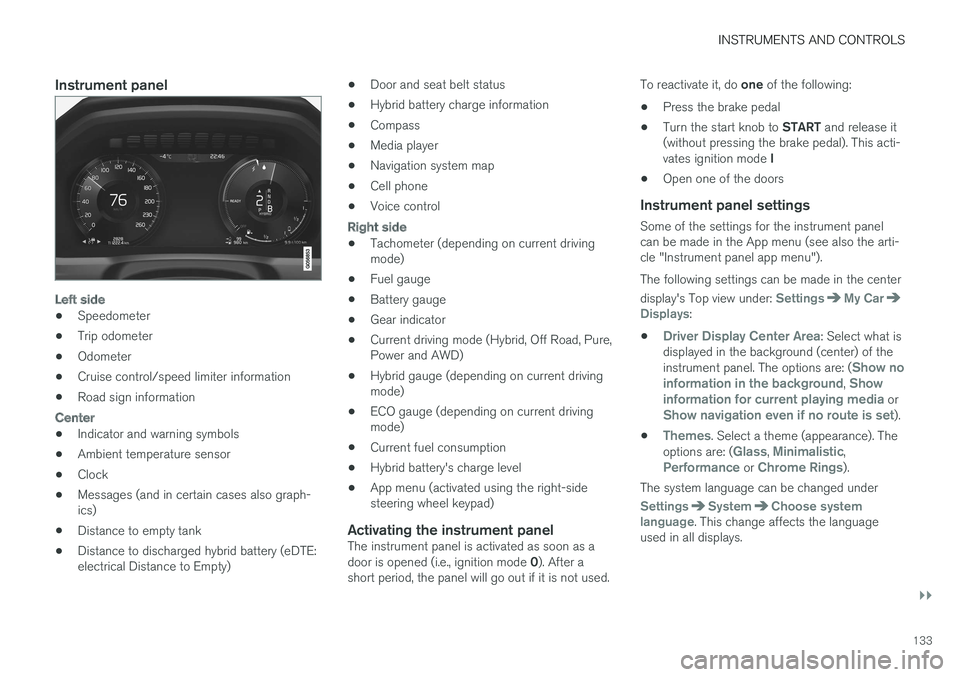
Instrument panel
Left side
•Speedometer
•Trip odometer
•Odometer
•Cruise control/speed limiter information
•Road sign information
Center
•Indicator and warning symbols
•Ambient temperature sensor
•Clock
•Messages (and in certain cases also graph-ics)
•Distance to empty tank
•Distance to discharged hybrid battery (eDTE:electrical Distance to Empty)
•Door and seat belt status
•Hybrid battery charge information
•Compass
•Media player
•Navigation system map
•Cell phone
•Voice control
Right side
•Tachometer (depending on current drivingmode)
•Fuel gauge
•Battery gauge
•Gear indicator
•Current driving mode (Hybrid, Off Road, Pure,Power and AWD)
•Hybrid gauge (depending on current drivingmode)
•ECO gauge (depending on current drivingmode)
•Current fuel consumption
•Hybrid battery's charge level
•App menu (activated using the right-sidesteering wheel keypad)
Activating the instrument panel
The instrument panel is activated as soon as adoor is opened (i.e., ignition mode 0). After ashort period, the panel will go out if it is not used.
To reactivate it, do one of the following:
•Press the brake pedal
•Turn the start knob to START and release it(without pressing the brake pedal). This acti-vates ignition mode I
•Open one of the doors
Instrument panel settings
Some of the settings for the instrument panelcan be made in the App menu (see also the arti-cle "Instrument panel app menu").
The following settings can be made in the center
display's Top view under: SettingsMy CarDisplays:
•Driver Display Center Area: Select what isdisplayed in the background (center) of theinstrument panel. The options are: (Show noinformation in the background, Showinformation for current playing media orShow navigation even if no route is set).
•Themes. Select a theme (appearance). Theoptions are: (Glass, Minimalistic,Performance or Chrome Rings).
The system language can be changed under
SettingsSystemChoose systemlanguage. This change affects the languageused in all displays.
Page 153 of 584
INSTRUMENTS AND CONTROLS
}}
* Option/accessory, for more information, see Introduction.151
Brake lights
The brake lights illuminate automatically whenthe brakes are applied.
In addition to illuminating when the brake pedal isdepressed, the brake lights also illuminate whenone of the driver support systems (e.g., adaptivecruise control, City Safety or collision warning)slow the vehicle.
Related information
•Adaptive Cruise Control (ACC)* (p. 281)
•City Safety™ (p. 326)
•Emergency brake lights (p. 380)
Hazard warning flashers
The hazard warning flashers should be used toindicate that the vehicle has become a traffichazard.
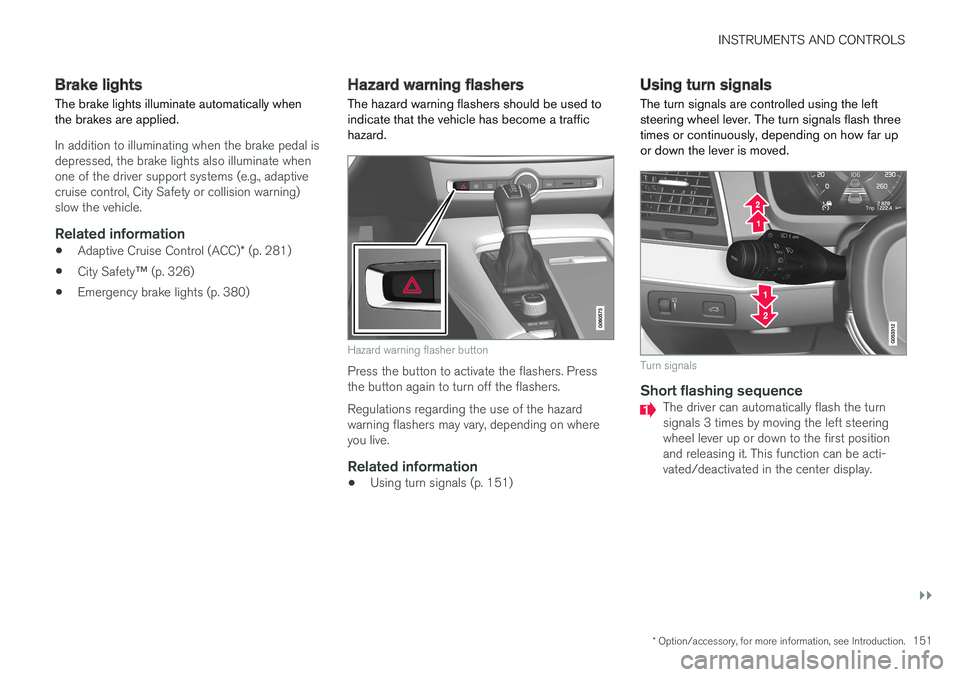
Hazard warning flasher button
Press the button to activate the flashers. Pressthe button again to turn off the flashers.
Regulations regarding the use of the hazardwarning flashers may vary, depending on whereyou live.
Related information
•Using turn signals (p. 151)
Using turn signals
The turn signals are controlled using the leftsteering wheel lever. The turn signals flash threetimes or continuously, depending on how far upor down the lever is moved.
Turn signals
Short flashing sequence
The driver can automatically flash the turnsignals 3 times by moving the left steeringwheel lever up or down to the first positionand releasing it. This function can be acti-vated/deactivated in the center display.
Page 167 of 584
INSTRUMENTS AND CONTROLS
* Option/accessory, for more information, see Introduction.165
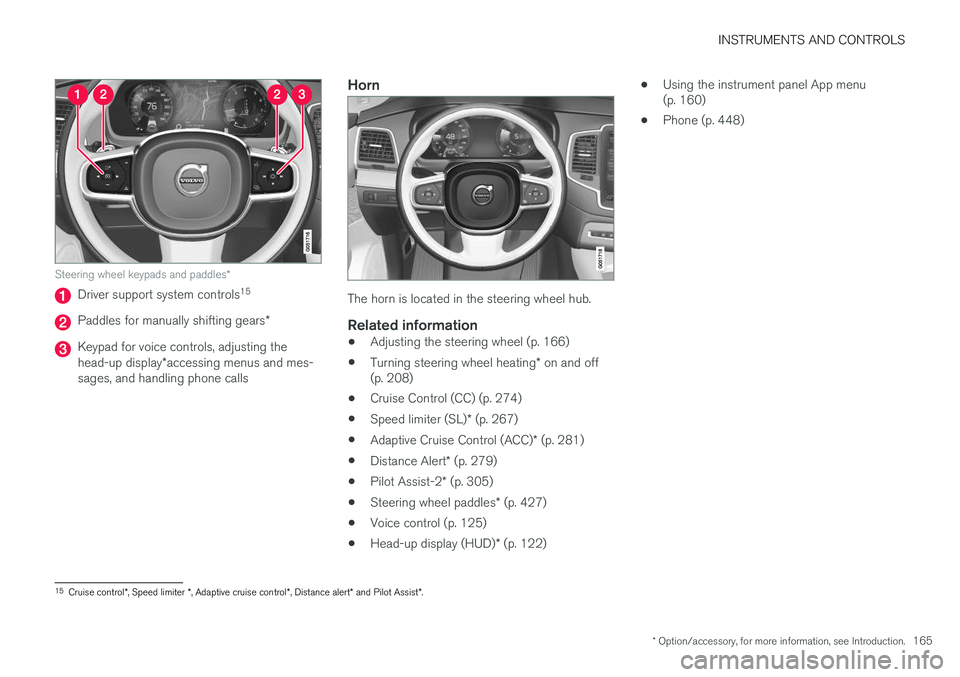
Steering wheel keypads and paddles*
Driver support system controls15
Paddles for manually shifting gears*
Keypad for voice controls, adjusting thehead-up display*accessing menus and mes-sages, and handling phone calls
Horn
The horn is located in the steering wheel hub.
Related information
•Adjusting the steering wheel (p. 166)
•Turning steering wheel heating* on and off(p. 208)
•Cruise Control (CC) (p. 274)
•Speed limiter (SL)* (p. 267)
•Adaptive Cruise Control (ACC)* (p. 281)
•Distance Alert* (p. 279)
•Pilot Assist-2* (p. 305)
•Steering wheel paddles* (p. 427)
•Voice control (p. 125)
•Head-up display (HUD)* (p. 122)
•Using the instrument panel App menu(p. 160)
•Phone (p. 448)
15Cruise control*, Speed limiter *, Adaptive cruise control*, Distance alert* and Pilot Assist*.
Page 243 of 584
LOCKS AND ALARM
* Option/accessory, for more information, see Introduction.241
Settings for the Red Key can be made by astandard remote key user from the center dis-
play's Top view under: SettingsSystem
Driver ProfileRed key.
Several of the vehicle's safety function cannot beturned off by a Red Key user.
The restrictions are designed to help reduce therisk of an accident and they cannot be changedby a Red Key user. These settings cannot bechanged by the Red Key's user.
Possible settings
The following settings can be made for a RedKey:
Speed Limiter * (On/Off)
•Setting interval: 30-160 mph (50-250 km/h)
•Default setting: 75 mph (120 km/h)
•Increments: 1 mph (1 km/h)
This symbol will appear in the instru-ment panel and the message RedkeySpeed limitation cannot beexceeded will be displayed if thedriver attempts to exceed the set maximumspeed.
See the article "Speed limiter" for additionalinformation.
Speed reminder (On/Off):
•Setting interval: 0-155 mph (0-250 km/h
•Default settings: 30, 45 and 55 mph (50, 70and 90 km/h.)
•Increments: 1 mph (1 km/h)
•Max. number of reminders: 6
Reduced max. volume (on/off)
•Default setting: On
Adaptive cruise control * (On/Off)
•Initial setting: On at the longest interval
•See the article "Adaptive cruise control" foradditional information
Safety functions
The following safety functions will always beactive for a Red Key user:
•Blind Spot Information (BLIS)*
•Lane Keeping Aid (LKA)*
•Distance Alert*
•City Safety*
•Driver Alert Control (DAC)*
•Road Sign Information (RSI)*
Related information
•Remote key (p. 238)
•Adaptive Cruise Control (ACC)* (p. 281)
•Speed limiter (SL)* (p. 267)
•Blind Spot Information (BLIS)* (p. 339)
•Driving lane assistance (p. 350)
•Distance Alert* (p. 279)
•City Safety™ (p. 326)
•Driver Alert Control (DAC) (p. 348)
•Road Sign Information (RSI)* (p. 346)
Page 264 of 584
DRIVER SUPPORT
* Option/accessory, for more information, see Introduction.262
Driver support systems
The vehicle is equipped with a number of driversupport systems that help provide the driver withactive/passive support.
Some of these systems are standard while othersare optional and they are designed to e.g., helpthe driver maintain a set speed or a set distanceto a vehicle ahead, or warn the driver of a poten-tial collision situation and in certain cases applythe brakes if necessary. Certain optional systemscan also assist in various parking situations.
Related information
•Adjustable steering force (p. 262)
•Electronic Stability Control (ESC) (p. 263)
•Roll stability control (RSC) (p. 267)
•Speed limiter (SL)* (p. 267)
•Distance Alert* (p. 279)
•Cruise Control (CC) (p. 274)
•Adaptive Cruise Control (ACC)* (p. 281)
•Pilot Assist* (p. 295)
•Driver support system radar sensor (p. 318)
•Driver support system camera (p. 322)
•City Safety™ (p. 326)
•Blind Spot Information (BLIS)* (p. 339)
•Cross Traffic Alert (CTA)* (p. 341)
•Road Sign Information (RSI)* (p. 346)
•Driver Alert Control (DAC) (p. 348)
•Driving lane assistance (p. 350)
•Run-off Mitigation (p. 355)
•Park Assist* (p. 358)
•Park Assist Camera (PAC)* (p. 362)
•Park Assist Pilot (PAP)* (p. 368)
Adjustable steering force
Steering force increases with the speed of thevehicle to give the driver an enhanced sense ofcontrol and stability. At low speed the vehicle iseasier to steer in order to facilitate parking, etc.
Changing the steering force level
To change the level of steering force, see theinformation under the heading "individual" in arti-cle "Drive modes" for additional information.
NOTE
•This steering force level menu functioncannot be accessed when the vehicle isin motion.
•In certain situations, the power steeringfunction may become too hot and mustbe temporarily cooled. During cooling,power steering effect will be reduced andmore force may be necessary to turn thesteering wheel and a message will bedisplayed in the instrument panel.
Related information
•Driver support systems (p. 262)
•Drive modes (p. 420)
Page 276 of 584

DRIVER SUPPORT
* Option/accessory, for more information, see Introduction.274
Cruise Control (CC)
Cruise Control (CC) is designed to assist thedriver by maintaining a set speed. It is primarilyintended for use on long straight roads in steadytraffic, such as on highways and other mainroads in smoothly flowing traffic.
Overview
Function buttons and symbols (generic illustration)
Increases the set speed or CC switchesfrom standby mode to active mode
The set speed will be resumed
Press to put CC in active mode and setthe current speed or from active mode, pressto put CC in standby mode
— Decreases the set speed
Set speed indicator
The vehicle's current speed
The set speed
In models equipped with the optional AdaptiveCruise Control (ACC), the driver can togglebetween CC and ACC – see the article "Switch-ing between Cruise Control and Adaptive CruiseControl".
WARNING
•The vehicle must always be drivenaccording to current traffic/road condi-tions. The driver must take action if CCdoes not maintain a suitable speedand/or distance to other vehicles.
•The driver is always responsible for oper-ating the vehicle in a safe manner.
Related information
•Starting and activating Cruise Control(p. 274)
•Changing Cruise Control speed (p. 275)
•Deactivating/resuming Cruise Control (CC)(p. 276)
•Turning Cruise Control off (p. 277)
•Adaptive Cruise Control (ACC)* (p. 281)
•Switching between Cruise Control andAdaptive Cruise Control* (p. 278)
Starting and activating CruiseControl
Cruise Control (CC) must be selected and acti-vated before it can regulate the vehicle's speed.
Selecting CC (putting it in standby
mode)
Function buttons and symbols
–Press ◀ (1) or ▶ (3) to scroll to the CC
() function.
>The symbol (4) will be displayed in theinstrument panel. This indicates that CChas been selected and can then be acti-vated to maintain a set speed.
Page 277 of 584

DRIVER SUPPORT
* Option/accessory, for more information, see Introduction.275
NOTE
Before CC can be activated, the vehicle'sspeed must be at least 20 mph (30 km/h).This is also the lowest speed that can be set.
Activating CC (putting it in active mode
and setting a speed)
–With the symbol displayed (CC is in
standby mode), press the button (2) onthe left-side steering wheel keypad.
>This puts CC in active mode and willmaintain the vehicle's current speed.
Related information
•Cruise Control (CC) (p. 274)
•Switching between Cruise Control andAdaptive Cruise Control* (p. 278)
•Deactivating/resuming Cruise Control (CC)(p. 276)
•Turning Cruise Control off (p. 277)
Changing Cruise Control speed
Changing a set speed
Function buttons and symbols (generic illustration)
–Change a set speed by pressing the (1)or — (3) buttons briefly or by pressing andholding them:
•Press briefly: changes speed in+/– 5 mph (+/– 5 km/h) increments.Each press changes the vehicle's speedby +/– 5 mph (+/– 5 km/h).
•Press and hold: changes the speed+/– 1 mph (+/– 1 km/h) at a time.Release the button when the set speedindicator (4)/(6) has moved to the desiredspeed.
If speed is increased by pressing the accelerator
pedal before the button is pressed, the vehi-cle's speed when the button is pressed will
become the set speed assuming that the accel-erator pedal is still depressed when the button ispressed.
A temporary increase in speed, such as whenpassing another vehicle, does not affect the CCset speed. The vehicle will return to the set speedwhen the accelerator pedal is released. Alwaysobserve posted speed limits.
Engine braking instead of applying the
brakes
CC regulates speed by applying the brakeslightly. To avoid a loss of speed when drivingdown hills, use the engine braking functioninstead of letting the CC apply the brakes. In thissituation, the driver can temporarily deactivate theCC braking function.
To do so:
–Press the accelerator pedal approx. halfwaydown and release it.
>CC will automatically deactivate the auto-matic brake function and will then onlyuse the engine braking function.
Related information
•Cruise Control (CC) (p. 274)