parking sensors VOLVO XC90 TWIN ENGINE HYBRID 2017 Owners Manual
[x] Cancel search | Manufacturer: VOLVO, Model Year: 2017, Model line: XC90 TWIN ENGINE HYBRID, Model: VOLVO XC90 TWIN ENGINE HYBRID 2017Pages: 584, PDF Size: 14.2 MB
Page 6 of 584
4
Passenger compartment lighting152
Home safe lighting155
Approach lighting155
Messages in the instrument paneland center display155
Handling messages in the instru-ment panel and center display157
Handling messages stored from theinstrument panel and center display158
Instrument panel App menu160
Using the instrument panel App menu160
Using the windshield wipers161
Activating/deactivating the rain sensor162
Windshield and headlight washers163
Tailgate window wiper and washer164
Steering wheel164
Adjusting the steering wheel166
Seats166
Manually operated front seats167
Power front seats*168
Adjusting power front seats*168
Adjusting the passenger's seat fromthe driver's seat*169
Using the power seat memory function*169
Multifunctional front seats*170
Adjusting function settings in themultifunctional front seats*171
Easy access to and from the driver seat174
Rear seats175
Adjusting the second row head restraints175
Moving the second row seats for-ward/rearward176
Adjusting the second row backrest tilt177
Folding the second row backrests178
Getting into and out of the third rowof seats179
Folding the third row backrests180
Driver profiles181
Selecting a driver profile181
Editing a driver profile182
Linking a remote key to a driver profile183
Importing/exporting a driver profilefrom/to a USB flash drive184
CLIMATE
Climate control system188
Perceived temperature188
Climate system sensors189
Parking climate (preconditioning)189
Activating/deactivating the parkingclimate timer191
Activating/deactivating the climatecomfort retaining function*191
Preconditioning timer192
Setting the parking climate (precon-ditioning) timer192
Starting and stopping preconditioning194
Preconditioning symbols and messages195
Air quality196
Clean Zone Interior Package (CZIP)*197
Interior Air Quality System (IAQS)*197
Passenger compartment air filter198
Automatic climate control198
Climate system controls199
Climate system controls in the centerdisplay199
Rear climate system controls on thetunnel console201
Setting the blower speed201
Setting the temperature203
Turning recirculation on and off205
Page 190 of 584
CLIMATE
188
Climate control system
The vehicle is equipped with Electronic ClimateControl (ECC) that cools, heats, dehumidifiesand filters the air in the passenger compartment.
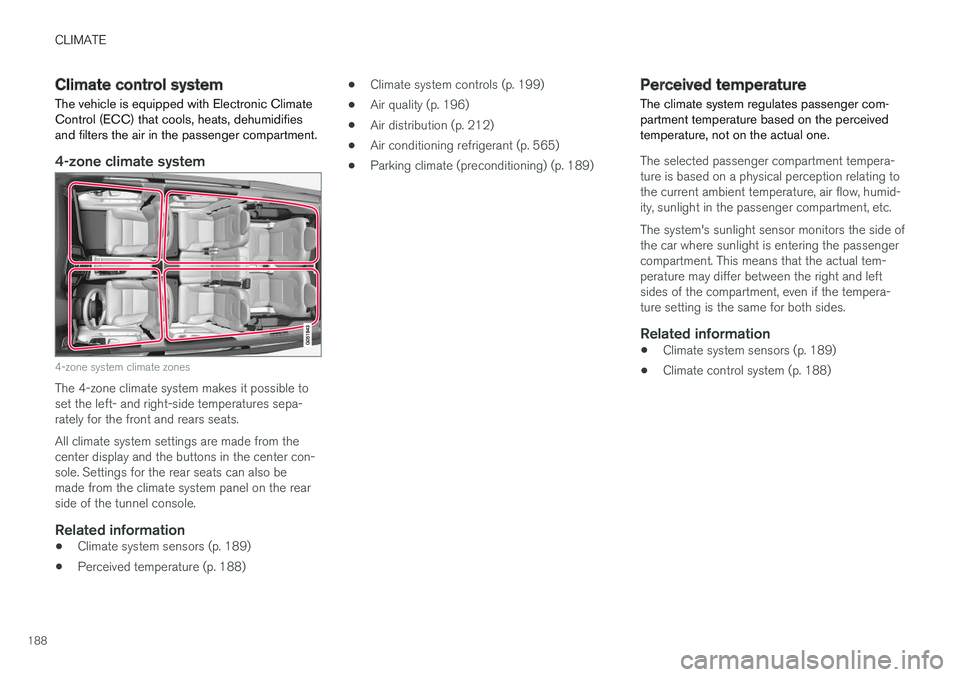
4-zone climate system
4-zone system climate zones
The 4-zone climate system makes it possible toset the left- and right-side temperatures sepa-rately for the front and rears seats.
All climate system settings are made from thecenter display and the buttons in the center con-sole. Settings for the rear seats can also bemade from the climate system panel on the rearside of the tunnel console.
Related information
•Climate system sensors (p. 189)
•Perceived temperature (p. 188)
•Climate system controls (p. 199)
•Air quality (p. 196)
•Air distribution (p. 212)
•Air conditioning refrigerant (p. 565)
•Parking climate (preconditioning) (p. 189)
Perceived temperature
The climate system regulates passenger com-partment temperature based on the perceivedtemperature, not on the actual one.
The selected passenger compartment tempera-ture is based on a physical perception relating tothe current ambient temperature, air flow, humid-ity, sunlight in the passenger compartment, etc.
The system's sunlight sensor monitors the side ofthe car where sunlight is entering the passengercompartment. This means that the actual tem-perature may differ between the right and leftsides of the compartment, even if the tempera-ture setting is the same for both sides.
Related information
•Climate system sensors (p. 189)
•Climate control system (p. 188)
Page 191 of 584
CLIMATE
}}
* Option/accessory, for more information, see Introduction.189
Climate system sensors
The climate system's sensors help regulate thepassenger compartment temperature, humiditylevel, etc.
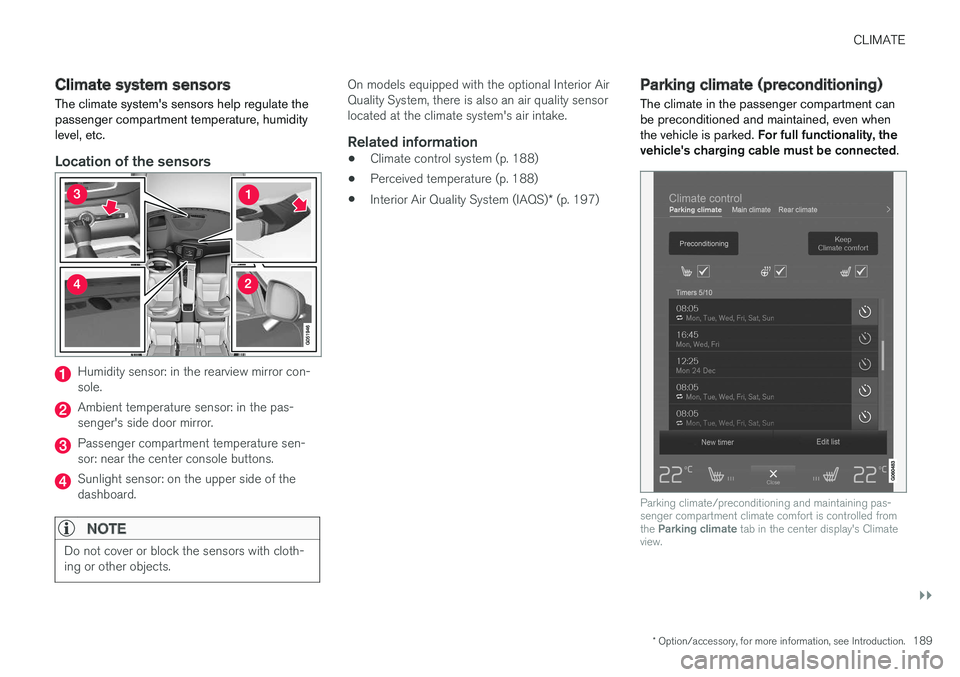
Location of the sensors
Humidity sensor: in the rearview mirror con-sole.
Ambient temperature sensor: in the pas-senger's side door mirror.
Passenger compartment temperature sen-sor: near the center console buttons.
Sunlight sensor: on the upper side of thedashboard.
NOTE
Do not cover or block the sensors with cloth-ing or other objects.
On models equipped with the optional Interior AirQuality System, there is also an air quality sensorlocated at the climate system's air intake.
Related information
•Climate control system (p. 188)
•Perceived temperature (p. 188)
•Interior Air Quality System (IAQS)* (p. 197)
Parking climate (preconditioning)
The climate in the passenger compartment canbe preconditioned and maintained, even whenthe vehicle is parked. For full functionality, thevehicle's charging cable must be connected.
Parking climate/preconditioning and maintaining pas-senger compartment climate comfort is controlled fromthe Parking climate tab in the center display's Climateview.
Page 337 of 584
DRIVER SUPPORT
}}}}
335
Camera and radar sensor's field of vision
The camera and radar sensor have limited fieldsof vision. In some situations they may detect avehicle, large animal, pedestrian or cyclist laterthan expected or not detect them at all.
Other vehicles that are dirty may be detectedlater than others and in dark conditions, motorcy-cles may be detected late or not at all.
If a text message is displayed in the instrumentpanel indicates that the camera or radar sensorare blocked, it may be difficult for City Safety todetect a vehicle, pedestrian or cyclist and thesystem's functionality may be reduced.
WARNING
Text messages may not be displayed in all sit-uations in which the camera and/or radarsensor are blocked. It is therefore essential tokeep the windshield in front the camera/radarsensor clean and free from snow, ice, etc.
Camera and radar sensor components shouldonly be serviced or replaced by a trained andqualified Volvo service technician.
Action by the driver
Backing up
City Safety is temporarily deactivated while thevehicle is backing up.
Low speed
City Safety is not activated at very low speeds(under approx. 3 mph (4 km/h). This means that
the system will not be triggered if your vehicleapproaches a vehicle ahead at very low speed,such as when parking.
Active driver
Action by the driver always has priority. For thisreason, City Safety may not react or react laterthan expected in situations in which the driver isactively operating the vehicle, even if a collision isimminent. This is also done to help eliminateexcessive warnings.
Other limitations
City Safety uses the vehicle's camera and radarsensor, which have certain general limitations.See the articles "Camera limitations" and "Radarsensor limitations" for additional information.
WARNING
•Warnings and braking may be delayed ornot occur at all if traffic, weather or otherconditions prevent the camera and/orradar sensor from detecting pedestrians,cyclists, large animals or other vehiclescorrectly.
•Other vehicles can only be detected indarkness if their headlights and taillightsare clearly visible.
•The sensors have a limited range forpedestrians and cyclists. The systemfunctions best at relative speeds up to30 mph (50 km/h). For stationary orslow-moving vehicles, the system func-tions best at speeds up to approx.43 mph (70 km/h).
•If there is a risk of colliding with a largeanimal, City Safety can reduce the vehi-cle's speed by up to 9 mph (15 km/h).Warnings and braking are most effectiveat speeds above 43 mph (70 km/h) andless effective at lower speeds.
WARNING
•Warnings for stationary or slow-movingvehicles and large animals may be impe-ded by darkness or poor visibility.
•Warnings and braking for pedestrians andcyclists will not be provided at speedsabove approx. 43 mph (70 km/h).
Page 343 of 584

DRIVER SUPPORT
}}
* Option/accessory, for more information, see Introduction.341
Blind Spot Information (BLIS)*limitations
Blind Spot Information functionality may bereduced in certain situations.
•Dirt, ice and snow on the sensors mayreduce functionality and prevent the systemfrom providing warnings.
•Do not attach any objects, tape, decals, etc.,on the surface of the sensors.
•BLIS is deactivated if a trailer is attached tothe vehicle's electrical system.
Maintenance
The BLIS/CTA6 sensors are located on theinside of the rear fenders/bumper.
Keep the highlighted area clean (on both sides of thevehicle)
For the system to function optimally, the areaover and around the sensors must be kept clean.
CAUTION
Repairs to the BLIS/CTA systems and/orrepainting the rear bumper should only bedone by a trained and qualified Volvo servicetechnician.
Related information
•Blind Spot Information (BLIS)* On/Off(p. 340)
•Blind Spot Information (BLIS)* (p. 339)
•Cross Traffic Alert (CTA)* (p. 341)
Cross Traffic Alert (CTA)*
Cross Traffic Alert (CTA) is a supplementary partof Blind Spot Information and is intended todetect vehicles crossing behind your vehiclewhile you are backing up.
When does Cross Traffic Alert function
Principle for CTA
CTA supplements BLIS by warning the driver ofcrossing traffic behind your vehicle, for example,when backing out of a parking space.
It is primarily designed to detect another vehiclebut in certain cases may also detect pedestriansor smaller objects such as bicycles.
CTA is only activated when the vehicle is rollingrearward or backing up and is activated automati-cally when the gear selector is put in reverse.
6Cross Traffic Alert*
Page 345 of 584

DRIVER SUPPORT
}}
* Option/accessory, for more information, see Introduction.343
Cross Traffic Alert (CTA)* limitations
CTA functionality may be reduced in certain sit-uations.
Limitations
CTA has limitations in certain situations, forexample, the CTA sensors cannot "see" throughother parked vehicles or obstructions.
The following are several examples where CTA's"field of vision" may initially be limited andapproaching vehicles cannot be detected untilthey are too close:
The vehicle is pulled far into a parking space
In angled parking spaces, CTA may be "blind" on oneside
CTA's blind area
CTA's "field of vision"
However, as you back your vehicle out of a park-ing space, CTA's "field of vision" expands.
Examples of other limitations include:
•Dirt, ice or snow obstructing the sensors mayreduce the system's function or make itimpossible to detect other vehicles orobjects.
•CTA is deactivated if a trailer's wiring is con-nected to the vehicle's electrical system.
Maintenance
The CTA sensors are located on the inside of therear fenders/bumper.
Keep the highlighted area clean (on both sides of thevehicle)
For the system to function optimally, the areaover and around the sensors must be kept clean.
Do not attach any objects, tape, decals, etc., onthe surface of the sensors.
CAUTION
Repairs to the BLIS/CTA systems and/orrepainting the rear bumper should only bedone by a trained and qualified Volvo servicetechnician.
Related information
•Cross Traffic Alert (CTA)* (p. 341)
•Activating/deactivating Cross Traffic Alert(CTA)* (p. 342)
Page 360 of 584

DRIVER SUPPORT
* Option/accessory, for more information, see Introduction.358
Park Assist*
The Park Assist system is designed to assist youwhen driving into parking spaces, garages, etc.An audible signal and symbols in the instrumentpanel and center display indicate the distance tothe object.
Display view showing object zones and sensor sectors
The center display shows an overview of the vehi-cle in relation to objects that have been detected.
The highlighted sector shows which of the sen-sors has detected the object. The closer thehighlighted sector is to the vehicle symbol, thecloser the actual object is to your vehicle.
The Park Assist system uses an intermittent tonethat pulses faster as you come closer to anobject. Sound from the infotainment system willbe temporarily turned down.
The audible signals for objects in front of and tothe sides are active while the vehicle is movingand will stop after the vehicle has been stoppedfor approx. 2 seconds. The audible signals forobjects behind the vehicle are active even whenthe vehicle has stopped moving.
The audible signal becomes constant when youare within approximately 1 ft (30 cm) of an objectand the highlighted sensor field is filled in.
While an audible signal is being given, its volumelevel can be raised/lowered using the >II controlin the center console or can be adjusted in thecenter displays Top view under Settings.
NOTE
Audible alerts will only be provided for objectsthat are directly in the vehicle's path.
WARNING
Park Assist is an information system, NOT asafety system. This system is designed to bea supplementary aid when parking the vehicle.It is not, however, intended to replace the driv-er's attention and judgement.
Rear park assist
The system's rear sensors are activated automat-ically when the engine is started and are active ifthe vehicle rolls rearward with the gear selectorin N or if R has been selected.
The distance monitored behind the vehicle isapproximately 5 ft (1.5 m). The audible signalcomes from the rear speakers.
The rear sensors will be deactivated automaticallywhen towing a trailer if Volvo genuine trailer wir-ing is used. If a non-Volvo trailer hitch is beingused, it may be necessary to switch off the sys-tem manually.
Page 361 of 584
DRIVER SUPPORT
* Option/accessory, for more information, see Introduction.359
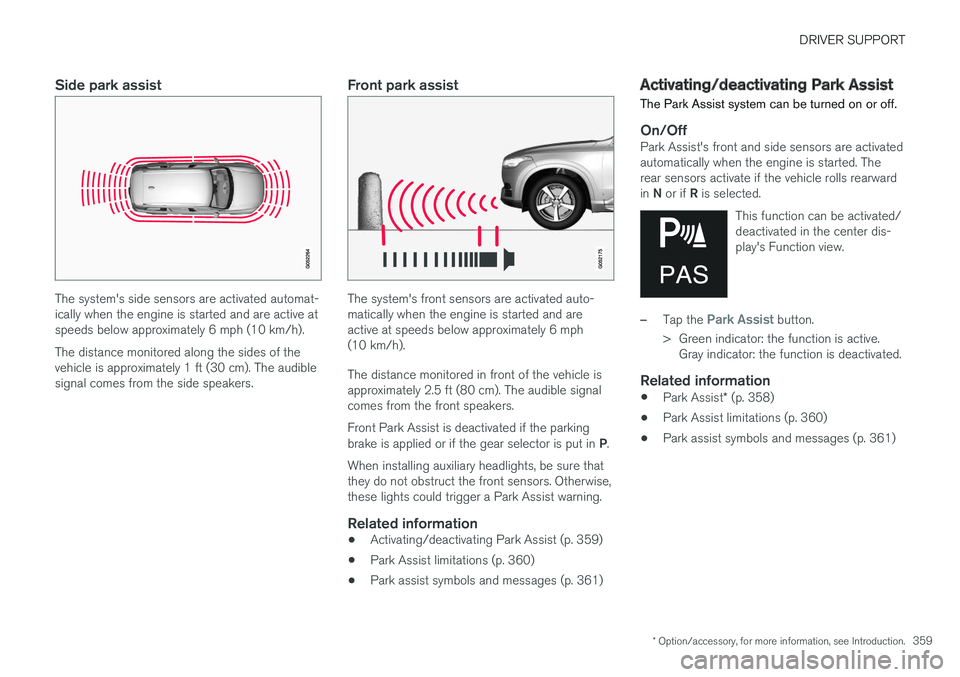
Side park assist
The system's side sensors are activated automat-ically when the engine is started and are active atspeeds below approximately 6 mph (10 km/h).
The distance monitored along the sides of thevehicle is approximately 1 ft (30 cm). The audiblesignal comes from the side speakers.
Front park assist
The system's front sensors are activated auto-matically when the engine is started and areactive at speeds below approximately 6 mph(10 km/h).
The distance monitored in front of the vehicle isapproximately 2.5 ft (80 cm). The audible signalcomes from the front speakers.
Front Park Assist is deactivated if the parkingbrake is applied or if the gear selector is put in P.
When installing auxiliary headlights, be sure thatthey do not obstruct the front sensors. Otherwise,these lights could trigger a Park Assist warning.
Related information
•Activating/deactivating Park Assist (p. 359)
•Park Assist limitations (p. 360)
•Park assist symbols and messages (p. 361)
Activating/deactivating Park Assist
The Park Assist system can be turned on or off.
On/Off
Park Assist's front and side sensors are activatedautomatically when the engine is started. Therear sensors activate if the vehicle rolls rearwardin N or if R is selected.
This function can be activated/deactivated in the center dis-play's Function view.
–Tap the Park Assist button.
>Green indicator: the function is active.Gray indicator: the function is deactivated.
Related information
•Park Assist* (p. 358)
•Park Assist limitations (p. 360)
•Park assist symbols and messages (p. 361)
Page 373 of 584

DRIVER SUPPORT
}}
371
When the vehicle is backing up, PAP will steer itinto the parking space. Do as follows:
1.Check that the area behind the vehicle isclear and put the gear selector in R.
2. Back up slowly without moving the steeringwheel. The vehicle's speed must be belowapproximately 4 mph (7 km/h).
3. Keep an eye on the instrument panel and beprepared to stop the vehicle when you areinstructed by PAP to do so.
NOTE
•Release the wheel while PAP is steeringthe vehicle.
•The steering wheel must be able to turnfreely.
•For PAP to function optimally, wait untilthe steering wheel is no longer turningbefore beginning the next phase of theparking procedure.
3: Adjusting the vehicle's position
Parallel
Perpendicular
After the vehicle has backed into the parkingspace, its position in the space has to be
adjusted by driving slightly forward and backingup.
1.Put the gear selector in D, wait until thesteering wheel has turned and drive forwardslowly.
2.Stop the vehicle when you are instructed byPAP to do so.
3.Put the gear selector in R, back up slowlyand stop when you are instructed by PAP todo so.
When the parking procedure is finished (this willbe indicated by a text message and a graphicimage), PAP switches off automatically. If neces-sary, the driver may need to make minor adjust-ments to ensure that the vehicle is parked cor-rectly.
CAUTION
The warning distance is shorter when PAP isusing the sensors than when Park Assist isusing them.
Leaving a parking space
This function can only be usedfor a vehicle that has been par-allel parked and is activated inthe center display's Functionview.
Page 375 of 584

DRIVER SUPPORT
* Option/accessory, for more information, see Introduction.373
•Heavy rain or snow may inhibit PAP'scapacity to correctly measure a parkingspace.
•Do not use PAP when using snow chainsand/or a temporary spare tire.
•Do not use PAP if there are any objects pro-truding from the vehicle.
WARNING
•The front end of your vehicle may turn outtoward oncoming traffic during the park-ing procedure.
•Objects located above the parking sen-sors' field of vision are not included whenPAP measures a parking space. For thisreason, PAP may turn into the parkingspace too soon. Avoid parking spaces ofthis type.
•The driver is always responsible for deter-mining if PAP has selected a suitableparking space.
Maintenance
Location of the PAP sensors
In order for PAP to function correctly, these sen-sors must be cleaned regularly with water and asuitable car washing detergent.
Related information
•Park Assist Pilot (PAP)* (p. 368)
•Park Assist Pilot (PAP)* limitations (p. 372)
•Park Assist Pilot (PAP)* symbols and mes-sages (p. 374)