height VOLVO XC90 TWIN ENGINE HYBRID 2017 Owners Manual
[x] Cancel search | Manufacturer: VOLVO, Model Year: 2017, Model line: XC90 TWIN ENGINE HYBRID, Model: VOLVO XC90 TWIN ENGINE HYBRID 2017Pages: 584, PDF Size: 14.2 MB
Page 68 of 584
||
SAFETY
* Option/accessory, for more information, see Introduction.66
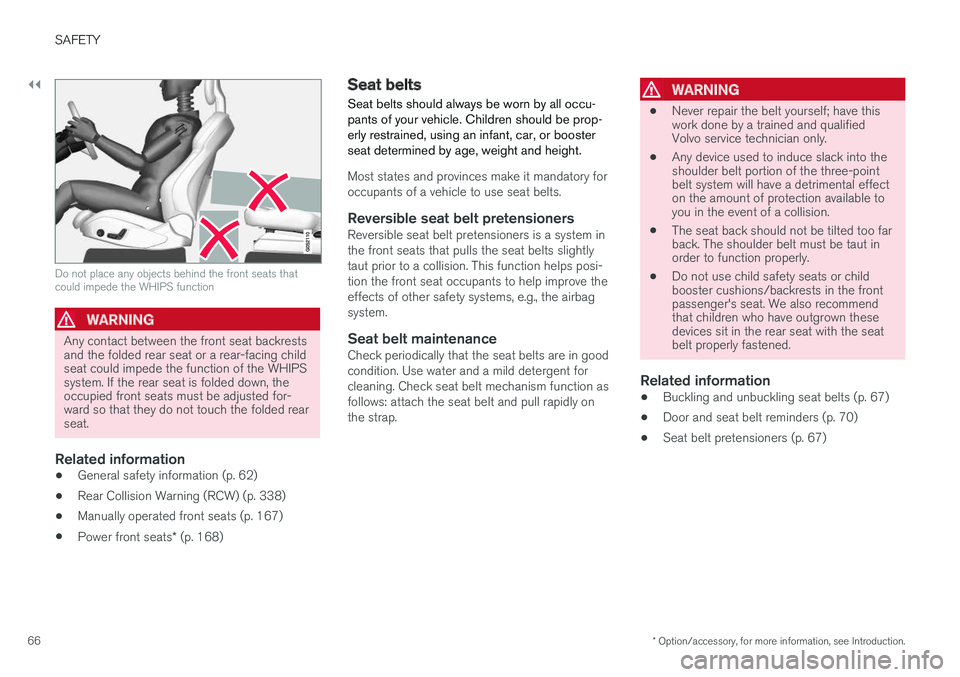
Do not place any objects behind the front seats thatcould impede the WHIPS function
WARNING
Any contact between the front seat backrestsand the folded rear seat or a rear-facing childseat could impede the function of the WHIPSsystem. If the rear seat is folded down, theoccupied front seats must be adjusted for-ward so that they do not touch the folded rearseat.
Related information
•General safety information (p. 62)
•Rear Collision Warning (RCW) (p. 338)
•Manually operated front seats (p. 167)
•Power front seats* (p. 168)
Seat belts
Seat belts should always be worn by all occu-pants of your vehicle. Children should be prop-erly restrained, using an infant, car, or boosterseat determined by age, weight and height.
Most states and provinces make it mandatory foroccupants of a vehicle to use seat belts.
Reversible seat belt pretensioners
Reversible seat belt pretensioners is a system inthe front seats that pulls the seat belts slightlytaut prior to a collision. This function helps posi-tion the front seat occupants to help improve theeffects of other safety systems, e.g., the airbagsystem.
Seat belt maintenance
Check periodically that the seat belts are in goodcondition. Use water and a mild detergent forcleaning. Check seat belt mechanism function asfollows: attach the seat belt and pull rapidly onthe strap.
WARNING
•Never repair the belt yourself; have thiswork done by a trained and qualifiedVolvo service technician only.
•Any device used to induce slack into theshoulder belt portion of the three-pointbelt system will have a detrimental effecton the amount of protection available toyou in the event of a collision.
•The seat back should not be tilted too farback. The shoulder belt must be taut inorder to function properly.
•Do not use child safety seats or childbooster cushions/backrests in the frontpassenger's seat. We also recommendthat children who have outgrown thesedevices sit in the rear seat with the seatbelt properly fastened.
Related information
•Buckling and unbuckling seat belts (p. 67)
•Door and seat belt reminders (p. 70)
•Seat belt pretensioners (p. 67)
Page 70 of 584
||
SAFETY
68
Buckling a seat belt
1. Pull the belt out slowly. It should not be twis-ted or turned.
Be sure that the seat belt in the center posi-tion of the second row of seats is correctlypositioned in the seat belt guide.
NOTE
Each seat belt is equipped with a seat beltretractor that will lock up in the following sit-uations:
•if the belt is pulled out rapidly
•during braking and acceleration
•if the vehicle is leaning excessively
•when driving in turns
•if the Automatic Locking Retractor/Emer-gency Locking Retractor (ALR/ELR) isactivated (each seat belt (except for thedriver's belt) is equipped with theALR/ELR function, which is designed tohelp keep the seat belt taut. ALR/ELRactivates if the seat belt is pulled out as faras possible. If this is done, a sound fromthe seat belt retractor will be audible,which is normal, and the seat belt will bepulled taut and locked in place. This func-tion is automatically disabled when theseat belt is unbuckled and fully retracted).
2. Insert the latch plate into the receptacle. Theseat belt retractor is normally "unlocked" andyou can move freely, provided that the shoul-der belt is not pulled out too far.
>A distinct click will be audible.
WARNING
The seat belt latch plate should only beinserted into its intended receptacle. Insertingit into one of the other receptacles may pre-vent it from functioning properly.
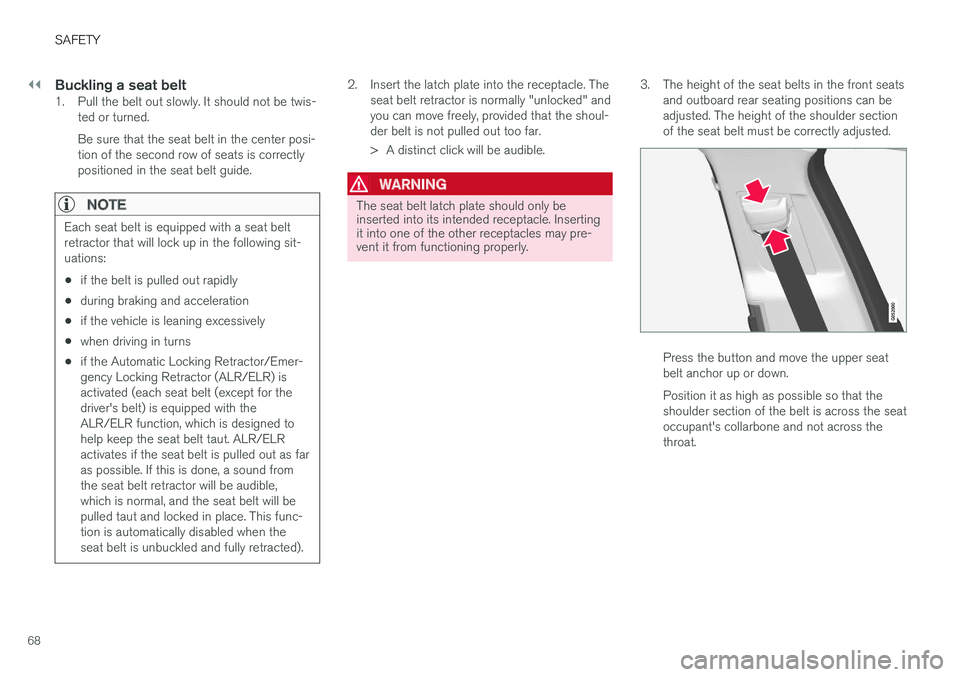
3.The height of the seat belts in the front seatsand outboard rear seating positions can beadjusted. The height of the shoulder sectionof the seat belt must be correctly adjusted.
Press the button and move the upper seatbelt anchor up or down.
Position it as high as possible so that theshoulder section of the belt is across the seatoccupant's collarbone and not across thethroat.
Page 75 of 584
SAFETY
}}
73
NOTE
•Deployment of front airbags occurs onlyone time during an accident. In a collisionwhere deployment occurs, the airbagsand seat belt pretensioners activate.Some noise occurs and a small amountof powder is released. The release of thepowder may appear as smoke-like matter.This is a normal characteristic and doesnot indicate fire.
•Volvo's front airbags use special sensorsthat are integrated with the front seatbuckles. The point at which the airbagdeploys is determined by whether or notthe seat belt is being used, as well as theseverity of the collision.
•Collisions can occur where only one ofthe airbags deploys. If the impact is lesssevere, but severe enough to present aclear injury risk, the airbags are triggeredat partial capacity. If the impact is moresevere, the airbags are triggered at fullcapacity.
WARNING
•Do not use child safety seats or childbooster cushions/backrests in the frontpassenger's seat. We also recommendthat occupants under 4 feet 7 inches(140 cm) in height who have outgrownthese devices sit in the rear seat with theseat belt fastened. See also the Occu-pant Weight Sensor information,.
•Never drive with the airbags deployed.The fact that they hang out can impair thesteering of your vehicle. Other safety sys-tems can also be damaged.
•The smoke and dust formed when theairbags are deployed can cause skin andeye irritation in the event of prolongedexposure.
Should you have questions about any componentin the SRS system, please contact a trained andqualified Volvo service technician or Volvo cus-tomer support:
In the USA
Volvo Car USA, LLC
Customer Care Center
1 Volvo Drive
P.O. Box 914
Rockleigh, New Jersey 07647
1-800-458-1552
www.volvocars.com/us
In Canada
Volvo Cars of Canada Corp.
National Customer Service
9130 Leslie Street, Suite 101
Richmond Hill, Ontario L4B 0B9
1-800-663-8255
www.volvocars.com/ca
Airbag decals
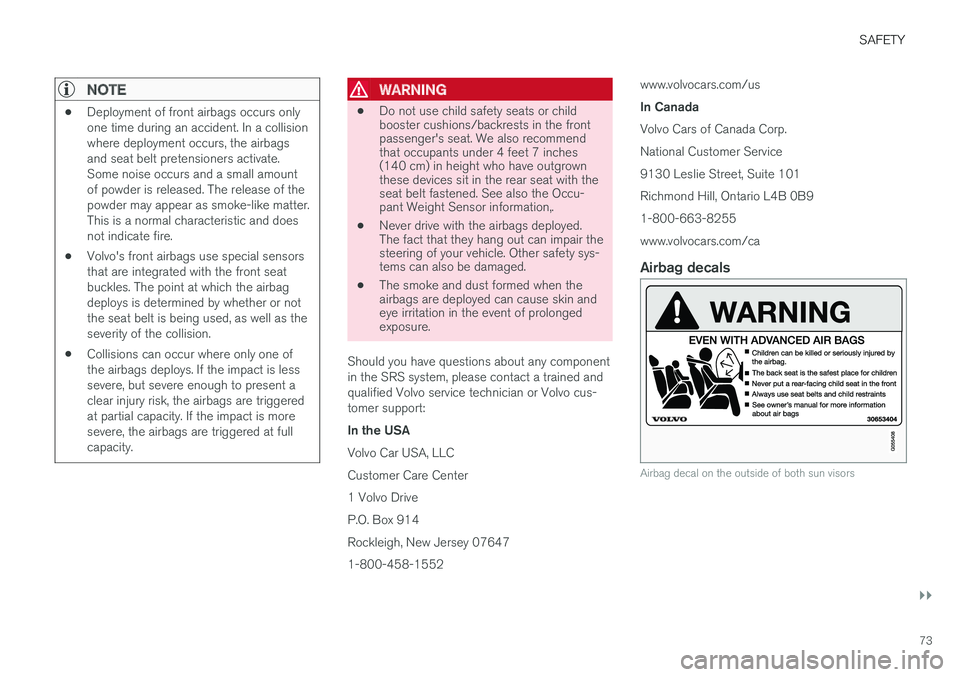
Airbag decal on the outside of both sun visors
Page 83 of 584
SAFETY
}}
81
Child safety
Children should always be seated safely whentraveling in the vehicle.
General information
Volvo recommends the proper use of restraintsystems for all occupants including children.Remember that, regardless of age and size, achild should always be properly restrained in avehicle.
Your vehicle is also equipped with ISOFIX/LATCH attachments, which make it more conven-ient to install child seats.
Some restraint systems for children are designedto be secured in the vehicle by lap belts or thelap portion of a lap-shoulder belt. Such childrestraint systems can help protect children invehicles in the event of an accident only if theyare used properly. However, children could beendangered in a crash if the child restraints arenot properly secured in the vehicle. Failure to fol-low the installation instructions for your childrestraint can result in your child striking the vehi-cle's interior in a sudden stop.
Holding a child in your arms is NOT a suitablesubstitute for a child restraint system. In an acci-dent, a child held in a person's arms can becrushed between the vehicle's interior and anunrestrained person. The child could also beinjured by striking the interior, or by being ejectedfrom the vehicle during a sudden maneuver or
impact. The same can also happen if the infant orchild rides unrestrained on the seat. Other occu-pants should also be properly restrained to helpreduce the chance of injuring or increasing theinjury of a child.
All states and provinces have legislation govern-ing how and where children should be carried ina vehicle. Find out the regulations existing in yourstate or province. Recent accident statistics haveshown that children are safer in rear seatingpositions than front seating positions when prop-erly restrained. A child restraint system can helpprotect a child in a vehicle. Here's what to lookfor when selecting a child restraint system:
It should have a label certifying that it meetsapplicable Federal Motor Vehicle Safety Stand-ards (FMVSS 213) – or in Canada, CMVSS 213.
Make sure the child restraint system is approvedfor the child's height, weight and development –the label required by the standard or regulation,or instructions for infant restraints, typically pro-vide this information.
In using any child restraint system, we urge youto carefully look over the instructions that areprovided with the restraint. Be sure you under-stand them and can use the device properly andsafely in this vehicle. A misused child restraintsystem can result in increased injuries for boththe infant or child and other occupants in thevehicle.
When a child has outgrown the child safety seat,you should use the rear seat with the standardseat belt fastened. The best way to help protectthe child here is to place the child on a cushionso that the seat belt is properly located on thehips. Legislation in your state or province maymandate the use of a child seat or cushion incombination with the seat belt, depending on thechild's age and/or size. Please check local regu-lations.
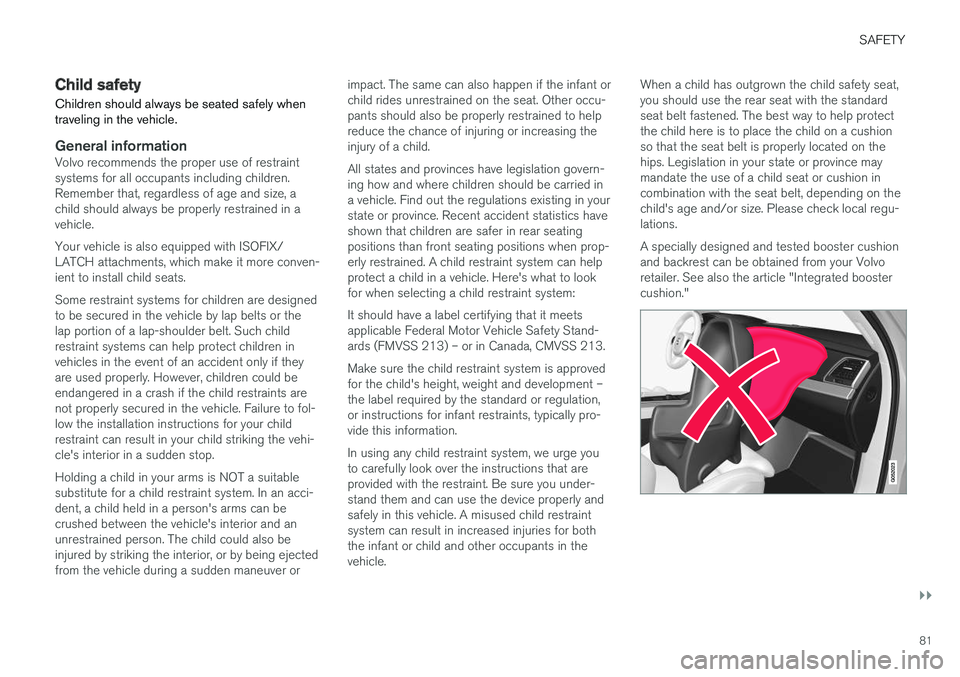
A specially designed and tested booster cushionand backrest can be obtained from your Volvoretailer. See also the article "Integrated boostercushion."
Page 84 of 584
||
SAFETY
* Option/accessory, for more information, see Introduction.82
WARNING
•Do not use child safety seats or childbooster cushions/backrests in the frontpassenger's seat. We also recommendthat children under 4 feet 7 inches(140 cm) in height who have outgrownthese devices sit in the rear seat with theseat belt fastened.
•Sedan models: Keep vehicle doors andtrunk locked and keep remote controlsout of a child
Page 95 of 584
SAFETY
}}
* Option/accessory, for more information, see Introduction.93
correctly fitted child restraints. Under nocircumstances are they to be used foradult seat belts or harnesses. The ancho-rages are not able to withstand excessiveforces on them in the event of collision iffull harness seat belts or adult seat beltsare installed to them. An adult who uses abelt anchored in a child restraint anchor-age runs a great risk of suffering severeinjuries should a collision occur.
•Do not install rear speakers that requirethe removal of the top tether anchors orinterfere with the proper use of the toptether strap.
Related information
•Child safety (p. 81)
•Child restraints (p. 83)
Integrated booster cushion*
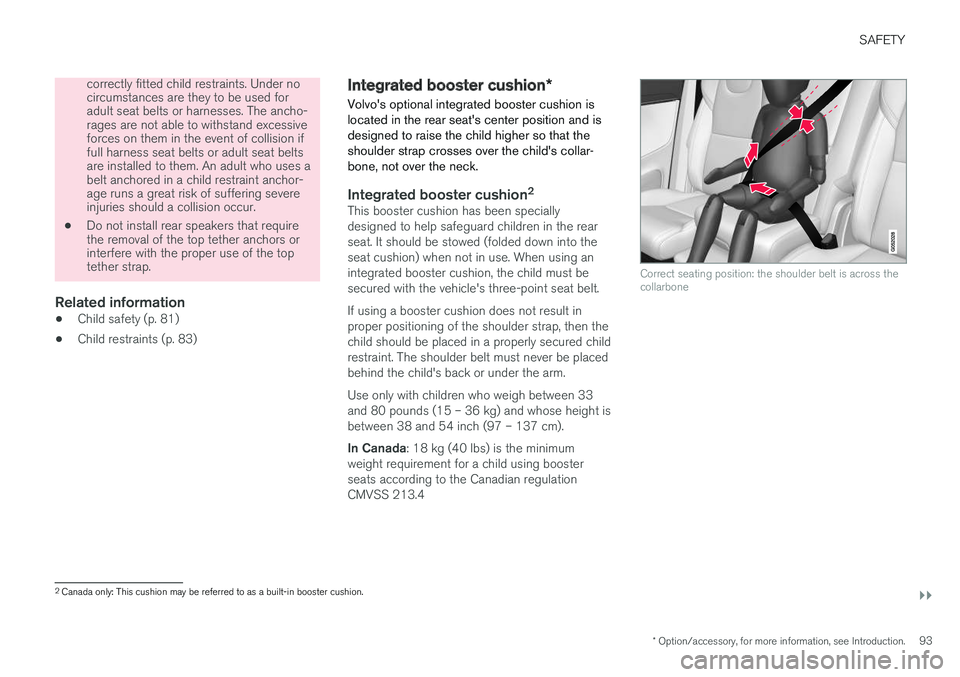
Volvo's optional integrated booster cushion islocated in the rear seat's center position and isdesigned to raise the child higher so that theshoulder strap crosses over the child's collar-bone, not over the neck.
Integrated booster cushion 2
This booster cushion has been speciallydesigned to help safeguard children in the rearseat. It should be stowed (folded down into theseat cushion) when not in use. When using anintegrated booster cushion, the child must besecured with the vehicle's three-point seat belt.
If using a booster cushion does not result inproper positioning of the shoulder strap, then thechild should be placed in a properly secured childrestraint. The shoulder belt must never be placedbehind the child's back or under the arm.
Use only with children who weigh between 33and 80 pounds (15 – 36 kg) and whose height isbetween 38 and 54 inch (97 – 137 cm).
In Canada: 18 kg (40 lbs) is the minimumweight requirement for a child using boosterseats according to the Canadian regulationCMVSS 213.4
Correct seating position: the shoulder belt is across thecollarbone
2
Canada only: This cushion may be referred to as a built-in booster cushion.
Page 125 of 584
INSTRUMENTS AND CONTROLS
}}
123
NOTE
The driver's ability to see information in theHUD may be impeded by:
•the use of polarizing sunglasses
•the use of an aftermarket or non-Volvoreplacement windshield
•not sitting in the center of the driver'sseat
•objects on the HUD projector glass onthe dashboard
•certain ambient lighting conditions
•certain types of vision problems, whichmay also result in headaches or eyestrain.
•Activating/deactivating and settings forHUD are only possible when an image isprojected on the windshield. The enginemust be running.
Activating/deactivating HUD
HUD can be activated in two ways in the centerdisplay:
Via Function view
Tap the Head-up display but-ton.
Via settings
1.Tap Settings in Top view.
2.Tap My CarDisplays.
3.Select/deselect Head-Up Display.
This selection can be stored as a personal set-ting in a driver profile.
Selecting display alternatives
1.Tap Settings in Top view.
2.Tap My CarDisplaysHead-UpDisplay Options.
Tap Go to the center display's Settings viewand select Driver Display & Head-upDisplay.
3.Select : Show Navigation In Head-UpDisplay, Road Sign Information In Head-Up Display, Show Driver Support InHead-Up Display or Show Phone InHead-Up Display.
This selection can be stored as a personal set-ting in a driver profile.
Adjusting HUD brightness and height
position
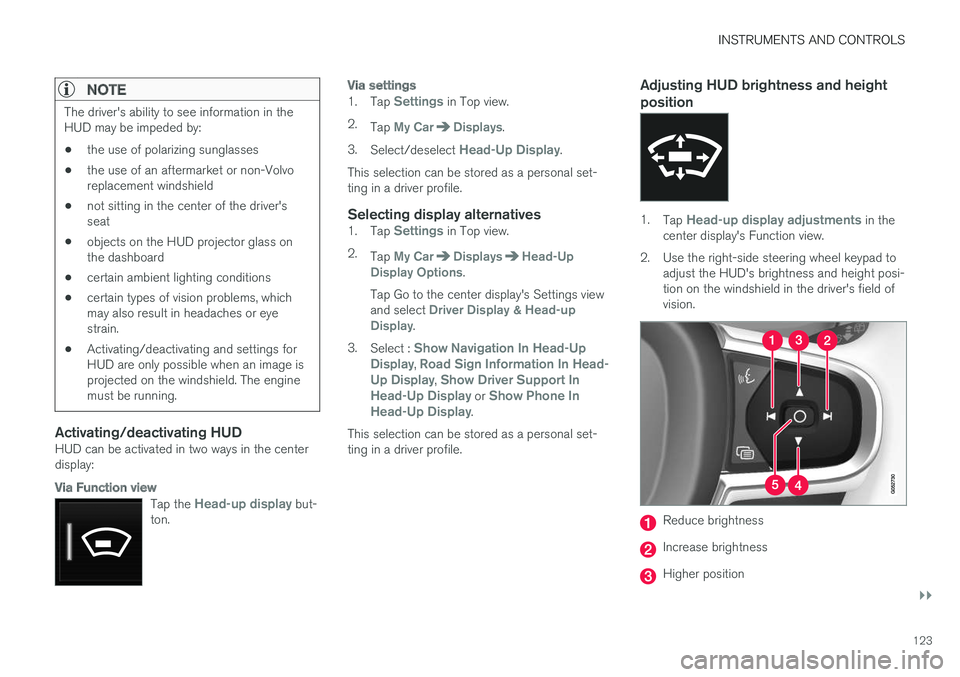
1.Tap Head-up display adjustments in thecenter display's Function view.
2.Use the right-side steering wheel keypad toadjust the HUD's brightness and height posi-tion on the windshield in the driver's field ofvision.
Reduce brightness
Increase brightness
Higher position
Page 168 of 584
INSTRUMENTS AND CONTROLS
* Option/accessory, for more information, see Introduction.166
Adjusting the steering wheel
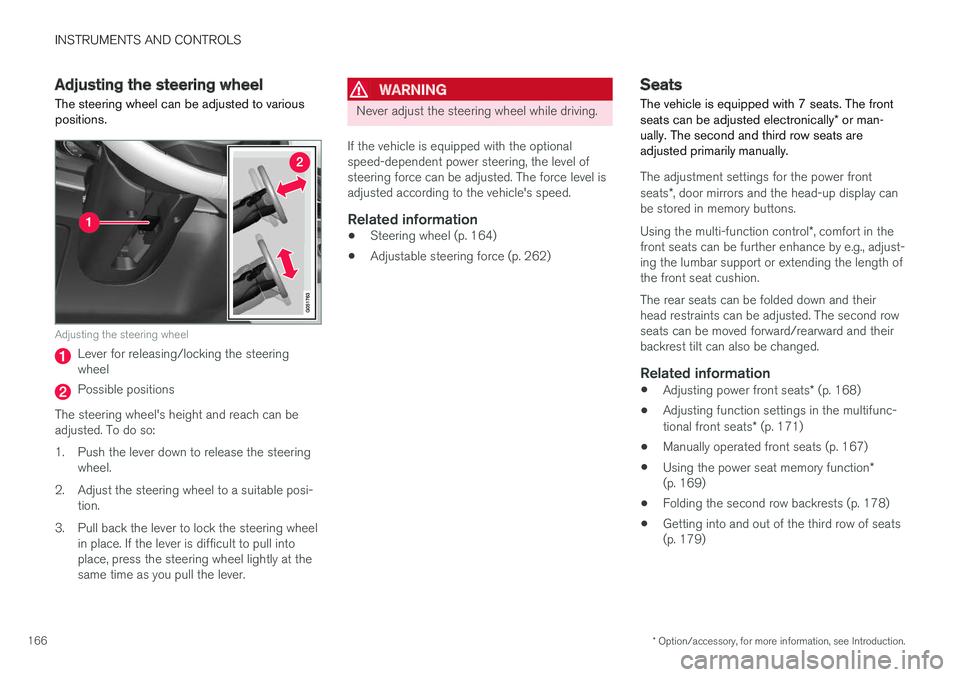
The steering wheel can be adjusted to variouspositions.
Adjusting the steering wheel
Lever for releasing/locking the steeringwheel
Possible positions
The steering wheel's height and reach can beadjusted. To do so:
1.Push the lever down to release the steeringwheel.
2. Adjust the steering wheel to a suitable posi-tion.
3. Pull back the lever to lock the steering wheelin place. If the lever is difficult to pull intoplace, press the steering wheel lightly at thesame time as you pull the lever.
WARNING
Never adjust the steering wheel while driving.
If the vehicle is equipped with the optionalspeed-dependent power steering, the level ofsteering force can be adjusted. The force level isadjusted according to the vehicle's speed.
Related information
•Steering wheel (p. 164)
•Adjustable steering force (p. 262)
Seats
The vehicle is equipped with 7 seats. The frontseats can be adjusted electronically* or man-ually. The second and third row seats areadjusted primarily manually.
The adjustment settings for the power frontseats*, door mirrors and the head-up display canbe stored in memory buttons.
Using the multi-function control*, comfort in thefront seats can be further enhance by e.g., adjust-ing the lumbar support or extending the length ofthe front seat cushion.
The rear seats can be folded down and theirhead restraints can be adjusted. The second rowseats can be moved forward/rearward and theirbackrest tilt can also be changed.
Related information
•Adjusting power front seats* (p. 168)
•Adjusting function settings in the multifunc-tional front seats* (p. 171)
•Manually operated front seats (p. 167)
•Using the power seat memory function*(p. 169)
•Folding the second row backrests (p. 178)
•Getting into and out of the third row of seats(p. 179)
Page 177 of 584
INSTRUMENTS AND CONTROLS
}}
* Option/accessory, for more information, see Introduction.175
Rear seats
Your vehicle has three rows of seats. The sec-ond row of seats has three individual seatingpositions and the third row of seats has two indi-vidual seating positions.
Related information
•Adjusting the second row backrest tilt(p. 177)
•Adjusting the second row head restraints(p. 175)
•Folding the second row backrests (p. 178)
•Folding the third row backrests (p. 180)
•Getting into and out of the third row of seats(p. 179)
•Moving the second row seats forward/rear-ward (p. 176)
•Turning seat heating* on and off (p. 210)
Adjusting the second row headrestraints
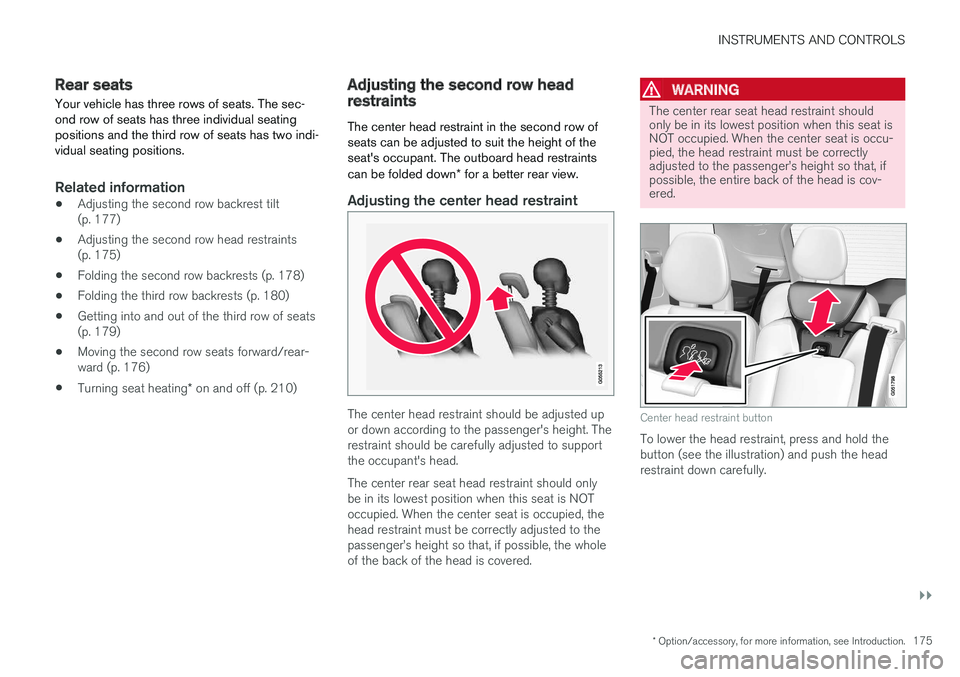
The center head restraint in the second row ofseats can be adjusted to suit the height of theseat's occupant. The outboard head restraintscan be folded down* for a better rear view.
Adjusting the center head restraint
The center head restraint should be adjusted upor down according to the passenger's height. Therestraint should be carefully adjusted to supportthe occupant's head.
The center rear seat head restraint should onlybe in its lowest position when this seat is NOToccupied. When the center seat is occupied, thehead restraint must be correctly adjusted to thepassenger
Page 432 of 584
||
STARTING AND DRIVING
430
Suspension leveling settings
Easy entry
The vehicle can be lowered to entering and exit-ing easier.
In the center display's Top view:
1.Tap Settings.
2.Tap My CarSuspension .
3.Select Easy Entry/Exit Control.
>When the vehicle is parked and theengine is turned off, the level is lowered.Level adjustment will stop if a side door isopened and will resume after a slightdelay when the door has been closed.When the engine is started and the vehi-cle begins to move, the level will be raisedto the height set by the selected drivemode.
If a door has been opened and closed, there maybe a slight delay before the leveling function willresume.
Turning off suspension and leveling control
In certain situations, this function has to beturned off, for example when lifting the vehicle ona jack to help avoid problems created by the dif-ference in levels in the pneumatic suspensionwhen the vehicle is raised.
1.Tap Settings in the center display's Topview.
2.Tap My CarSuspension .
3.Select Deactivate Suspension & LevelingControl.
Loading mode
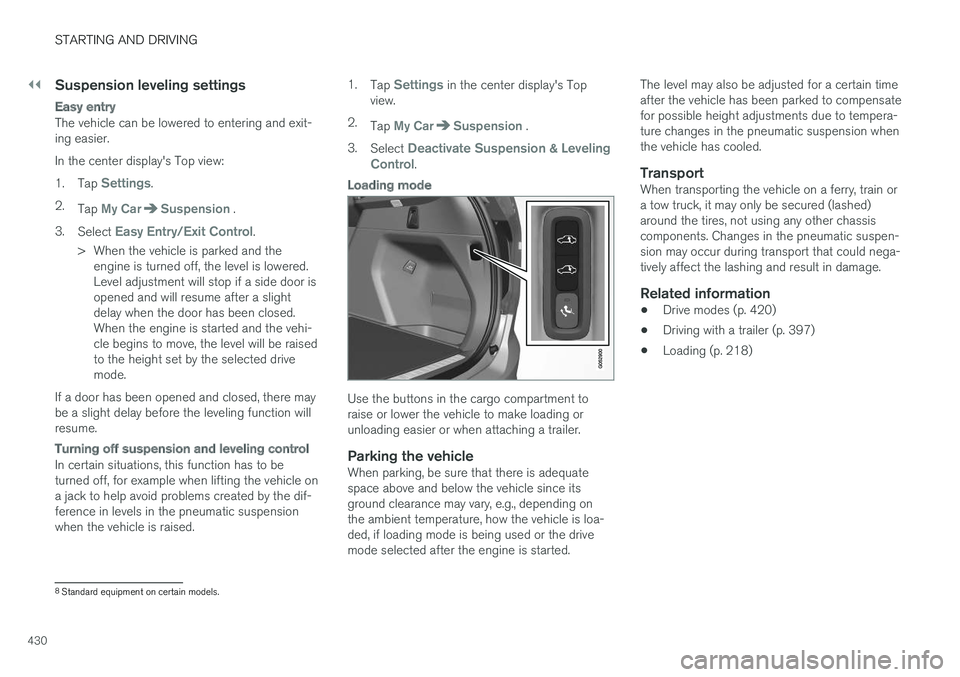
Use the buttons in the cargo compartment toraise or lower the vehicle to make loading orunloading easier or when attaching a trailer.
Parking the vehicle
When parking, be sure that there is adequatespace above and below the vehicle since itsground clearance may vary, e.g., depending onthe ambient temperature, how the vehicle is loa-ded, if loading mode is being used or the drivemode selected after the engine is started.
The level may also be adjusted for a certain timeafter the vehicle has been parked to compensatefor possible height adjustments due to tempera-ture changes in the pneumatic suspension whenthe vehicle has cooled.
Transport
When transporting the vehicle on a ferry, train ora tow truck, it may only be secured (lashed)around the tires, not using any other chassiscomponents. Changes in the pneumatic suspen-sion may occur during transport that could nega-tively affect the lashing and result in damage.
Related information
•Drive modes (p. 420)
•Driving with a trailer (p. 397)
•Loading (p. 218)
8Standard equipment on certain models.