reset YAMAHA AEROX50 2013 Owners Manual
[x] Cancel search | Manufacturer: YAMAHA, Model Year: 2013, Model line: AEROX50, Model: YAMAHA AEROX50 2013Pages: 74, PDF Size: 2.34 MB
Page 20 of 74

INSTRUMENT AND CONTROL FUNCTIONS
3-4
3
EAUM2821
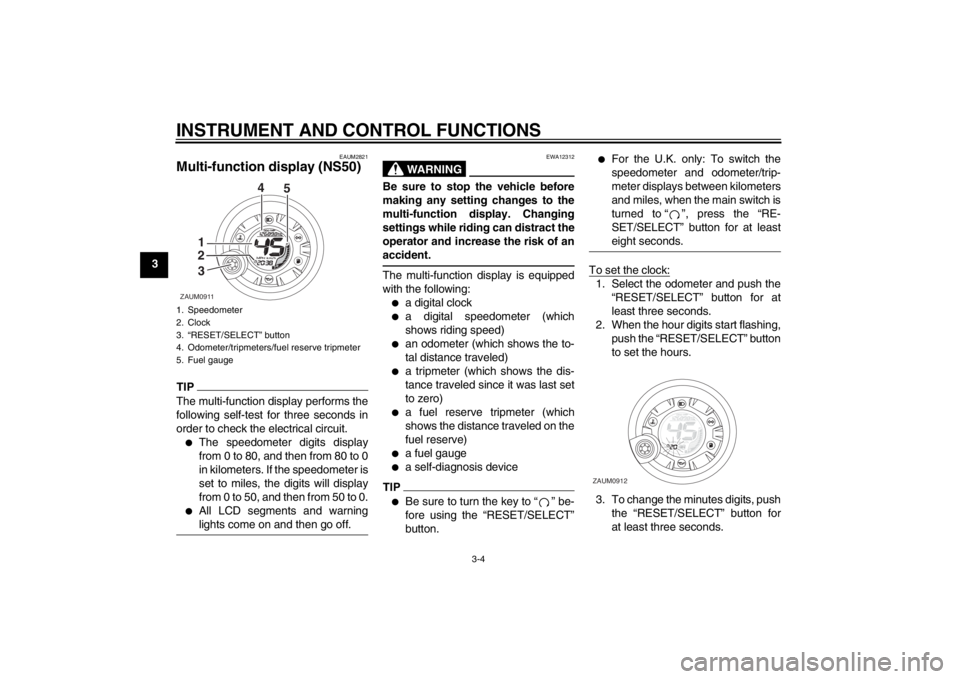
Multi-function display (NS50)TIPThe multi-function display performs the
following self-test for three seconds in
order to check the electrical circuit.â—Ź
The speedometer digits display
from 0 to 80, and then from 80 to 0
in kilometers. If the speedometer is
set to miles, the digits will display
from 0 to 50, and then from 50 to 0.
â—Ź
All LCD segments and warning
lights come on and then go off.
WARNING
EWA12312
Be sure to stop the vehicle before
making any setting changes to the
multi-function display. Changing
settings while riding can distract the
operator and increase the risk of an
accident.The multi-function display is equipped
with the following:â—Ź
a digital clock
â—Ź
a digital speedometer (which
shows riding speed)
â—Ź
an odometer (which shows the to-
tal distance traveled)
â—Ź
a tripmeter (which shows the dis-
tance traveled since it was last set
to zero)
â—Ź
a fuel reserve tripmeter (which
shows the distance traveled on the
fuel reserve)
â—Ź
a fuel gauge
â—Ź
a self-diagnosis device
TIPâ—Ź
Be sure to turn the key to “ ” be-
fore using the “RESET/SELECT”
button.
â—Ź
For the U.K. only: To switch the
speedometer and odometer/trip-
meter displays between kilometers
and miles, when the main switch is
turned to “ ”, press the “RE-
SET/SELECT” button for at least
eight seconds.
To set the clock:1. Select the odometer and push the
“RESET/SELECT” button for at
least three seconds.
2. When the hour digits start flashing,
push the “RESET/SELECT” button
to set the hours.
3. To change the minutes digits, push
the “RESET/SELECT” button for
at least three seconds.
1. Speedometer
2. Clock
3. “RESET/SELECT” button
4. Odometer/tripmeters/fuel reserve tripmeter
5. Fuel gaugeZAUM0911
1
2
34
5
ZAUM0912
U1PHE0E0.book Page 4 Wednesday, August 29, 2012 4:42 PM
Page 21 of 74

INSTRUMENT AND CONTROL FUNCTIONS
3-5
3 4. When the minutes digits start
flashing, push the “RESET/SE-
LECT” button to set the minutes.
5. Push the “RESET/SELECT” but-
ton for at least three seconds to
start the clock.
TIPAfter setting the clock, be sure to push
the “RESET/SELECT” button for at
least three seconds before turning the
key to “ ”, otherwise the clock will not
be set.Odometer and tripmeter modes
Pushing the “RESET/SELECT” button
switches the display between the
odometer mode “ODO” and the tripme-
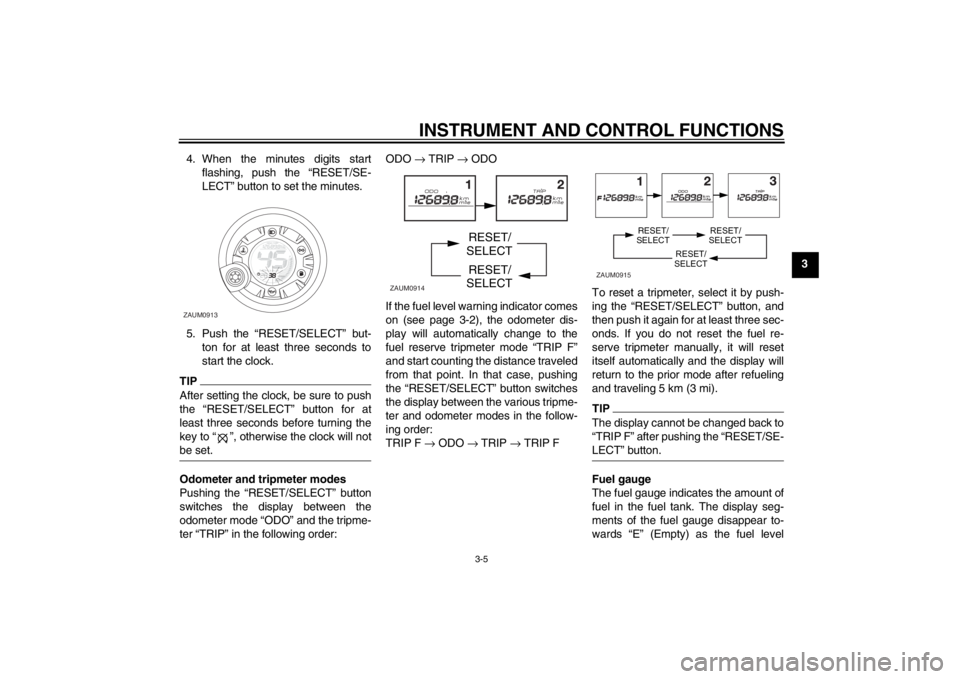
ter “TRIP” in the following order:ODO → TRIP → ODO
If the fuel level warning indicator comes
on (see page 3-2), the odometer dis-
play will automatically change to the
fuel reserve tripmeter mode “TRIP F”
and start counting the distance traveled
from that point. In that case, pushing
the “RESET/SELECT” button switches
the display between the various tripme-
ter and odometer modes in the follow-
ing order:
TRIP F → ODO → TRIP → TRIP FTo reset a tripmeter, select it by push-
ing the “RESET/SELECT” button, and
then push it again for at least three sec-
onds. If you do not reset the fuel re-
serve tripmeter manually, it will reset
itself automatically and the display will
return to the prior mode after refueling
and traveling 5 km (3 mi).
TIPThe display cannot be changed back to
“TRIP F” after pushing the “RESET/SE-
LECT” button.Fuel gauge
The fuel gauge indicates the amount of
fuel in the fuel tank. The display seg-
ments of the fuel gauge disappear to-
wards “E” (Empty) as the fuel level
ZAUM0913
ZAUM0914
RESET/
SELECT
RESET/
SELECT
ZAUM0915
RESET/
SELECT
RESET/
SELECT
RESET/
SELECT
U1PHE0E0.book Page 5 Wednesday, August 29, 2012 4:42 PM