YAMAHA FJR1300AS 2013 Owner's Guide
Manufacturer: YAMAHA, Model Year: 2013, Model line: FJR1300AS, Model: YAMAHA FJR1300AS 2013Pages: 122, PDF Size: 3.34 MB
Page 31 of 122
INSTRUMENT AND CONTROL FUNCTIONS
3-16
3
This display is automatically reset when
the key is turned to “OFF”.
TIPThere are also “TIME–2” and “TIME–3”
elapsed time displays, but they cannot
be set to the information display. See
“Setting mode” on page 3-18 for de-
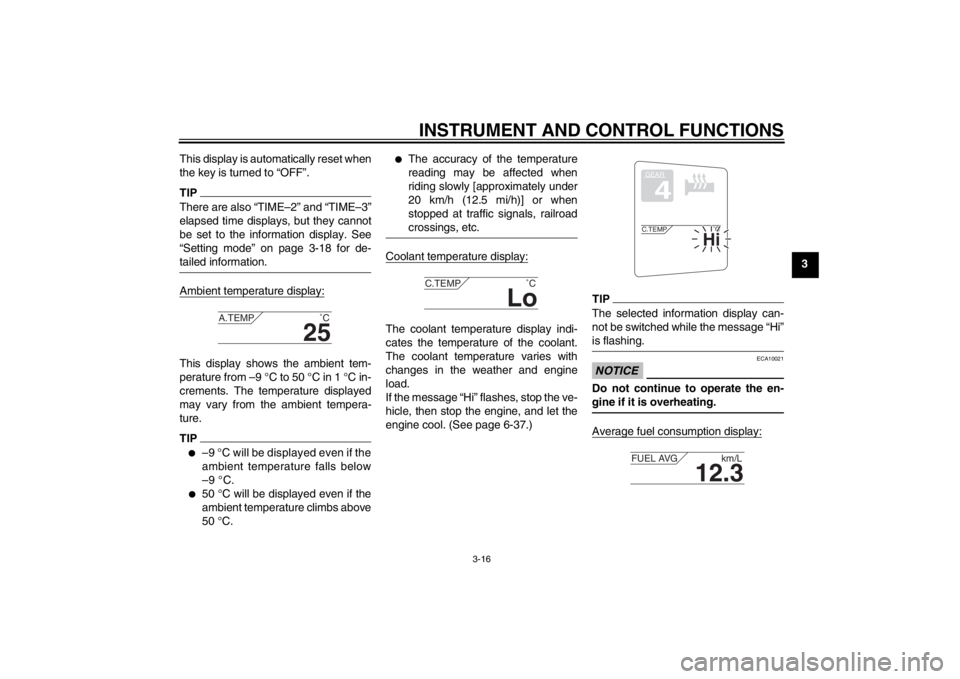
tailed information.Ambient temperature display:This display shows the ambient tem-
perature from –9 °C to 50 °C in 1 °C in-
crements. The temperature displayed
may vary from the ambient tempera-
ture.TIP●
–9 °C will be displayed even if the
ambient temperature falls below
–9 °C.
●
50 °C will be displayed even if the
ambient temperature climbs above
50 °C.
●
The accuracy of the temperature
reading may be affected when
riding slowly [approximately under
20 km/h (12.5 mi/h)] or when
stopped at traffic signals, railroad
crossings, etc.
Coolant temperature display:The coolant temperature display indi-
cates the temperature of the coolant.
The coolant temperature varies with
changes in the weather and engine
load.
If the message “Hi” flashes, stop the ve-
hicle, then stop the engine, and let the
engine cool. (See page 6-37.)
TIPThe selected information display can-
not be switched while the message “Hi”
is flashing.NOTICE
ECA10021
Do not continue to operate the en-
gine if it is overheating.Average fuel consumption display:
25
A.TEMP
˚C
Lo
C.TEMP˚C
GEAR4
Hi
C.TEMP˚C
12.3
FUEL AVG km/L
U1MDE0E0.book Page 16 Friday, February 15, 2013 1:26 PM
Page 32 of 122
INSTRUMENT AND CONTROL FUNCTIONS
3-17
3The average fuel consumption display
modes “km/L”, “L/100km” or “MPG” (for
the UK only) show the average fuel
consumption since the display was last
reset.
●
The “km/L” display shows the av-
erage distance that can be trav-
eled on 1.0 L of fuel.
●
The “L/100km” display shows the
average amount of fuel necessary
to travel 100 km.
●
For the UK only: The “MPG” dis-
play shows the average distance
that can be traveled on 1.0 Imp.gal
of fuel.
To reset the average fuel consumption
display, use the select switch to select
the information display that contains
the average fuel consumption display.
Push the “RESET” button briefly so that
the average fuel consumption display
flashes, and then push the “RESET”
button again for at least 2 seconds
while the display is flashing.
TIPAfter resetting the average fuel con-
sumption display, “_ _._” will be shown
for that display until the vehicle has
traveled 1 km (0.6 mi).NOTICE
ECA15473
If there is a malfunction, “– –.–” will
be continuously displayed. Have a
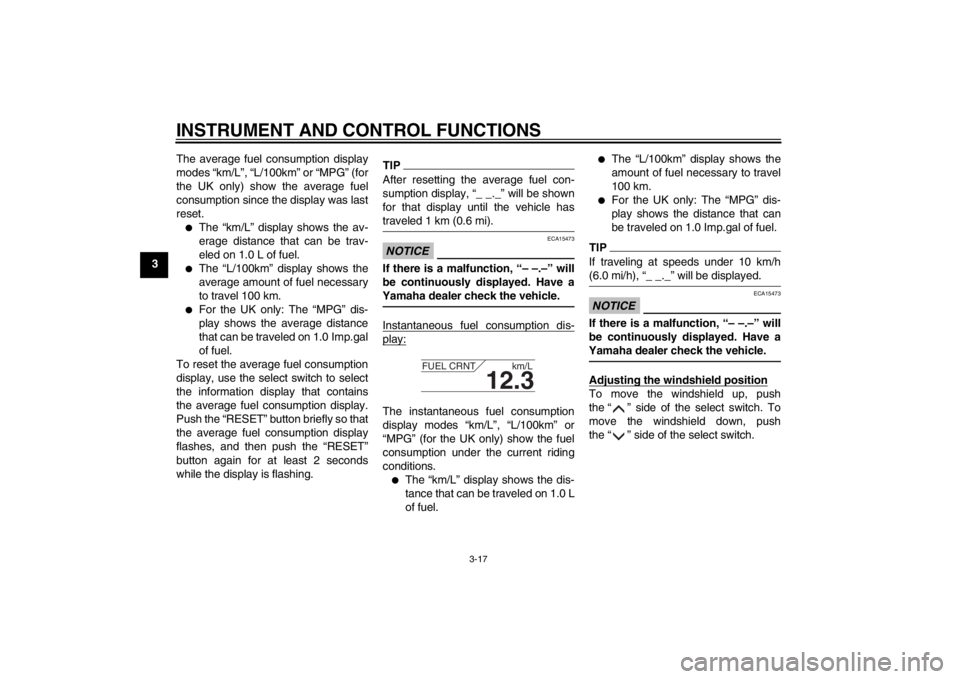
Yamaha dealer check the vehicle.Instantaneous fuel consumption dis-play:The instantaneous fuel consumption
display modes “km/L”, “L/100km” or
“MPG” (for the UK only) show the fuel
consumption under the current riding
conditions.●
The “km/L” display shows the dis-
tance that can be traveled on 1.0 L
of fuel.
●
The “L/100km” display shows the
amount of fuel necessary to travel
100 km.
●
For the UK only: The “MPG” dis-
play shows the distance that can
be traveled on 1.0 Imp.gal of fuel.
TIPIf traveling at speeds under 10 km/h
(6.0 mi/h), “_ _._” will be displayed.NOTICE
ECA15473
If there is a malfunction, “– –.–” will
be continuously displayed. Have a
Yamaha dealer check the vehicle.Adjusting the windshield positionTo move the windshield up, push
the “ ” side of the select switch. To
move the windshield down, push
the “ ” side of the select switch.
12.3
FUEL CRNT km/L
U1MDE0E0.book Page 17 Friday, February 15, 2013 1:26 PM
Page 33 of 122
INSTRUMENT AND CONTROL FUNCTIONS
3-18
3
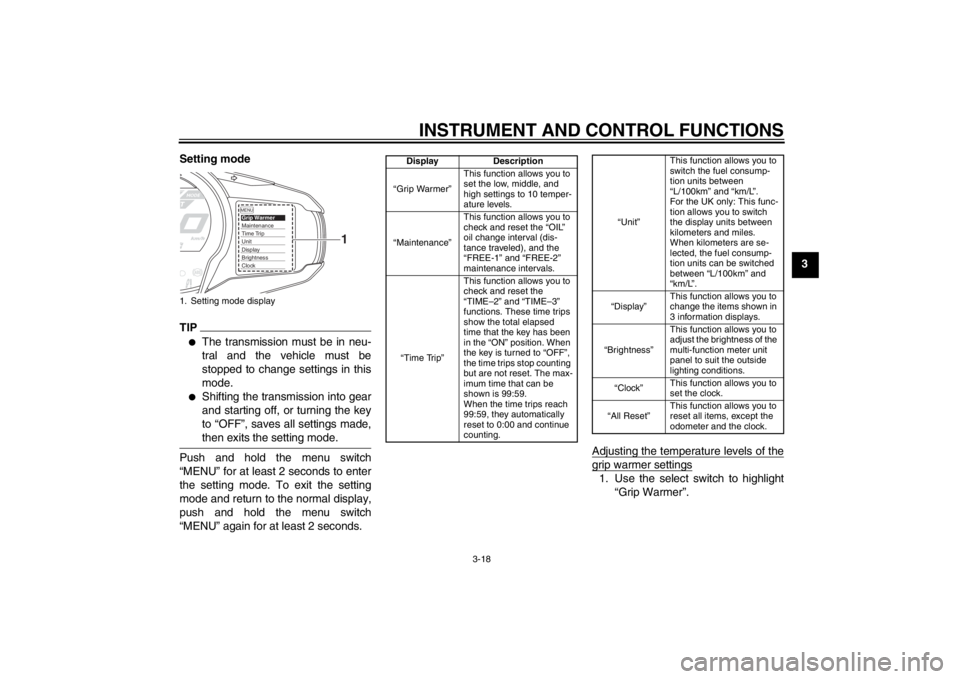
Setting mode
TIP●
The transmission must be in neu-
tral and the vehicle must be
stopped to change settings in this
mode.
●
Shifting the transmission into gear
and starting off, or turning the key
to “OFF”, saves all settings made,
then exits the setting mode.
Push and hold the menu switch
“MENU” for at least 2 seconds to enter
the setting mode. To exit the setting
mode and return to the normal display,
push and hold the menu switch
“MENU” again for at least 2 seconds.
Adjusting the temperature levels of the
grip warmer settings1. Use the select switch to highlight
“Grip Warmer”.
1. Setting mode display
MENUGrip WarmerMaintenanceTime TripUnitDisplayBrightnessClock
1
Display Description
“Grip Warmer” This function allows you to
set the low, middle, and
high settings to 10 temper-
ature levels.
“Maintenance” This function allows you to
check and reset the “OIL”
oil change interval (dis-
tance traveled), and the
“FREE-1” and “FREE-2”
maintenance intervals.
“Time Trip” This function allows you to
check and reset the
“TIME–2” and “TIME–3”
functions. These time trips
show the total elapsed
time that the key has been
in the “ON” position. When
the key is turned to “OFF”,
the time trips stop counting
but are not reset. The max-
imum time that can be
shown is 99:59.
When the time trips reach
99:59, they automatically
reset to 0:00 and continue
counting.
“Unit”
This function allows you to
switch the fuel consump-
tion units between
“L/100km” and “km/L”.
For the UK only: This func-
tion allows you to switch
the display units between
kilometers and miles.
When kilometers are se-
lected, the fuel consump-
tion units can be switched
between “L/100km” and
“km/L”.
“Display” This function allows you to
change the items shown in
3 information displays.
“Brightness” This function allows you to
adjust the brightness of the
multi-function meter unit
panel to suit the outside
lighting conditions.
“Clock” This function allows you to
set the clock.
“All Reset” This function allows you to
reset all items, except the
odometer and the clock.
U1MDE0E0.book Page 18 Friday, February 15, 2013 1:26 PM
Page 34 of 122
INSTRUMENT AND CONTROL FUNCTIONS
3-19
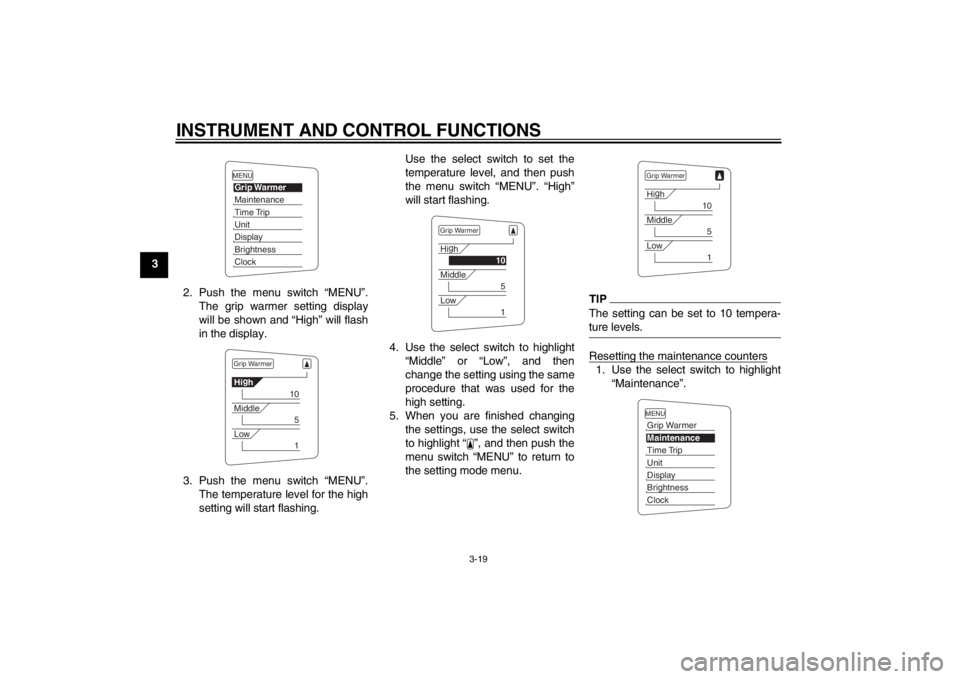
32. Push the menu switch “MENU”.The grip warmer setting display
will be shown and “High” will flash
in the display.
3. Push the menu switch “MENU”. The temperature level for the high
setting will start flashing. Use the select switch to set the
temperature level, and then push
the menu switch “MENU”. “High”
will start flashing.
4. Use the select switch to highlight “Middle” or “Low”, and then
change the setting using the same
procedure that was used for the
high setting.
5. When you are finished changing the settings, use the select switch
to highlight “ ”, and then push the
menu switch “MENU” to return to
the setting mode menu.
TIPThe setting can be set to 10 tempera-
ture levels.Resetting the maintenance counters1. Use the select switch to highlight“Maintenance”.
MENUGrip WarmerMaintenanceTime TripUnitDisplayBrightnessClockGrip WarmerHig
h
10
Middle
5
Low
1
Grip WarmerHi g
h
10
Middle
5
Low
1
Grip WarmerHi g
h
10
Middle
5
Low
1
MENUGrip WarmerMaintenanceTime TripUnitDisplayBrightnessClock
U1MDE0E0.book Page 19 Friday, February 15, 2013 1:26 PM
Page 35 of 122
INSTRUMENT AND CONTROL FUNCTIONS
3-20
3
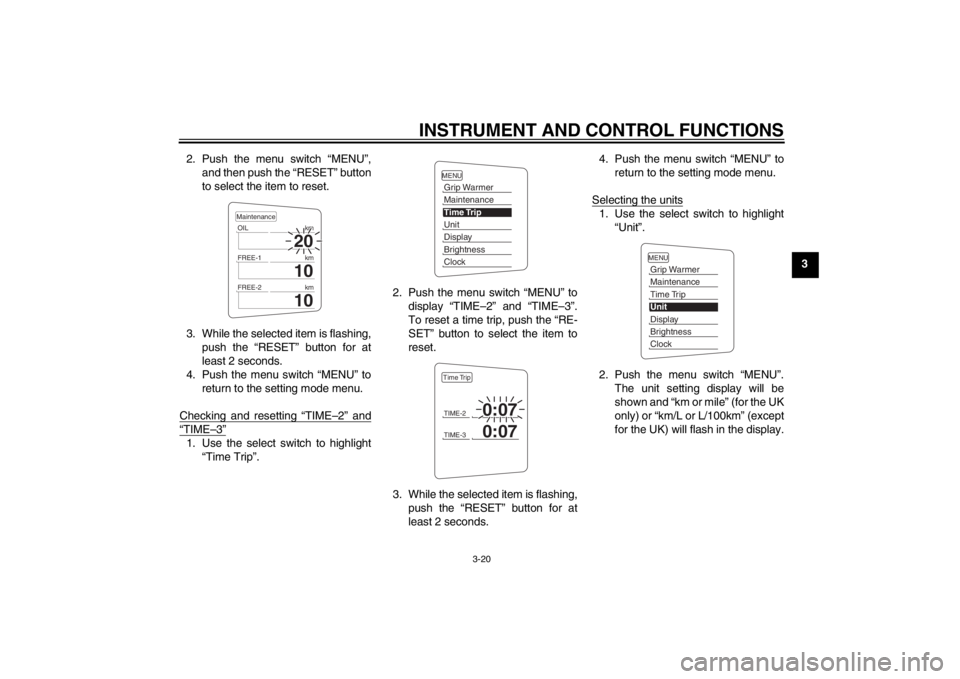
2. Push the menu switch “MENU”,
and then push the “RESET” button
to select the item to reset.
3. While the selected item is flashing, push the “RESET” button for at
least 2 seconds.
4. Push the menu switch “MENU” to return to the setting mode menu.
Checking and resetting “TIME–2” and
“TIME–3”1. Use the select switch to highlight “Time Trip”. 2. Push the menu switch “MENU” to
display “TIME–2” and “TIME–3”.
To reset a time trip, push the “RE-
SET” button to select the item to
reset.
3. While the selected item is flashing, push the “RESET” button for at
least 2 seconds. 4. Push the menu switch “MENU” to
return to the setting mode menu.
Selecting the units
1. Use the select switch to highlight “Unit”.
2. Push the menu switch “MENU”. The unit setting display will be
shown and “km or mile” (for the UK
only) or “km/L or L/100km” (except
for the UK) will flash in the display.
20
OIL km
10
FREE-1km
10
FREE-2kmMaintenance
MENUGrip WarmerMaintenanceTime TripUnitDisplayBrightnessClockTIME-2
0:07
TIME-3
0:07
Time Trip
MENUGrip WarmerMaintenanceTime TripUnitDisplayBrightnessClock
U1MDE0E0.book Page 20 Friday, February 15, 2013 1:26 PM
Page 36 of 122
INSTRUMENT AND CONTROL FUNCTIONS
3-21
3
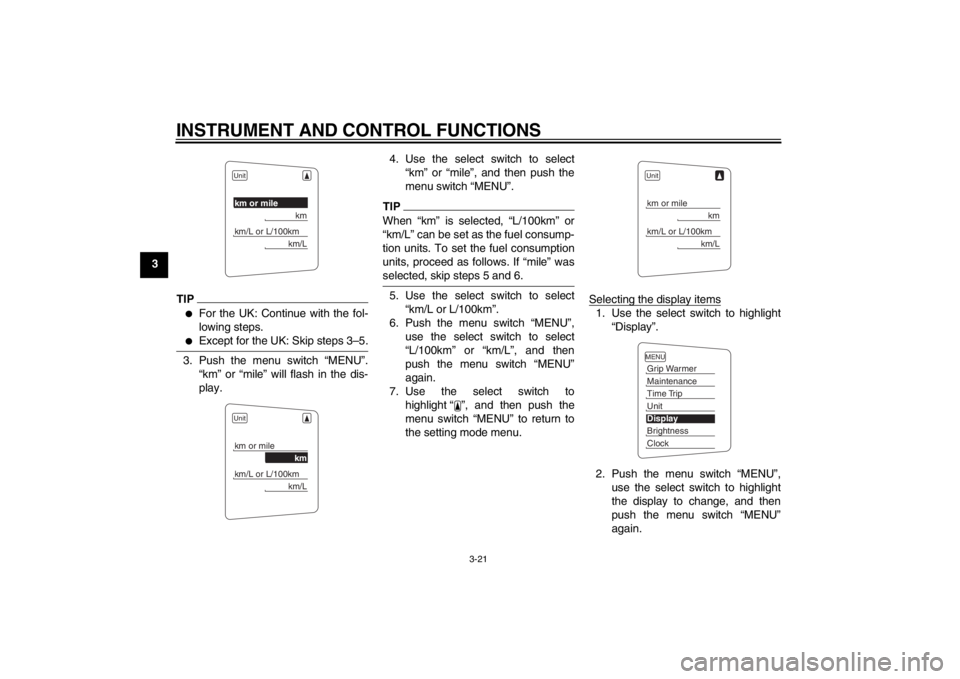
TIP●
For the UK: Continue with the fol-
lowing steps.
●
Except for the UK: Skip steps 3–5.
3. Push the menu switch “MENU”.“km” or “mile” will flash in the dis-
play. 4. Use the select switch to select
“km” or “mile”, and then push the
menu switch “MENU”.
TIPWhen “km” is selected, “L/100km” or
“km/L” can be set as the fuel consump-
tion units. To set the fuel consumption
units, proceed as follows. If “mile” was
selected, skip steps 5 and 6.5. Use the select switch to select“km/L or L/100km”.
6. Push the menu switch “MENU”, use the select switch to select
“L/100km” or “km/L”, and then
push the menu switch “MENU”
again.
7. Use the select switch to highlight “ ”, and then push the
menu switch “MENU” to return to
the setting mode menu. Selecting the display items
1. Use the select switch to highlight
“Display”.
2. Push the menu switch “MENU”, use the select switch to highlight
the display to change, and then
push the menu switch “MENU”
again.
Unitkm or mile
km
km/L or L/100km
km/L
Unitkm or mile
km
km/L or L/100km
km/L
Unitkm or mile
km
km/L or L/100km
km/L
MENUGrip WarmerMaintenanceTime TripUnitDisplayBrightnessClock
U1MDE0E0.book Page 21 Friday, February 15, 2013 1:26 PM
Page 37 of 122
INSTRUMENT AND CONTROL FUNCTIONS
3-22
3
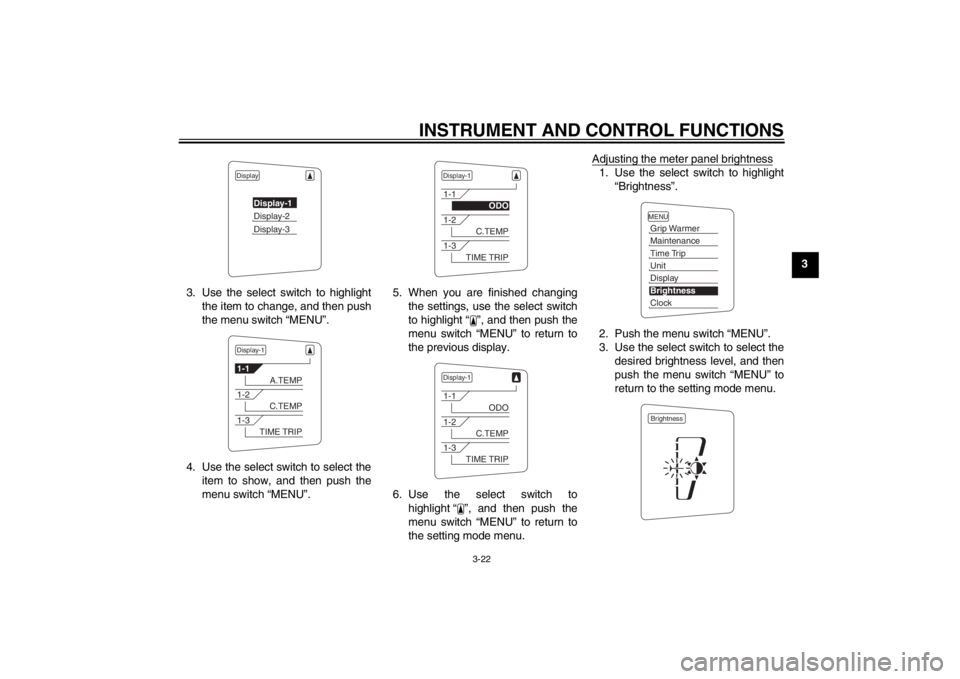
3. Use the select switch to highlight the item to change, and then push
the menu switch “MENU”.
4. Use the select switch to select the item to show, and then push the
menu switch “MENU”. 5. When you are finished changing
the settings, use the select switch
to highlight “ ”, and then push the
menu switch “MENU” to return to
the previous display.
6. Use the select switch to highlight “ ”, and then push the
menu switch “MENU” to return to
the setting mode menu. Adjusting the meter panel brightness
1. Use the select switch to highlight
“Brightness”.
2. Push the menu switch “MENU”.
3. Use the select switch to select the desired brightness level, and then
push the menu switch “MENU” to
return to the setting mode menu.
Display
Display-1Display-2Display-3
Display-11-1
A.TEMP
1-2
C.TEMP
1-3
TIME TRIP
Display-11-1
ODO
1-2
C.TEMP
1-3
TIME TRIP
Display-11-1
ODO
1-2
C.TEMP
1-3
TIME TRIP
MENUGrip WarmerMaintenanceTime TripUnitDisplayBrightnessClockBrightness
U1MDE0E0.book Page 22 Friday, February 15, 2013 1:26 PM
Page 38 of 122
INSTRUMENT AND CONTROL FUNCTIONS
3-23
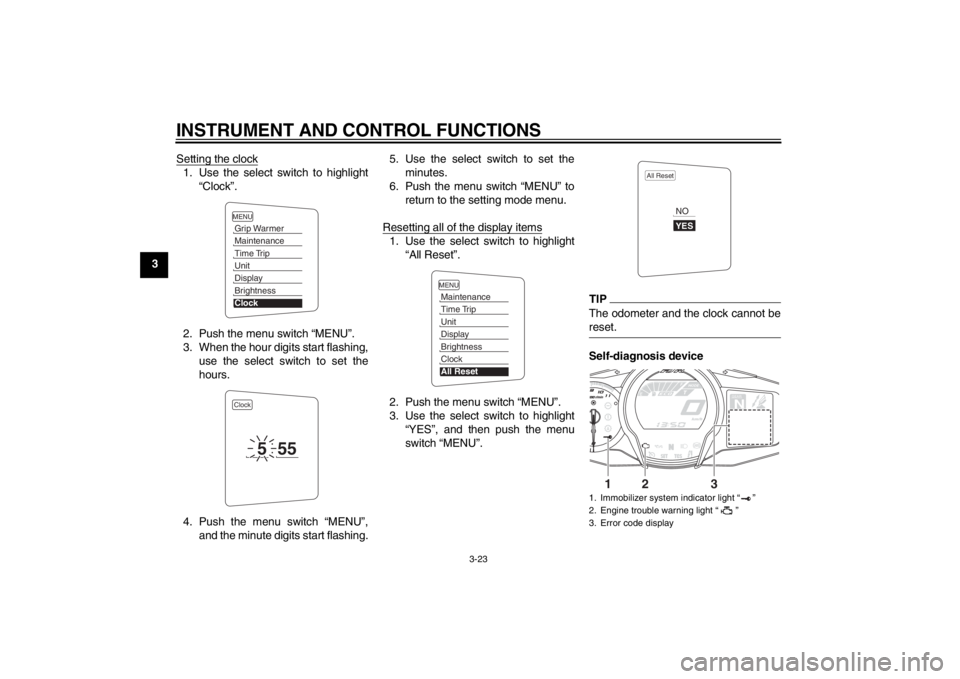
3Setting the clock
1. Use the select switch to highlight
“Clock”.
2. Push the menu switch “MENU”.
3. When the hour digits start flashing, use the select switch to set the
hours.
4. Push the menu switch “MENU”, and the minute digits start flashing. 5. Use the select switch to set the
minutes.
6. Push the menu switch “MENU” to return to the setting mode menu.
Resetting all of the display items
1. Use the select switch to highlight “All Reset”.
2. Push the menu switch “MENU”.
3. Use the select switch to highlight “YES”, and then push the menu
switch “MENU”.
TIPThe odometer and the clock cannot be
reset.Self-diagnosis device
MENUGrip WarmerMaintenanceTime TripUnitDisplayBrightnessClockClock
5
55
MENUMaintenanceTime TripUnitDisplayBrightnessClockAll Reset
1. Immobilizer system indicator light “ ”
2. Engine trouble warning light “ ”
3. Error code display
All Reset
YESNO
GEARN
25
A.TEMP ˚C
Lo
C.TEMP ˚C
0:06
TIME TRIP
1
2
3
U1MDE0E0.book Page 23 Friday, February 15, 2013 1:26 PM
Page 39 of 122
INSTRUMENT AND CONTROL FUNCTIONS
3-24
3
This model is equipped with a self-diag-
nosis device for various electrical cir-
cuits. If a problem is detected in any of
those circuits, the engine trouble warn-
ing light will come on and the informa-
tion display will indicate an error code.
If the information display indicates any
error codes, note the code number, and
then have a Yamaha dealer check the
vehicle.
The self-diagnosis device also detects
problems in the immobilizer system cir-
cuits.
If a problem is detected in the immobi-
lizer system circuits, the immobilizer
system indicator light will flash and the
information display will indicate an error
code when the key is turned to “ON”.
TIPIf the information display indicates error
code 52, this could be caused by tran-
sponder interference. If this error ap-
pears, try the following.1. Use the code re-registering key to
start the engine.
TIPMake sure there are no other immobi-
lizer keys close to the main switch, and
do not keep more than one immobilizer
key on the same key ring! Immobilizer
system keys may cause signal interfer-
ence, which may prevent the engine
from starting.2. If the engine starts, turn it off, andtry starting the engine with the
standard keys.
3. If one or both of the standard keys do not start the engine, take the
vehicle, the code re-registering
key and both standard keys to a
Yamaha dealer and have the stan- dard keys re-registered.NOTICE
ECA11590
If the display indicates an error
code, the vehicle should be checked
as soon as possible in order to avoid
engine damage.
EAU49431
D-mode (drive mode) D-mode is an electronically controlled
engine performance system with two
mode selections (touring mode “T” and
sports mode “S”).
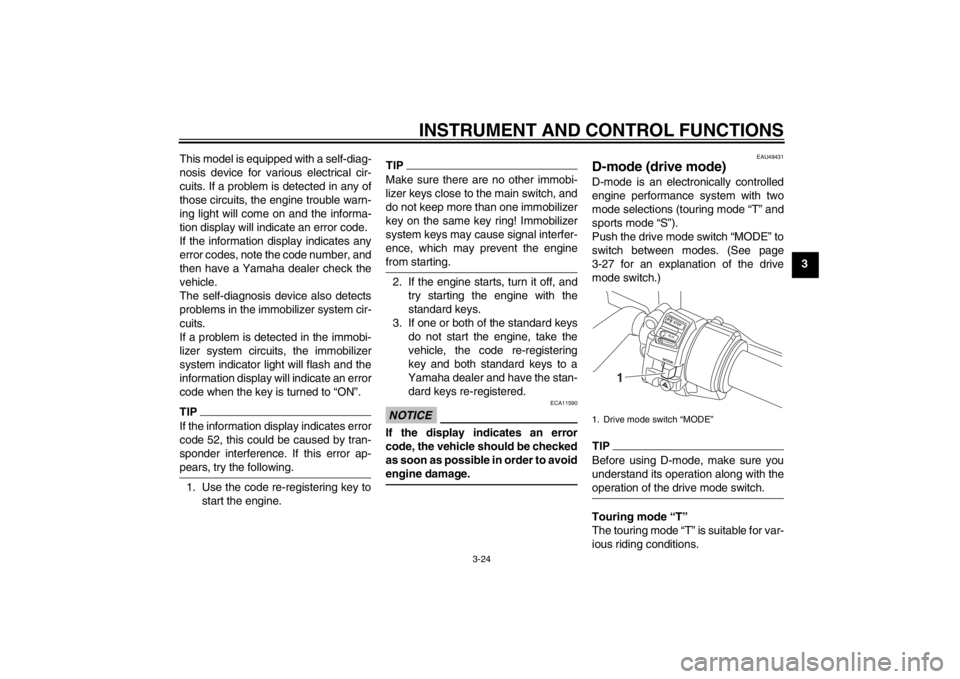
Push the drive mode switch “MODE” to
switch between modes. (See page
3-27 for an explanation of the drive
mode switch.)TIPBefore using D-mode, make sure you
understand its operation along with the
operation of the drive mode switch.Touring mode “T”
The touring mode “T” is suitable for var-
ious riding conditions.1. Drive mode switch “MODE”
STOPM ODERUNSTART
1
U1MDE0E0.book Page 24 Friday, February 15, 2013 1:26 PM
Page 40 of 122
INSTRUMENT AND CONTROL FUNCTIONS
3-25
3This mode allows the rider to enjoy
smooth drivability from the low-speed
range to the high-speed range.
Sports mode “S”
This mode offers a sportier engine re-
sponse in the low- to mid-speed range
compared to the touring mode.
EAU1234C
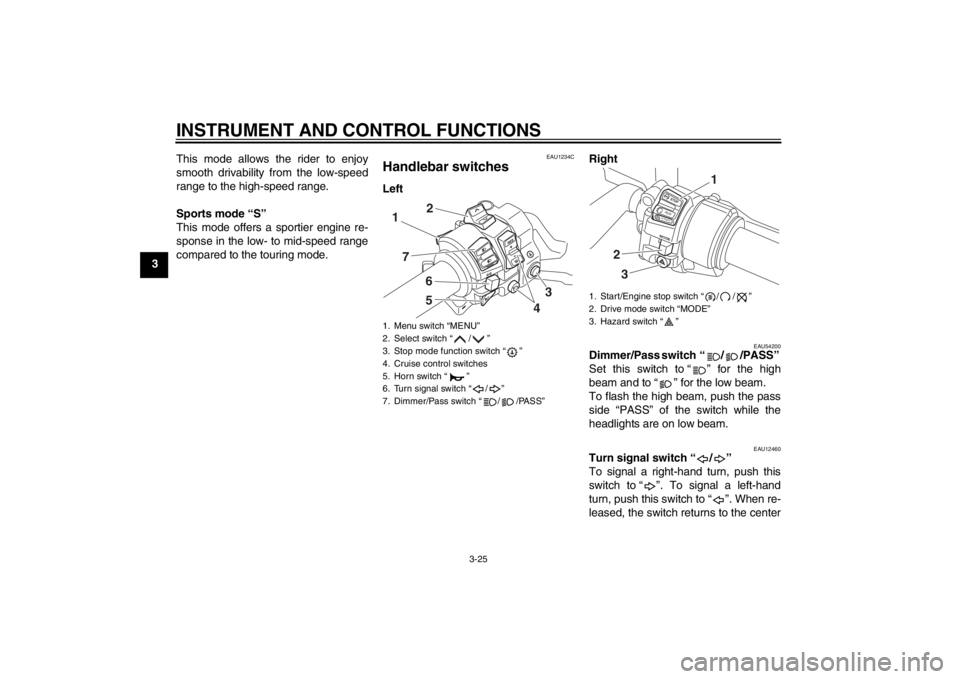
Handlebar switches Left
Right
EAU54200
Dimmer/Pass switch “ / /PASS”
Set this switch to “ ” for the high
beam and to “ ” for the low beam.
To flash the high beam, push the pass
side “PASS” of the switch while the
headlights are on low beam.
EAU12460
Turn signal switch “ / ”
To signal a right-hand turn, push this
switch to “ ”. To signal a left-hand
turn, push this switch to “ ”. When re-
leased, the switch returns to the center
1. Menu switch “MENU”
2. Select switch “ / ”
3. Stop mode function switch “ ”
4. Cruise control switches
5. Horn switch “ ”
6. Turn signal switch “ / ”
7. Dimmer/Pass switch “ / /PASS”17
652
4
3
1. Start/Engine stop switch “ / / ”
2. Drive mode switch “MODE”
3. Hazard switch “ ”
STOPM
ODERUNSTART
32
1
U1MDE0E0.book Page 25 Friday, February 15, 2013 1:26 PM