checking oil YAMAHA FX HO CRUISER 2022 Owners Manual
[x] Cancel search | Manufacturer: YAMAHA, Model Year: 2022, Model line: FX HO CRUISER, Model: YAMAHA FX HO CRUISER 2022Pages: 136, PDF Size: 5.62 MB
Page 74 of 136
Instrument operation
65
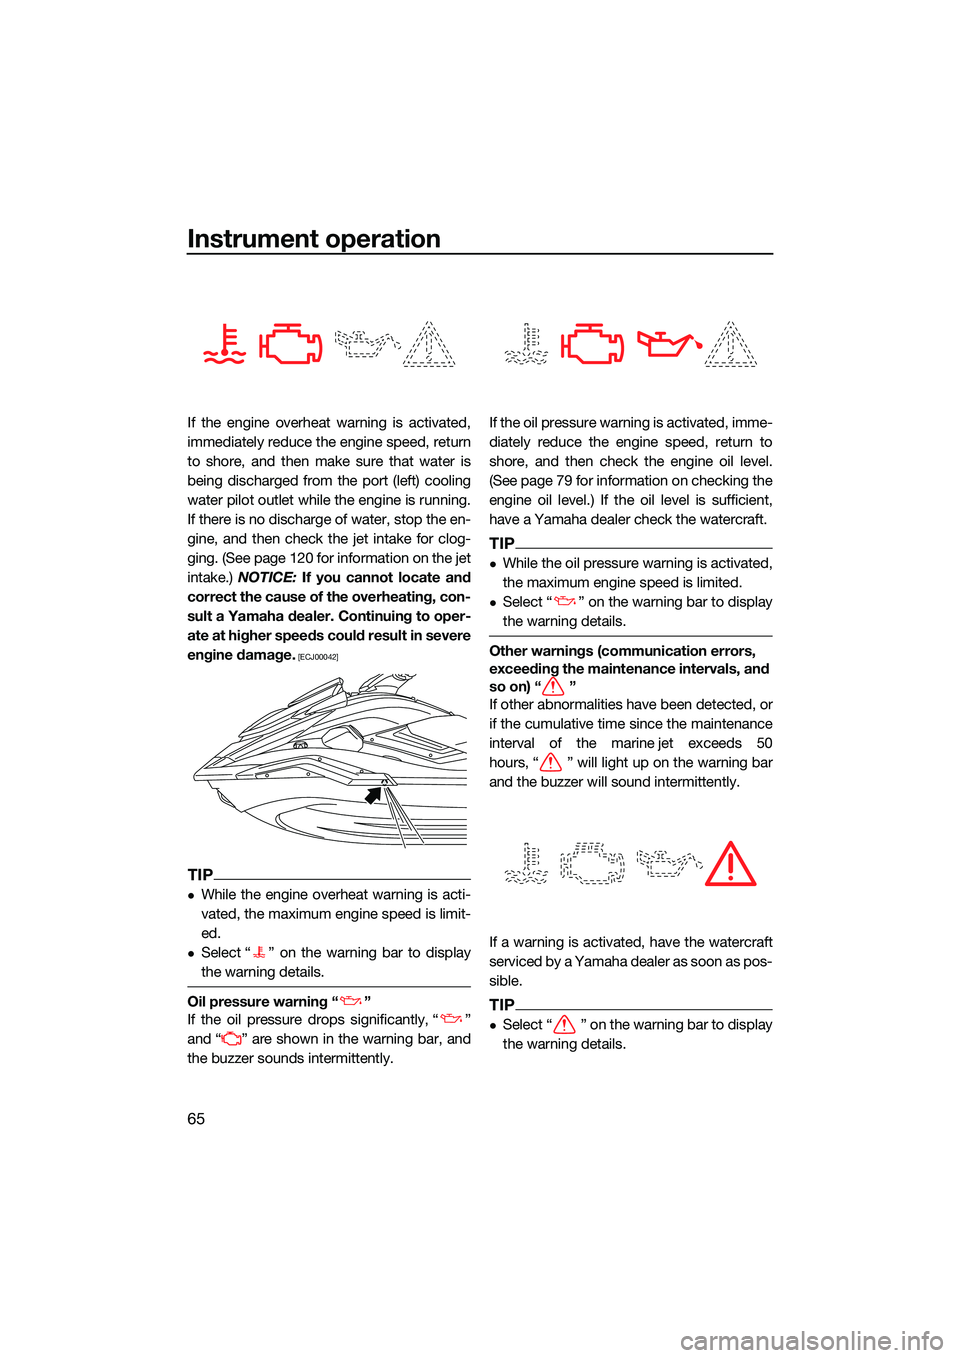
If the engine overheat warning is activated,
immediately reduce the engine speed, return
to shore, and then make sure that water is
being discharged from the port (left) cooling
water pilot outlet while the engine is running.
If there is no discharge of water, stop the en-
gine, and then check the jet intake for clog-
ging. (See page 120 for information on the jet
intake.) NOTICE: If you cannot locate and
correct the cause of the overheating, con-
sult a Yamaha dealer. Continuing to oper-
ate at higher speeds could result in severe
engine damage.
[ECJ00042]
TIP
While the engine overheat warning is acti-
vated, the maximum engine speed is limit-
ed.
Select “ ” on the warning bar to display
the warning details.
Oil pressure warning “ ”
If the oil pressure drops significantly, “ ”
and “ ” are shown in the warning bar, and
the buzzer sounds intermittently. If the oil pressure warning is activated, imme-
diately reduce the engine speed, return to
shore, and then check the engine oil level.
(See page 79 for information on checking the
engine oil level.) If the oil level is sufficient,
have a Yamaha dealer check the watercraft.
TIP
While the oil pressure warning is activated,
the maximum engine speed is limited.
Select “ ” on the warning bar to display
the warning details.
Other warnings (communication errors,
exceeding the maintenance intervals, and
so on) “ ”
If other abnormalities have been detected, or
if the cumulative time since the maintenance
interval of the marine jet exceeds 50
hours, “ ” will light up on the warning bar
and the buzzer will sound intermittently.
If a warning is activated, have the watercraft
serviced by a Yamaha dealer as soon as pos-
sible.
TIP
Select “ ” on the warning bar to display
the warning details.
UF3V73E0.book Page 65 Friday, October 8, 2021 1:30 PM
Page 88 of 136
Operation and handling requirements
79
EJU40291
Engine oil requirementsEJU41514Engine oilECJ00282
Use only 4-stroke engine oil. Usage of 2-
stroke engine oil could result in severe en-
gine damage.
TIP
When the engine is operated at high speeds,
some engine oil may be consumed. Be sure
to check the engine oil level.
Why Yamalube
YAMALUBE oil is a Genuine YAMAHA Part
born of the engineers’ passion and belief that
engine oil is an important liquid engine com-
ponent. We form teams of specialists in the
fields of mechanical engineering, chemistry,
electronics and track testing, and have them
develop the engine together with the oil it will
use. Yamalube oils take full advantage of the
base oil’s qualities and blend in the ideal bal-
ance of additives to make sure the final oil
clears our performance standards. Thus,
Yamalube mineral, semisynthetic and syn- thetic oils have their own distinct characters
and value. Yamaha’s experience gained over
many years of research and development
into oil since the 1960’s helps make
Yamalube the best choice for your Yamaha engine. Checking the engine oil level
EWJ00341
Engine oil is extremely hot immediately af-
ter the engine is turned off. Coming in con-
tact with or getting any engine oil on your
clothes could result in burns.
ECJ01002
Make sure that debris and water do not
enter the oil filler hole. Debris and water in
the engine oil can cause serious engine
damage.
To check the engine oil level:
(1) Place the watercraft in a precisely level
position on land with the engine
stopped. If the engine was running, allow
the engine oil to settle by waiting 5 min-
utes or more before checking the oil lev-
el.
(2) Remove the seats. (See page 69 for seat removal and installation procedures.)
(3) Remove the dipstick and wipe it clean.
Recommended engine oil:
YAMALUBE 4W or 4-stroke motor oil
Recommended engine oil type: SAE 10W-30, 10W-40, 20W-40,
20W-50
Recommended engine oil grade: API SG, SH, SJ, SL
UF3V73E0.book Page 79 Friday, October 8, 2021 1:30 PM
Page 92 of 136
First-time operation
83
EJU36667
Engine break-inECJ00432
Failure to perform the engine break-in
could result in reduced engine life or even
severe engine damage.
The engine break-in is essential to allow the
various components of the engine to wear
and polish themselves to the correct operat-
ing clearances. This ensures proper perfor-
mance and promotes longer component life.
To perform the engine break-in:
(1) Check the engine oil level. (See page 79for information on checking the engine
oil level.)
(2) Launch the watercraft and start the en- gine. (See page 94 for information on
starting the engine.)
(3) For the first 5 minutes, operate with the engine speed at 2000 r/min.
(4) For the next 30 minutes, operate with the engine speed below 5000 r/min.
(5) For the next 1 hour, operate with the en- gine speed below 6000 r/min.
After the engine break-in is complete, the wa-
tercraft can be operated normally.
UF3V73E0.book Page 83 Friday, October 8, 2021 1:30 PM
Page 96 of 136
Pre-operation checks
87
EJU40182Engine unit check
Check the exterior of the engine unit for dam-
age or other problem.
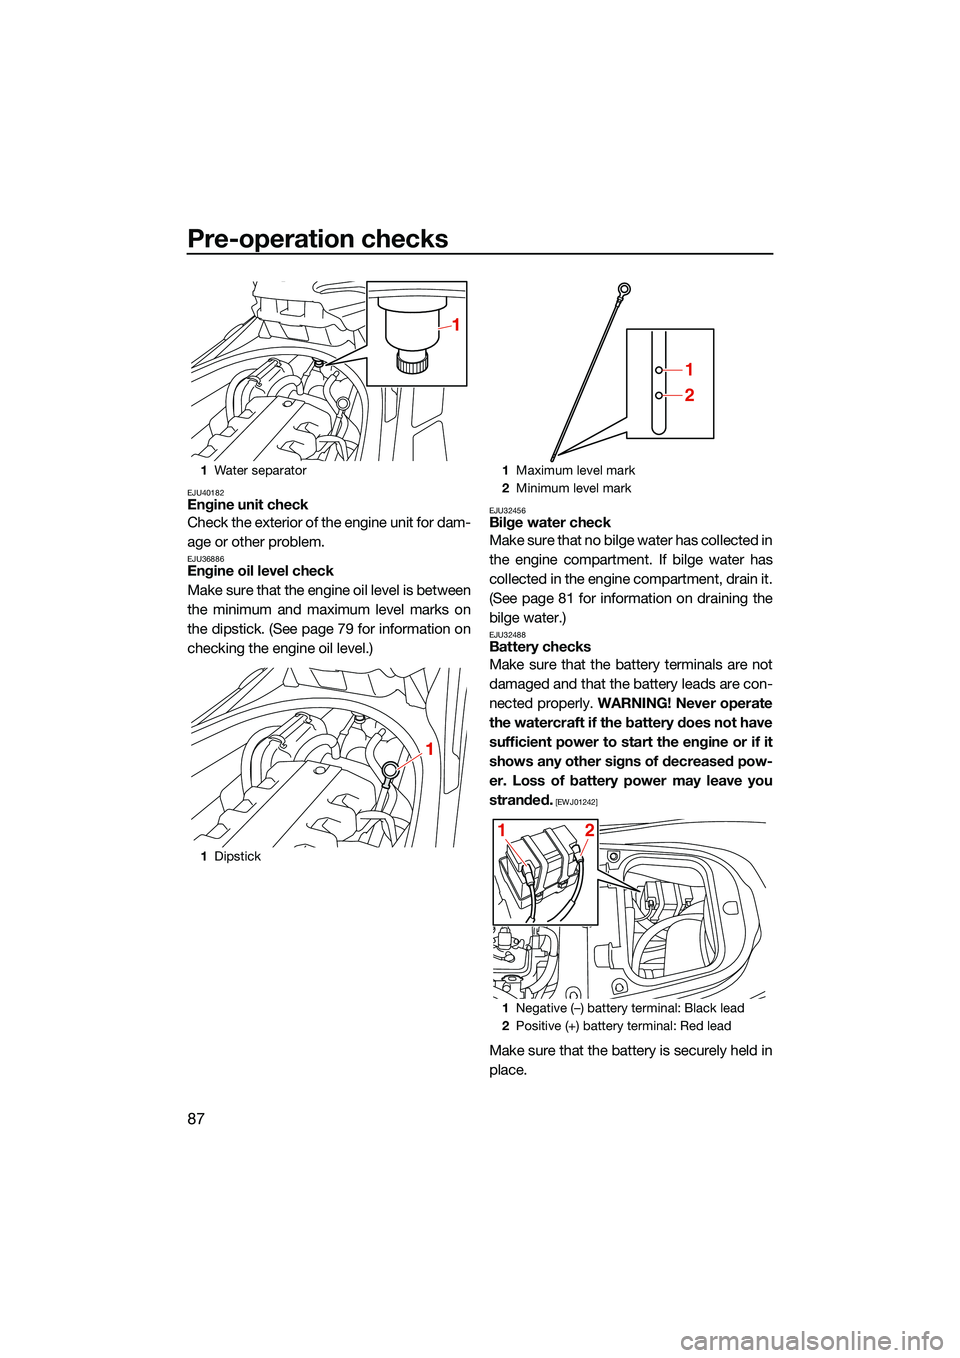
EJU36886Engine oil level check
Make sure that the engine oil level is between
the minimum and maximum level marks on
the dipstick. (See page 79 for information on
checking the engine oil level.)
EJU32456Bilge water check
Make sure that no bilge water has collected in
the engine compartment. If bilge water has
collected in the engine compartment, drain it.
(See page 81 for information on draining the
bilge water.)
EJU32488Battery checks
Make sure that the battery terminals are not
damaged and that the battery leads are con-
nected properly. WARNING! Never operate
the watercraft if the battery does not have
sufficient power to start the engine or if it
shows any other signs of decreased pow-
er. Loss of battery power may leave you
stranded.
[EWJ01242]
Make sure that the battery is securely held in
place.
1 Water separator
1 Dipstick
1
1
1Maximum level mark
2 Minimum level mark
1 Negative (–) battery terminal: Black lead
2 Positive (+) battery terminal: Red lead
1
2
12
UF3V73E0.book Page 87 Friday, October 8, 2021 1:30 PM
Page 116 of 136
Care and storage
107
ventilated. Always shield your eyes when
working near batteries.
Keep out of the reach of children.
Antidotes
External: Flush with water.
Internal: Drink large quantities of water or
milk. Follow with milk of magnesia, beaten
egg, or vegetable oil. Call a physician im-
mediately.
Eyes: Flush with water for 15 minutes and
get prompt medical attention.
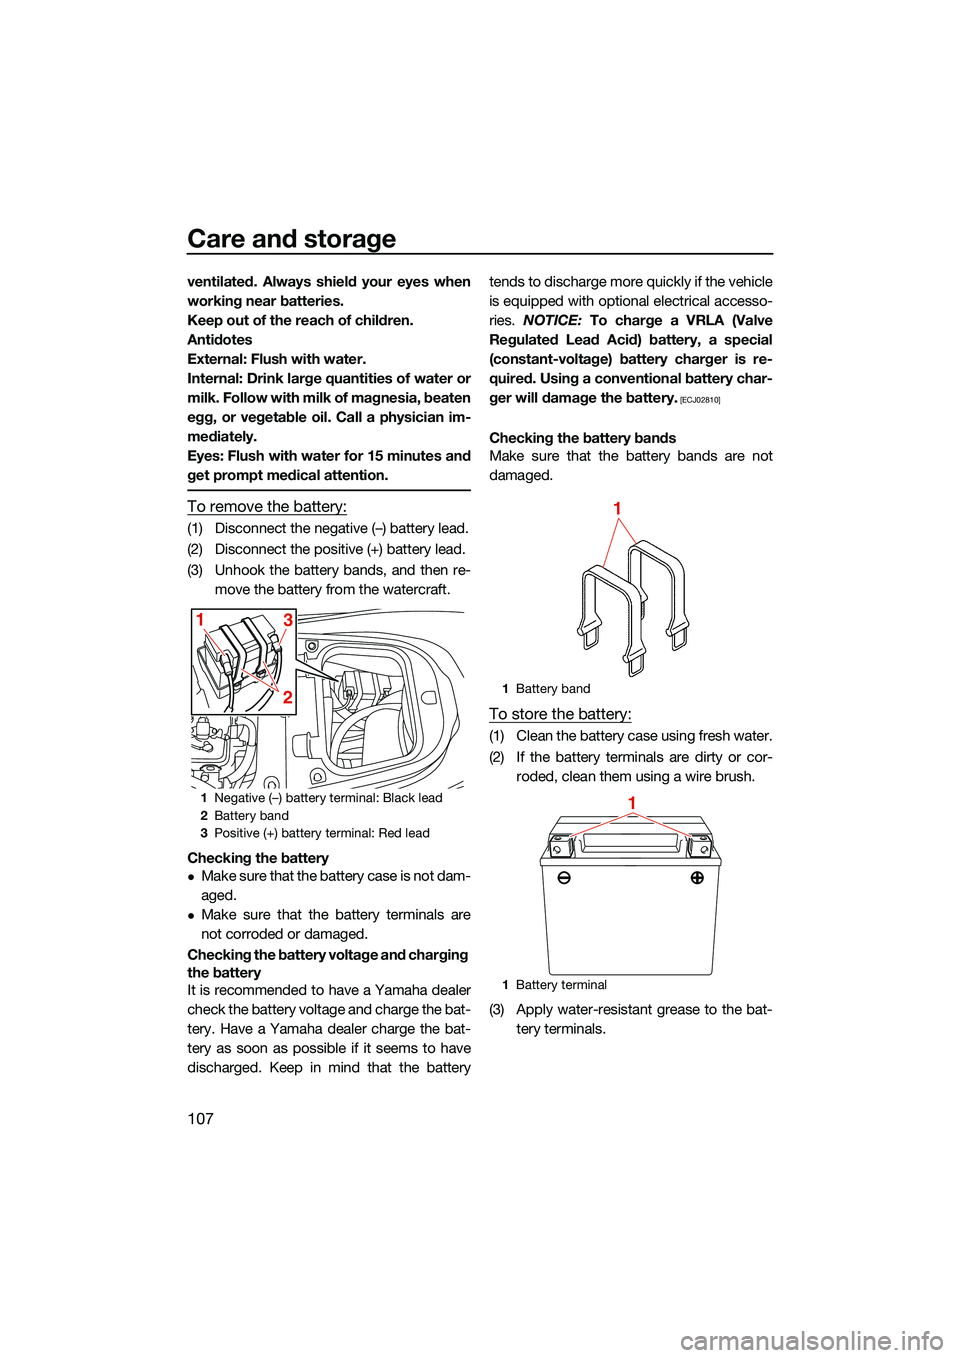
To remove the battery:
(1) Disconnect the negative (–) battery lead.
(2) Disconnect the positive (+) battery lead.
(3) Unhook the battery bands, and then re-move the battery from the watercraft.
Checking the battery
Make sure that the battery case is not dam-
aged.
Make sure that the battery terminals are
not corroded or damaged.
Checking the battery voltage and charging
the battery
It is recommended to have a Yamaha dealer
check the battery voltage and charge the bat-
tery. Have a Yamaha dealer charge the bat-
tery as soon as possible if it seems to have
discharged. Keep in mind that the battery tends to discharge more quickly if the vehicle
is equipped with optional electrical accesso-
ries.
NOTICE: To charge a VRLA (Valve
Regulated Lead Acid) battery, a special
(constant-voltage) battery charger is re-
quired. Using a conventional battery char-
ger will damage the battery.
[ECJ02810]
Checking the battery bands
Make sure that the battery bands are not
damaged.
To store the battery:
(1) Clean the battery case using fresh water.
(2) If the battery terminals are dirty or cor- roded, clean them using a wire brush.
(3) Apply water-resistant grease to the bat- tery terminals.
1Negative (–) battery terminal: Black lead
2 Battery band
3 Positive (+) battery terminal: Red lead
1
231
Battery band
1 Battery terminal
1
1
UF3V73E0.book Page 107 Friday, October 8, 2021 1:30 PM