engine YAMAHA GRIZZLY 125 2005 Service Manual
[x] Cancel search | Manufacturer: YAMAHA, Model Year: 2005, Model line: GRIZZLY 125, Model: YAMAHA GRIZZLY 125 2005Pages: 362, PDF Size: 5.52 MB
Page 260 of 362
8-31
EBU14840
Engine air filter element and V-belt case air
filter element cleaning
Both air filter elements should be cleaned at the
specified intervals in the periodic maintenance
chart.
Engine air filter element
NOTE:
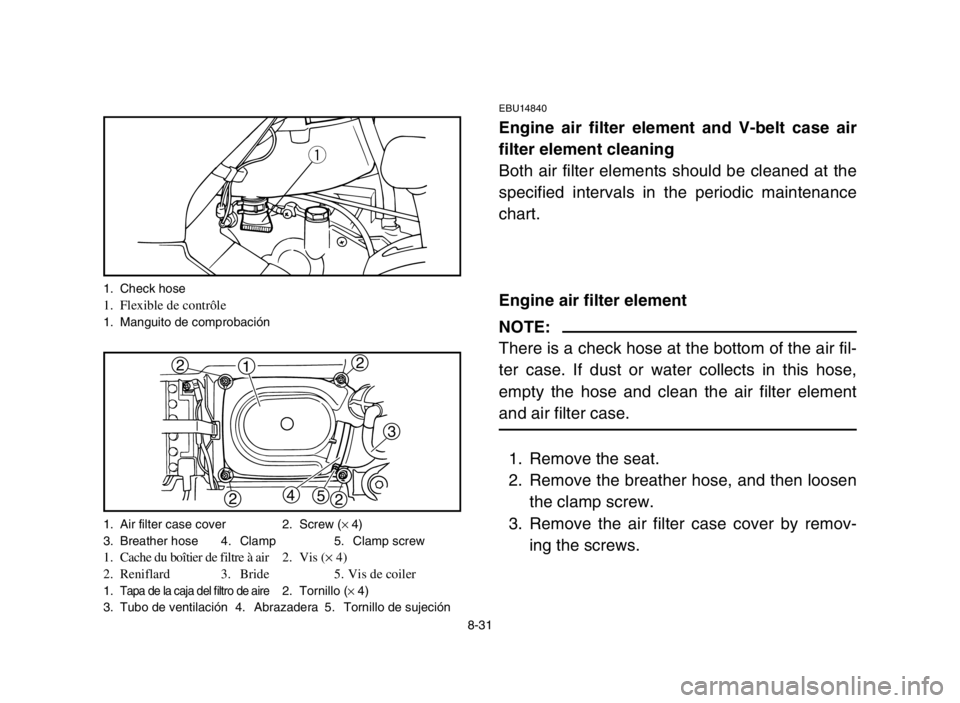
There is a check hose at the bottom of the air fil-
ter case. If dust or water collects in this hose,
empty the hose and clean the air filter element
and air filter case.
1. Remove the seat.
2. Remove the breather hose, and then loosen
the clamp screw.
3. Remove the air filter case cover by remov-
ing the screws.
q
1
3
4
5
2
2
2
2
1. Check hose1. Flexible de contrôle1. Manguito de comprobación
1. Air filter case cover 2. Screw (
× 4)
3. Breather hose 4. Clamp 5. Clamp screw
1. Cache du boîtier de filtre à air 2.Vis (× 4)
2. Reniflard 3. Bride 5. Vis de coiler
1.Tapa de la caja del filtro de aire2. Tornillo (× 4)
3. Tubo de ventilación 4. Abrazadera 5. Tornillo de sujeción
1C5-9-61-08 9/4/04 9:30 AM Page 8-32
Page 262 of 362
8-33
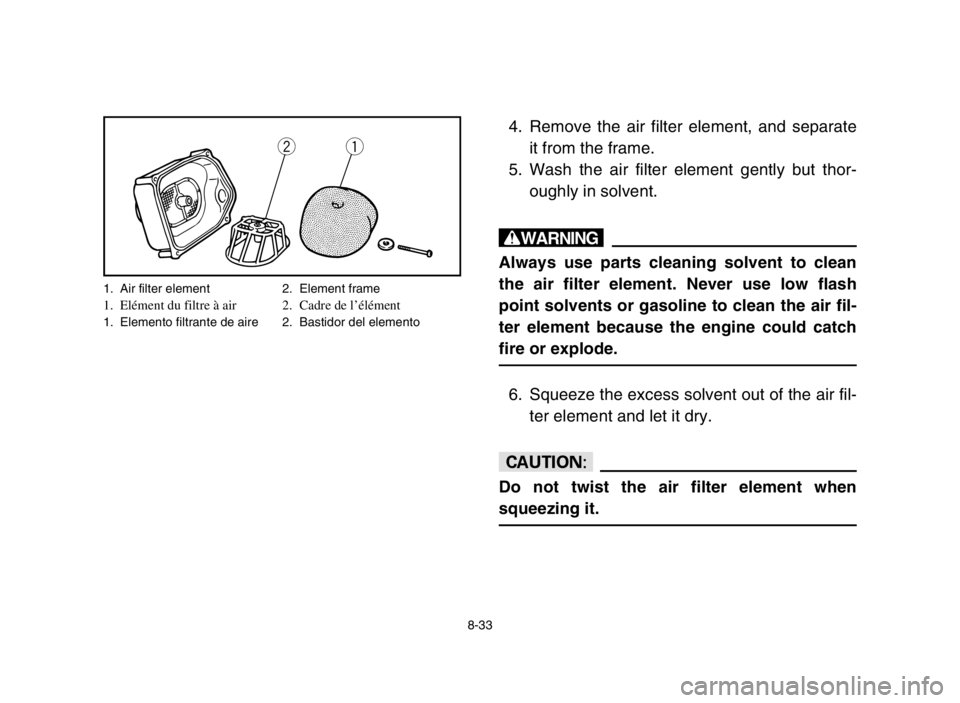
4. Remove the air filter element, and separate
it from the frame.
5. Wash the air filter element gently but thor-
oughly in solvent.
w
Always use parts cleaning solvent to clean
the air filter element. Never use low flash
point solvents or gasoline to clean the air fil-
ter element because the engine could catch
fire or explode.
6. Squeeze the excess solvent out of the air fil-
ter element and let it dry.
cC
Do not twist the air filter element when
squeezing it.
qw
1. Air filter element 2. Element frame1. Elément du filtre à air 2. Cadre de l’élément1. Elemento filtrante de aire 2. Bastidor del elemento
1C5-9-61-08 9/4/04 9:30 AM Page 8-34
Page 266 of 362
8-37
NOTE:
The air filter element should be cleaned every
20-40 hours. It should be cleaned and lubricated
more often if the machine is operated in
extremely dusty areas. Each time air filter ele-
ment maintenance is performed, check the air
inlet to the air filter case for obstructions. Check
the air filter case rubber joint to the carburetor
and manifold fittings for an airtight seal. Tighten
all fittings securely to avoid the possibility of
unfiltered air entering the engine.
cC
Never operate the engine with the air filter
element removed. This will allow unfiltered
air to enter, causing rapid engine wear and
possible engine damage. Additionally, opera-
tion without the air filter element will affect
carburetor jetting with subsequent poor per-
formance and possible engine overheating.
1C5-9-61-08 9/4/04 9:30 AM Page 8-38
Page 272 of 362

8-43
EBU13020
Idle speed adjustment
NOTE:
A diagnostic tachometer must be used for this
procedure.
1. Start the engine and warm it up for a few
minutes at approximately 1,000 to 2,000
r/min. Occasionally rev the engine to 4,000
to 5,000 r/min. The engine is warm when it
quickly responds to the throttle.
2. Connect the tachometer to the spark plug
lead, and then set the idle to the specified
idling speed by adjusting the throttle stop
screw. Turn the screw in direction ato
increase the engine speed, and in direction
bto decrease the engine speed.
ab
q
1. Throttle stop screw1. Vis de butée de papillon1. Tornillo tope del acelerador
Specified idle speed:
1,650–1,750 r/min
1C5-9-61-08 9/4/04 9:30 AM Page 8-44
Page 274 of 362
8-45
EBU00303
Valve clearance adjustment
The correct valve clearance changes with use,
resulting in improper fuel/air supply or engine
noise. To prevent this, the valve clearance must
be adjusted regularly. This adjustment however,
should be left to a professional Yamaha service
technician.
EAU00307
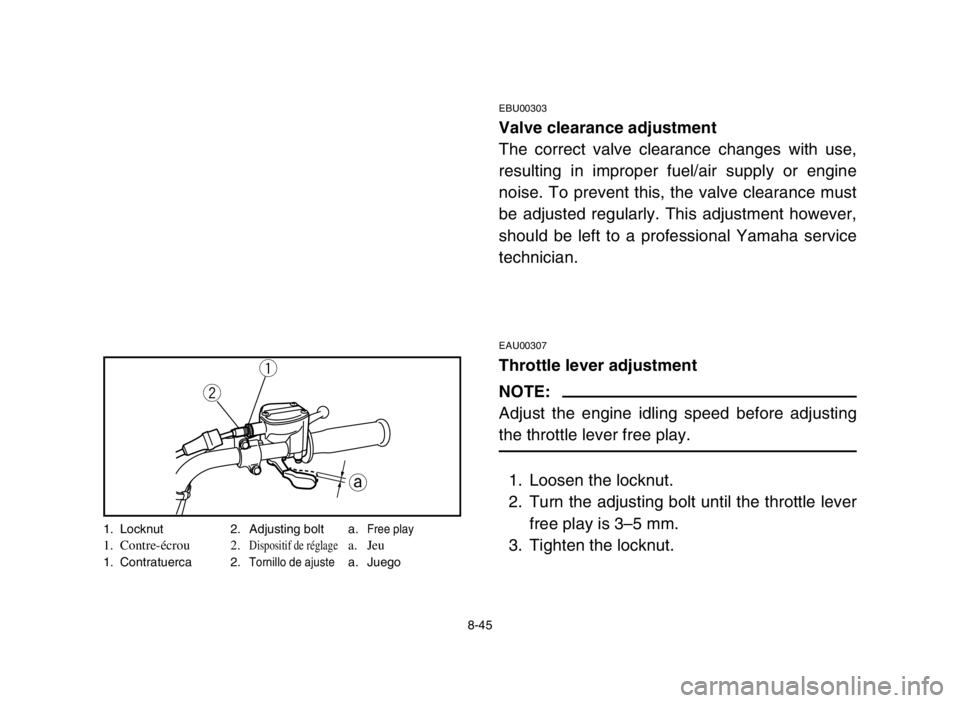
Throttle lever adjustment
NOTE:
Adjust the engine idling speed before adjusting
the throttle lever free play.
1. Loosen the locknut.
2. Turn the adjusting bolt until the throttle lever
free play is 3–5 mm.
3. Tighten the locknut.a q
w
1. Locknut 2. Adjusting bolt a.Free play1. Contre-écrou 2.Dispositif de réglagea. Jeu 1. Contratuerca 2.Tornillo de ajustea. Juego
1C5-9-61-08 9/4/04 9:30 AM Page 8-46
Page 292 of 362
8-63
EBU01146
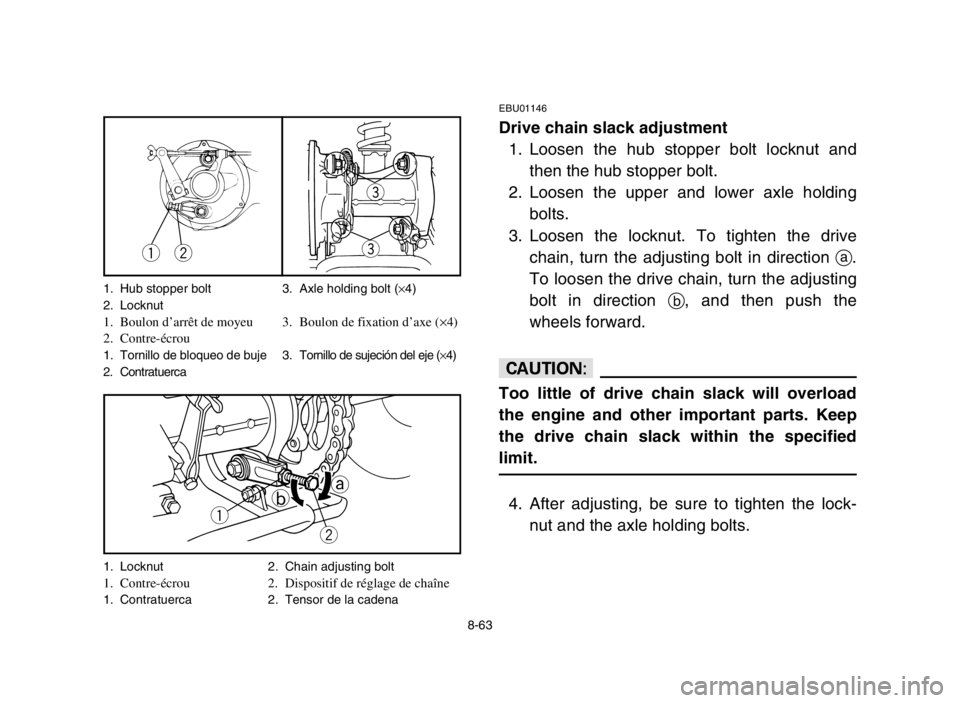
Drive chain slack adjustment
1. Loosen the hub stopper bolt locknut and
then the hub stopper bolt.
2. Loosen the upper and lower axle holding
bolts.
3. Loosen the locknut. To tighten the drive
chain, turn the adjusting bolt in direction a.
To loosen the drive chain, turn the adjusting
bolt in direction b, and then push the
wheels forward.
cC
Too little of drive chain slack will overload
the engine and other important parts. Keep
the drive chain slack within the specified
limit.
4. After adjusting, be sure to tighten the lock-
nut and the axle holding bolts.
wq
e
e
q
wa
b
1. Hub stopper bolt 3. Axle holding bolt (×4)
2. Locknut
1. Boulon d’arrêt de moyeu 3. Boulon de fixation d’axe (×4)
2. Contre-écrou
1. Tornillo de bloqueo de buje 3.Tornillo de sujeción del eje (×4)
2. Contratuerca
1. Locknut 2. Chain adjusting bolt
1. Contre-écrou 2. Dispositif de réglage de chaîne
1. Contratuerca 2. Tensor de la cadena
1C5-9-61-08 9/4/04 9:30 AM Page 8-64
Page 298 of 362

8-69
2. Wipe the drive chain dry.
3. Thoroughly lubricate the drive chain with a
special O-ring chain lubricant.
cC
Do not use engine oil or any other lubricants
for the drive chain, as they may contain sub-
stances that could damage the O-rings.
EBU00355
Draining the V-belt compartment
If water leaks into the V-belt compartment such
as when the machine is driven in water, remove
the drain screw on the bottom of compartment
and drain the water. Be sure to drive slowly until
the V-belt becomes dry. If slipping is noticed,
ask a Yamaha dealer to inspect.
q
q
1. O-ring1. Joint toriques1. Junta tóricas
1. Drain screw
1. Vis de vidange1. Tornillo de drenaje
1C5-9-61-08 9/4/04 9:30 AM Page 8-70
Page 300 of 362

8-71
EBU00570
Cable inspection and lubrication
w
Inspect cables frequently and replace if dam-
aged. Corrosion can result when the outer
covering of control cables becomes dam-
aged. Cables can also become frayed or
kinked. Operation of controls could be
restricted, which could cause an accident or
injury.
Lubricate the inner cables and the cable ends. If
the cables do not operate smoothly, ask a
Yamaha dealer to replace them.
Recommended lubricant:
Engine oil
1C5-9-61-08 9/4/04 9:30 AM Page 8-72
Page 328 of 362
8-99
EBU00440
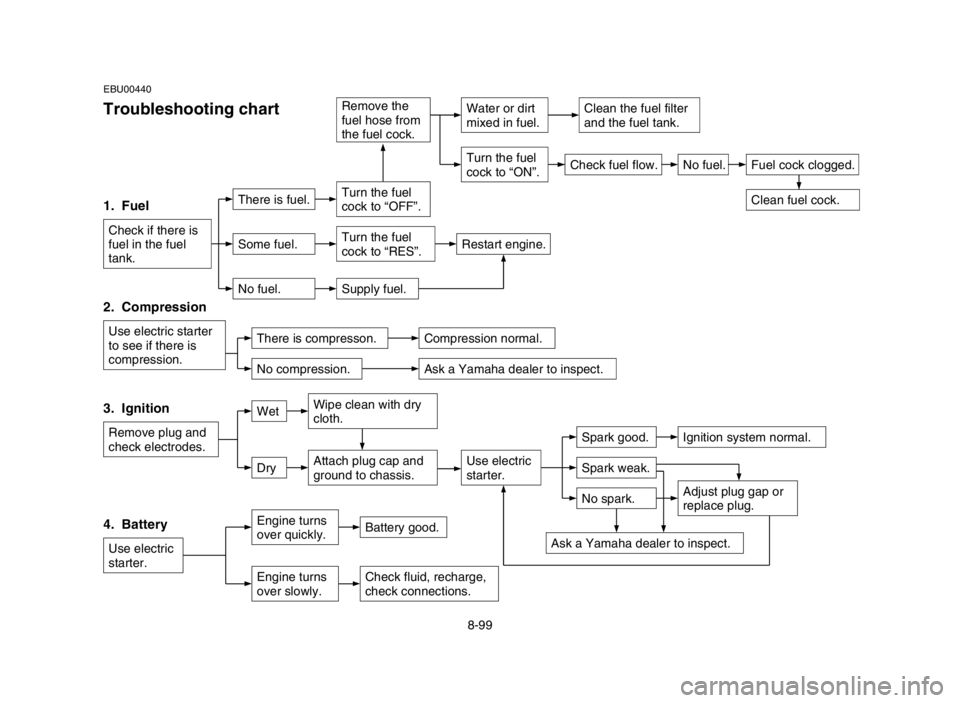
Troubleshooting chart
1. Fuel
Check if there is
fuel in the fuel
tank.
2. Compression
Use electric starter
to see if there is
compression.
3. Ignition
Remove plug and
check electrodes.
WetWipe clean with dry
cloth.
DryAttach plug cap and
ground to chassis.Use electric
starter.Spark weak.
Spark good.Ignition system normal.
No spark.
Ask a Yamaha dealer to inspect.
Adjust plug gap or
replace plug.
There is compresson.Compression normal.
Ask a Yamaha dealer to inspect.No compression.
There is fuel.Turn the fuel
cock to “OFF”.
Remove the
fuel hose from
the fuel cock.
Some fuel.Turn the fuel
cock to “RES”.Restart engine.
No fuel.Supply fuel.
4. Battery
Use electric
starter.
Engine turns
over quickly.Battery good.
Engine turns
over slowly.Check fluid, recharge,
check connections.
Check fuel flow.
Water or dirt
mixed in fuel.
Turn the fuel
cock to “ON”.No fuel.Fuel cock clogged.
Clean the fuel filter
and the fuel tank.
Clean fuel cock.
1C5-9-61-08 9/4/04 9:30 AM Page 8-100
Page 332 of 362

9-1
EBU00418
CLEANING AND STORAGE
A. CLEANING
Frequent, thorough cleaning of your machine
will not only enhance its appearance but will
improve its general performance and extend the
useful life of many components.
1. Before cleaning the machine:
a. Block off the end of the exhaust pipe to
prevent water entry. A plastic bag and
strong rubber band may be used.
b. Make sure the spark plug and all filler
caps are properly installed.
2. If the engine case is excessively greasy,
apply degreaser with a paint brush. Do not
apply degreaser to the chain, sprockets or
wheel axles.
3. Rinse the dirt and degreaser off with a gar-
den hose. Use only enough pressure to do
the job.
1C5-9-61-09~11 9/4/04 9:29 AM Page 2