brake YAMAHA GRIZZLY 450 2013 User Guide
[x] Cancel search | Manufacturer: YAMAHA, Model Year: 2013, Model line: GRIZZLY 450, Model: YAMAHA GRIZZLY 450 2013Pages: 172, PDF Size: 3.96 MB
Page 58 of 172

5-4
5Brake fluid leakage (front brake)
Check to see if any brake fluid is leaking out of the
hose, joint or brake fluid reservoir of the front
brake. Apply the brake firmly for one minute. If the
lever moves slowly inward, there may be a leak in
the brake system. If there is any leakage, the brake
system should be checked by a Yamaha dealer.
Brake operation
Test the brakes at slow speed after starting out to
make sure they are working properly. If the brakes
do not provide proper braking performance, check
the brake pads and friction plates for wear. (See
page 8-39.)
EBU19761Throttle lever Check the operation of the throttle lever. It must
open smoothly and spring back to the idle position
when released. Have a Yamaha dealer correct if
necessary.EBU19814Tires Check tire pressure regularly to make sure it is at
the recommended specifications. Also check for
wear and damage. Tire pressure
Use the low-pressure tire gauge to check and ad-
just tire pressures when the tires are cold. Tire
pressures must be equal on both sides.
WARNING! Operation of this vehicle with im- proper tire pressure may cause severe injury
or death from loss of control or rollover. Tire
pressure below the minimum specified could
also cause the tire to dislodge from the rim un-
der severe riding conditions.
[EWB02541]
Set tire
pressures to the following specifications:
U1CT62E0.book Page 4 Friday, May 11, 2012 9:03 AM
Page 62 of 172
6-1
6
EBU19881
OPERATION
EBU19901Read the Owner’s Manual carefully before riding
the ATV. If there is a control or function you do not
understand, ask your Yamaha dealer.
WARNING
EWB00631Read the Owner’s Manual carefully to become
familiar with all controls in order to help pre-
vent any loss of control, which could cause an
accident or injury.EBU26545Starting a cold engine NOTICEECB00150See the “Engine break-in” section on page 6-5
prior to operating the engine for the first time.1. Turn the fuel cock to “ON”.
2. Turn the key to “ON” and the engine stopswitch to “ ”. 3. Shift the drive select lever into the neutral or
park position. The corresponding indicator
light should come on, if it does not come on,
have a Yamaha dealer check the electrical cir-
cuit.
TIPThe engine can be started under the following con-
ditions:●The drive select lever is in the neutral or park po-
sition.●The rear brake lever is applied with the drive se-
lect lever in any position. However, it is recom-
mended to shift into the neutral or park position
before starting the engine.4. Use the starter (choke) in reference to the fig-ure:
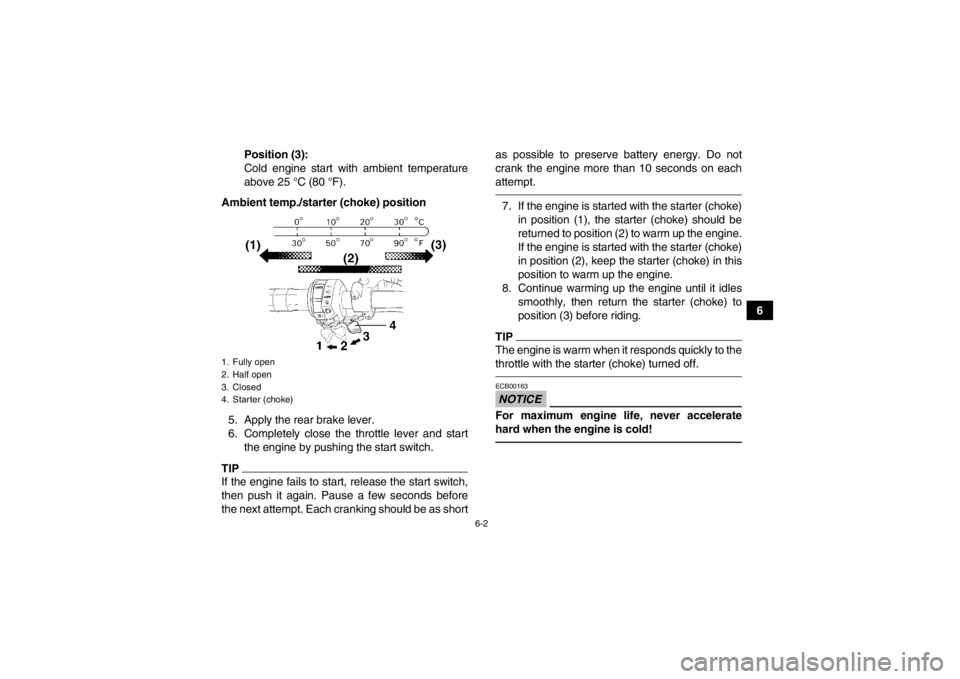
Position (1):
Cold engine start with ambient temperature
below 5 °C (40 °F).
Position (2):
Cold engine start with ambient temperature
between 0 °C (30 °F) and 30 °C (90 °F).
U1CT62E0.book Page 1 Friday, May 11, 2012 9:03 AM
Page 63 of 172
6-2
6
Position (3):
Cold engine start with ambient temperature
above 25 °C (80 °F).
Ambient temp./starter (choke) position
5. Apply the rear brake lever.
6. Completely close the throttle lever and start the engine by pushing the start switch.
TIPIf the engine fails to start, release the start switch,
then push it again. Pause a few seconds before
the next attempt. Each cranking should be as short as possible to preserve battery energy. Do not
crank the engine more than 10 seconds on each
attempt.
7. If the engine is started with the starter (choke)
in position (1), the starter (choke) should be
returned to position (2) to warm up the engine.
If the engine is started with the starter (choke)
in position (2), keep the starter (choke) in this
position to warm up the engine.
8. Continue warming up the engine until it idles smoothly, then return the starter (choke) to
position (3) before riding.TIPThe engine is warm when it responds quickly to the
throttle with the starter (choke) turned off.NOTICEECB00163For maximum engine life, never accelerate
hard when the engine is cold!
1. Fully open
2. Half open
3. Closed
4. Starter (choke)U1CT62E0.book Page 2 Friday, May 11, 2012 9:03 AM
Page 64 of 172
6-3
6
EBU20291Starting a warm engine Follow the same procedure as for starting a cold
engine, with the exception that the starter (choke)
is not required when the engine is warm. Instead,
start the engine with the throttle slightly open.EBU20441Operating the drive select lever and
driving in reverse NOTICEECB00170Before shifting, stop the ATV, otherwise the
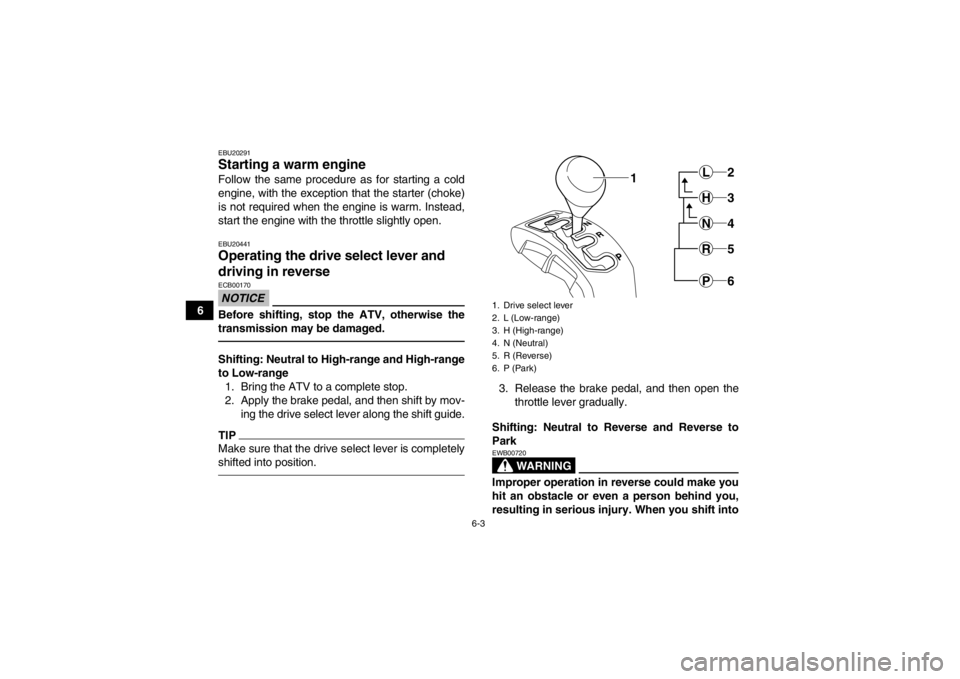
transmission may be damaged.Shifting: Neutral to High-range and High-range
to Low-range1. Bring the ATV to a complete stop.
2. Apply the brake pedal, and then shift by mov- ing the drive select lever along the shift guide.TIPMake sure that the drive select lever is completely
shifted into position.
3. Release the brake pedal, and then open thethrottle lever gradually.
Shifting: Neutral to Reverse and Reverse to
Park
WARNING
EWB00720Improper operation in reverse could make you
hit an obstacle or even a person behind you,
resulting in serious injury. When you shift into1. Drive select lever
2. L (Low-range)
3. H (High-range)
4. N (Neutral)
5. R (Reverse)
6. P (Park)
1
2L3H4N5R6P
U1CT62E0.book Page 3 Friday, May 11, 2012 9:03 AM
Page 65 of 172
6-4
6
reverse, make sure there are no people or ob-
stacles behind you. When it is safe to proceed,
go slowly.
1. Bring the ATV to a complete stop.
2. Apply the brake pedal. The drive select lever
cannot be shifted into or from reverse or park
without applying the brake pedal.
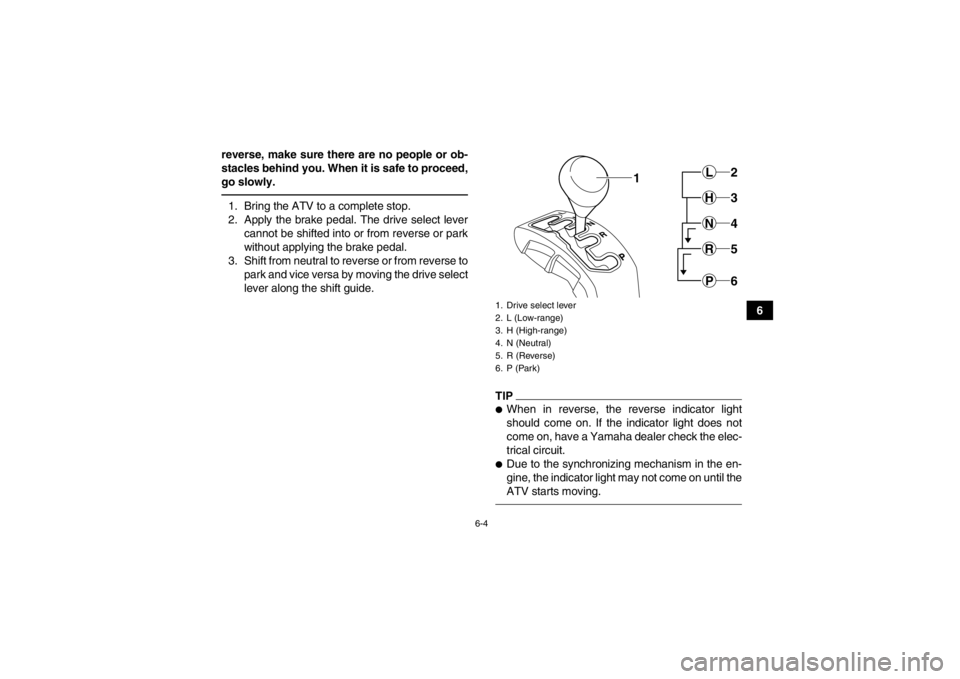
3. Shift from neutral to reverse or from reverse to park and vice versa by moving the drive select
lever along the shift guide.
TIP●When in reverse, the reverse indicator light
should come on. If the indicator light does not
come on, have a Yamaha dealer check the elec-
trical circuit.●Due to the synchronizing mechanism in the en-
gine, the indicator light may not come on until the
ATV starts moving.1. Drive select lever
2. L (Low-range)
3. H (High-range)
4. N (Neutral)
5. R (Reverse)
6. P (Park)
2L3H4N5R6P
1
U1CT62E0.book Page 4 Friday, May 11, 2012 9:03 AM
Page 66 of 172
6-5
64. Check behind for people or obstacles, and
then release the brake pedal.
5. Open the throttle lever gradually and continue to watch to the rear while backing.
EBU20682Engine break-in TIP●For ATVs equipped with an odometer or an hour
meter, follow the figures given in km (mi) or the
figures given in hours.●For ATVs not equipped with an odometer or
hour meter, follow the figures given in hours.There is never a more important period in the life of
your engine than the first 320 km (200 mi) or 20
hours of riding. For this reason, you should read
the following material carefully.
Since the engine is brand new, do not put an ex-
cessive load on it for the first 320 km (200 mi) or 20
hours. The various parts in the engine wear and
polish themselves to the correct operating clear-
ances. During this period, prolonged full-throttle
operation or any condition that might result in en-
gine overheating must be avoided. 0–160 km (0–100 mi) or 0–10 hours
Avoid prolonged operation above 1/2 throttle. Vary
the speed of the ATV regularly. Do not operate it at
one set throttle position.
160–320 km (100–200 mi) or 10–20 hours
Avoid prolonged operation above 3/4 throttle. Rev
the engine freely, but do not use full throttle at any
time.
320 km (200 mi) or 20 hours and beyond
The ATV can now be operated normally.
NOTICEECB00220If any engine trouble should occur during the
engine break-in period, immediately have a
Yamaha dealer check the ATV.EBU20691Parking When parking the ATV, stop the engine, apply the
brake pedal, shift the drive select lever into the
park position, and then turn the fuel cock to the
“OFF” position.
U1CT62E0.book Page 5 Friday, May 11, 2012 9:03 AM
Page 67 of 172
6-6
6
EBU20821Parking on a slope
WARNING
EWB00860Avoid parking on hills or other inclines. Park-
ing on a hill or other incline could cause the
ATV to roll out of control, increasing the
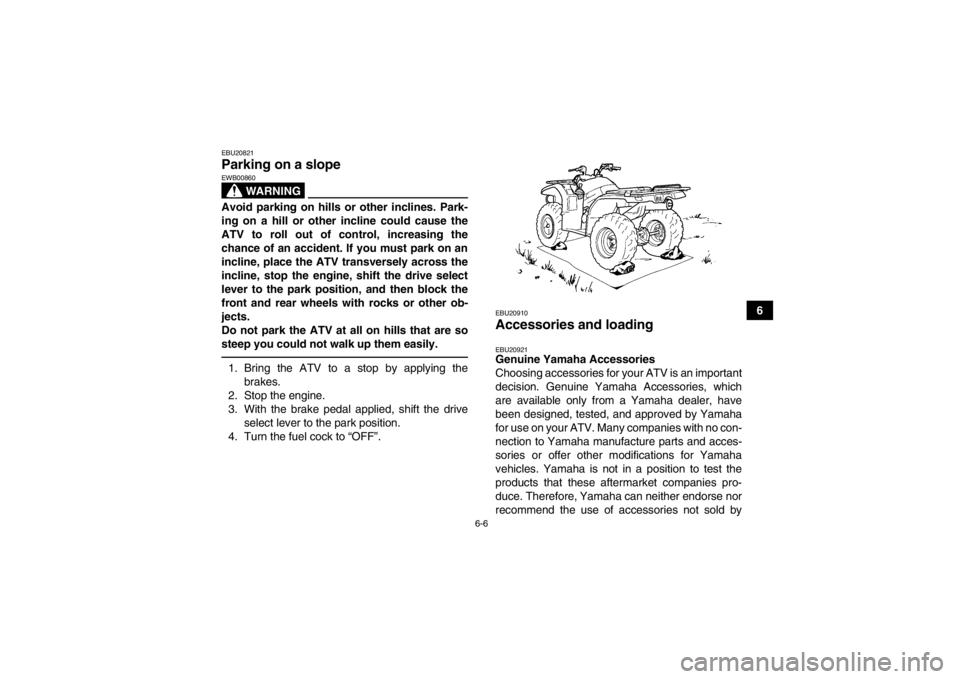
chance of an accident. If you must park on an
incline, place the ATV transversely across the
incline, stop the engine, shift the drive select
lever to the park position, and then block the
front and rear wheels with rocks or other ob-
jects.
Do not park the ATV at all on hills that are so
steep you could not walk up them easily.1. Bring the ATV to a stop by applying thebrakes.
2. Stop the engine.
3. With the brake pedal applied, shift the drive select lever to the park position.
4. Turn the fuel cock to “OFF”.
EBU20910Accessories and loading EBU20921Genuine Yamaha Accessories
Choosing accessories for your ATV is an important
decision. Genuine Yamaha Accessories, which
are available only from a Yamaha dealer, have
been designed, tested, and approved by Yamaha
for use on your ATV. Many companies with no con-
nection to Yamaha manufacture parts and acces-
sories or offer other modifications for Yamaha
vehicles. Yamaha is not in a position to test the
products that these aftermarket companies pro-
duce. Therefore, Yamaha can neither endorse nor
recommend the use of accessories not sold by
U1CT62E0.book Page 6 Friday, May 11, 2012 9:03 AM
Page 81 of 172
7-12
7
Select a large, flat, unpaved area to become famil-
iar with your ATV. Make sure that this area is free
of obstacles and other riders. You should practice
control of the throttle, brakes, shifting procedures,
and turning techniques in this area before trying
more difficult terrain.
Shift to the park position and follow the instruction
on page 6-1 to start the engine. Once it has
warmed up you are ready to begin riding your ATV.
With the engine idling, shift the drive select lever
into the low-range position or the high-range posi-
tion. Apply the throttle slowly and smoothly.
The centrifugal clutch will engage and you will start
to accelerate. If the throttle is applied too abruptly,
the front wheels may lift off the ground, resulting in
a loss of directional control. Avoid higher speeds
until you are thoroughly familiar with the operation
of your ATV.
When slowing down or stopping, release the throt-
tle and apply the brakes smoothly and evenly. Im-
proper use of the brakes can cause the tires to lose
traction, reducing control and increasing the possi-
bility of an accident.
NOTICEECB00251Do not shift from low-range to high-range or
vice versa without coming to a complete stop.
Damage to the engine or drive train may occur.TURNING YOUR ATV
WARNING
EWB01771Always follow proper procedures for turning
as described in this Owner’s Manual. Practice
turning at low speeds before attempting to turn
at faster speeds. Do not turn at speeds too fast
for your skills or the conditions. ATV could go
out of control, causing a collision or overturn.To achieve maximum traction on unpaved surfac-
es, the two rear wheels turn together at the same
speed. Therefore, unless the wheel on the inside
of the turn is allowed to slip or lose some traction,
the ATV will resist turning. A special turning tech-
nique must be used to allow the ATV to make turns
quickly and easily. It is essential that this skill be
learned first at low speed.
U1CT62E0.book Page 12 Friday, May 11, 2012 9:03 AM
Page 84 of 172

7-15
7Do not attempt to climb hills until you have mas-
tered basic maneuvers on flat ground. Always
check the terrain carefully before attempting any
hill. In all cases avoid inclines with slippery or loose
surfaces, or obstacles that might cause you to lose
control.
To climb a hill, you need traction, momentum, and
steady throttle. For more traction and control for
climbing steeper and/or rougher slopes, select the
“4WD” or 4WD-LOCK (“DIFF. LOCK”). Travel fast
enough to maintain momentum, but not so fast that
you cannot react to changes in the terrain as you
climb.
It is important when climbing a hill to make sure
that your weight is transferred forward on the ATV.
This can be accomplished by leaning forward and,
on steeper inclines, standing on the footboards
and leaning forward over the handlebars. Whenev-
er possible, ride straight up hills.
Slow down when you reach the crest of the hill if
you cannot see clearly what is on the other side –
there could be another person, an obstacle, or a
sharp drop-off. Use common sense and remember
that some hills are too steep for you to climb or de-
scend. If you are climbing a hill and you find that you have
not properly judged your ability to make it to the
top, you should turn the ATV around while you still
have forward motion (provided you have the room
to do so) and go down the hill.
If your ATV has stalled or stopped and you believe
you can continue up the hill, restart carefully to
make sure you do not lift the front wheels which
could cause you to lose control. If you are unable
to continue up the hill, dismount the ATV on the up-
hill side. Physically turn the ATV around and then
descend the hill.
If you start to roll backwards, DO NOT apply either
brake abruptly. If you are in “2WD”, apply only the
front brake. When fully stopped, apply the rear
brake as well, and then shift to the park position. If
you are in “4WD”, because all wheels are intercon-
nected by the drive train, applying either brake will
brake all wheels, therefore, avoid sudden applica-
tion of either the front or rear brake as the wheels
on the uphill side could come off the ground. The
ATV could easily tip over backwards. Apply both
the front and rear brakes gradually. When fully
stopped, shift to the park position and dismount the
ATV immediately on the uphill side, or to a side if
pointed straight uphill. Turn the ATV around and
U1CT62E0.book Page 15 Friday, May 11, 2012 9:03 AM
Page 85 of 172
7-16
7
remount, following the procedure described in the
Owner’s Manual.
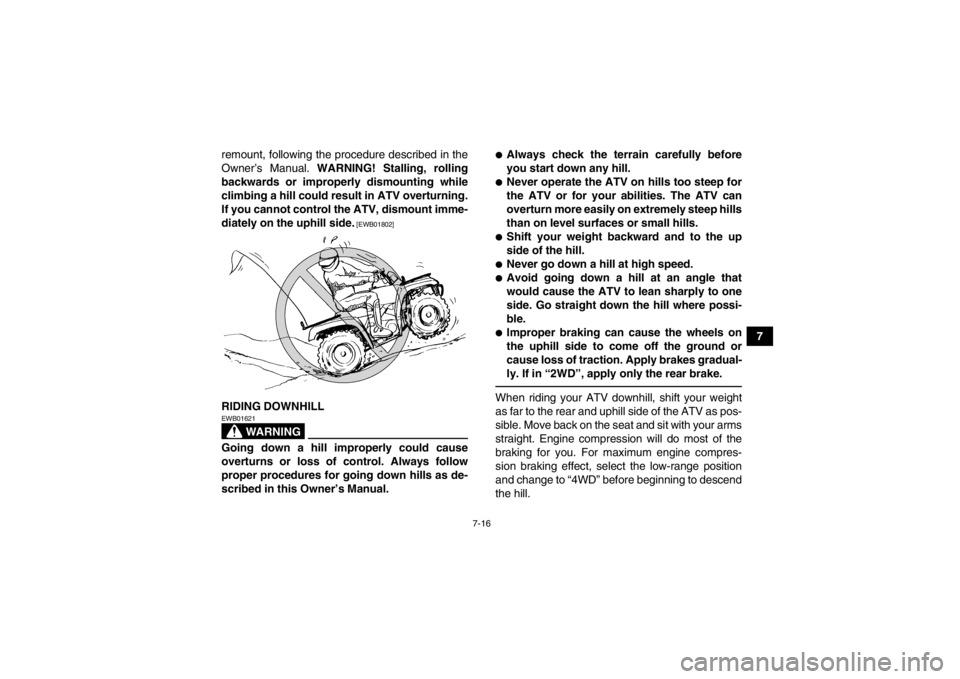
WARNING! Stalling, rolling
backwards or improperly dismounting while
climbing a hill could result in ATV overturning.
If you cannot control the ATV, dismount imme-
diately on the uphill side.
[EWB01802]
RIDING DOWNHILL
WARNING
EWB01621Going down a hill improperly could cause
overturns or loss of control. Always follow
proper procedures for going down hills as de-
scribed in this Owner’s Manual.
●Always check the terrain carefully before
you start down any hill.●Never operate the ATV on hills too steep for
the ATV or for your abilities. The ATV can
overturn more easily on extremely steep hills
than on level surfaces or small hills.●Shift your weight backward and to the up
side of the hill.●Never go down a hill at high speed.●Avoid going down a hill at an angle that
would cause the ATV to lean sharply to one
side. Go straight down the hill where possi-
ble.●Improper braking can cause the wheels on
the uphill side to come off the ground or
cause loss of traction. Apply brakes gradual-
ly. If in “2WD”, apply only the rear brake.When riding your ATV downhill, shift your weight
as far to the rear and uphill side of the ATV as pos-
sible. Move back on the seat and sit with your arms
straight. Engine compression will do most of the
braking for you. For maximum engine compres-
sion braking effect, select the low-range position
and change to “4WD” before beginning to descend
the hill.
U1CT62E0.book Page 16 Friday, May 11, 2012 9:03 AM