brake YAMAHA GRIZZLY 450 2013 Owner's Manual
[x] Cancel search | Manufacturer: YAMAHA, Model Year: 2013, Model line: GRIZZLY 450, Model: YAMAHA GRIZZLY 450 2013Pages: 172, PDF Size: 3.96 MB
Page 86 of 172
7-17
7Use caution while descending a hill with loose or
slippery surfaces. Braking ability and traction may
be adversely affected by these surfaces. Improper
braking may also cause a loss of traction.
When this ATV is in “4WD”, all wheels (front and
rear) are interconnected by the drive train. This
means that applying either the front brake or the
rear brake will brake all wheels. When descending
hills, using either brake lever or the brake pedal will
brake the wheels on the downhill side. Avoid sud-
den application of either the front or rear brake be-
cause the wheels on the uphill side could come off
the ground. Apply both the front and rear brakes
gradually.
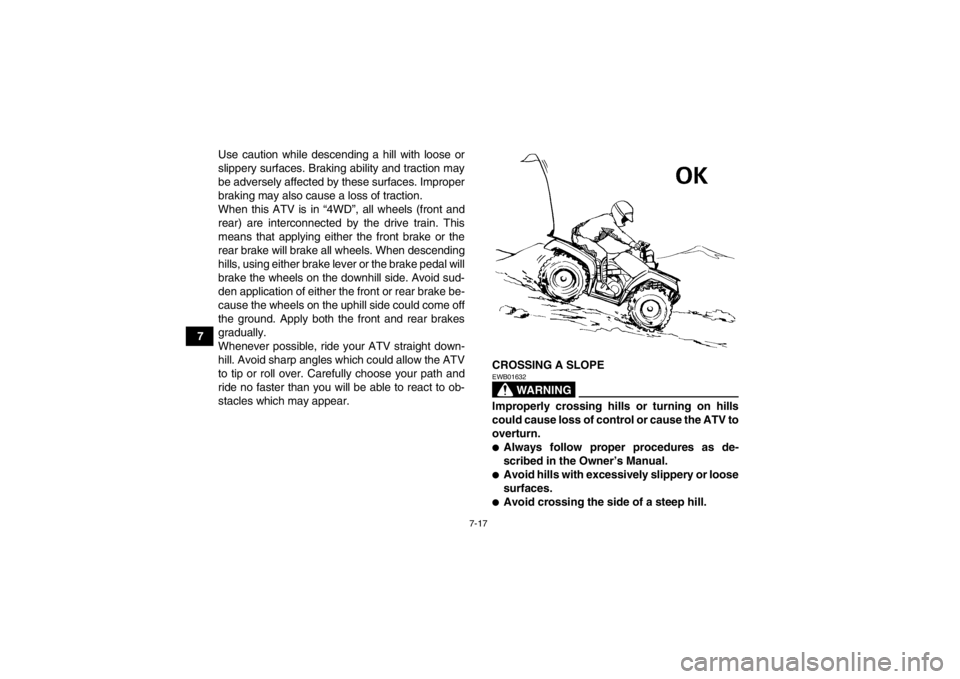
Whenever possible, ride your ATV straight down-
hill. Avoid sharp angles which could allow the ATV
to tip or roll over. Carefully choose your path and
ride no faster than you will be able to react to ob-
stacles which may appear.
CROSSING A SLOPE
WARNING
EWB01632Improperly crossing hills or turning on hills
could cause loss of control or cause the ATV to
overturn.●Always follow proper procedures as de-
scribed in the Owner’s Manual.●Avoid hills with excessively slippery or loose
surfaces.●Avoid crossing the side of a steep hill.
U1CT62E0.book Page 17 Friday, May 11, 2012 9:03 AM
Page 88 of 172
7-19
7The ATV can be used to cross slow moving, shal-
low water of up to a maximum of 35 cm (14 in) in
depth. Before entering the water, choose your path
carefully. Enter where there is no sharp drop off,
and avoid rocks or other obstacles which may be
slippery or upset the ATV. Drive slowly and care-
fully.
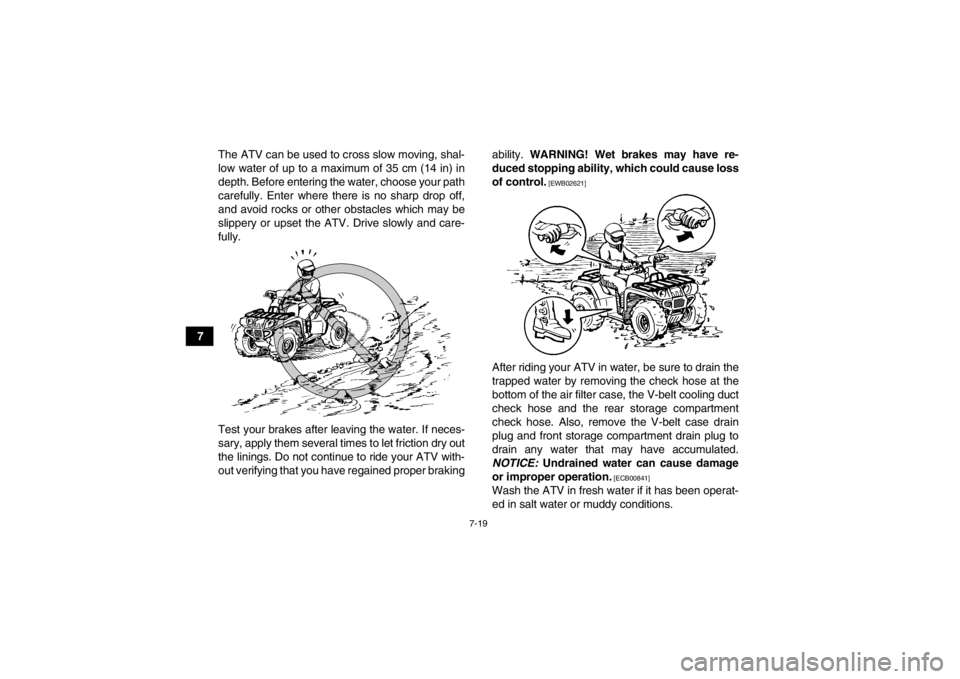
Test your brakes after leaving the water. If neces-
sary, apply them several times to let friction dry out
the linings. Do not continue to ride your ATV with-
out verifying that you have regained proper braking ability.
WARNING! Wet brakes may have re-
duced stopping ability, which could cause loss
of control.
[EWB02621]
After riding your ATV in water, be sure to drain the
trapped water by removing the check hose at the
bottom of the air filter case, the V-belt cooling duct
check hose and the rear storage compartment
check hose. Also, remove the V-belt case drain
plug and front storage compartment drain plug to
drain any water that may have accumulated.
NOTICE: Undrained water can cause damage
or improper operation.
[ECB00841]
Wash the ATV in fresh water if it has been operat-
ed in salt water or muddy conditions.
U1CT62E0.book Page 19 Friday, May 11, 2012 9:03 AM
Page 91 of 172
7-22
7
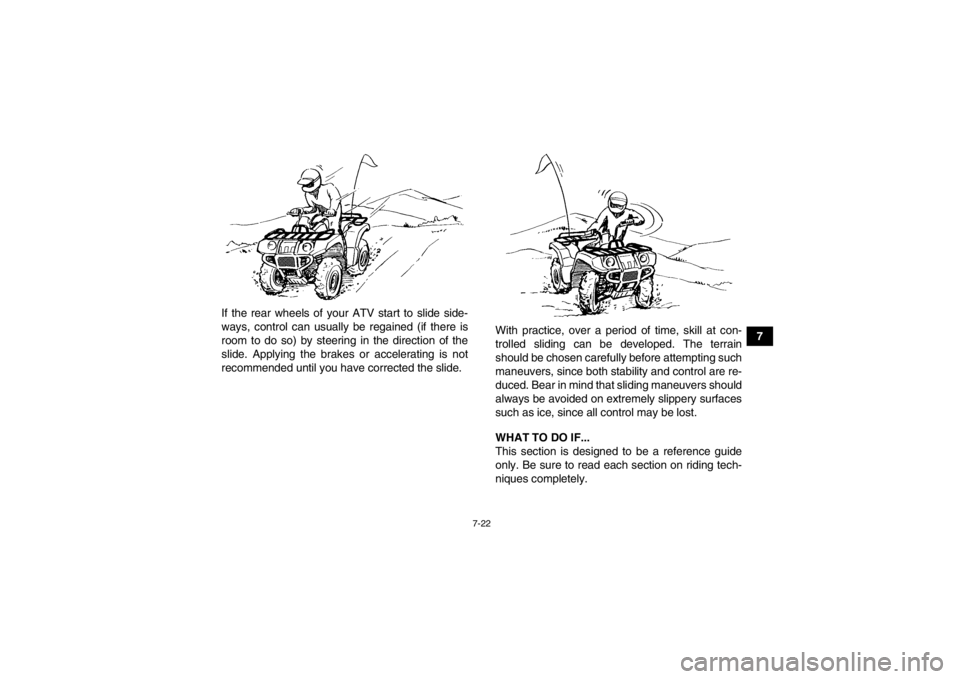
If the rear wheels of your ATV start to slide side-
ways, control can usually be regained (if there is
room to do so) by steering in the direction of the
slide. Applying the brakes or accelerating is not
recommended until you have corrected the slide. With practice, over a period of time, skill at con-
trolled sliding can be developed. The terrain
should be chosen carefully before attempting such
maneuvers, since both stability and control are re-
duced. Bear in mind that sliding maneuvers should
always be avoided on extremely slippery surfaces
such as ice, since all control may be lost.
WHAT TO DO IF...
This section is designed to be a reference guide
only. Be sure to read each section on riding tech-
niques completely.
U1CT62E0.book Page 22 Friday, May 11, 2012 9:03 AM
Page 92 of 172

7-23
7WHAT TO DO...
●If your ATV doesn’t turn when you want it to:
Bring the ATV to a stop and practice the turning
maneuvers again. Be sure you are putting your
weight on the footboard to the outside of the
turn. Position your weight over the front wheels
for better control. (See page 7-12.)●If your ATV begins to tip while turning:
Lean more into the turn to regain balance. If nec-
essary, gradually let off the throttle and/or steer
to the outside of the turn. (See page 7-12.)●If your ATV starts to slide sideways:
Steer in the direction of the slide if you have the
room. Applying the brakes or accelerating is not
recommended until you have corrected the
slide. (See page 7-21.)●If your ATV can’t make it up a hill you are trying
to climb:
Turn the ATV around if you still have forward
speed. If not, stop, dismount on the uphill side of
the ATV and physically turn the ATV around. If
the ATV starts to slip backwards, DO NOT USE
THE REAR BRAKE IF THE ATV IS IN “2WD” –
the ATV may tip over on top of you. Dismount
the ATV on the uphill side. (See page 7-13.)
●If your ATV is traversing a sloping surface:
Be sure to ride with your weight positioned to-
wards the uphill side of the ATV to maintain
proper balance. If the ATV starts to tip, steer
down the hill (if there are no obstacles in your
way) to regain balance. If you discover that the
ATV is going to tip over, dismount on the uphill
side. (See page 7-17.)●If your ATV encounters shallow water:
Ride slowly and carefully through slow moving
water, watching for obstacles. Be sure to let wa-
ter drain from the ATV and CHECK YOUR
BRAKES FOR PROPER OPERATION when
you come out of the water. Do not continue to
ride your ATV until you have regained adequate
braking ability. (See page 7-18.)
U1CT62E0.book Page 23 Friday, May 11, 2012 9:03 AM
Page 93 of 172
8-1
8
EBU28783
PERIODIC MAINTENANCE AND ADJUSTMENT
EBU21674Periodic inspection, adjustment, and lubrication
will keep your vehicle in the safest and most effi-
cient condition possible. Safety is an obligation of
the vehicle owner/operator. The most important
points of vehicle inspection, adjustment, and lubri-
cation are explained on the following pages.
WARNING
EWB01841Failure to properly maintain the vehicle or per-
forming maintenance activities incorrectly may
increase your risk of injury or death during ser-
vice or while using the vehicle. If you are not fa-
miliar with vehicle service, have a Yamaha
dealer perform the service.
WARNING
EWB02562Turn off the engine when performing mainte-
nance unless otherwise specified.●A running engine has moving parts that can
catch on body parts or clothing and electri-
cal parts that can cause shocks or fires.
●Running the engine while servicing can lead
to eye injury, burns, fire, or carbon monoxide
poisoning - possibly leading to death. See
page 2-6 for more information about carbon
monoxide.
WARNING
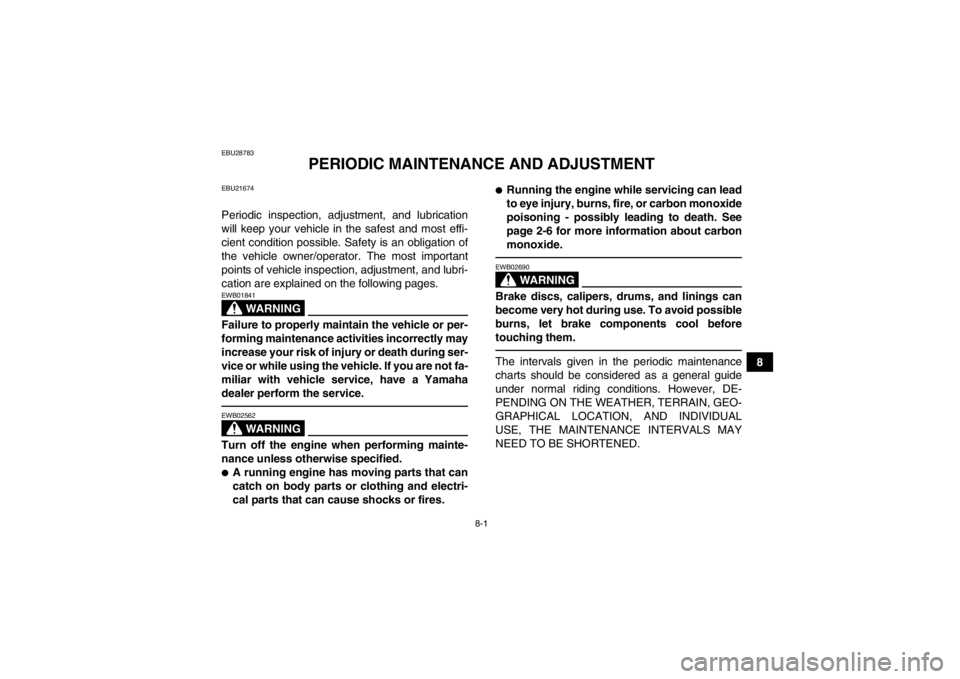
EWB02690Brake discs, calipers, drums, and linings can
become very hot during use. To avoid possible
burns, let brake components cool before
touching them.The intervals given in the periodic maintenance
charts should be considered as a general guide
under normal riding conditions. However, DE-
PENDING ON THE WEATHER, TERRAIN, GEO-
GRAPHICAL LOCATION, AND INDIVIDUAL
USE, THE MAINTENANCE INTERVALS MAY
NEED TO BE SHORTENED.
U1CT62E0.book Page 1 Friday, May 11, 2012 9:03 AM
Page 97 of 172
8-5
8
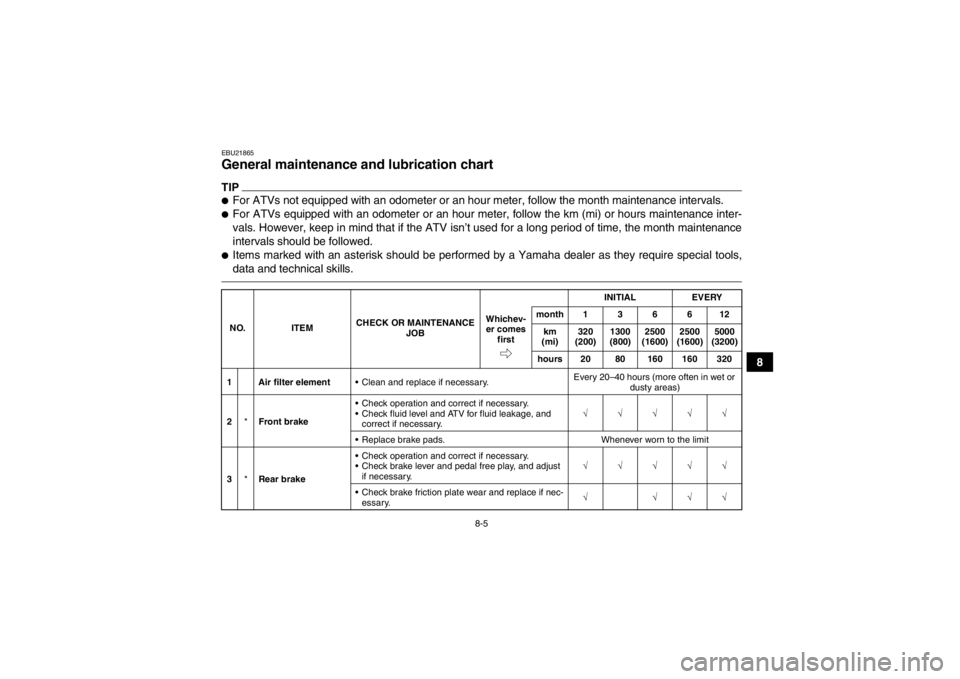
EBU21865General maintenance and lubrication chart TIP●For ATVs not equipped with an odometer or an hour meter, follow the month maintenance intervals.●For ATVs equipped with an odometer or an hour meter, follow the km (mi) or hours maintenance inter-
vals. However, keep in mind that if the ATV isn’t used for a long period of time, the month maintenance
intervals should be followed.●Items marked with an asterisk should be performed by a Yamaha dealer as they require special tools,
data and technical skills.NO.ITEM CHECK OR MAINTENANCE
JOB INITIAL
EVERY
Whichev- er comes first month136612
km
(mi) 320
(200) 1300
(800) 2500
(1600) 2500
(1600) 5000
(3200)
hours 20 80 160 160 320
1 Air filter element Clean and replace if necessary. Every 20–40 hours (more often in wet or
dusty areas)
2 *Front brake Check operation and correct if necessary.
Check fluid level and ATV for fluid leakage, and
correct if necessary. √√√√√
Replace brake pads. Whenever worn to the limit
3 *Rear brake Check operation and correct if necessary.
Check brake lever and pedal free play, and adjust
if necessary. √√√√√
Check brake friction plate wear and replace if nec- essary. √ √√√
U1CT62E0.book Page 5 Friday, May 11, 2012 9:03 AM
Page 98 of 172

8-6
8
4*Brake hoses Check for cracks or other damage, and replace if
necessary. √√√√
Replace. Every 4 years
5 *Wheels Check runout and for damage, and replace if nec-
essary. √ √√√
6 *Tires Check tread depth and for damage, and replace if
necessary.
Check air pressure and balance, and correct if necessary. √ √√√
7 *Wheel hub bearings Check for looseness or damage, and replace if
necessary. √ √√√
8 *V- b e l t Check for wear, cracks or other damage, and re-
place if necessary. √ √√√
9 *Drive shaft univer-
sal joint Lubricate with lithium-soap-based grease.
√√√
10 *Chassis fasteners Make sure that all nuts, bolts, and screws are
properly tightened. √√√√√
11 *Shock absorber as-
semblies Check operation and correct if necessary.
Check for oil leakage and replace if necessary.
√√√
12 *Stabilizer bushes Check for cracks or other damage, and replace if
necessary. √√√
NO. ITEM
CHECK OR MAINTENANCE
JOB INITIAL EVERY
Whichev- er comes first month136612
km
(mi) 320
(200) 1300
(800) 2500
(1600) 2500
(1600) 5000
(3200)
hours 20 80 160 160 320U1CT62E0.book Page 6 Friday, May 11, 2012 9:03 AM
Page 100 of 172
8-8
8
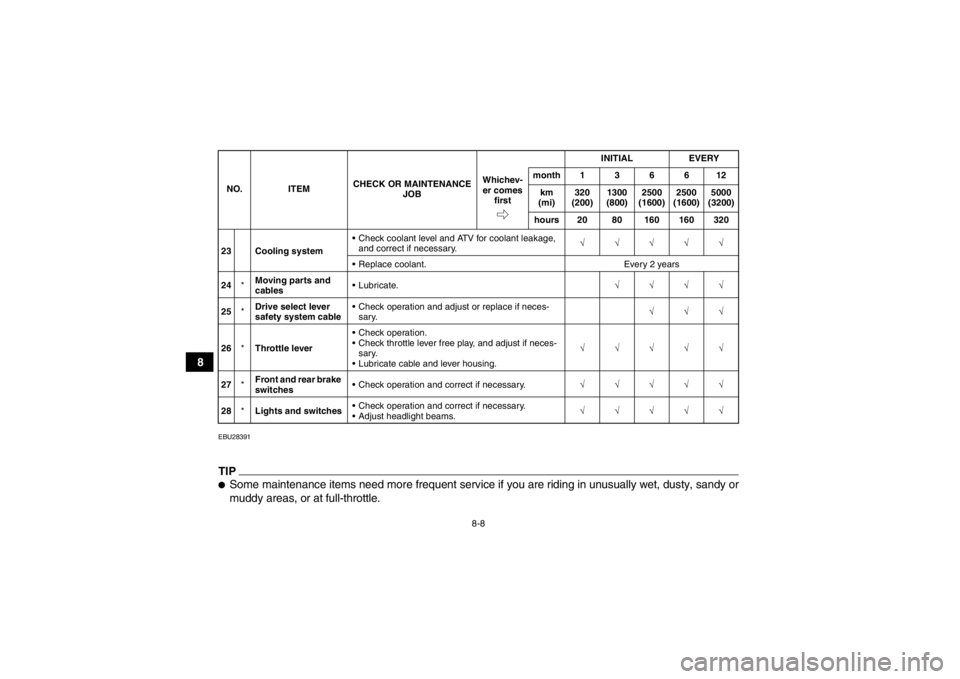
EBU28391TIP●Some maintenance items need more frequent service if you are riding in unusually wet, dusty, sandy or
muddy areas, or at full-throttle.23 Cooling system Check coolant level and ATV for coolant leakage,
and correct if necessary. √√√√√
Replace coolant. Every 2 years
24 *Moving parts and
cables Lubricate.
√√√√
25 *Drive select lever
safety system cable Check operation and adjust or replace if neces-
sary. √√√
26 *Throttle lever Check operation.
Check throttle lever free play, and adjust if neces-
sary.
Lubricate cable and lever housing. √√√√√
27 *Front and rear brake
switches Check operation and correct if necessary.
√√√√√
28 *Lights and switches Check operation and correct if necessary.
Adjust headlight beams. √√√√√
NO. ITEM
CHECK OR MAINTENANCE
JOB INITIAL EVERY
Whichev- er comes first month136612
km
(mi) 320
(200) 1300
(800) 2500
(1600) 2500
(1600) 5000
(3200)
hours 20 80 160 160 320U1CT62E0.book Page 8 Friday, May 11, 2012 9:03 AM
Page 101 of 172
8-9
8
●Hydraulic brake service
Regularly check and, if necessary, correct the brake fluid level.
Every two years replace the internal components of the brake master cylinder and calipers, and changethe brake fluid.
Replace the brake hoses every four years and if cracked or damaged.
U1CT62E0.book Page 9 Friday, May 11, 2012 9:03 AM
Page 115 of 172
8-23
8
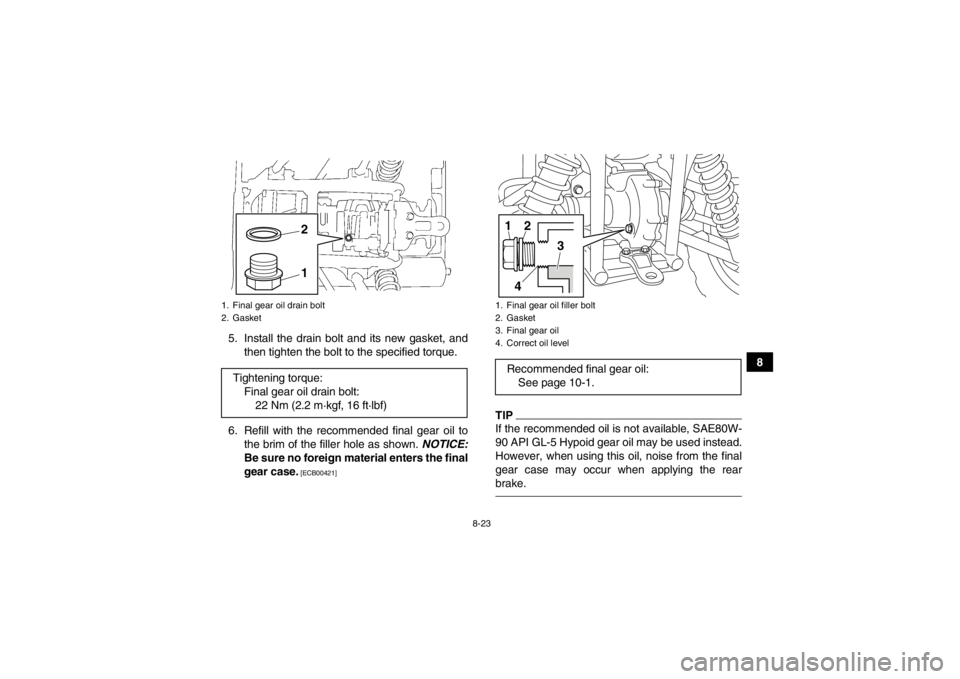
5. Install the drain bolt and its new gasket, and
then tighten the bolt to the specified torque.
6. Refill with the recommended final gear oil to the brim of the filler hole as shown. NOTICE:
Be sure no foreign material enters the final
gear case.
[ECB00421]
TIPIf the recommended oil is not available, SAE80W-
90 API GL-5 Hypoid gear oil may be used instead.
However, when using this oil, noise from the final
gear case may occur when applying the rear
brake.
1. Final gear oil drain bolt
2. GasketTightening torque: Final gear oil drain bolt:22 Nm (2.2 m·kgf, 16 ft·lbf)
12
1. Final gear oil filler bolt
2. Gasket
3. Final gear oil
4. Correct oil levelRecommended final gear oil: See page 10-1.1
2
3
4
U1CT62E0.book Page 23 Friday, May 11, 2012 9:03 AM